Utilizar la API de formato en un componente de Power Apps
Power Apps component framework proporciona una API de formato que puede ser bastante útil cuando necesita formatear varios valores en su aplicación. Esta unidad muestra cómo usar esta API creando una tabla HTML para ilustrar cómo se pueden usar varios métodos.
Inicializar su proyecto de componente
Para inicializar el proyecto de componente, siga estos pasos:
Inicie Visual Studio Code.
Seleccione Terminal y, luego, Nuevo terminal.
Cambie el directorio a su carpeta de origen.
cd sourceDesde el directorio de origen, cree un directorio llamado Formatting-API.
md Formatting-APIEjecute el siguiente comando para cambiar al directorio nuevo.
cd Formatting-APIInicialice el proyecto ejecutando el comando siguiente.
pac pcf init --namespace SampleNamespace --name FormattingAPI --template fieldEjecute npm install para cargar bibliotecas dependientes en su proyecto.
npm installAbra el proyecto en Visual Studio Code mediante la ejecución del comando siguiente.
code -a .
Implementar la lógica del componente del código
Para implementar su lógica de componente de código, siga estos pasos:
Expanda la carpeta FormattingAPI y abra el archivo ControlManifest.Input.xml.
Reemplace todo el manifiesto con el siguiente XML.
<?xml version="1.0" encoding="utf-8" ?>
<manifest>
  <control namespace="SampleNamespace" constructor="FormattingAPI" version="1.1.0" display-name-key="TS_FormattingAPI_Display_Key" description-key="TS_FormattingAPI_Desc_Key" control-type="standard">
    <property name="controlValue" display-name-key="controlValue_Display_Key" description-key="controlValue_Desc_Key" of-type="SingleLine.Text" usage="bound" required="true" />
    <resources>
      <code path="index.ts" order="1" />
      <css path="css/TS_FormattingAPI.css" order="2" />
    </resources>
  </control>
</manifest>
Puede agregar los archivos de soporte que se encuentran en este manifiesto más adelante.
Abra el archivo index.ts.
Encima del método constructor, inserte las siguientes variables privadas.
// PCF framework delegate that will be assigned to this object that would be called whenever any update happens.
private _notifyOutputChanged: () => void;

// Reference to the div element that holds together all the HTML elements that you are creating as part of this control
private divElement: HTMLDivElement;

// Reference to HTMLTableElement rendered by control
private _tableElement: HTMLTableElement;

// Reference to the control container HTMLDivElement
// This element contains all elements of your custom control example
private _container: HTMLDivElement;

// Reference to ComponentFramework Context object
private _context: ComponentFramework.Context<IInputs>;

// Flag if control view has been rendered
private _controlViewRendered: Boolean;
Coloque la siguiente lógica en el método init.
this._notifyOutputChanged = notifyOutputChanged;
this._controlViewRendered = false;
this._context = context;

this._container = document.createElement("div");
this._container.classList.add("TSFormatting_Container");
container.appendChild(this._container);
Agregue la siguiente lógica al método updateView:
if (!this._controlViewRendered)
{
    // Render and add HTMLTable to the custom control container element
    let tableElement: HTMLTableElement = this.createHTMLTableElement();
    this._container.appendChild(tableElement);

    this._controlViewRendered = true;
}
Agregue los siguientes métodos auxiliares para generar su tabla HTML, que mostrará valores formateados después del método destroy.
/**
* Helper method to create an HTML Table Row Element
* @param key : string value to show in left column cell
* @param value : string value to show in right column cell
* @param isHeaderRow : true if method should generate a header row
*/
private createHTMLTableRowElement(key: string, value: string, isHeaderRow: boolean): HTMLTableRowElement
{
    let keyCell: HTMLTableCellElement = this.createHTMLTableCellElement(key, "FormattingControlSampleHtmlTable_HtmlCell_Key", isHeaderRow);
    let valueCell: HTMLTableCellElement = this.createHTMLTableCellElement(value, "FormattingControlSampleHtmlTable_HtmlCell_Value", isHeaderRow);

    let rowElement: HTMLTableRowElement = document.createElement("tr");
    rowElement.setAttribute("class", "FormattingControlSampleHtmlTable_HtmlRow");
    rowElement.appendChild(keyCell);
    rowElement.appendChild(valueCell);

    return rowElement;
}

/**
* Helper method to create an HTML Table Cell Element
* @param cellValue : string value to inject in the cell
* @param className : class name for the cell
* @param isHeaderRow : true if method should generate a header row cell
*/
private createHTMLTableCellElement(cellValue: string, className: string, isHeaderRow: boolean): HTMLTableCellElement
{
    let cellElement: HTMLTableCellElement;

    if (isHeaderRow)
    {
        cellElement = document.createElement("th");
        cellElement.setAttribute("class", "FormattingControlSampleHtmlTable_HtmlHeaderCell " + className);
        let textElement: Text = document.createTextNode(cellValue);
        cellElement.appendChild(textElement);
    }
    else
    {
        cellElement = document.createElement("td");
        cellElement.setAttribute("class", "FormattingControlSampleHtmlTable_HtmlCell " + className);
        let textElement: Text = document.createTextNode(cellValue);
        cellElement.appendChild(textElement);
    }
    return cellElement;
}
Agregue el siguiente método, que contiene ejemplos de uso de la API de formato, guardándolos como celdas de tabla después de los métodos auxiliares.
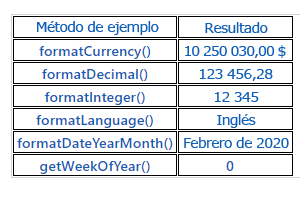
/**
* Creates an HTML Table that showcases examples of basic methods available to the custom control
* The left column of the table shows the method name or property that is being used
* The right column of the table shows the result of that method name or property
*/
private createHTMLTableElement(): HTMLTableElement
{
    // Create HTML Table Element
    let tableElement: HTMLTableElement = document.createElement("table");
    tableElement.setAttribute("class", "FormattingControlSampleHtmlTable_HtmlTable");

    // Create header row for table
    let key: string = "Example Method";
    let value: string = "Result";
    tableElement.appendChild(this.createHTMLTableRowElement(key, value, true));

    // Example use of formatCurrency() method
    // Change the default currency and the precision or pass in the precision and currency as additional parameters.
    key = "formatCurrency()";
    value = this._context.formatting.formatCurrency(10250030);
    tableElement.appendChild(this.createHTMLTableRowElement(key, value, false));

    // Example use of formatDecimal() method
    // Change the settings from user settings to see the output change its format accordingly
    key = "formatDecimal()";
    value = this._context.formatting.formatDecimal(123456.2782);
    tableElement.appendChild(this.createHTMLTableRowElement(key, value, false));

    // Example use of formatInteger() method
    // change the settings from user settings to see the output change its format accordingly.
    key = "formatInteger()";
    value = this._context.formatting.formatInteger(12345);
    tableElement.appendChild(this.createHTMLTableRowElement(key, value, false));

    // Example use of formatLanguage() method
    // Install additional languages and pass in the corresponding language code to see its string value
    key = "formatLanguage()";
    value = this._context.formatting.formatLanguage(1033);
    tableElement.appendChild(this.createHTMLTableRowElement(key, value, false));

    // Example of formatDateYearMonth() method
    // Pass a JavaScript Data object set to the current time into formatDateYearMonth method to format the data
    // and get the return in Year, Month format
    key = "formatDateYearMonth()";
    value = this._context.formatting.formatDateYearMonth(new Date());
    tableElement.appendChild(this.createHTMLTableRowElement(key, value, false));

    // Example of getWeekOfYear() method
    // Pass a JavaScript Data object set to the current time into getWeekOfYear method to get the value for week of the year
    key = "getWeekOfYear()";
    value = this._context.formatting.getWeekOfYear(new Date()).toString();
    tableElement.appendChild(this.createHTMLTableRowElement(key, value, false));

    return tableElement;
}
Seleccione Archivo y Guardar todo para guardar todos los cambios.
Después de haber realizado las actualizaciones, la clase completada debe ser similar a la mostrada en el siguiente ejemplo.
import {IInputs, IOutputs} from "./generated/ManifestTypes";

export class FormattingAPI implements ComponentFramework.StandardControl<IInputs, IOutputs> {

    // PCF framework delegate that will be assigned to this object that would be called whenever any update happens.
    private _notifyOutputChanged: () => void;

    // Reference to the div element that holds together all the HTML elements that you are creating as part of this control
    private divElement: HTMLDivElement;

    // Reference to HTMLTableElement rendered by control
    private _tableElement: HTMLTableElement;

    // Reference to the control container HTMLDivElement
    // This element contains all elements of your custom control example
    private _container: HTMLDivElement;

    // Reference to ComponentFramework Context object
    private _context: ComponentFramework.Context<IInputs>;

    // Flag if control view has been rendered
    private _controlViewRendered: Boolean;

    /**
    * Used to initialize the control instance. Controls can kick off remote server calls and other initialization actions here.
    * Dataset values are not initialized here, use updateView.
    * @param context The entire property bag is available to control through the Context Object; It contains values as set up by the customizer and mapped to property names that are defined in the manifest and to utility functions.
    * @param notifyOutputChanged A callback method to alert the framework that the control has new outputs ready to be retrieved asynchronously.
    * @param state A piece of data that persists in one session for a single user. Can be set at any point in a control's life cycle by calling 'setControlState' in the Mode interface.
    * @param container If a control is marked control-type='starndard', it will receive an empty div element within which it can render its content.
    */
    public init(context: ComponentFramework.Context<IInputs>, notifyOutputChanged: () => void, state: ComponentFramework.Dictionary, container:HTMLDivElement)
    {
        this._notifyOutputChanged = notifyOutputChanged;
        this._controlViewRendered = false;
        this._context = context;

        this._container = document.createElement("div");
        this._container.classList.add("TSFormatting_Container");
        container.appendChild(this._container);
    }

    /**
    * Called when any value in the property bag has changed. This includes field values, datasets, global values such as container height and width, offline status, control metadata values such as label, visible, and so on.
    * @param context The entire property bag that is available to control through the Context Object; It contains values as set up by the customizer that are mapped to names defined in the manifest and to utility functions
    */
    public updateView(context: ComponentFramework.Context<IInputs>): void
    {
        if (!this._controlViewRendered)
        {
            // Render and add HTMLTable to the custom control container element
            let tableElement: HTMLTableElement = this.createHTMLTableElement();
            this._container.appendChild(tableElement);

            this._controlViewRendered = true;
        }
    }

    /**
    * It is called by the framework prior to a control receiving new data.
    * @returns an object based on nomenclature that is defined in the manifest, expecting object[s] for property marked as "bound" or "output"
    */
    public getOutputs(): IOutputs
    {
        return { };
    }

    /**
    * Called when the control is to be removed from the DOM tree. Controls should use this call for cleanup,
    * such as canceling any pending remote calls, removing listeners, and so on.
    */
    public destroy()
    {

    }

    /**
    * Helper method to create an HTML Table Row Element
    * @param key : string value to show in left column cell
    * @param value : string value to show in right column cell
    * @param isHeaderRow : true if method should generate a header row
    */
    private createHTMLTableRowElement(key: string, value: string, isHeaderRow: boolean): HTMLTableRowElement
    {
        let keyCell: HTMLTableCellElement = this.createHTMLTableCellElement(key, "FormattingControlSampleHtmlTable_HtmlCell_Key", isHeaderRow);
        let valueCell: HTMLTableCellElement = this.createHTMLTableCellElement(value, "FormattingControlSampleHtmlTable_HtmlCell_Value", isHeaderRow);

        let rowElement: HTMLTableRowElement = document.createElement("tr");
        rowElement.setAttribute("class", "FormattingControlSampleHtmlTable_HtmlRow");
        rowElement.appendChild(keyCell);
        rowElement.appendChild(valueCell);

        return rowElement;
    }

    /**
    * Helper method to create an HTML Table Cell Element
    * @param cellValue : string value to inject in the cell
    * @param className : class name for the cell
    * @param isHeaderRow : true if method should generate a header row cell
    */
    private createHTMLTableCellElement(cellValue: string, className: string, isHeaderRow: boolean): HTMLTableCellElement
    {
        let cellElement: HTMLTableCellElement;

        if (isHeaderRow)
        {
            cellElement = document.createElement("th");
            cellElement.setAttribute("class", "FormattingControlSampleHtmlTable_HtmlHeaderCell " + className);
            let textElement: Text = document.createTextNode(cellValue);
            cellElement.appendChild(textElement);
        }
        else
        {
            cellElement = document.createElement("td");
            cellElement.setAttribute("class", "FormattingControlSampleHtmlTable_HtmlCell " + className);
            let textElement: Text = document.createTextNode(cellValue);
            cellElement.appendChild(textElement);
        }
        return cellElement;
    }

    /**
    * Creates an HTML Table that showcases examples of basic methods that are available to the custom control
    * The left column of the table shows the method name or property that is being used
    * The right column of the table shows the result of that method name or property
    */
    private createHTMLTableElement(): HTMLTableElement
    {
        // Create HTML Table Element
        let tableElement: HTMLTableElement = document.createElement("table");
        tableElement.setAttribute("class", "FormattingControlSampleHtmlTable_HtmlTable");

        // Create header row for table
        let key: string = "Example Method";
        let value: string = "Result";
        tableElement.appendChild(this.createHTMLTableRowElement(key, value, true));

        // Example use of formatCurrency() method
        // Change the default currency and the precision or pass in the precision and currency as additional parameters.
        key = "formatCurrency()";
        value = this._context.formatting.formatCurrency(10250030);
        tableElement.appendChild(this.createHTMLTableRowElement(key, value, false));

        // Example use of formatDecimal() method
        // Change the settings from user settings to see the output change its format accordingly
        key = "formatDecimal()";
        value = this._context.formatting.formatDecimal(123456.2782);
        tableElement.appendChild(this.createHTMLTableRowElement(key, value, false));

        // Example use of formatInteger() method
        // change the settings from user settings to see the output change its format accordingly.
        key = "formatInteger()";
        value = this._context.formatting.formatInteger(12345);
        tableElement.appendChild(this.createHTMLTableRowElement(key, value, false));

        // Example use of formatLanguage() method
        // Install additional languages and pass in the corresponding language code to see its string value
        key = "formatLanguage()";
        value = this._context.formatting.formatLanguage(1033);
        tableElement.appendChild(this.createHTMLTableRowElement(key, value, false));

        // Example of formatDateYearMonth() method
        // Pass a JavaScript Data object set to the current time into formatDateYearMonth method to format the data
        // and get the return in Year, Month format
        key = "formatDateYearMonth()";
        value = this._context.formatting.formatDateYearMonth(new Date());
        tableElement.appendChild(this.createHTMLTableRowElement(key, value, false));

        // Example of getWeekOfYear() method
        // Pass a JavaScript Data object set to the current time into getWeekOfYear method to get the value for week of the year
        key = "getWeekOfYear()";
        value = this._context.formatting.getWeekOfYear(new Date()).toString();
        tableElement.appendChild(this.createHTMLTableRowElement(key, value, false));

        return tableElement;
    }

}
Agregar estilo al componente de código
Para agregar estilo al componente de código, siga estos pasos:
Cree una nueva subcarpeta css en la carpeta FormattingAPI.
Cree un nuevo archivo TS_FormattingAPI.css en la subcarpeta CSS.
Agregue el siguiente contenido de estilo al archivo TS_FormattingAPI.css.
.SampleNamespace\.FormattingAPI
{
    font-family: 'SegoeUI-Semibold', 'Segoe UI Semibold', 'Segoe UI Regular', 'Segoe UI';
}

.SampleNamespace\.FormattingAPI .TSFormatting_Container
{
    overflow-x: auto;
}

.SampleNamespace\.FormattingAPI .FormattingControlSampleHtmlTable_HtmlRow
{
    background-color: #FFFFFF;
}

.SampleNamespace\.FormattingAPI .FormattingControlSampleHtmlTable_HtmlHeaderCell
{
    text-align: center;
}

.SampleNamespace\.FormattingAPI .FormattingControlSampleHtmlTable_HtmlCell,
.SampleNamespace\.FormattingAPI .FormattingControlSampleHtmlTable_HtmlHeaderCell
{
    border: 1px solid black;
    padding-left: 3px;
    padding-right: 3px;
}

.SampleNamespace\.FormattingAPI .FormattingControlSampleHtmlTable_HtmlInputTextCell
{
    border: 1px solid black;
    padding: 0px;
}

.SampleNamespace\.FormattingAPI .FormattingControlSampleHtmlTable_HtmlHeaderCell
{
    font-weight: bold;
    font-size: 16px;
}

.SampleNamespace\.FormattingAPI .FormattingControlSampleHtmlTable_HtmlCell_Key
{
    color: #1160B7;
}

.SampleNamespace\.FormattingAPI .FormattingControlSampleHtmlTable_HtmlCell_Value
{
    color: #1160B7;
    text-align: center;
}
Seleccione Archivo y Guardar todo para guardar todos los cambios.
Crear y ejecutar el componente
Para crear y ejecutar el componente, siga estos pasos:
Compile su solución ejecutando el comando siguiente.
npm run buildDespués de realizar la compilación correctamente, puede probar su nuevo componente de API de formato ejecutando npm start.
npm startCierre la ventana del explorador de la herramienta de ejecución de pruebas.
Vuelva al terminal y presione [CONTROL] + C para detener el monitor.
Escriba Y y, luego, presione [ENTER].
Para obtener más información, consulte Implementar un componente de API de formato.