Note
Access to this page requires authorization. You can try signing in or changing directories.
Access to this page requires authorization. You can try changing directories.
This article outlines the steps to create a Snowflake database connection.
Summary
The Snowflake database connector supports the following authentication types for copy and dataflow Gen2 respectively.
| Authentication type | Copy | Dataflow Gen2 |
|---|---|---|
| Snowflake | √ | √ |
| Microsoft Account | √ | √ |
| Key-pair | √ | √ |
| Service Principal (SPN) | √ |
Set up your connection for Dataflow Gen2
You can connect a dataflow Gen2 in Fabric to Snowflake using Power Query connectors. Follow these steps to create your connection:
- Check capabilities, limitations, and considerations to make sure your scenario is supported.
- Get data in Fabric.
- Connect to a Snowflake database.
Supported capabilities
- Import
- DirectQuery (Power BI semantic models)
- Advanced options
- Specify a text value to use as Role name
- Relationship columns
- Connection timeout in seconds
- Command timeout in seconds
- Database
- Native SQL statement
Connection settings
Get data
To get data in Data Factory:
On the left side of Data Factory, select Workspaces.
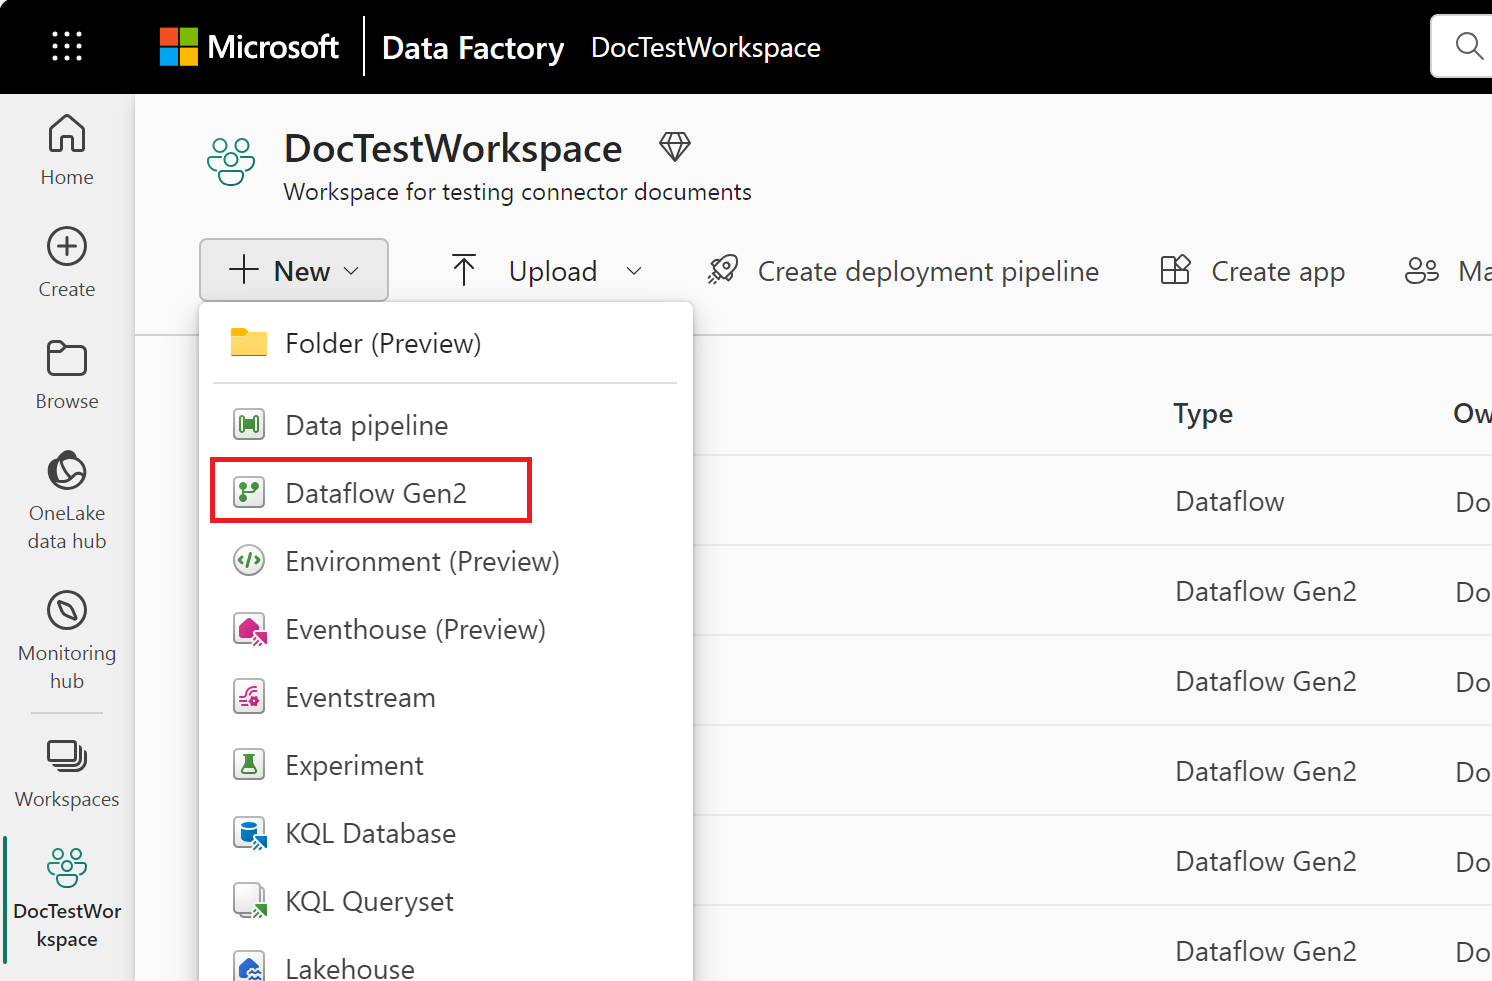
From your Data Factory workspace, select New > then select your data factory item: a dataflow, pipeline, copy job, or mirroring job.
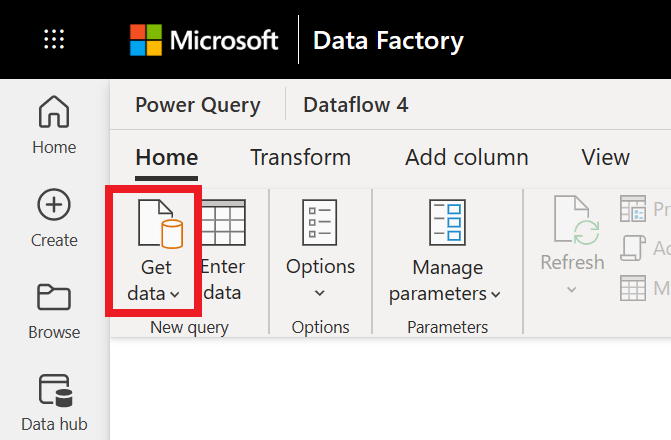
In Power Query, either select Get data in the ribbon or select Get data from another source in the current view.
In the Choose data source page, use Search to search for the name of the connector, or select View more to the right of the connector list to see all the connectors available in Data Factory.

If you choose to view more connectors, you can still use Search to search for the name of the connector, or choose a category to see a list of connectors associated with that category.


Connection steps
To make the connection, take the following steps:
Select the Snowflake option in the connector selection.
In the Snowflake dialog that appears, enter the name of the server and warehouse.
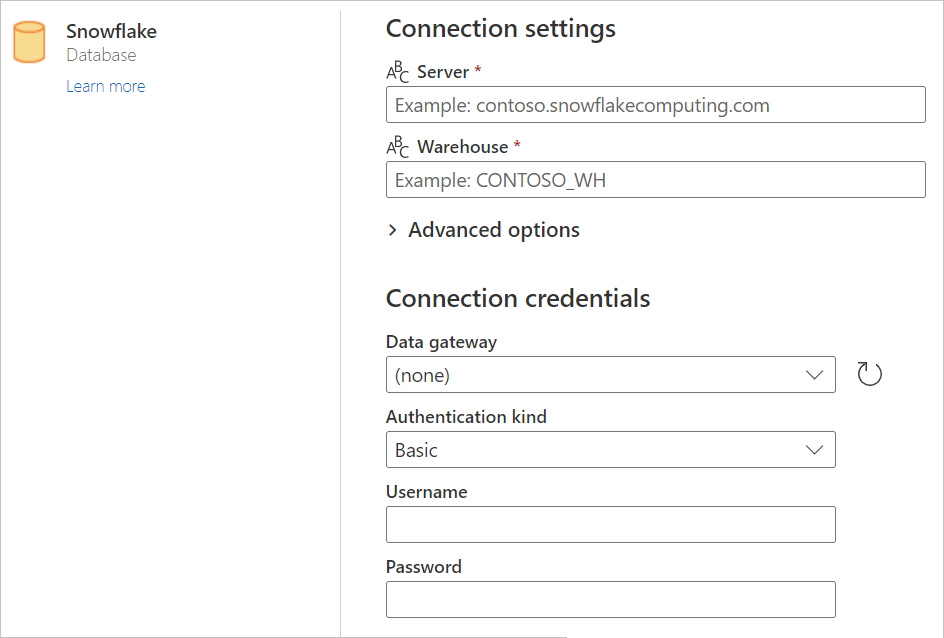
Enter any values in the advanced options you want to use. If there are any advanced options not represented in the UI, you can edit them in the Advanced Editor in Power Query later.
Enter your connection credentials, including selecting or creating a new connection, which gateway you would like to use, and a username and password.
Select Next to connect to the database.
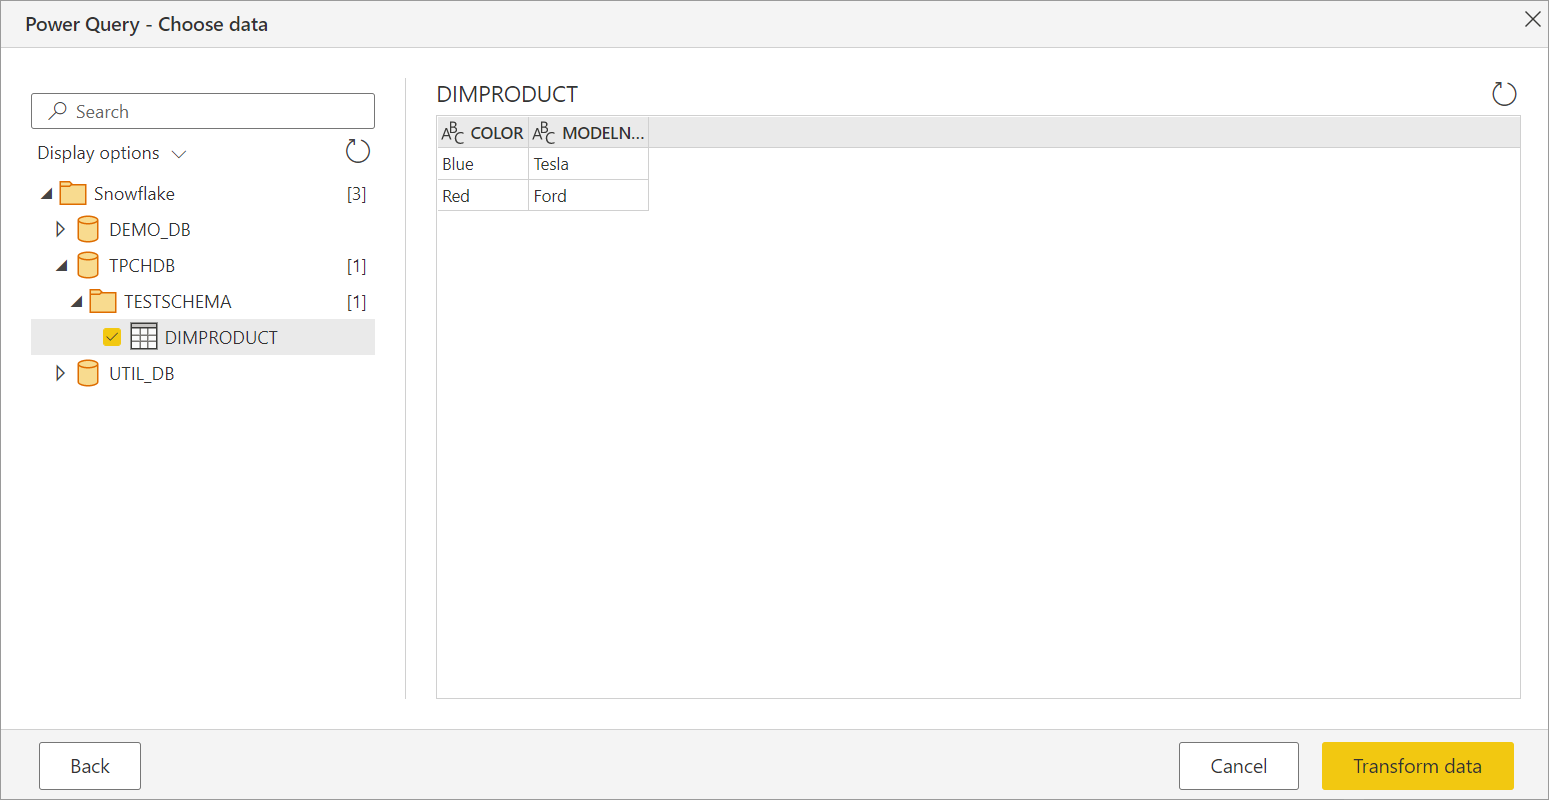
In Navigator, select the data you require, then select Transform data to transform the data in Power Query Editor.
Set up your connection in Manage connections and gateways
Connection properties
The following table contains a summary of the properties needed for Snowflake connection:
| Name | Description | Required |
|---|---|---|
| Connection name | A name for your connection. | Yes |
| Connection type | Select a type for your connection. | Yes |
| Server | The host name of the Snowflake account. | Yes |
| Warehouse | The default virtual warehouse used for the session after connecting. | Yes |
| Authentication kind | Go to Authentication. | Yes |
| Privacy Level | The privacy level that you want to apply. Allowed values are None, Organizational, Privacy, and Public. | Yes |
| Specify a text value to use as Role name | Enter a text value to use as Role name. | No |
| Connection timeout in seconds | The time to wait (in seconds) while trying to establish a connection before terminating the attempt and generating an error. | No |
| Command timeout in seconds | The time to wait (in seconds) while trying to execute a command before terminating the attempt and generating an error. | No |
| Implementation | The implementation modes for test connection. | No |
Connection instructions
For specific instructions to set up your connection in Manage connections and gateways, follow these steps:
From the page header in Data Integration service, select Settings
 > Manage connections and gateways
Select New at the top of the ribbon to add a new data source.

The New connection pane shows up on the left side of the page.

In the New connection pane, choose Cloud, and specify the following fields:

- Connection name: Specify a name for your connection.
- Connection type: Select a type for your connection.
- Server: Specify the host name of the Snowflake account. For example,
contoso.snowflakecomputing.com. - Warehouse: Specify the default virtual warehouse used for the session after connecting. For example,
CONTOSO_WH.
Under Authentication method, select your authentication from the drop-down list and complete the related configuration. The Snowflake connector supports the following authentication types:

Optionally, set the privacy level that you want to apply. Allowed values are None, Organizational, Privacy, and Public. For more information, see privacy levels in the Power Query documentation.
Advanced Options are used for test connection only. Items that use this connection must specify these options in queries.

- Specify a text value to use as Role name: Enter a text value to use as Role name.
- Connection timeout in seconds: Specify the time to wait (in seconds) while trying to establish a connection before terminating the attempt and generating an error.
- Command timeout in seconds: Specify the time to wait (in seconds) while trying to execute a command before terminating the attempt and generating an error.
- Implementation: Specify your implementation modes for test connection.
Select Create to create your connection. Your creation is successfully tested and saved if all the credentials are correct. If not correct, the creation fails with errors.


Authentication
This section lists the instructions for each authentication type supported by the Snowflake connector:
Snowflake authentication

- Username: Specify the login name for the Snowflake user.
- Password: Specify the password for the Snowflake user.
Microsoft Account authentication

Select Edit credentials, which displays the sign in interface. Enter your account and password to sign in your organizational account. After signing in, go back to the New connection page.
Key-pair authentication

To use Key-pair authentication, you need to configure and create a Key-pair authentication user in Snowflake by referring to Key-pair Authentication & Key-pair Rotation.
Username: Specify the login name for the Snowflake user.
Private key: Upload the private key file used for Key-pair authentication. After you upload the private key file, the service automatically detects whether it is encrypted or unencrypted, and displays or hides the Passphrase accordingly.
Passphrase: Specify the passphrase used to decrypt the private key. This is required only if the private key file is encrypted.

Additional information
Authentication details
Note
Username/password authentication mode will be deprecated. Read more here. More information can be found under Connectivity on our Fabric roadmap.
Key Pair Auth isn't supported for Dataflows Gen1 and Power Apps (Dataflows).
The Snowflake connector supports the following authentication methods:
Microsoft Entra ID (recommended): Enables strong, identity-based authentication without storing usernames or passwords.
- In Microsoft Fabric, this authentication method can be backed by workspace identity in supported experiences (such as Datasets and Dataflows Gen2), allowing Fabric to authenticate to Snowflake using the workspace’s managed identity.
Workspace Identity: A managed identity associated with a Microsoft Fabric workspace. When you authenticate with Microsoft Entra ID, supported Fabric experiences (such as Datasets and Dataflows Gen2) can use the workspace identity to authenticate to Snowflake. This method allows Fabric to access Snowflake using an identity tied to the workspace, rather than individual user credentials.
Key pair authentication (ADBC): Certificate-based authentication for supported scenarios.
Service Principal (SPN): Service principals are supported with Snowflake for scenarios where a non-user, application-level identity is required. Support is dependent on Snowflake configuration and the authentication method used.
Advanced options
Power Query provides a set of advanced options that you can add to your query if needed.
The following table lists all of the advanced options you can set in Power Query.
| Advanced option | Description |
|---|---|
| Role name | Specifies the role that the report uses via the driver. This role must be available to the user. Otherwise no role is set. |
| Include relationship columns | If checked, includes columns that might have relationships to other tables. If this box is cleared, you don’t see those columns. |
| Connection timeout in seconds | Specifies how long to wait for a response when interacting with the Snowflake service before returning an error. Default is 0 (no timeout). |
| Command timeout in seconds | Specifies how long to wait for a query to complete before returning an error. Default is 0 (no timeout). |
| Database | Specifies a specific database in the warehouse. This option is only available in Power Query Desktop. |
| SQL Statement | For information, see Import data from a database using native database query. |
Once you select the advanced options you require, select OK in Power Query Desktop or Next in Power Query Online to connect to your Snowflake database.
Implementation 2.0
In January 2025, we introduced a new implementation for the Snowflake connector to enhance the integration with Snowflake. This connector is generally available since July 2025. We recommend that you upgrade Power BI Desktop and the on-premises data gateway to the latest version to benefit from the most current capabilities. Provide us feedback to help us continue improving the connector.
The Snowflake connector implementation 2.0 is built using the open-source Arrow Database Connectivity (ADBC) driver. ADBC provides a set of standard interfaces for interacting with Arrow data, which is especially efficient at fetching large datasets with minimal overhead and no serialization or copying. The ADBC driver also incorporates security enhancements, such as memory safety and garbage collection. Additionally, collaboration with the open-source community enables more rapid updates, utilizing modern tools and secure development lifecycle (SDL) processes.
To enable you to take advantage of these performance and security enhancements, starting July 2025, all the newly created connections in Desktop automatically use the 2.0 implementation. You can also test the 2.0 implementation by updating your existing queries and adding the Implementation="2.0" flag in Snowflake.Databases as follows.
Source = Snowflake.Databases("contoso.snowflakecomputing.com", "CONTOSO_WH", [Implementation="2.0"])
To aid with diagnosing any potential issue, you can find the Implementation and DriverType details in your Mashup logs like the following example. If you encounter any issue during the transition, contact support. Meanwhile, to self-mitigate, you can remove Implementation="2.0" to keep using the ODBC connector to avoid business interruption before the issue is resolved. However, if you're using Key Pair authentication, the ADBC driver is always used regardless of this setting.
{
   "Start":"2024-11-02T00:14:02.7968686Z",
   "Action":"Engine/Module/Snowflake/IO/Snowflake/Implementation",
   "ResourceKind":"Snowflake",
   "ResourcePath":"powerbi.snowflakecomputing.com ;DEMO_WH",
   "HostProcessId":"29200",
   "Implementation":"2.0",
   "DriverType":"ADBC",
   "ProductVersion":"2.139.0.0 (Main)+eda56ecd858054173a4d11db9c63a6da5cf92a99",
   "ActivityId":"106f16b6-cfbb-4853-9f20-ed45486486d2",
   "Process":"Microsoft.Mashup.Container.NetFX45",
   "Pid":38560,
   "Tid":1,
   "Duration":"00:00:00.0000291"
}
The following options are available since the July 2025 release:
UseHighPrecision: Controls the precision of how Snowflake NUMBER(38,0) fields should be handled. If no value is specified, the connector queries Snowflake using theSHOW PARAMETERS LIKE 'ODBC_TREAT_DECIMAL_AS_INT'query. If the no value is set, then the connector uses the scale specified by the column. Atruevalue treats NUMBER(38,0) as a Decimal type. The valuefalsetreats NUMBER(38,0) as an Int64 type. If the scale is higher than 0, then the column is considered as a Double type.DateTimePrecision: Controls the precision of how Snowflake Timestamp values are treated. Snowflake typically stores Timestamp values with nanosecond precision. In ADBC, this precision can cause an overflow exception for dates before 1677 or after 2262, according to Snowflake. Valid values for this option are null,nanoseconds, ormicroseconds. A null value usesmicrosecondsby default. We recommend that users who need dates before 1677 or after 2262 use themicrosecondssetting. If users need to retain precision to the ten millionth place before 1677 or after 2262, we recommend staying with the ODBC driver.
If you need to use proxy to connect to Snowflake, refer to the proxy setting instruction. The driver uses environment variables for the proxy settings.
Note
When you use the on-premises data gateway, note the minimal supported version is January 2025. We recommend you use the latest version with the most current capabilities.
Note
This feature is supported in the 64-bit version of Power BI Desktop and doesn't work in the 32-bit version.
Limitations and considerations
Known issues in Snowflake connector implementation 2.0
Currently, the Snowflake connector implementation 2.0 has the following known issues. There's ongoing work towards a fix and the documentation will be updated when a fix is released.
- Snowflake query with
count distinctlogic returns incorrect result. - Increased memory use. The overall load time is typically faster using
Implementation="2.0", but the memory consumption can also be higher, in some cases causing issues such asResource Governing: This operation was canceled because there wasn't enough memory to finish running it. Either reduce the memory footprint of your dataset by doing things such as limiting the amount of imported data, or if using Power BI Premium, increase the memory of the Premium capacity where this dataset is hosted.
Resolved issues
Hyphens in database names
If a database name has a hyphen in it, you can encounter an ODBC: ERROR[42000] SQL compilation error. This issue is addressed in the September 2024 release.
Slicer visual for Boolean datatype
The slicer visual for the Boolean data type isn't functioning as expected in the June 2024 release. This nonfunctionality is a known issue. As a temporary solution, users can convert the Boolean data type in their reports to text by navigating to: Transfer -> Data Type -> Text. A fix is provided in October 2024 release.
Views not visible with Implementation="2.0"
In some version of the March 2025 release of Power BI Desktop, you might encounter an issue that views aren't visible when using the Snowflake connector implementation 2.0 (Implementation="2.0"). This issue is fixed since the latest March 2025 release of Power BI Desktop. To try again, upgrade your installation.
Snowflake connections might not work when the server URL is in uppercase
If you create a Snowflake connection in Fabric and enter the server URL in uppercase letters, the connection might not appear when you try to select it in your Fabric items. You might also encounter errors when you use the connection.
Workaround: When you create a Snowflake connection, enter the server URL in all lowercase letters. For example, use myaccount.snowflakecomputing.com instead of MYACCOUNT.SNOWFLAKECOMPUTING.COM.