Note
Access to this page requires authorization. You can try signing in or changing directories.
Access to this page requires authorization. You can try changing directories.
Microsoft Fabric supports secure data access through private links, which use Azure Private Link and private endpoints to route traffic over Microsoft’s private network backbone rather than the public internet. You can configure private links at both the tenant and the workspace level. This article explains how to set up private links for a Fabric tenant.
Before you begin, review the information in Private links for Fabric tenants. To configure private endpoints, you must be a Fabric administrator and have permissions in Azure to create and configure resources such as virtual machines (VMs) and virtual networks (VNets).
Step 1. Set up private endpoints for Fabric
Sign in to Fabric as an administrator.
Find and expand the setting Azure Private Link.
Set the toggle to Enabled.
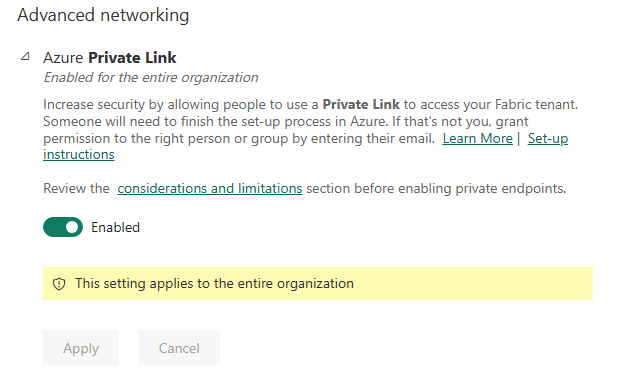
It takes about 15 minutes to configure a private link for your tenant, including configuring a separate FQDN (fully qualified domain name) for the tenant to communicate privately with Fabric services.
When this process is finished, move on to the next step.
Step 2. Create a Microsoft.PowerBI private link services for Power BI resource in the Azure portal
This step is used to support Azure Private Endpoint association with your Fabric resource.
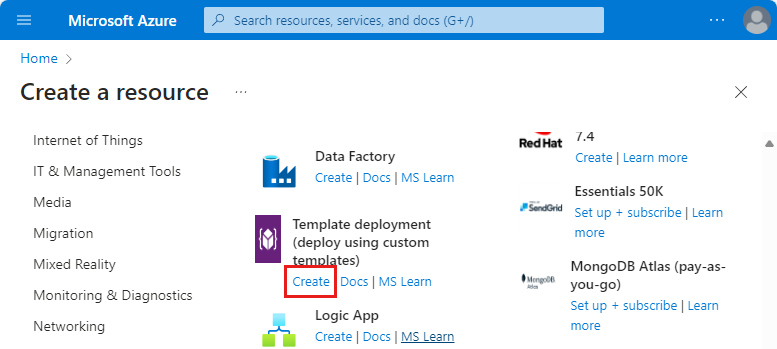
Sign in to the Azure portal.
Select Create a resource.
Under Template deployment, select Create.
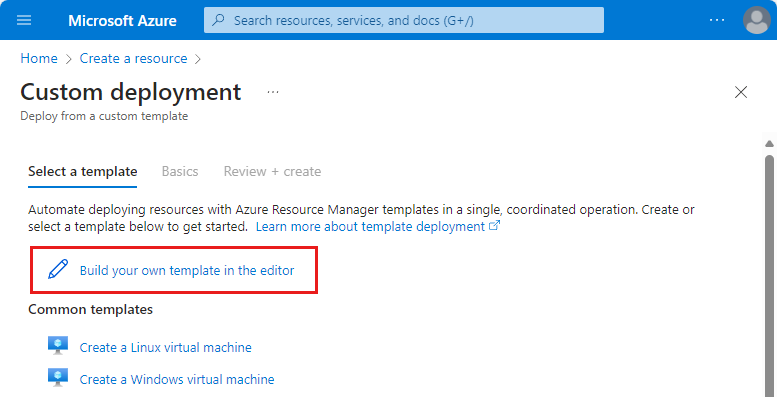
On the Custom deployment page, select Build your own template in the editor.
In the editor, create the following a Fabric resource using the ARM template as shown, where
<resource-name>is the name you choose for the Fabric resource.<tenant-object-id>is your Microsoft Entra tenant ID. See How to find your Microsoft Entra tenant ID.
{
  "$schema": "http://schema.management.azure.com/schemas/2015-01-01/deploymentTemplate.json#",
  "contentVersion": "1.0.0.0",
  "parameters": {},
  "resources": [
      {
          "type":"Microsoft.PowerBI/privateLinkServicesForPowerBI",
          "apiVersion": "2020-06-01",
          "name" : "<resource-name>",
          "location": "global",
          "properties" :
          {
               "tenantId": "<tenant-object-id>"
          }
      }
  ]
}
If you're using an Azure Government cloud for Power BI,
locationshould be the region name of the tenant. For example, if the tenant is in US Gov Texas, you should put"location": "usgovtexas"in the ARM template. The list of Power BI US Government regions can be found in the Power BI for US government article.Important
Use
Microsoft.PowerBI/privateLinkServicesForPowerBIastypevalue, even though the resource is being created for Fabric.Save the template. Then enter the following information.
Setting Value Project details Subscription Select your subscription. Resource group Select **Create new. Enter test-PL as the name. Select OK. Instance details Select the region. Region 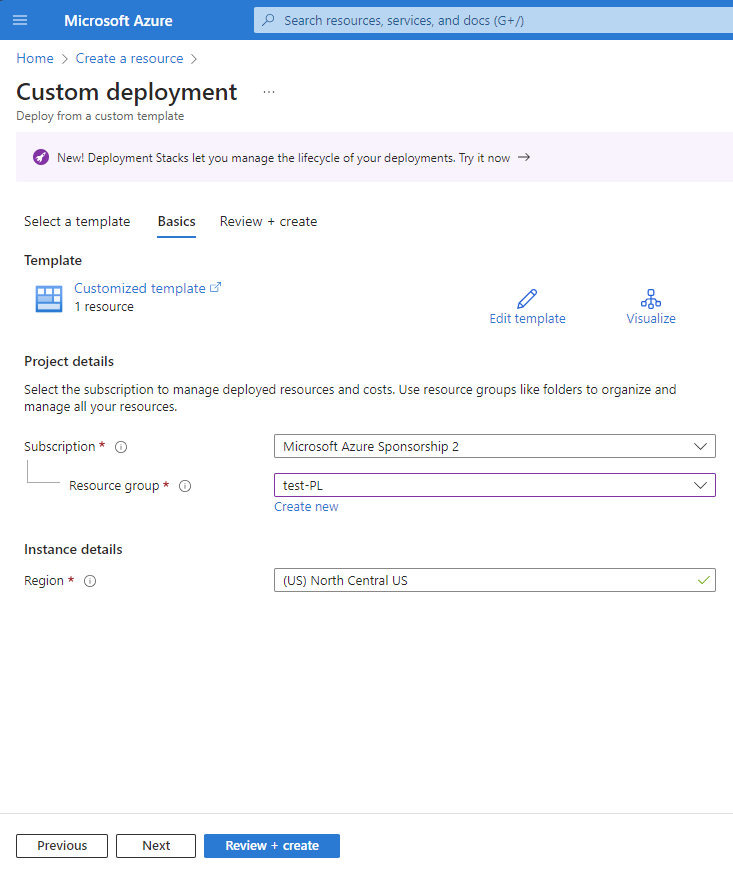
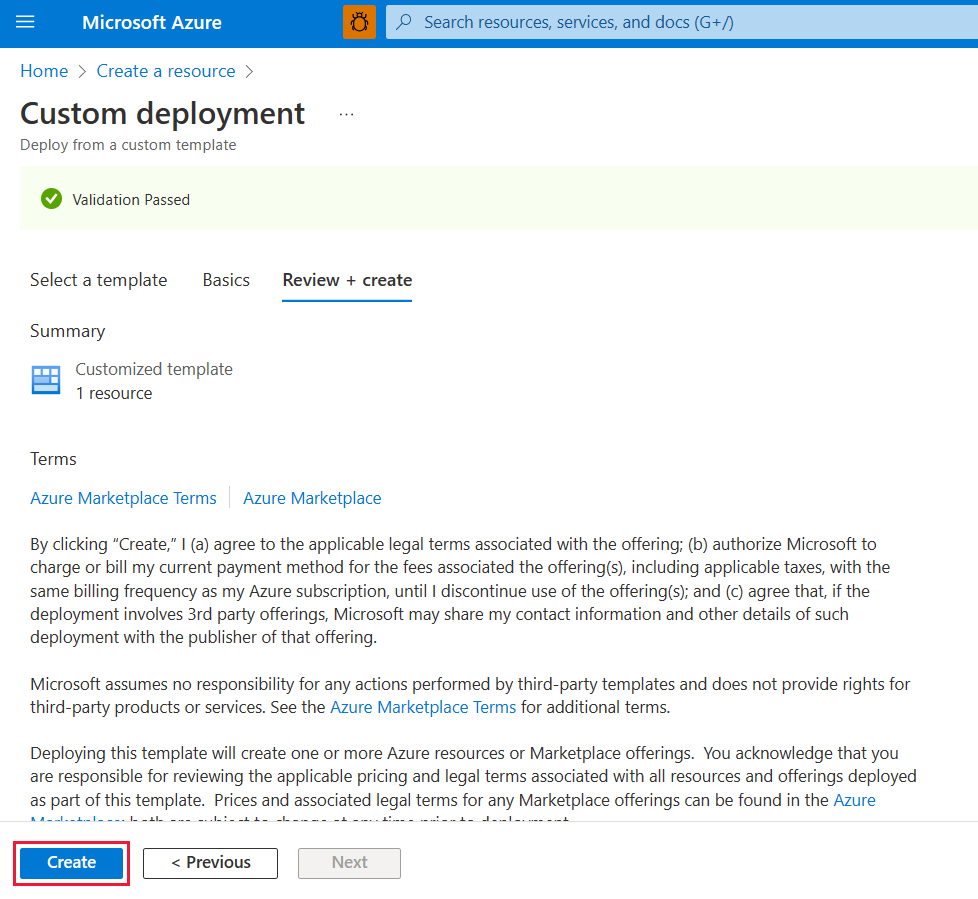
On the review screen, select Create to accept the terms and conditions.
Step 3. Create a virtual network
The following procedure creates a virtual network with a resource subnet, an Azure Bastion subnet, and an Azure Bastion host.
The number of IP addresses your subnet needs is the number of capacities you created on your tenant plus 15. For example, if you're creating a subnet for a tenant with seven capacities, you need 22 IP addresses.
Sign in to the Azure portal.
In the search box, enter Virtual networks and select it in the search results.
On the Virtual networks page, select + Create.
On the Basics tab of Create virtual network, enter or select the following information:
Setting Value Subscription Select your subscription. Resource group Select the resource group you created earlier for the private link service, such as test-PL. Name Enter a name for your virtual network, such as vnet-1. Region Select the region where you'll initiate the connection to Fabric. 
Select Next to proceed to the Security tab. You can keep the default settings or modify them according to your organization's requirements.
Select Next to proceed to the IP Addresses tab. You can keep the default settings or modify them according to your organization's requirements.

Select Save.
Select Review + create at the bottom of the screen. When validation passes, select Create.

Step 4. Create a virtual machine
The next step is to create a virtual machine.
Sign in to the Azure portal.
Go to Create a resource > Compute > Virtual machines.
On the Basics tab, enter or select the following information:
Setting Value Subscription Select your Azure Subscription. Resource group Select the same resource group you used earlier when you created the private link service. Virtual machine name Enter a name for the new virtual machine. Select the info bubble next to the field name to see important information about virtual machine names. Region Select the same region you used previously when creating the virtual network. Availability options For testing, choose No infrastructure redundancy required Security Type Leave the default. Image Select the image you want. For example, choose Windows Server 2022. VM architecture Leave the default of x64. Size Select a size. Username Enter a username of your choosing. Password Enter a password of your choosing. The password must be at least 12 characters long and meet the defined complexity requirements. Confirm password Reenter password. Public inbound ports Choose None. 
Select Next: Disks.
On the Disks tab, leave the defaults and select Next: Networking.
On the Networking tab, select the following information:
Setting Value Virtual network Select the virtual network you created earlier for this deployment. Subnet Select the default subnet (for example, 10.0.0.0/24) that you created earlier as part of the virtual network setup. For the rest of the fields, leave the defaults.

Select Review + create. You're taken to the Review + create page where Azure validates your configuration.
When you see the Validation passed message, select Create.


Step 5. Create a private endpoint
The next step is to create a private endpoint for Fabric.
In the search box at the top of the portal, enter Private endpoint. Select Private endpoints.
Select + Create in Private endpoints.
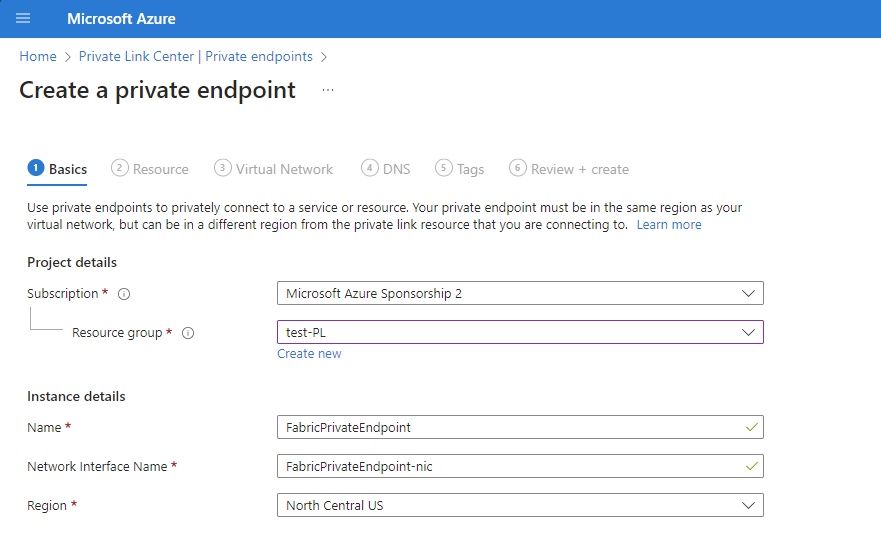
On the Basics tab of Create a private endpoint, enter or select the following information:
Settings Value Project details Subscription Select your Azure Subscription. Resource group Select the resource group you created earlier when creating the private link service in Azure. Instance details Name Enter FabricPrivateEndpoint. If this name is taken, create a unique name. Region Select the region you created earlier for your virtual network. The following image shows the Create a private endpoint - Basics window.
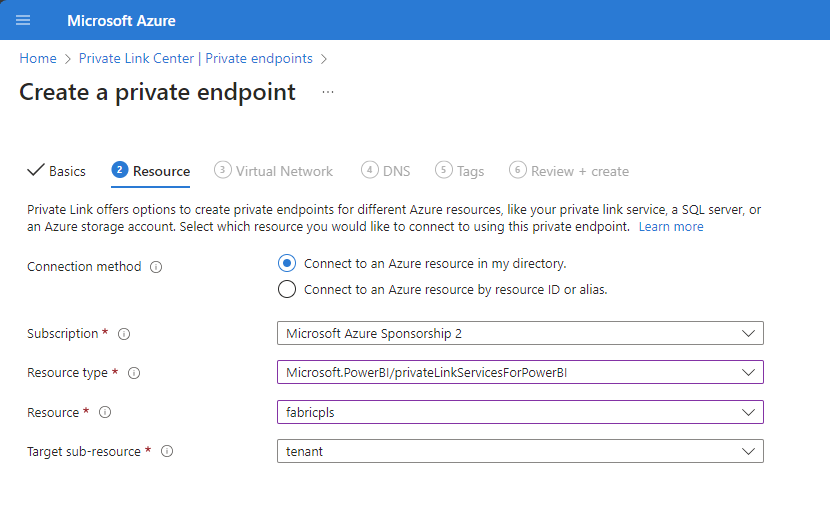
Select Next: Resource. In the Resource pane, enter or select the following information:
Settings Value Connection method Select connect to an Azure resource in my directory. Subscription Select your subscription. Resource type Select Microsoft.PowerBI/privateLinkServicesForPowerBI Resource Choose the Fabric resource you created earlier when creating the private link service in Azure. Target subresource Tenant The following image shows the Create a private endpoint - Resource window.
Select Next: Virtual Network. In Virtual Network, enter or select the following information.
Settings Value NETWORKING Virtual network Select the virtual network name you created earlier (for example vnet-1). Subnet Select the subnet name you created earlier (for example subnet-1). PRIVATE DNS INTEGRATION Integrate with private DNS zone Select Yes. Private DNS Zone Select
(New)privatelink.analysis.windows.net
(New)privatelink.pbidedicated.windows.net
(New)privatelink.prod.powerquery.microsoft.com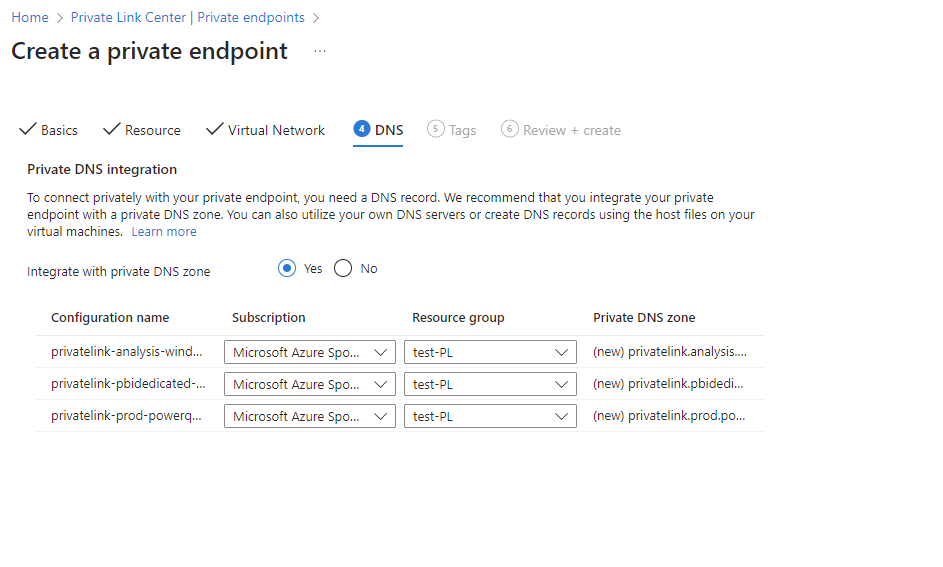
Select Next: Tags, then Next: Review + create.
Select Create.
Step 6. Connect to a VM using Bastion
Azure Bastion protects your virtual machines by providing lightweight, browser-based connectivity without the need to expose them through public IP addresses. For more information, see What is Azure Bastion?.
Connect to your VM using the following steps:
In the virtual network you created earlier, add a new subnet named AzureBastionSubnet.

In the portal's search bar, type the name of the virtual machine you created earlier, and select it from the search results.
Select the Connect button, and choose Connect via Bastion from the dropdown menu.

Select Deploy Bastion.
On the Bastion page, enter the required authentication credentials, then select Connect.


Step 7. Access Fabric privately from the VM
The next step is to access Fabric privately, from the virtual machine you created in the previous step, using the following steps:
In the virtual machine, open PowerShell.
Enter
nslookup <tenant-object-id-without-hyphens>-api.privatelink.analysis.windows.net.You receive a response similar to the following message and can see that the private IP address is returned. You can see that the OneLake endpoint and Warehouse endpoint also return private IPs.

Open the browser and go to app.fabric.microsoft.com to access Fabric privately.

Step 8. Disable public access for Fabric
Finally, you can optionally disable public access for Fabric.
If you disable public access for Fabric, certain constraints on access to Fabric services are put into place, as described in the next section.
Important
When you turn on Block Internet Access, some unsupported Fabric items become disabled. Learn the full list of limitations and considerations in About private links.
To disable public access for Fabric, sign in to Fabric as an administrator, and navigate to the Admin portal. Select Tenant settings and scroll to the Advanced networking section. Enable the toggle button in the Block Public Internet Access tenant setting.
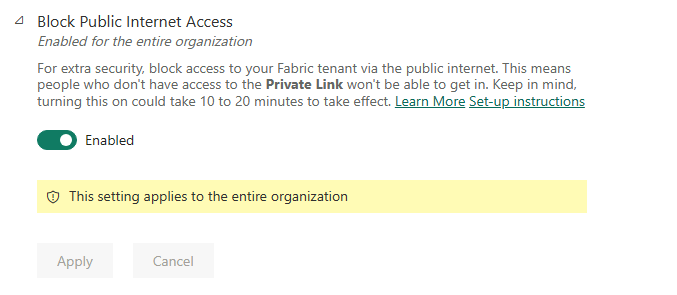
It takes approximately 15 minutes for the system to disable your organization's access to Fabric from the public Internet.
Completion of private endpoint configuration
Once you complete the steps in the previous sections and the private link is successfully configured, your organization implements private links based on the following configuration selections, whether the selection is set upon initial configuration or changed later.
If Azure Private Link is properly configured and Block public Internet access is enabled:
- Fabric is only accessible for your organization from private endpoints, and isn't accessible from the public Internet.
- Traffic from the virtual network targeting endpoints and scenarios that support private links are transported through the private link.
- Traffic from the virtual network targeting endpoints and scenarios that don't support private links are blocked by the service.
- There could be scenarios that don't support private links, which are blocked at the service when Block public Internet access is enabled.
If Azure Private Link is properly configured and Block public Internet access is disabled:
- Traffic from the public Internet is allowed by Fabric services.
- Traffic from the virtual network targeting endpoints and scenarios that support private links is transported through the private link.
- Traffic from the virtual network targeting endpoints and scenarios that don't support private links is transported through the public Internet, and is allowed by Fabric services.
- If the virtual network is configured to block public Internet access, scenarios that don't support private links are blocked by the virtual network.
The following video shows how to connect a mobile device to Fabric, using private endpoints:
Note
This video might use earlier versions of Power BI Desktop or the Power BI service.
More questions? Ask the Fabric Community.
Disable Private Link
If you want to disable the Private Link setting, make sure that all the private endpoints you created and the corresponding private DNS zone are deleted before disabling the setting. If your virtual network has private endpoints set up but Private Link is disabled, connections from this virtual network could fail.
If you're going to disable the Private Link setting, it's recommended to do so during nonbusiness hours. It might take up to 15 minutes of downtime for some scenarios to reflect the change.