Tutorial: Use a user-assigned managed identity on a VM to access Azure Resource Manager
This quickstart shows you how to use a system-assigned managed identity as a virtual machine (VM)'s identity to access the Azure Resource Manager API. Managed identities for Azure resources are automatically managed by Azure and enable you to authenticate to services that support Microsoft Entra authentication without needing to insert credentials into your code.
Managed identities for Azure resources is a feature of Microsoft Entra ID. Each of the Azure services that support managed identities for Azure resources are subject to their own timeline. Make sure you review the availability status of managed identities for your resource and known issues before you begin.
You'll learn how to:
- Grant your virtual machine (VM) access to a resource group in Azure Resource Manager
- Get an access token using a virtual machine (VM) identity and use it to call Azure Resource Manager
Prerequisites
- A basic understanding of managed identities. If you're not familiar with the managed identities for Azure resources feature, see What are managed identities for Azure resources?.
- An Azure account, sign up for a free account.
- Owner permissions at the appropriate scope (your subscription or resource group) to perform required resource creation and role management steps. If you need assistance with role assignments, see Assign Azure roles to manage access to your Azure subscription resources.
- A Windows VM that has system assigned managed identities enabled.
- If you need to create a Windows VM for this tutorial, see Create a virtual machine with system-assigned identity enabled.
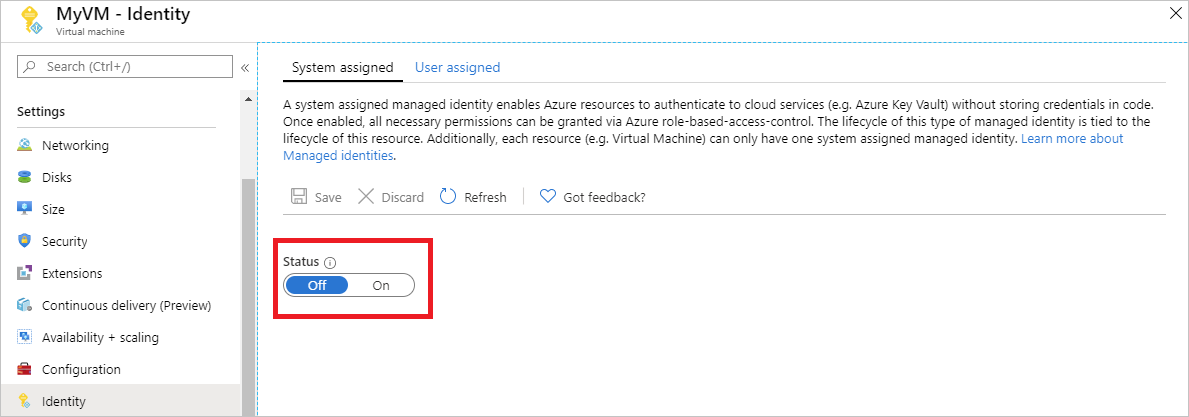
Enable a system-assigned managed identity
Enabling a system-assigned managed identity is a one-click experience. You can either enable it during the creation of a VM or in the properties of an existing VM.
To enable a system-assigned managed identity on a new VM:
Grant your VM access to a resource group in Resource Manager
Tip
Steps in this article might vary slightly based on the portal you start from.
Using managed identities for Azure resources, your application can access tokens to authenticate to resources that support Microsoft Entra authentication. The Azure Resource Manager API supports Microsoft Entra authentication, which grants the VM's identity access to a resource in Azure Resource Manager; in this case, access to a resource group that the VM is contained. Assign the Reader role to the managed identity at the scope of the resource group.
- Use an administrator account to sign in to the Azure portal.
- Navigate to the tab for Resource Groups.
- Select the Resource Group you want to grant the VM's managed identity access.
- In the left panel, select Access control (IAM).
- Select Add, then select Add role assignment.
- In the Role tab, select Reader. This role allows view all resources, but doesn't allow you to make any changes.
- In the Members tab, for the Assign access to, select Managed identity, then select + Select members.
- Ensure the proper subscription is listed in the Subscription dropdown. And for Resource Group, select All resource groups.
- For the Manage identity dropdown, select Virtual Machine.
- In Select choose your Windows VM in the dropdown, then select Save.
Get an access token
Use the VM's system-assigned managed identity and use it to call Azure Resource Manager to get an access token.
You'll need to access PowerShell to complete these steps. If you don’t have PowerShell installed, download it here.
- In the portal, navigate to Virtual Machines and go to your Windows VM.
- In the Overview section, select Connect.
- Enter in your Username and Password for which you added when you created the Windows VM. This creates a Remote Desktop Connection with the VM.
- Open PowerShell in the remote session.
- Using the
Invoke-WebRequestcmdlet, make a request to the local managed identity for the Azure resources endpoint.
This code generates an access token for Azure Resource Manager.
$response = Invoke-WebRequest -Uri 'http://169.254.169.254/metadata/identity/oauth2/token?api-version=2018-02-01&resource=https://management.azure.com/' -Method GET -Headers @{Metadata="true"}
Note
The value of the resource parameter must be an exact match for what is expected by Microsoft Entra ID. When using the Azure Resource Manager resource ID, you must include the trailing slash in the URI.
Next, extract the full response, which is stored as a JavaScript Object Notation (JSON) formatted string in the $response object.
$content = $response.Content | ConvertFrom-Json
Next, extract the access token from the response.
$ArmToken = $content.access_token
\```

Finally, call Azure Resource Manager using the access token. This example shows using the `Invoke-WebRequest` cmdlet to make the call to Azure Resource Manager and includes the access token in the Authorization header.

```powershell
(Invoke-WebRequest -Uri https://management.azure.com/subscriptions/<SUBSCRIPTION ID>/resourceGroups/<RESOURCE GROUP>?api-version=2016-06-01 -Method GET -ContentType "application/json" -Headers @{ Authorization ="Bearer $ArmToken"}).content
Note
The URL is case-sensitive, so ensure you use the exact case as you used earlier when you named the Resource Group. Also use the uppercase "G" in resourceGroups.
The following command returns the details of the resource group:
{"id":"/subscriptions/aaaa0a0a-bb1b-cc2c-dd3d-eeeeee4e4e4e/resourceGroups/DevTest","name":"DevTest","location":"westus","properties":{"provisioningState":"Succeeded"}}
Prerequisites
- An understanding of managed identities. If you're not familiar with managed identities, see What are managed identities for Azure resources?.
- An Azure account, sign up for a free account.
- A Linux VM that has system assigned managed identities enabled. If you have a VM, but need to enable system assigned managed identities, you can do this in the identity section of the VM's properties.
- If you need to create a Linux VM for completing this tutorial, see Create a Linux virtual machine with the Azure portal.
Tip
Steps in this article might vary slightly based on the portal you start from.
Grant your VM access to a resource group in Resource Manager
Using managed identities for Azure resources, your application can access tokens to authenticate to resources that support Microsoft Entra authentication. The Azure Resource Manager API supports Microsoft Entra authentication, which grants the VM's identity access to a resource in Azure Resource Manager; in this case, access to a resource group that the VM is contained.
Sign in to the Azure portal with your administrator account.
Navigate to the tab for Resource Groups.
Select the Resource Group that you want to grant the VM's managed identity access.
In the left panel, select Access control (IAM).
Select Add, then select Add role assignment.
In the Role tab, select Reader. This role allows view all resources, but doesn't allow you to make any changes.
In the Members tab, for the Assign access to option, select Managed identity. Then select + Select members.
Ensure the proper subscription is listed in the Subscription dropdown. For Resource Group, select All resource groups.
For the Manage identity dropdown, select Virtual Machine.
For Select, choose your VM in the dropdown, then select Save.

Get an access token
Use the VM's system-assigned managed identity and call the Resource Manager to get an access token.
To complete these steps, you need an SSH client. If you're using Windows, you can use the SSH client in the Windows Subsystem for Linux. If you need assistance configuring your SSH client's keys, see How to Use SSH keys with Windows on Azure, or How to create and use an SSH public and private key pair for Linux VMs in Azure.
In the portal, navigate to your Linux VM and in the Overview, select Connect.
Connect to the VM with the SSH client of your choice.
In the terminal window, using
curl, make a request to the local managed identities for Azure resources endpoint to get an access token for Azure Resource Manager. Thecurlrequest for the access token is below.
curl 'http://169.254.169.254/metadata/identity/oauth2/token?api-version=2018-02-01&resource=https://management.azure.com/' -H Metadata:true
Note
The value of the resource parameter must be an exact match for what is expected by Microsoft Entra ID. In the case of the Resource Manager resource ID, you must include the trailing slash on the URI.
The response includes the access token you need to access Azure Resource Manager.
Response:
{
  "access_token":"eyJ0eXAiOi...",
  "refresh_token":"",
  "expires_in":"3599",
  "expires_on":"1504130527",
  "not_before":"1504126627",
  "resource":"https://management.azure.com",
  "token_type":"Bearer"
}
Use this access token to access Azure Resource Manager; for example, to read the details of the Resource Group to which you previously granted this VM access. Replace the values of <SUBSCRIPTION-ID>, <RESOURCE-GROUP>, and <ACCESS-TOKEN> with the ones you created earlier.
Note
The URL is case-sensitive, so ensure if you are using the exact case as you used earlier when you named the resource group, and the uppercase “G” in “resourceGroup”.
curl https://management.azure.com/subscriptions/<SUBSCRIPTION-ID>/resourceGroups/<RESOURCE-GROUP>?api-version=2016-09-01 -H "Authorization: Bearer <ACCESS-TOKEN>"
The response back with the specific resource group information:
{
"id":"/subscriptions/aaaa0a0a-bb1b-cc2c-dd3d-eeeeee4e4e4e/resourceGroups/DevTest",
"name":"DevTest",
"location":"westus",
"properties":
{
  "provisioningState":"Succeeded"
  }
}
Next steps
In this quickstart, you learned how to use a system-assigned managed identity on a VM to access the Azure Resource Manager API. To learn more about Azure Resource Manager, see:
Commentaires
Bientôt disponible : pendant toute l’année 2024, nous allons éliminer progressivement Problèmes GitHub comme mécanisme de commentaires pour le contenu et le remplacer par un nouveau système de commentaires. Pour plus d’informations, voir : https://aka.ms/ContentUserFeedback.
Soumettre et afficher des commentaires pour