VS LoadTest data segregation strategies
Most of the times we bump into situations where we want to segregate the Test Data that we have for our performance tests based on real life scenarios that we are required to simulate.
I would be covering 3 approaches that me and my teammates used in our project to segregate the test data based on our requirements.
1. Using out of the box file access methods in a webtest
Whenever we add a data source (CSV) to our webtest we can define how we want the file to be accessed. Below screenshot depicts the options that visual studio provides us out of the box. 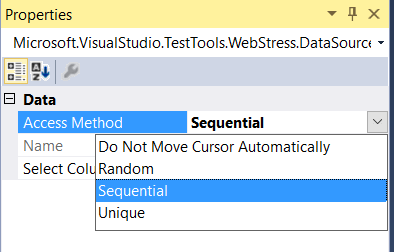
On a high level
- Do Not Move Cursor Automatically will use the same row for all the test iterations across all agents
- Random as the name suggests will pick out random rows from the file and a copy of the file is place on all the agents
- Sequential will also place a copy of the file in all the test agents but will go one row after the other and repeat from the start once the data rows are complete
- Unique divides the file into equal parts based on the agent count and runs each row exactly once on the specific Agent.
Detailed information on those could be found here
Note :- For Unique Data Access Method, if the LoadTest is time based and all the rows from the data source have been read, the LoadTest will stop with an error saying no more data rows found.
2. Unique repeatable set of Data used in each AGENT
Many a times we want to run unique set data on individual agents but we don’t want the load test to stop once the data rows are exhausted. We would want each agent start again with its unique set of data till the time of the load test has expired.
Visual Studio does not provide an out of the box solution for it but with a simple webtest plugin this could be easily achieved. The following code will do that for you.
 public class PickAgentWiseUniqueRow : WebTestPlugin
{
     static int counter = 1;
     public override void PreWebTest(object sender, PreWebTestEventArgs e)
     {
          while ((counter % e.WebTest.Context.AgentCount) != (e.WebTest.Context.AgentId))
          {
               foreach (DataSource d in e.WebTest.DataSources)
               {
                    e.WebTest.MoveDataTableCursor(d.Name, d.Tables[0].Name);
               }
          counter++;
          }
     }
}
You can add this class to any class file in your project and add it as a web test plugin to you webtest.
This code basically takes a modulo of the row count of current iteration with the number of agents present. It matches that value with the AgentID (0,1,2….) and moves the cursor in the file by one if the match returns a false.
This makes sure that every agent runs a specific series of rows based on its AgentID and it can use the same data again and again in the life span of the load test.
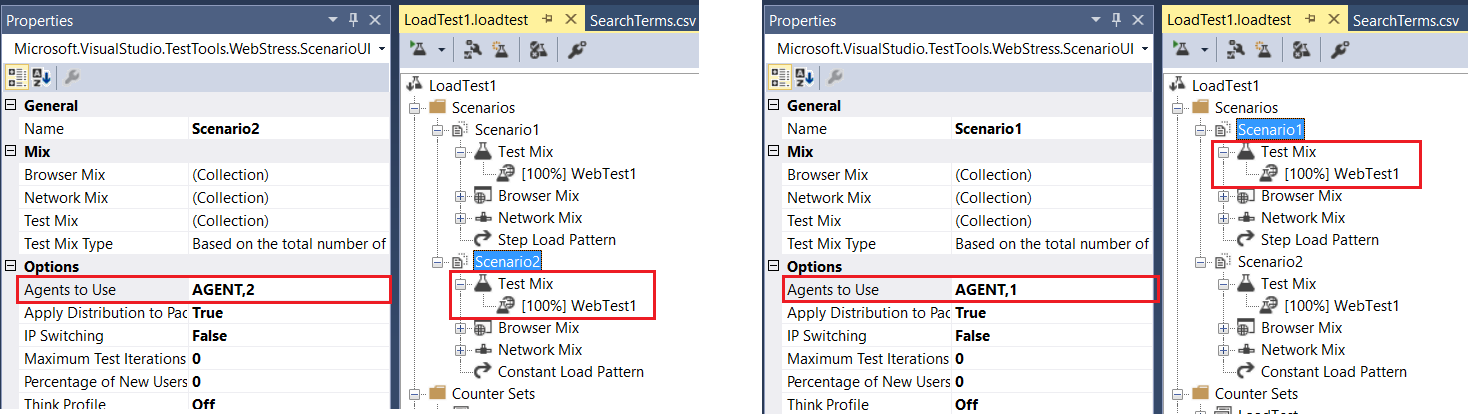
1. Assigning an Agent to a LoadTest Scenario
Sometimes you would want to test the entire Functionality Suite of an application at one go and you would want particular type of test being run on particular Agents.
One example that I can think of is, when all of your agents are not equally sized in terms of performance, you would want the higher complexity and higher utilization consuming tests (with lot of heavy duty custom code in them) to be run on high end agents and other light weight test to run on Agents with low end specs.
Another example would be, when you want to run a same test (User Login might be an example) with different data on different Agents (like mentioned in point 2) you can create multiple copy of tests accessing different data files and run them on different Agents by adding them to different scenarios in a LoadTest and assigning different Agent to each scenario.
Following Image depicts how you can achieve the above mentioned.