My Take on an Azure Open Source Cross-Platform DevOps Toolkit–Part 8
| My Take on an Azure Open Source Cross-Platform DevOps Toolkit–Part 1 | Click Here |
| My Take on an Azure Open Source Cross-Platform DevOps Toolkit–Part 2 | Click Here |
| My Take on an Azure Open Source Cross-Platform DevOps Toolkit–Part 3 | Click Here |
| My Take on an Azure Open Source Cross-Platform DevOps Toolkit–Part 4 | Click Here |
| My Take on an Azure Open Source Cross-Platform DevOps Toolkit–Part 5 | Click Here |
| My Take on an Azure Open Source Cross-Platform DevOps Toolkit–Part 6 | Click Here |
| My Take on an Azure Open Source Cross-Platform DevOps Toolkit–Part 7 | Click Here |
| My Take on an Azure Open Source Cross-Platform DevOps Toolkit–Part 8 | Click Here |
| My Take on an Azure Open Source Cross-Platform DevOps Toolkit–Part 9 | Click Here |
| My Take on an Azure Open Source Cross-Platform DevOps Toolkit–Part 10 | Click Here |
| My Take on an Azure Open Source Cross-Platform DevOps Toolkit–Part 11 | Click Here |
| My Take on an Azure Open Source Cross-Platform DevOps Toolkit–Part 12 | Click Here |
Testing Docker Image/Container
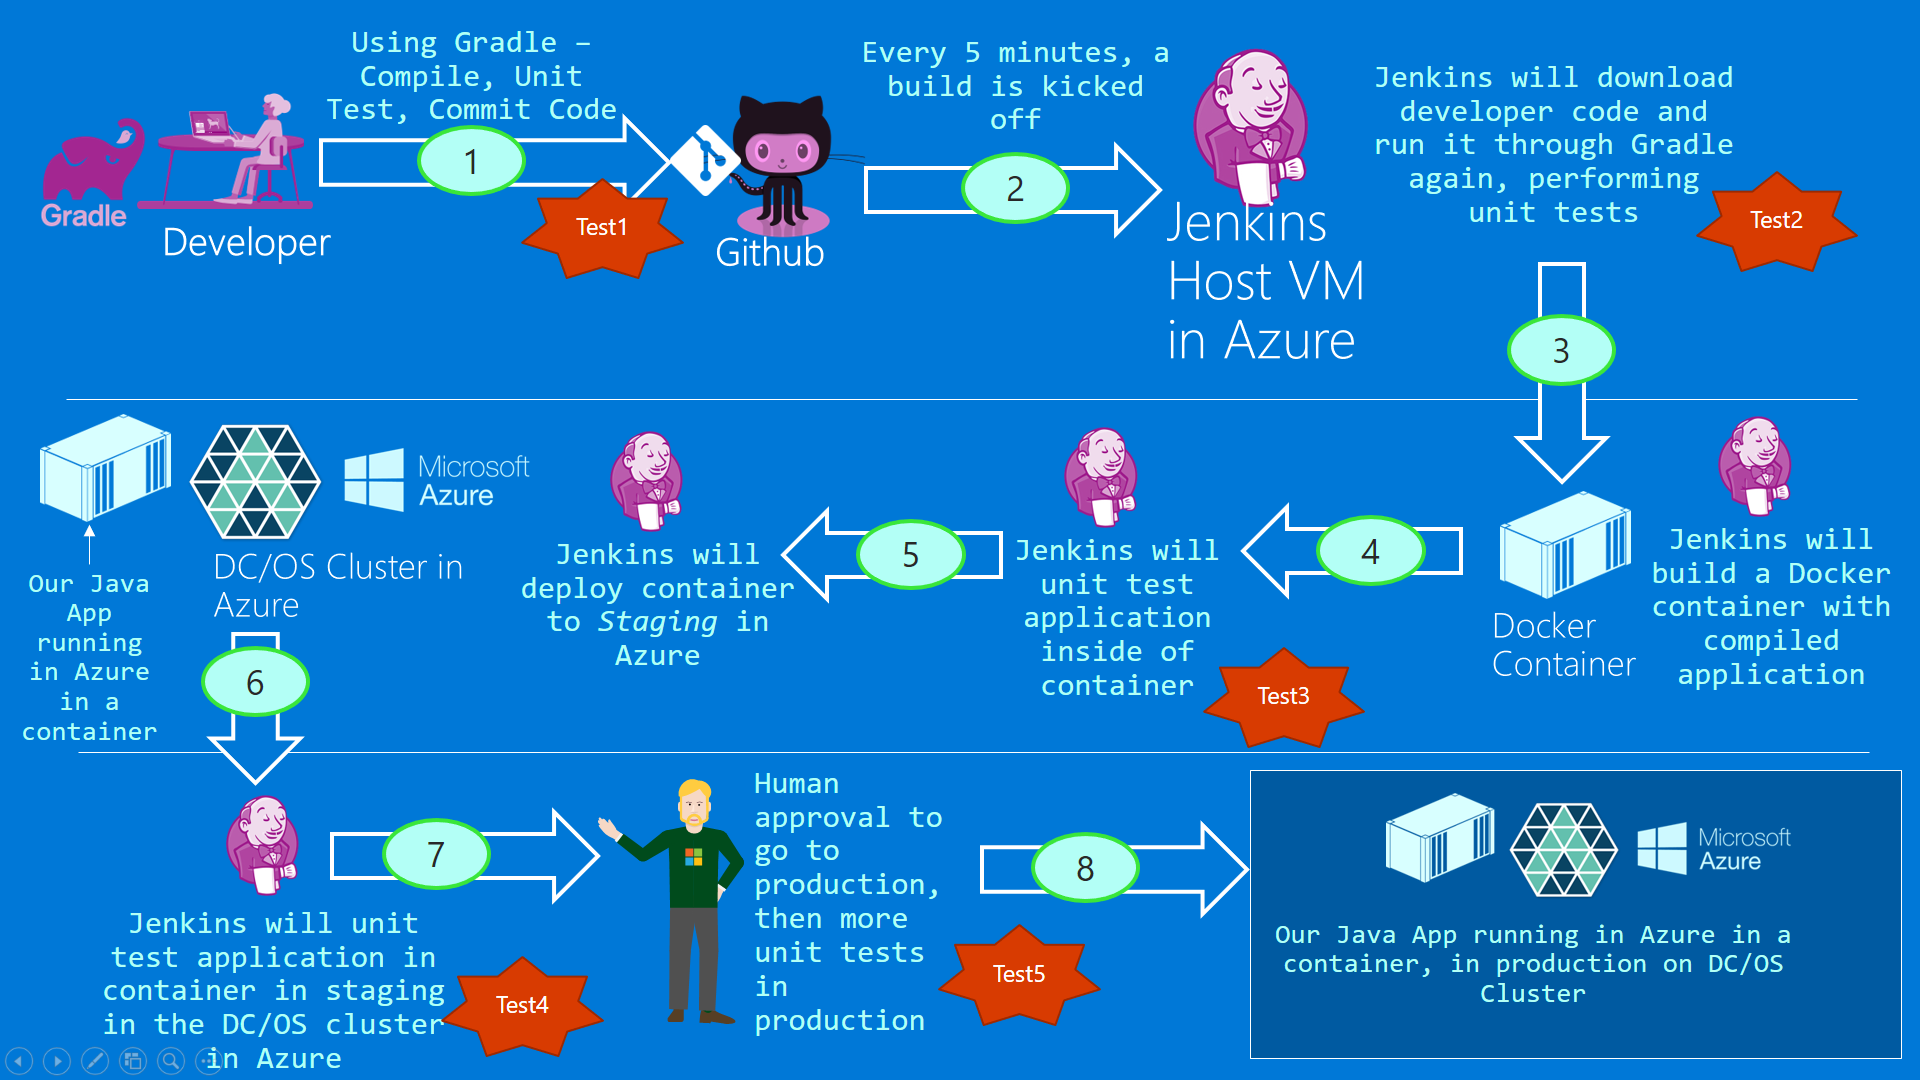
As we pass through step 4 we will now begin to think about testing the running container. This is a little bit tricky in that we first need to run the container, and then perform some HTTP requests upon it to verify that the appropriate return JSON string comes back.
Stopping the old container
But what if the old containers is still running? We need code to shut it down. We can use the "docker stop" command to do so.
The Unit Tests
Our unit tests hit an http endpoint and expect a JSON response with the string "Mesos" that ultimately comes from our MySQL Database.
So in truth, this is testing quite a few different components all working together. It's a great sanity check before actually running the container in the staging environment and doing yet more tests.
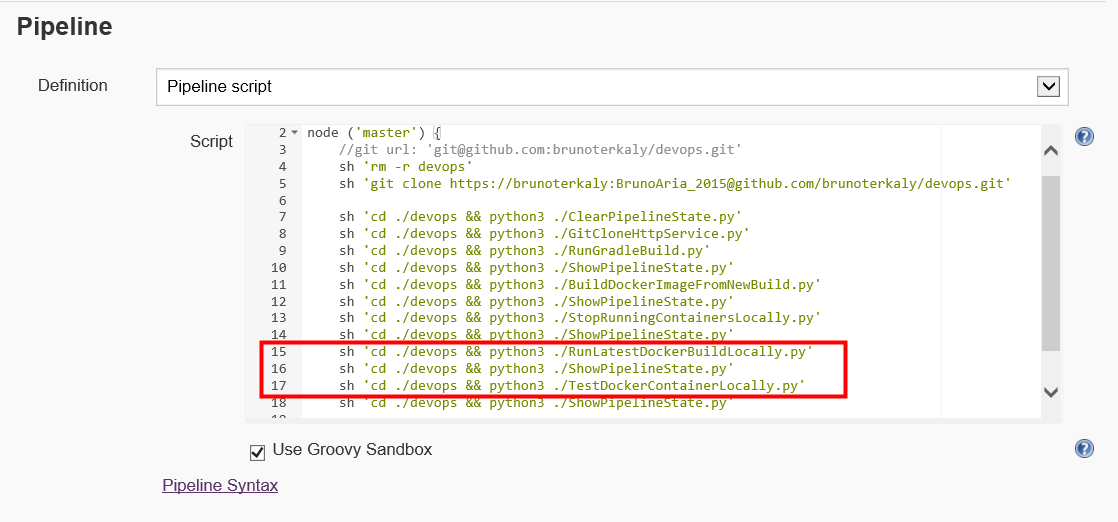
Figure 1: The big picture
Notice that on line 13 we begin the actual testing of our container. The test will take place on the Jenkins docker host.
Running the stopped container
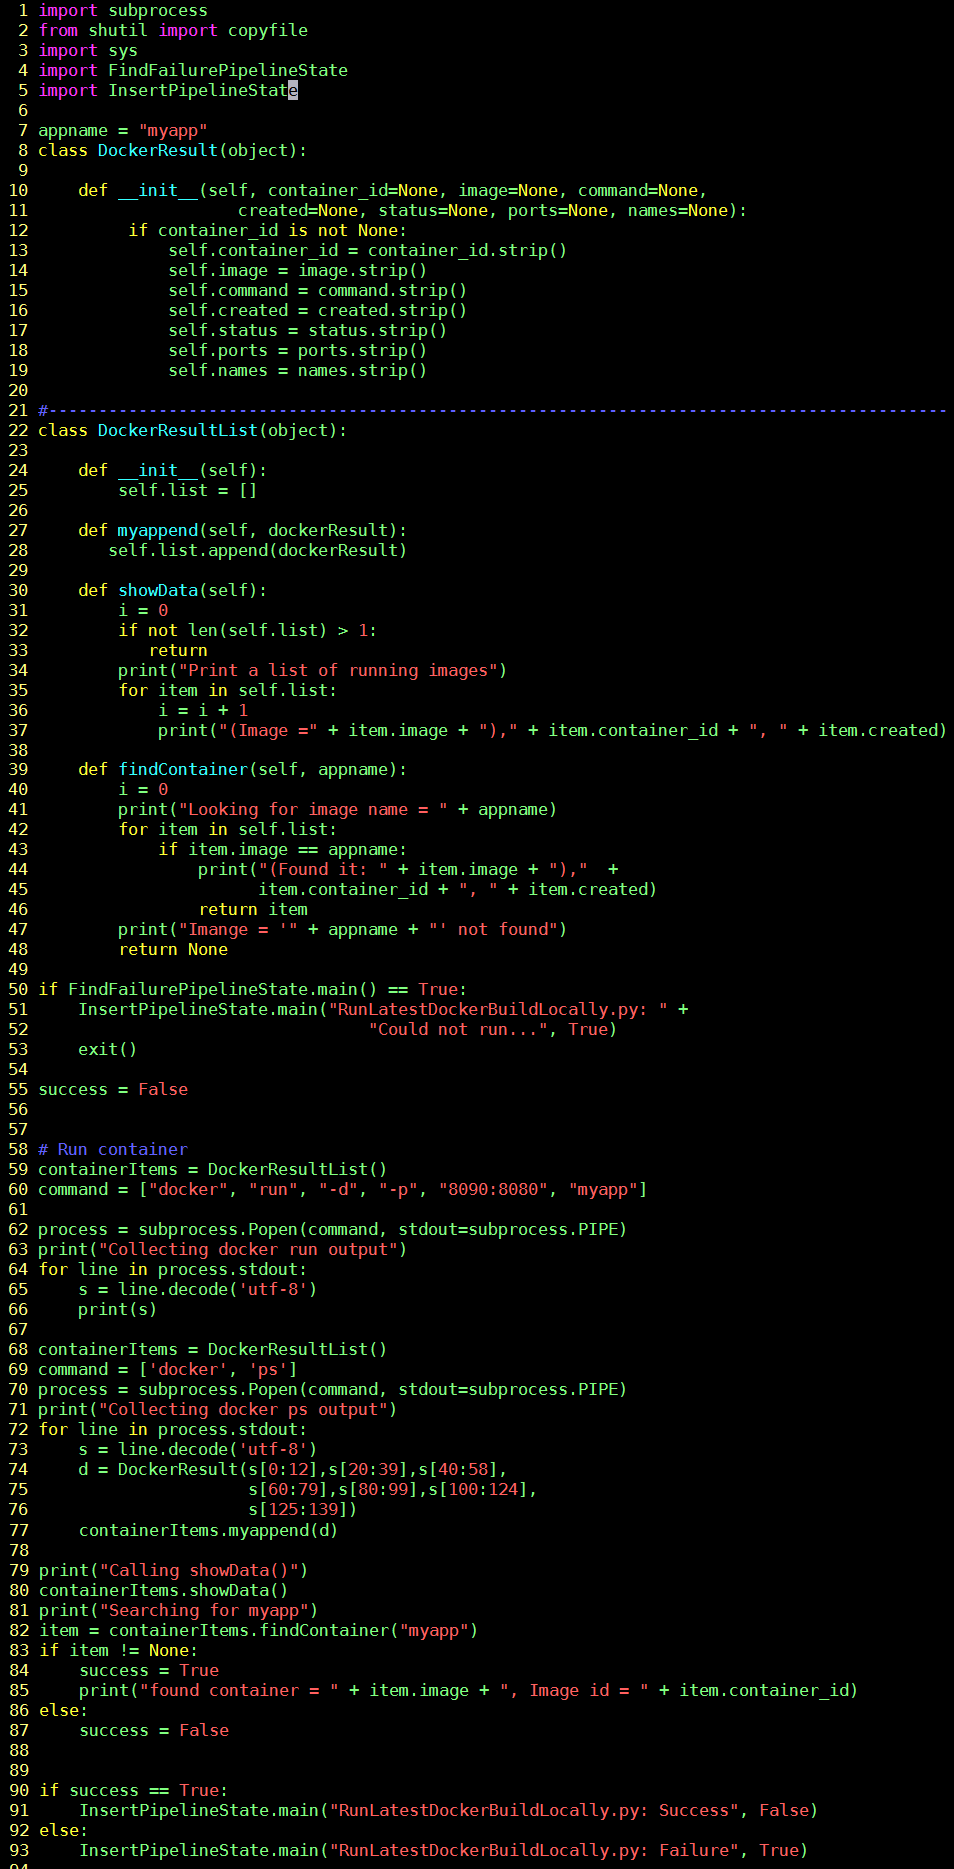
Here is some explanation of the code:
| Line(s) | Explanation |
| 10-48 | Two classes (explained in previous posts) that used to represent running containers. We need them to verify that our "docker run" command is working correctly here. |
| 59-60 | The syntax for our "docker run" command. Notice that we can connect through port 8090 from a browser. But we are really hitting our Java application (web-based) running in Tomcat that listening on port 8080. |
| 68-82 | Verify that the container is running. |
| 90-93 | The typical recording of state of the pipeline execution. |
Figure 2: RunLatestDockerBuildLocally.py
Let us run RunLatestDockerBuildLocally.py
We have already stopped the running container from the last post. It is time to run the new one.
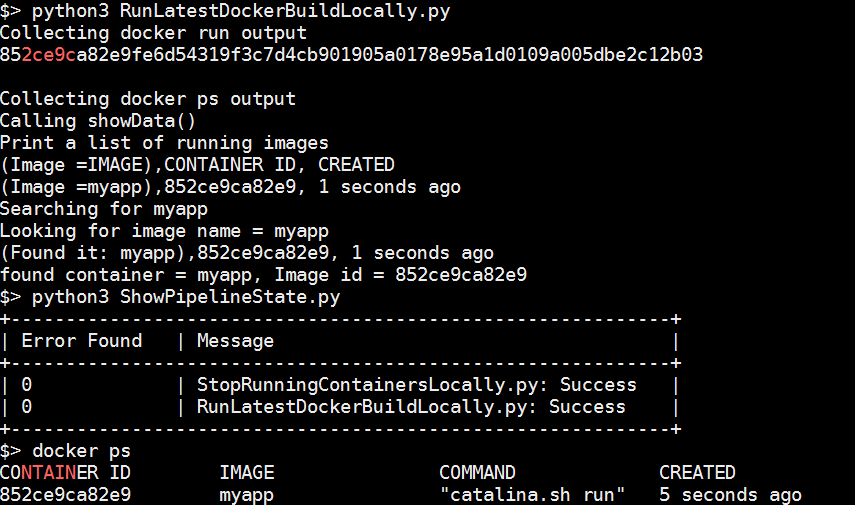
We can begin testing on the command line, outside of Jenkins. The command line is an easy way to test correct operation of our Python script before incorporating it into our pipeline.
Notice:
- We run RunLatestDockerBuildLocally.py
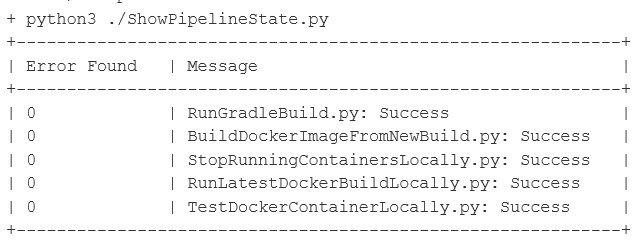
- We call ShowPipelineState.py to verify RunLatestDockerBuildLocally.py ran correctly
- We verify with a "docker ps" command
Verifying correct operation (again)
You can see that once we run our two Python scripts, the expected behavior results.
| python3 RunLatestDockerBuildLocally.py | Starts our container using myapp.war |
| python3 ShowPipelineState.py | Displays the messages table |
| docker ps | Proves that the container is running |
Figure 3: Validating RunLatestDockerBuildLocally.py
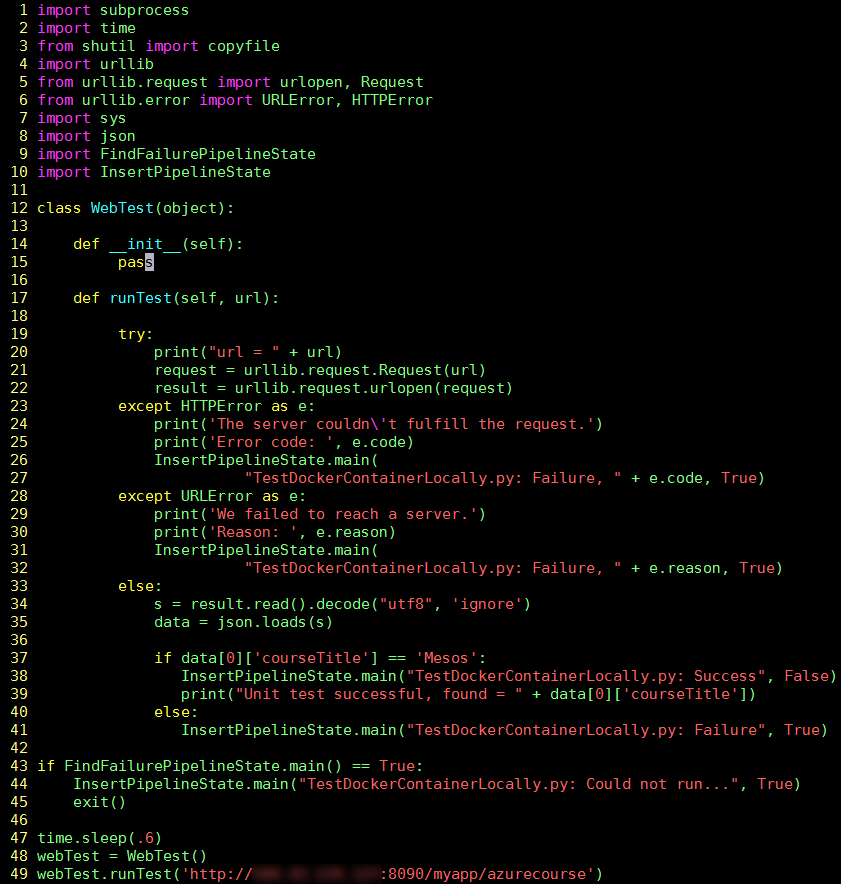
Let's review the code below:
TestDockerContainerLocally.py
| Lines | Explanation |
| 1-10 | A few new import statements were introduced. these packages helped with the execution of an HTTP request that we are using to test our service. In addition, we will parse the JSON data that comes back from our Java-based service running inside of our container. |
| 12-41 | The WebTest class that does our unit test using Python |
| 23-32 | Error trapping code in the event the Web server is not available or the container is not properly exposing our application. If an error is encountered, we store that in the database. |
| 34-41 | This is where we read the JSON response and parse it using a JSON library/package. Notice that on line 35 are looking for the magic string of "Mesos." InsertPipelineState is called appropriately throughout the script |
| 43-45 | This is the same courtesy and all of our scripts, to verify that an error has not occurred in a previous step. we abort the script if an error was found previously. |
| 47 | Needed for timing purposes, giving the previously executed docker run command a chance to start |
| 49 | This is the URL which allows us to test our running container. I omitted here is the public IP address of the virtual machine where the container is running. This is the Jenkins server running in Azure. You can get the public IP of a virtual machine running in Azure from the Azure portal. |
Figure 4: TestDockerContainerLocally.py
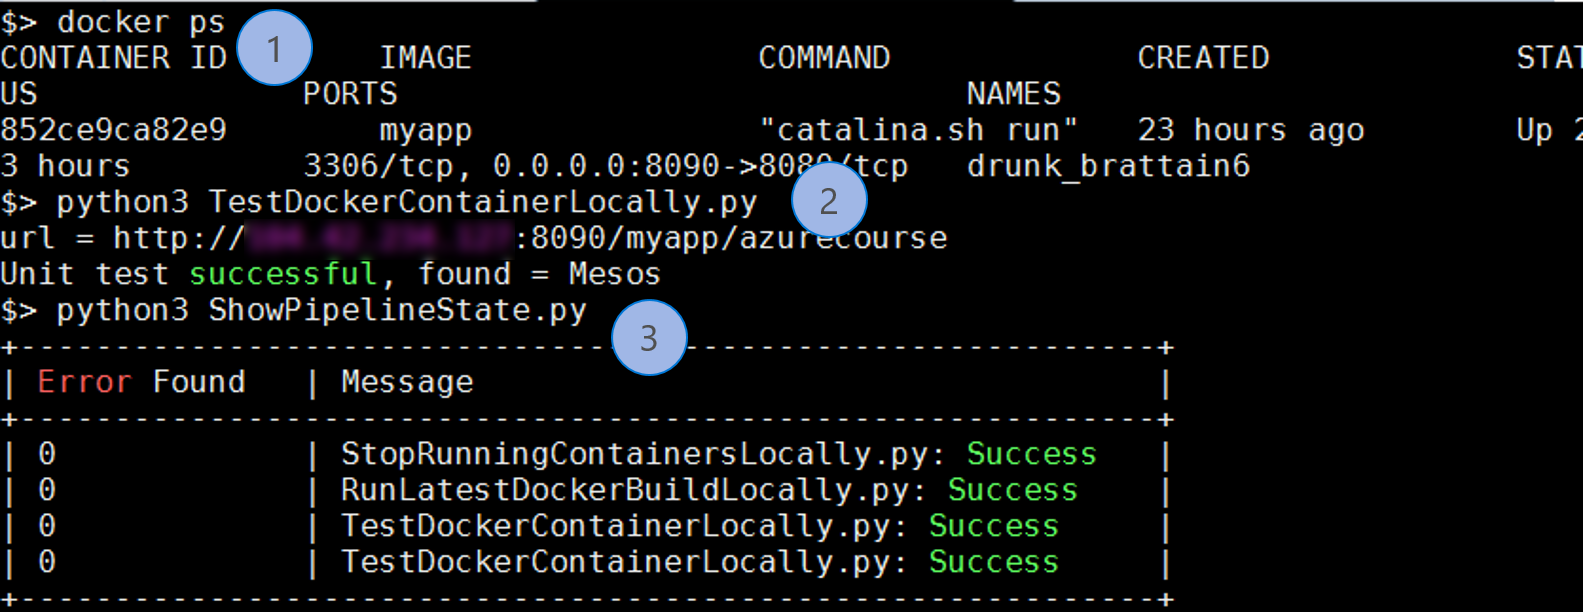
Testing everything
Notice the commands used to verify correct operation
| 1 | docker ps | Validate that container is running |
| 2 | python3 TestDockerContainerLocally.py | Verifying correct execution of unit test |
| 3 | python3 ShowPipelineState.py | Illustrate pipeline state is going well |
Figure 5: Testing our Unit Test
Conclusions
In this post we were looking to accomplish two tasks. The first task is to actually run our container, after making sure that the previous, old version was not running. Once we establish that our container was running, the next task was to actually run the unit test and verify correct operation.
