Step-By-Step: Securing a Xamarin app with Azure AD's Multi-factor Authentication
In a recent collaboration between PCL and Microsoft, the team came together to digitally transform a manual onboarding process for contractors at local jobsites. The current paper-based process, with its triplicate impact forms, meant high costs for PCL in both form printing and the manual input hours clocked by the PCL Human Resources team. Plans for the new digital system would increase efficiency in terms of data entry and analysis without compromising security of said data.
Along with the Xamarin development that occurred in digitalizing the paper-based onboarding form, PCL needed to ensure that the application would be locked once the form had been submitted -- and that it would block the modification of any data by unauthorized users. The solution proposed was to pause the application on a prompt and use Azure AD's Multi-factor Authentication (MFA) to allow a valid administrator account to unlock the application and return to the available jobs screen.
This post will run through steps on how to enable Azure AD MFA on an existing Azure AD deployment, enable MFA on a required user's account and how to inject JSON code into an application to initiate the call for MFA to submit information.
Step 1: Creating an Azure MFA Provider
- Login to the Azure portal as an administrator
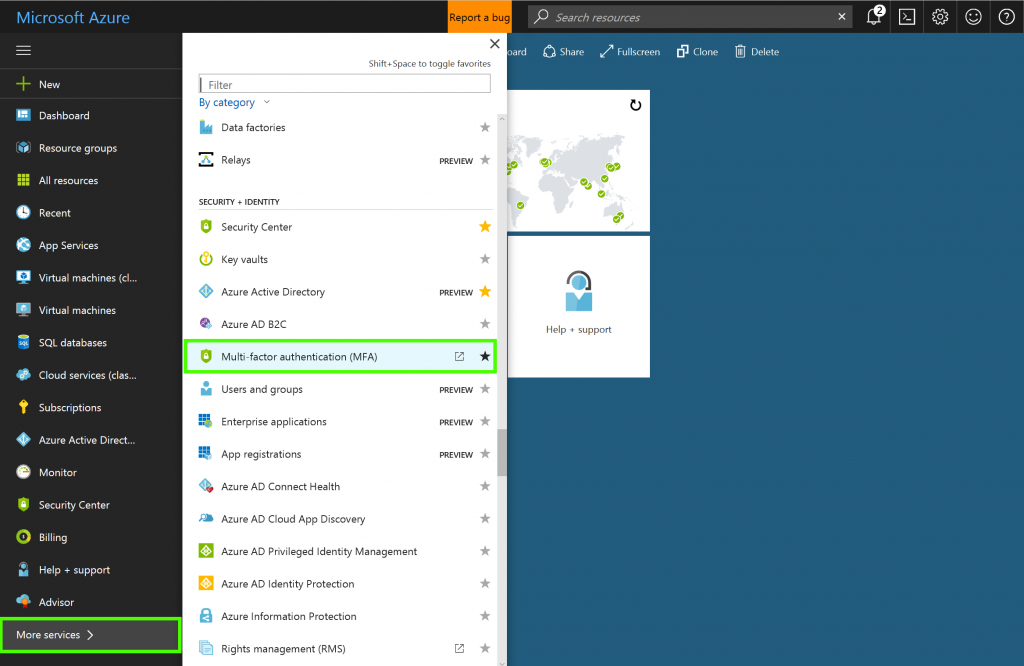
- In the left menu, select More services
- In the pop-up menu, scroll down to Security + Identity
- Select Multi-Factor Authentication (MFA)

- On the Active Directory page, select Create a new Multi-Factor Authentication provider
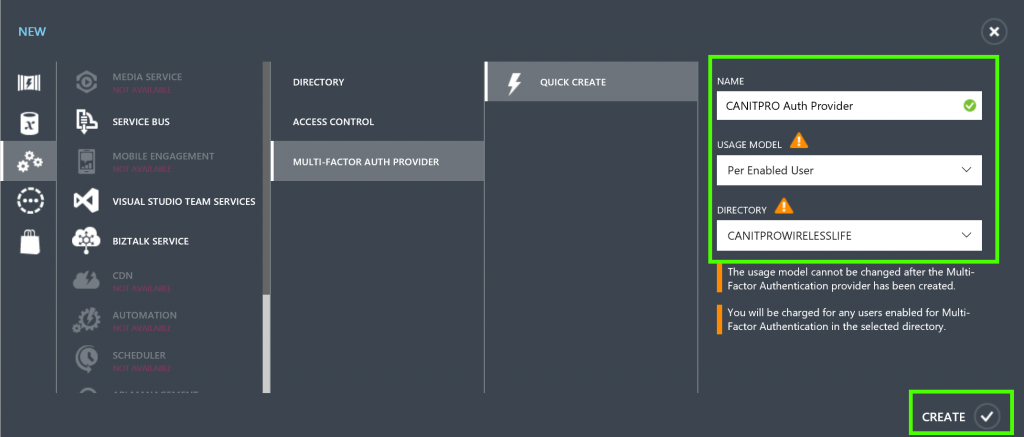
- Fill in the Name of the Multi-Factor Auth Provider
- Select the desired Usage Model
NOTE: Two Usage Models are available.
- Per Enabled User – used for employee access to apps such as Office 365. Choose this option if you have some users that are already licensed for Azure MFA.
- Per Authentication – used for scenarios that use Azure Multi-Factor Authentication in a consumer-facing application. - Select the desired Directory that the Azure Active Directory tenant will be associated to the Multi-Factor Authentication Provider
NOTE: Azure AD directory is not needed to create a Multi-Factor Auth Provider. If you are only planning to use the Azure MFA Server or SDK, leave the box blank. Azure AD Connect, AAD Sync, or DirSync are only a requirement if you are synchronizing your on-premises Active Directory environment with an Azure AD directory. The Multi-Factor Auth Provider must be associated with an Azure AD directory to take advantage of the advanced features.

- Click Create
Step 2: Enrolling a user into Azure MFA
Next step is to enroll the desired users with the Azure MFA provider now enabled. All users start out disabled and change to enabled when enrolled. Once enrolled, the user is forced to complete the MFA registration process.
- While in the Active Directory window, click Directory located at the top of the window
- Select the desired MFA enabled directory

- Select Manage Multi-Factor Auth located at the bottom of the window
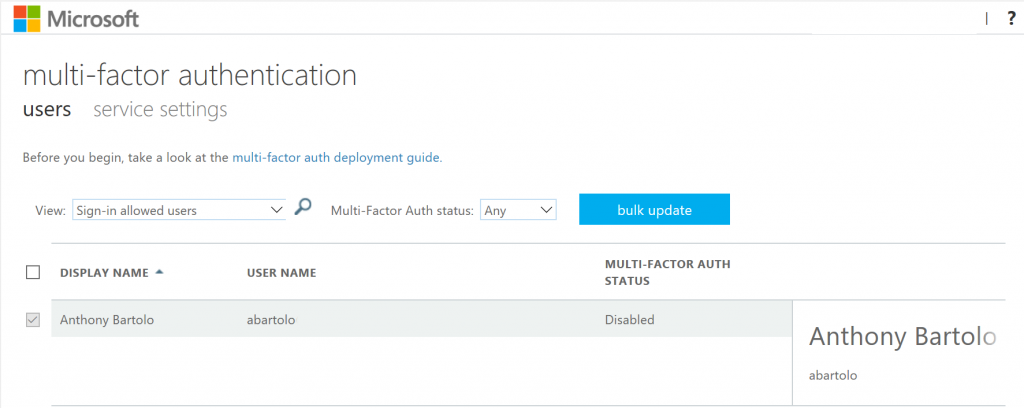
- In the Multi-Factor Authentication window, find and select the user that you want to enable for Azure MFA

- Check the box to the left of the user's name
- On the right select Enable located under quick steps
- Select enable multi-factor auth in the popup window
Once completed, MFA is now enabled for the desired user.
Step 3: Using JSON to envoke MFA completion for authentication
In PCL's case, once the team had solved the issues of data binding and connecting to the Azure Mobile Service, they moved on to the next technical challenge: securing the application during use. PCL needed to ensure that the application would be locked once the form had been submitted -- and that it would block the modification of any data by unauthorized users. With the steps above now completed, a simple request could be made to the MFA service with, for example, the administrator's cell phone number used for verification.
A simplified version of the code used looks something like this:
 private async Task<string> MakeRequest(string path)

{
       HttpClient httpClient = new HttpClient();
       Uri _uri = new Uri($"{_settings.MobileService}/{path}");
       httpClient.DefaultRequestHeaders.Add("ZUMO-API-VERSION", "2.0.0");
       //httpClient.DefaultRequestHeaders.Add("Content-Type", "application/json");

       var response = httpClient.GetAsync(_uri);
       var responseBody = await response.Result.Content.ReadAsStringAsync();

       if (response.Result.StatusCode == System.Net.HttpStatusCode.OK)

               return responseBody;

       else

               return null;

}
Azure Mobile App Services were used to allow the created Xamarin client a secure way to connect, authenticate and retrieve the data stored in PCL's existing database. Azure Mobile App Services handles authentication by connecting to PCL's existing Azure Active Directory and provides the client with data access to the Craft Services stream. The Mobile App Services backend also utilized multi-factor authentication APIs, providing a locking? mechanism for the app made available through PCL's Azure AD Premium subscription.