Backup Microsoft Azure Virtual Machines using Azure Backup Services
In my conversations with enterprises I’ve received a lot of requests to back up Microsoft Azure Virtual Machines (VMs) with no downtime from within Azure. Typically, backing up an Azure VM was done by running a script or backing up just the data. I have some exciting news, Azure Virtual Machines are now able to be backed up without downtime using Azure backup services.
Azure Virtual Machine Backup Features
Application-consistent backup of virtual machines Backup with no impact to production workloads
- No shut down of VM required
- Application level consistency for Windows OSes
- File system level consistency for Linux OSes
Fabric level backup unlimited scalability, with no customer resources required for backup
- Agentless backup of multiple VMs at the same time
- Single, central management interface through the Azure portal
- Detailed Jobs view for tracking progress and success/failure
Policy-driven backup and retention Configuration of scheduled backup
- On-demand backup
- Automatic management of recovery points within Azure Backup vault
- Retain backup data in Azure Backup vault even if the original VM is deleted
**
Source:
Let’s take a look at how the process works…
Walk-Through
Navigate to https://manage.windowsazure.com and log in. If you don’t have an Azure subscription you may register for a trial here: https://azure.microsoft.com/en-us/pricing/free-trial/
Create a new backup vault in the region where your VMs reside by selecting NEW --> DATA SERVICES --> RECOVERY SERVICES --> BACKUP VAULT --> QUICK CREATE:
When registering a backup vault you’ll need to select a storage replication option.
Note: Once virtual machines are protected the replication settings cannot be changed.
Registering Virtual Machines
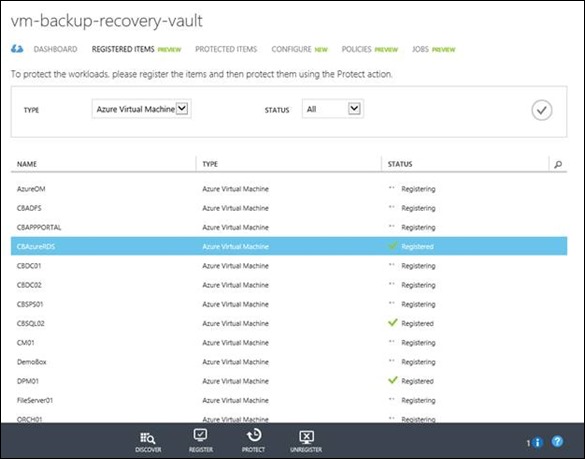
Now you’ll want to register VMs to be backed up:
Select from the list of VMs to register and select the check box on the bottom right of the page:
A few minutes later they all show as registered:
Select PROTECT at the bottom of the page:
Select one or more VMs to protect:
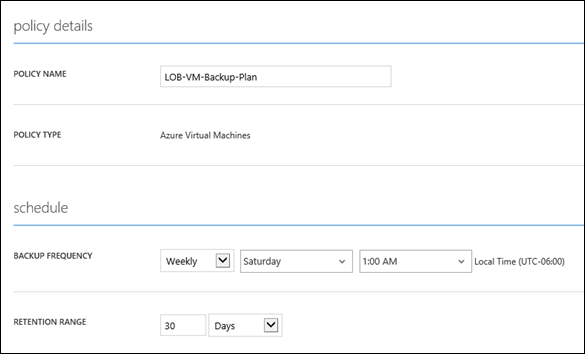
Create a backup policy or add to an existing policy:
Viewing Protected Items
Select PROTECTED ITEMS at the top of the page:
Search for Azure Virtual Machine
If you don’t want to wait for the scheduled backup at the bottom of the page you can select BACKUP NOW to create an immediate backup job:
On the BACKUP DETAILS page you’ll see information regarding the last backup:
On the BACK POLICY page you’ll see details about the backup policy previously configured:
Conclusion
Backing up Azure Virtual Machines is simple, fast, and agentless. Begin protecting your Azure VMs today by using Azure Backup Services.


