The XNA Role Playing Game Starter Kit
In my spare time I’ve been looking at the C#code for the XNA Role Playing Game starter kit. This kit is not new, but I’m interested in Role Playing Games (RPGs), so I thought I’d keep some notes on what I’m learning as I play with it. Though not especially fancy, I like this code as it represents something that a developer with intermediate level skills can pick up without too much effort. It would be fun to write the next Fallout or WarCraft during my spare time on the weekend, but since my resources and patience are limited I thought it might be more rewarding to work on a simpler project.
The starter kit comes as an MSI installable package. It adds a new template into Visual Studio, making it possible for you to choose File | New | Role Playing Game from the menu. This one step process initiates the creation of a new solution containing the source for a complete tile-based role playing game. In Figure 1 you can see the Solution Explorer and Class View for the created project. By viewing this screen shot you can get some sense of what is available inside the start kit. Obviously this is a fairly extensive bit of source code with lots of logic for you to digest and learn from, especially if you are new to game development.

Figure 1: Class View and the Solution Explore for the XNA Role Playing Starter Kit.
The Tile Engine
The kit features a simple tile engine written in C# which supports several layers. The first layer allows you to define a basic landscape or the interior of a building. A second layer allows you to decorate it with trees, chairs, or other objects. A third layer contains your sprites, and a fourth layer defines the boundaries inside which the sprites can move.
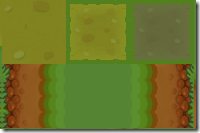
As is usually the case with tile engines, this code base allows you to work with a series of two dimensional numerical arrays, each of which contain simple integers defining offsets into a set of tiled bit maps. For instance, if you stare hard enough at Figure 2, you can see that it can be broken out into six separate “tiles”, three on the top, and three on the bottom, where the middle tile on the bottom row looks a bit like grass.

Figure 2: A tiny excerpt from the tile map used in the starter kit.
If you mentally assigned numbers to the tiles in the bitmap then you could use these digits as names for each of the six tiles in this source bitmap. The numbers 1, 2 and 3 would range across the top row, and 4, 5 and 6 across the bottom row. You can now create a two dimensional array like this which would represents offsets into the tiles:
4 5 5 6
4 5 5 6
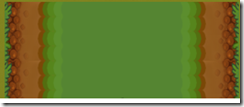
The tile engine then reads the array, calculates the offsets into the source bitmap, and blits out the tiles designated into a final map, as shown in Figure 3. Here you see the two outermost tiles on the bottom row of the source bitmap, plus the center tile on the bottom row repeated twice. None of the tiles on the top row of the source tile map are used in this example.
Figure 3: A small world map created from calculating offsets into the tiles seen in the second row of Figure 2.
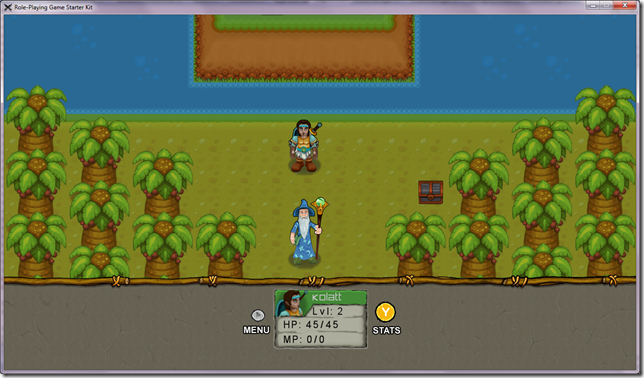
If you have a larger source and destination tile map, a larger array, and a larger world map with multiple layers, then you can create entire landscapes inhabited by characters, such as the one shown in Figure 4. This screen shot is taken from the world map used in the starter kit. The water and land are defined by the bottom array in the tile engine, the trees are defined in the second layer, and the two characters are defined in the third layer. The fourth layer is used to ensure that characters are not able to walk out onto the water. In short, the fourth layer defines boundaries for the movement of sprites in the game.
Figure 4: The playing screen from the starter kit. Click the screen shot to see a full size image.
Of course, this is a two dimensional tile map, and not a 3D engine. If you want a 3D engine, XNA can support one, and there are starter kits and many game engines that can help you get started. However, if you just want to hack around a bit without burning up the midnight oil, your career, your marriage, and the best years of your life, a 2D engine is both convenient and practical.
The tile engine and other tools from the starter kit are reasonably well designed and fairly modular. If you develop an urge to do so, you should have little trouble stripping them out of this game and putting them to use in your own custom projects. Additionally, they provide examples of best practices, so studying them may be a productive exercise. You might find this true even if you want to create a very different game driven by a 3D engine.
Questions about licensing issues should be addressed to the XNA team, but I’ll express some muted optimism here because the starter kit is released under the MSPL, and because the team explains at some length how to use the code in your own projects. In particular, the XNA team provides additional information about reusing the tile engine in your own game. I suggest you read through all the text on the tile engine, as it provides useful information about the structure of the RPG Starter Kit.
The Quest Engine
Another important feature of the game is the quest engine. role playing games generally feature a series of tasks that the player is expected to complete. For instance, in many RPGs one might have to crawl through a dungeon and find a jewel, or go to war against a series of trolls that have taken over a house. When you have completed the task, you generally report back to some non-playing character (NPC) who gives you a reward for completing the job. When you have finished all the tasks supplied with the game, then a screen comes up with lots of flashing graphics, and you are told that you have won. Why I find it enjoyable to do this I have no idea, but my experience is that many people, including myself, are drawn to this kind of experience.
The XNA RPG Starter Kit comes with C# code demonstrating how to construct a quest engine. The engine is driven by a series of XML files. By manipulating the text in these files you can modify existing quests and add new quests. This means that there is a rough separation of the data, which is stored in the XML files, and the actions, which are written in C#. At least in theory, you need never change the C# code, all you need do is modify the XML. This kind of design is a best practice, and one that developers can learn from – if you haven’t already implemented a similar scheme in your own code. (Note that the two dimensional arrays defined in the tile engine provide a similar functionality for that code base. Clearly the developers of this starter kit believe in separating data and code.)
Here is information on how to use the quest engine. It is a simple tutorial you can complete in about 20 or 30 minutes. In it you learn how to modify quests, and how to create your own quests.
Acquiring the Starting Kit
The downloads for the RGP Starter Kit are broken out into versions for XNA Game Studio 2.0 and 3.0. There is also a distinction between code that targets Windows and code for the XBox:
- For XNA Game Studio 3.0 Windows
- For XNA Game Studio 3.0 XBox 360
- For XNA Game Studio 2.0 Windows
- For XNA Game Studio 2.0 XBox 360
Here are some additional links
- Home page and some documentation for the starter kit.
- Forum thread for discussing the kit.
- Information on the quest engine.
- Information the the tile engine.
Here is the documentation for the Microsoft Cross Platform Audio Creation Tool (XACT). I’ll try to find time to describe it in a future article, as the music included with this game should come with warnings about its potential affect on your mental health. It turns out to be very easy to take MP3s of your favorite music and add them to the game so that you can tinker in peace.
Summary
The rains will be settling in here in Redmond in just a few more weeks. As we contemplate the coming of winter, its nice to prepare a little something to do to wile away a peaceful, but wet, Saturday afternoon. Tinkering with the source for a game is one rewarding option. In this post I’ve accomplished almost nothing that I set out to do, but I have managed to introduce the XNA RPG Starter kit. Hopefully I can find time to come back and explore some of the modifications I’ve been making to the kit, and to explain a little about how it works and what useful lessons we might learn from it.
Comments
Anonymous
September 27, 2009
Nice, but pointless if there is no PS3 cross compatibility version. I mean, who would bother learning how to develop code just for one obsolete platform?Anonymous
October 02, 2009
It was great to read your write-up on this. I just downloaded this recently and was having a similar sense of things. It may be simple, but it is well done and complete. I am looking forward to customizing it with my kids and perhaps starting something fun on my own. Cheers, BrettAnonymous
October 09, 2009
Thank you for this much needed article on the RPG starter kit - both because it aggregates all the existing key resources and because it puts some of the more esoteric elements (for real beginners) in easy to understand terms - in particular the tile engine. Thumbs up and thanks again. Here is looking forward to some much-needed catalog in the indie RPG genre for XBLA.Anonymous
November 16, 2009
The comment has been removedAnonymous
September 24, 2012
Hey Joe, Xbox is a much larger platform than ps3 and the xna platform is used to develop all those great indie games on the marketplace. It is a suggested platform for people who want to begin game programming.Anonymous
January 16, 2013
Xbox is a product of Microsoft, PS3 is Sony's. That's why there is no cross-platform for the latter.Anonymous
March 19, 2014
I hate to kick a dead horse here, but speaking of obsolete platforms, the PS4 is out, and guess what's obsolete now by anyone's standard? Hmm? Hmmmm?

