Building the ASP.net Core Razor Pages site – CORS tutorial
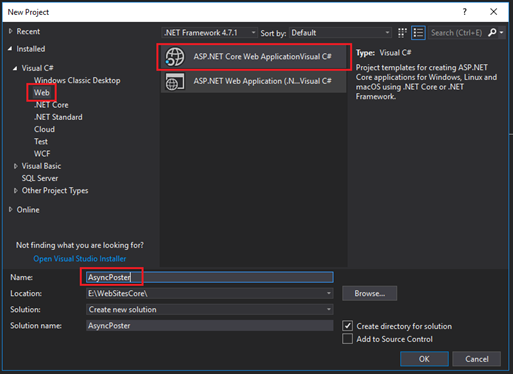
In this part of the tutorial on CORS and ASP.net Core, we will create the front end application. Using Visual Studio 2017, I have selected to create a new Project. Inside the New Project dialog box, select the Web category, and then select the ASP.net Core Web Application template as show below:

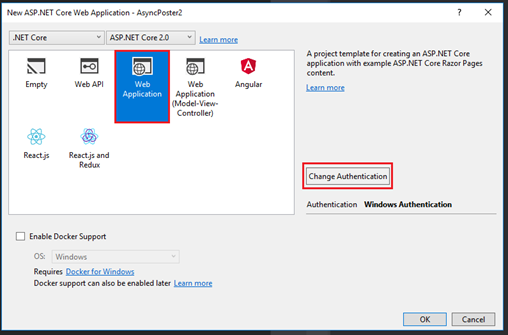
In the next step of the Wizard, select the 'Web Application' template, change the authentication type to 'Windows Integrated' by pressing the 'Change Authentication' button on the right hand side. Once you are done, Visual Studio will do the rest.

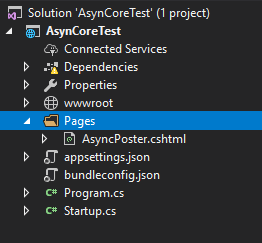
Once the solution is generated, you can proceed and delete all the files that are found underneath the 'Pages' folder since we will not be using the for this tutorial. Create a new Razor Page and call the page AsycnPoster.cshtml as shown below:

Now, for the code of the page. The first thing we want the page to do is print out the time and date it was generated on. If you are familiar with Razor syntax from MVC, this is very straight forwards:
@page
@model AsynCoreTest.Pages.AsyncPosterModel @{
Layout = null;
} <!DOCTYPE html> <html> <head> <meta name="viewport" content="width=device-width" /> <title>AsyncPoster</title> </head> <body> <h1>Razor Page to echo back text</h1> <p><strong>The time on geeration of the page is:</strong>
@DateTime.Now.ToLongTimeString()</p> <p>Page generation date was: @DateTime.Now.ToLongDateString()</p>
<hr/> <strong>Text to echo back:</strong> <br/> <textarea id="txtInputArea" rows="5" cols="60"></textarea> <br /> <br /> <button id="btnAsyncPost">Echo Text</button> <br /> <br /> <div style="display:none"> <hr /> <div id="displayDiv"></div> </div>
@section Scripts {
@{await Html.RenderPartialAsync("_ValidationScriptsPartial");} } </body> </html>
The calls to DateTime.Now (highlighted here in gray) will help us print the exact time and date when the page was executed.
This was the easy part. We will now add a script tag to include JQuery (which is already in the www folder for the solution) and then a second script tag that will allow the page to capture the text that was input by the user in the text area. These tags will be added just before the call to @section, at the bottom of the page, so the loading of the script tags does not block the rendering of the page in the browser.
<script src="~/lib/jquery/dist/jquery.js"></script>
<script>
$(document).ready(function () {
$("#btnAsyncPost").click( function () {
//call function to perform ajax postback to web-api
ajaxEchoText();
});
});
</script>
The second tag uses the JQuery document ready function to select the button control by its ID (btnAsyncPost) and the attach a callback function to its click event. Each time the button's click even is raised, a call back function will execute a call to a JavaScript function called ajaxEchoText(). Here is the code for this function:
function ajaxEchoText() {
//attempt to select the textarea control using jquery
var textArea = $("#txtInputArea");
//also select the div where the echoed text should be placed
var displayDiv = $("#displayDiv");
var jsonTextEcho = {
echoText: textArea.val()
}
$.ajax({
url: "https://CoreWebAPI/api/EchoCors",
type: "POST",
contentType: "application/json",
dataType: 'json',
xhrFields: {
withCredentials: true
},
data: JSON.stringify(jsonTextEcho),
success: function (data, textStatus, jqXHR) {
//display the parent div that encapsulates the displayDiv
displayDiv.parent("div").show();
//set the innerHtml of the target div to the data coming back from the controller
displayDiv.html("<strong>Posted Text:</strong><br/>" + data);
//finally, clear the textarea of the text
textArea.val('');
},
error: function (jqXHR, textStatus, errorThrown) {
//if nothing else clear the textarea
textArea.val('');
//hide any results previously echoed
displayDiv.parent("div").hide();
}
});
}
This function is quite long, but should be fairly simple to understand. It will first use JQuery to select the textarea control and the div which will be used to display the result (called displayDiv) by their respective IDs. It will then create an object (called jsonTextEcho) which will have one member property called 'echoText' and will set the value of this member to the value of the text area's content – by calling textArea.val().
Then comes the interesting part. We will use the JQuery ajax function to create a POST request to the backend WebAPI controller. In this function, we specify the URL of the WebAPI controller: https://CoreWebAPI/api/EchoCors. We will also specify the type of request: POST, as we as the content type of what we are sending to the server ('application/json') and the data type of 'json'. Without these settings, the POST request will not have the correct content type set, and will result in the controller returning a 415 status code – indicating that the 'content type is not supported'. By default, WebAPI controllers in ASP.net Core expect to receive JSON data. You can read more about content negotiation in ASP.net Core here: /en-us/aspnet/core/mvc/models/formatting.
The next field is equally important: xhrFields. This indicates to the JavaScript engine to expect to do authentication when the request is sent off to the backend WebApi controller. Without the withCredentials: true line of code, the request will fail if the backend WebApi controller is doing authentication.
Finally, the data: parameter will receive the jSonEchoText object we have created, and will be serialized into JSON format by calling the JSON.stringify() method.
The rest of the function call indicates what the code should execute in case of a successful request or in case of a failure. In case of success (success: tag), the code will proceed to select the parent div of the div element that is used to display the text. If you review the markup, this div has a style attribute setting 'display: none', so that the entire ensemble is hidden while there is no text to display from the backend. Once the parent div is selected, we can make the ensemble be visible by calling the show() method.
The code continues execution by setting the value of the div that displays the text (div element with id='displayDiv'). It will concatenate some HTML text for the header of the display area with the 'data' parameter that we receive back from the AJAX POST request in case of success. Finally, the value of the text area is set to 'empty' as to delete the previously entered text.
In case of failure, the code simply resets the value of the text entered in the text area and proceeds to hide the parent div element of the 'displayDiv'.
The final complete code for the page is listed below:
@page
@model AsynCoreTest.Pages.AsyncPosterModel @{
Layout = null;
} <!DOCTYPE html> <html> <head>
<meta name="viewport" content="width=device-width" />
<title>AsyncPoster</title> </head> <body> <h1>Razor Page to echo back text</h1> <p><strong>The time on geeration of the page is:</strong>
@DateTime.Now.ToLongTimeString()</p>
<p>Page generation date was: @DateTime.Now.ToLongDateString()</p> <hr /> <strong>Text to echo back:</strong>
<br /> <textarea id="txtInputArea" rows="5" cols="60"> </textarea> <br />
<br />
<button id="btnAsyncPost">Echo Text</button> <br />
<br />
<div style="display:none">
<hr /> <div id="displayDiv"></div>
</div> <script src="~/lib/jquery/dist/jquery.js"></script> <script> function ajaxEchoText() {
//attempt to select the textarea control using jquery
var textArea = $("#txtInputArea");
//also select the div where the echoed text should be placed
var displayDiv = $("#displayDiv");
var jsonTextEcho =
{
echoText: textArea.val()
}
$.ajax({
url: "https://CoreWebAPI/api/EchoCors",
type: "POST",
contentType: "application/json",
dataType: 'json',
xhrFields: {
withCredentials: true
},
data: JSON.stringify(jsonTextEcho),
success: function (data, textStatus, jqXHR) {
//display the parent div that encapsulates the displayDiv
displayDiv.parent("div").show();
//set the innerHtml of the target div to the data coming back from the controller
displayDiv.html("<strong>Posted Text:</strong><br/>" + data);
//finally, clear the textarea of the text
textArea.val('');
},
error: function (jqXHR, textStatus, errorThrown) {
//if nothing else clear the textarea
textArea.val('');
//hide any results previously echoed
displayDiv.parent("div").hide();
}
});
}
$(document).ready(function () {
$("#btnAsyncPost").click( function () {
//call function to perform ajax postback to web-api
ajaxEchoText();
});
});
</script> @section Scripts {
@{await Html.RenderPartialAsync("_ValidationScriptsPartial");} }
</body> </html>
Publishing the website to IIS is the following the following documentation: /en-us/aspnet/core/publishing/iis?tabs=aspnetcore2x .
Proceed to the next article in the series ->
By Paul Cociuba https://linqto.me/about/pcociuba
Comments
- Anonymous
November 24, 2017
Congratulations on the article!- Anonymous
November 27, 2017
Thank you Rafael. Very happy to have been of service.Paul
- Anonymous