Possible to Transit Traffic through Dynamic Gateway of Azure Virtual Network?
One of my customer give me this scenario:
- Customer have three sites and they plan to use Azure IaaS
- There is no WAN/VPN between their sites
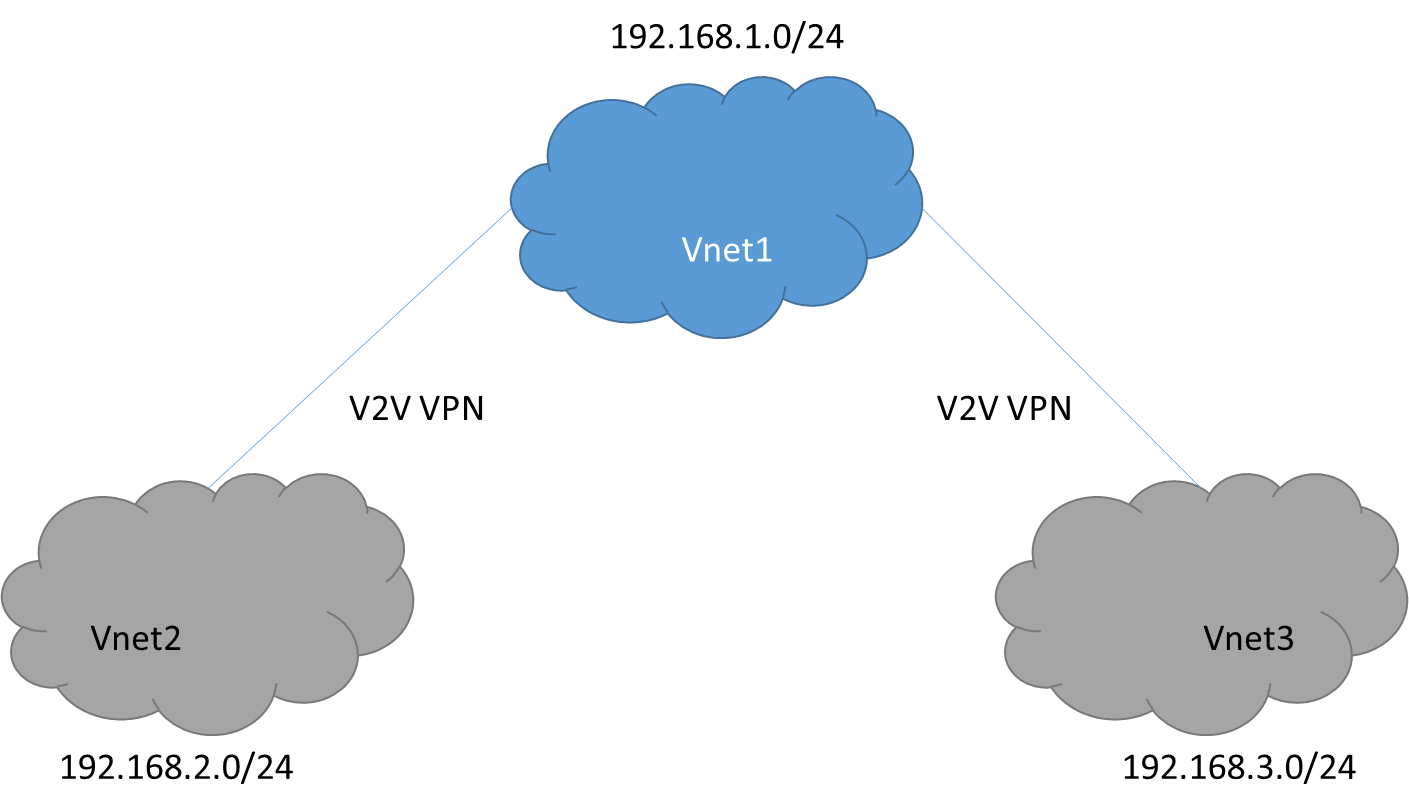
- They want to leverage Azure Site-to-Site VPN with following architecture
But their intention is: They want to leverage the Dynamic Gateway on Azure to establish the network connection between sites. That is the machine in Site A can visit the machine in Site B and Site C….etc
If you have tried this architecture before, you will find it will not just happen. Also, in our Virtual Network FAQ, you will find:
It seems like the only way is to establish the Site-to-Site VPN between customer’s sites. But wait, you see a hope from the FAQ:
You see that although it’s not recommended, you can configure NETCFG to achieve their target. But how? That is this article talking about:
First, let me introduce my LAB environment:
- I create 3 Virtual Network on Azure, and simulate Vnet2 as Site A; Vnet3 as Site B
- Vnet1’s IP range is 192.168.1.0/24. Vnet2’s IP Range is 192.168.2.0/24. Vnet3’s IP Range is 192.168.3.0/24.
- I establish Vnet-to-Vnet VPN between Vnet1 and Vnet2; Vnet1 and Vnet3. Please note there is NO VPN connection between Vnet2 and Vnet3.
For Vnet-to-Vnet configuration, you could check for detail steps: https://msdn.microsoft.com/en-us/library/azure/dn690122.aspx
But there are few things need to take care.
- For the routing setting, our intention is to leverage Dynamic Gateway. So the relationship will be like this:
|
192.168.1.0/24 |
192.168.2.0/24 |
192.168.3.0/24 |
Vnet1 |
Itself |
Vnet2 |
Vnet3 |
Vnet2 |
Vnet1 |
Itself |
Vnet1 |
Vnet3 |
Vnet1 |
Vnet1 |
Itself |
For Vnet1, it will route 192.168.2.0/24 to Vnet2 and 192.168.3.0/24 to Vnet3.
For Vnet2, it will route 192.168.1.0/24 and 192.168.3.0/24 to Vnet1.
For Vnet3, it will route 192.168.1.0/24 and 192.168.2.0/24 to Vnet1.
Therefore, the local network setting in virtual network will be
We will assign Local Network Vnet2 and Local Network Vnet3 to Virtual Network Vnet1.
We will assign Local Network Vnet13 to Virtual Network Vnet2.
We will assign Local Network Vnet12 to Virtual Network Vnet3.
2. We use NETCFG to change the network configuration rather than GUI. Please export NETCFG from Azure Management Portal. You will get a file name “NetworkConfig.xml”. Here, I suppose you should already complete the gateway creation and local network setup before export.

3. Open NetworkConfig.xml with Notepad. You will find some information from my example. The Green part is the local network configuration. It should be already there if you complete the previous steps. The Red part is the gateway configuration. You need to manual insert the configuration.
<NetworkConfiguration xmlns:xsd="https://www.w3.org/2001/XMLSchema" xmlns:xsi="https://www.w3.org/2001/XMLSchema-instance" xmlns="https://schemas.microsoft.com/ServiceHosting/2011/07/NetworkConfiguration">
<VirtualNetworkConfiguration>
<Dns>
<DnsServers>
<DnsServer name="DNS1" IPAddress="192.168.1.21" />
<DnsServer name="DNS2" IPAddress="192.168.2.31" />
<DnsServer name="DNS3" IPAddress="192.168.3.31" />
</DnsServers>
</Dns>
<LocalNetworkSites>
<LocalNetworkSite name="Vnet12">
<AddressSpace>
<AddressPrefix>192.168.1.0/24</AddressPrefix>
<AddressPrefix>192.168.2.0/24</AddressPrefix>
</AddressSpace>
<VPNGatewayAddress>191.234.22.183</VPNGatewayAddress>
</LocalNetworkSite>
<LocalNetworkSite name="Vnet13">
<AddressSpace>
<AddressPrefix>192.168.1.0/24</AddressPrefix>
<AddressPrefix>192.168.3.0/24</AddressPrefix>
</AddressSpace>
<VPNGatewayAddress>191.234.22.183</VPNGatewayAddress>
</LocalNetworkSite>
<LocalNetworkSite name="Vnet2">
<AddressSpace>
<AddressPrefix>192.168.2.0/24</AddressPrefix>
</AddressSpace>
<VPNGatewayAddress>104.46.234.89</VPNGatewayAddress>
</LocalNetworkSite>
<LocalNetworkSite name="Vnet3">
<AddressSpace>
<AddressPrefix>192.168.3.0/24</AddressPrefix>
</AddressSpace>
<VPNGatewayAddress>104.41.179.89</VPNGatewayAddress>
</LocalNetworkSite>
</LocalNetworkSites>
<VirtualNetworkSites>
<VirtualNetworkSite name="Vnet1" Location="East Asia">
<AddressSpace>
<AddressPrefix>192.168.1.0/24</AddressPrefix>
</AddressSpace>
<Subnets>
<Subnet name="Subnet-1">
<AddressPrefix>192.168.1.0/27</AddressPrefix>
</Subnet>
<Subnet name="GatewaySubnet">
<AddressPrefix>192.168.1.32/29</AddressPrefix>
</Subnet>
</Subnets>
<DnsServersRef>
<DnsServerRef name="DNS1" />
</DnsServersRef>
<Gateway>
<ConnectionsToLocalNetwork>
<LocalNetworkSiteRef name="Vnet2">
<Connection type="IPsec" />
</LocalNetworkSiteRef>
<LocalNetworkSiteRef name="Vnet3">
<Connection type="IPsec" />
</LocalNetworkSiteRef>
</ConnectionsToLocalNetwork>
</Gateway>
</VirtualNetworkSite>
<VirtualNetworkSite name="VNet2" Location="Japan West">
<AddressSpace>
<AddressPrefix>192.168.2.0/24</AddressPrefix>
</AddressSpace>
<Subnets>
<Subnet name="Subnet-1">
<AddressPrefix>192.168.2.0/27</AddressPrefix>
</Subnet>
<Subnet name="GatewaySubnet">
<AddressPrefix>192.168.2.32/29</AddressPrefix>
</Subnet>
</Subnets>
<DnsServersRef>
<DnsServerRef name="DNS2" />
</DnsServersRef>
<Gateway>
<ConnectionsToLocalNetwork>
<LocalNetworkSiteRef name="Vnet13">
<Connection type="IPsec" />
</LocalNetworkSiteRef>
</ConnectionsToLocalNetwork>
</Gateway>
</VirtualNetworkSite>
<VirtualNetworkSite name="VNet3" Location="Japan East">
<AddressSpace>
<AddressPrefix>192.168.3.0/24</AddressPrefix>
</AddressSpace>
<Subnets>
<Subnet name="Subnet-1">
<AddressPrefix>192.168.3.0/27</AddressPrefix>
</Subnet>
<Subnet name="GatewaySubnet">
<AddressPrefix>192.168.3.32/29</AddressPrefix>
</Subnet>
</Subnets>
<DnsServersRef>
<DnsServerRef name="DNS3" />
</DnsServersRef>
<Gateway>
<ConnectionsToLocalNetwork>
<LocalNetworkSiteRef name="Vnet12">
<Connection type="IPsec" />
</LocalNetworkSiteRef>
</ConnectionsToLocalNetwork>
</Gateway>
</VirtualNetworkSite>
</VirtualNetworkSites>
</VirtualNetworkConfiguration>
</NetworkConfiguration>
4. After complete the NETCFG, you can import the settings into Azure Virtual Network
5. Finally, you need to connect the gateway, please check for detail steps: https://msdn.microsoft.com/en-us/library/azure/dn690122.aspx#BKMK_PreSharedKeys
You need to create sharedkey for each VPN. In my example, I used the following powershell cmd.
Set-AzureVNetGatewayKey -VNetName VNet1 -LocalNetworkSiteName VNet2 -SharedKey herbchung
Set-AzureVNetGatewayKey -VNetName VNet1 -LocalNetworkSiteName Vnet3 -SharedKey herbchung
Set-AzureVNetGatewayKey -VNetName Vnet2 -LocalNetworkSiteName Vnet13 -SharedKey herbchung
Set-AzureVNetGatewayKey -VNetName Vnet3 -LocalNetworkSiteName Vnet12 -SharedKey herbchung
6. After the setup, you should find the Vnet has connected by our architecture design.
Now, the virtual network has been set up. Let’s do an experiment to create VM in Vnet2 and Vnet3 and see if they can communicate with each other.
The IP Address of VM in Vnet2 is 192.168.2.4
The IP Address of VM in Vnet3 is 192.168.3.4
We try to ping from Vnet2 to Vnet3 and try to ping from Vnet3 to Vnet2. The ping is successful.


Comments
- Anonymous
January 12, 2016
The comment has been removed


