Creating and Executing First Cloud Project With Windows Azure
The Azure™ Services Platform (Azure) is an internet-scale cloud services platform hosted in Microsoft data centers, which provides an operating system and a set of developer services that can be used individually or together. Azure’s flexible and interoperable platform can be used to build new applications to run from the cloud or enhance existing applications with cloud-based capabilities. Its open architecture gives developers the choice to build web applications, applications running on connected devices, PCs, servers, or hybrid solutions offering the best of online and on-premises.
In this post we will create simple web site and execute it in the local development fabric. The Development Fabric simulates the Windows Azure fabric on your local machine so that you may run and test your service locally before deploying it.
Learn how to initialize the development fabric here.
Pre-requisites for this post:
Windows Vista SP1 / Windows Server 2008
IIS 7 with ASP.NET
Microsoft Visual Studio 2008
Microsoft .NET Framework 3.5 SP1
Windows Azure SDK 1.0.0
Windows Azure Tools for Microsoft Visual Studio 1.0
Note, you can use the Microsoft Web Platform Installer to get all the prerequisites.
Creating the project
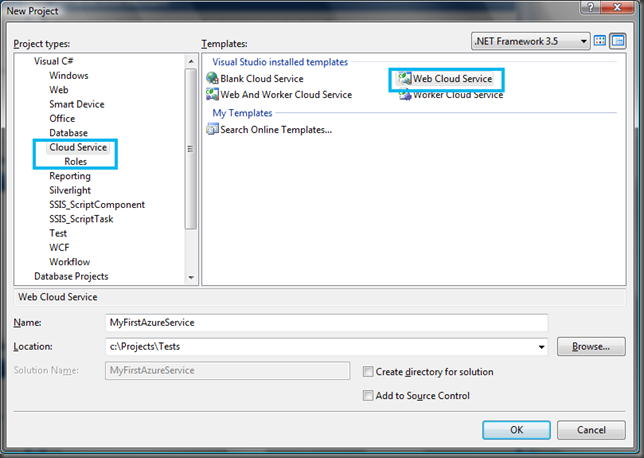
After installation of the SDK and VS tools, new project templates are available in Visual Studio.
You will use the Windows Azure Tools for Microsoft Visual Studio to create the project using the Cloud Service project templates. These tools extend Visual Studio 2008 to enable the creation, building and running of Windows Azure services.
For a Hosted Windows Azure project you have the possibility to create a Web Cloud Service or a Worker Cloud Service. A single project may contain one of each but no more.
For now I’m going to create a Web Cloud Service which is an ASP.NET Forms application.
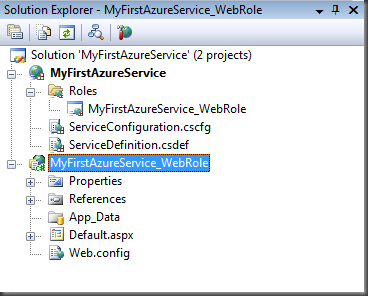
The MyFirstAzureService_WebRole project is a standard ASP.NET Web Application project template that has been modified to work with Windows Azure. This contains the bulk of the project.
The MyFirstAzureService project contains a reference to the ASP.NET project, along with ServiceDefinition . csdef and ServiceConfiguration . cscfg files. The ServiceDefinition . csdef file contains the metadata needed by the Windows Azure fabric to understand the requirements of your application, such as which roles are used. It will also contain configuration settings that apply to all instances. These configuration settings can be read using the Windows Azure API. The ServiceConfiguration.cscfg file lets you set the values for the configuration settings and the number of instances to run for each role.
The Roles node in the Cloud Services project enables you to configure what roles the services include (Web, worker or both) as well as which projects are used for these roles.
Adding configuring roles through the Roles node will update the ServiceDefinition . csdef and ServiceConfiguration.cscfg files.
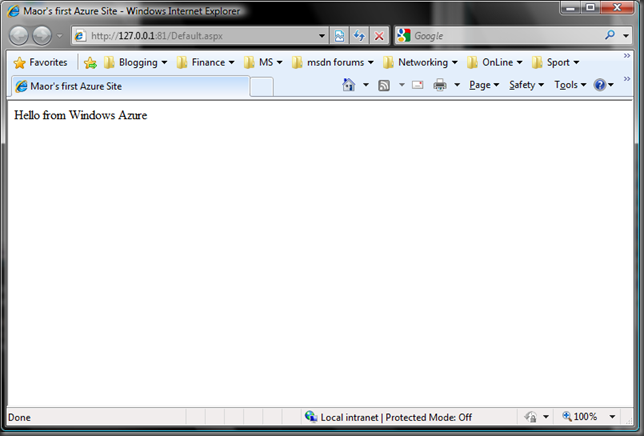
Lets modify the default.aspx page, then build and execute the site in the development fabric.
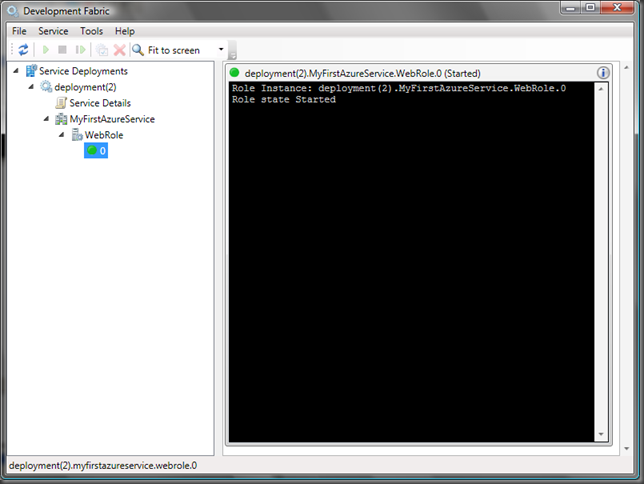
To show the development fabric UI, right-click its icon in the system tray and select Show Development Fabric UI.
Windows Azure development fabric
Expand the tree on the left panel to see the WebRole instances. Click on the node with the 0 label. This shows the log for this instance. Also, we can see here that my Web Role is started.
That's all! Now that our website is running locally we can go and publish this to the cloud (if we registered to Windows Azure) or explore some of the Windows Azure API and development fabric features as Configuration, Logging, and Debugging – This will be in the next post.
Enjoy!
Comments
Anonymous
February 02, 2009
In this post I’ll explain the steps required to host a cloud service in the cloud… Step 1: Creating theAnonymous
February 23, 2009
Creare un progetto di Windows Azure passo per passoAnonymous
February 23, 2009
Sul blog di maor sono disponibili una serie di post che spiegano come creare e pubblicare un progetto


