Building a Windows Phone 7 game, with SharePoint communication
So, you’ve never made a game before for the Windows Phone 7 - you’ve opened up your brand new Visual Studio 2010, with the Windows Phone 7 developer tools; but you don’t know what to do, or how to get started.
This is the situation that both myself (Michael Tsikkos) and James Glading faced at the beginning of our internship in MCS (Microsoft Consulting Services). We were given, as a starter project, the task of developing a game for the Windows Phone 7 (WP7), which could log high scores, whilst communicating with an intranet SharePoint site. Prior to this, we had no prior experience in using Visual Studio or SharePoint, let alone the WP7 tools.
This was a great opportunity, as new interns, to learn some of the key technologies that we would use further in the year. Furthermore, this was a hugely exciting project; developing for the WP7, which not many people had actually done at the time.
In this post (part 1), we will take you through the development process we went through, and how you can create your own game also. We will detail some of the tips and tricks we learnt on the way, including that of flick gestures, handling multiple pages and other key aspects of a phone application.
In part 2, we will go into a more in-depth discussion about the actual connection between the phone and SharePoint, and the constraints behind it. We will also detail our solution to succeeding in this.
Getting Started
Here comes the fun part!
For the front end, download Visual Studio 2010 and Silverlight 4.0. In terms of the WP7 tools, we had used the Windows Phone 7 Developer Tools Beta. However, there are now more recent versions of the tools, which you should use. Lastly, download Expression Studio 4, primarily for Expression Blend 4 with sketch flow. This will help when it comes to creating the interface as well as the storyboards (animations).
We used SharePoint 2010 as a backend server, whilst Silverlight was used for the front end of the site.
OK, now you’re ready to go.
First, let’s create our project. From within Visual Studio 2010, create a new project and select the “Silverlight for Windows Phone” option, and then select the “Windows Phone Application” template.
This will automatically create your project and set the default page to ‘MainPage.xaml”.
You can now start creating your game.
The main page is arguably the most important part of the application. It is the first thing the user sees and inevitably how they judge the whole application. Key to the main page, and consistently within Windows Phone 7 applications, panorama controls are at the forefront of the application. However, the Beta tools did not have Panorama Controls built in, hence why we opted to create our own. The latest versions of the tools provide Panorama Controls and are to be used instead of creating your own.
Panorama Controls
We were not lucky enough to have a version of the tools which provided built in Panorama controls, and therefore we went about creating our own via other tools. Although this is not best practice – it gave us a good learning curve when it came to using many facilities, such as Expression Blend, as well as establishing a way of implementing flick gestures, which can be used over a breadth of other Silverlight applications.
How We Created Our Own:
This section details a lot of the learning curves we went through for a Panorama control, as well as some of the tips and tricks we learnt along the way that apply to any application you create.
Neither of us had done anything like this before, and therefore we had looked into a lot of online help. What we found incredibly useful when attacking this issue was a blog post we found whilst doing some research online for Panorama Controls in the WP7 Beta tools. This was used as the basis of our implementation, although altered slightly, especially when it came to the flick gestures.
We will detail our overall solution, as well as cover how to implement flick gestures between pages.
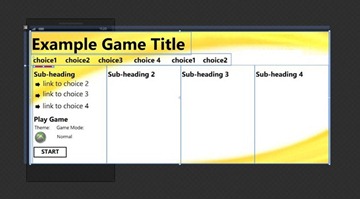
Firstly, in Visual Studio, right click on your “MainPage.xaml” and select the option “Open in Expression Blend”. Once loaded, blank out the entire page so that you are just left with a Content Grid. Now, expand the content grid accordingly. The default width on the phone is 480 pixels. Drag the Content Grid across in multiples of 480 to create the basis for each page – in our case, 4 ‘pages’ = 1920 (indicated below with extra ‘example’ grids). From here, you can place your background image onto this content grid as seen below.
Adding Images Correctly:
When adding images into a project in Visual Studio 2010 or Expression Blend 4, I would recommend setting up a separate directory in your project folder (i.e. /projectName/projectName/Images). Also, ensure you add the items correctly through Visual Studio, by selecting ‘Images’ --> ‘Add’ --> ‘Existing Item…’, and then adding the desired image. This will ensure that Visual Studio never has a problem in referencing the image on file.
Now to start adding items to your main page:
 Firstly, add a large title that would pan out over the content grid, as well as a navigation bar across the top.
Also, place four canvases just below these on each page. When inserting the canvases, ensure their width is not as long as the width of the phone so that each subsequent canvas is slightly overlapping onto the same page on the view of the phone.
Place a rectangle as the first item on each canvas. This is going to be used for the flick gestures (as canvases and scroll viewers are not very responsive to the actions used). This rectangle should have no Stroke, and have a fill of ‘transparent’. From here, place all other elements over the top of this.
 After inserting each page’s content, the last thing to do now is to create the animations that will control the page transitions.
Under the “Objects and Timeline” menu, select “New” under the button indicated by a down arrow (see left).
Name your storyboard, for example, pageMoveLeft1, and click OK.
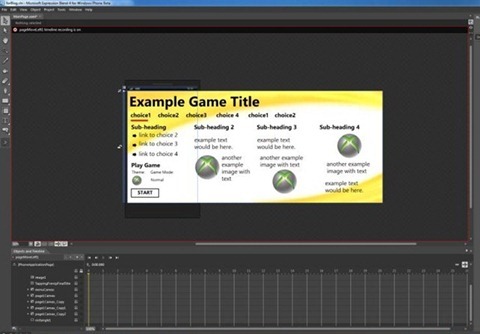
You are now recording (see below). Any changes you make to any elements on the page will only be affected in the timeline of the storyboard, seen at the bottom of the screen. Ensure you close the storyboard before wanting to make any permanent changes.
 From here, you want to select the four canvases, the title and the background image in the timeline.
Move the yellow cursor to 0.5 seconds. Now select “Transform” form the menu that will appear to the right of the screen (right).
Now you want to use the “Render Transform” option to move these elements along the X- axis until the next page lines up again with the most left option in the navigation bar.
Now, select the navigation bar (on its own), and do a render transform on this until it lines up with the second page heading.
(Note – this is the menu where you can make quick and accurate changes to all attributes; and will appear when you select any element)
The overall outcome will look like this:
Multiple Storyboards in Cohesion:
Note down the starting and finishing point on the X-axis for each item. This will need to be kept consistent with all subsequent storyboards. For example, the next storyboard will need each item to start at the same point in which it finished on the previous storyboard; and vice-versa.
To finish up here, create all the storyboards for each page transition left and right. Also, in terms of the ‘duplicate’ options on the navigation bar – create two more storyboards that will return to the 1st and 2nd page respectively, using the same principal as before.
For the navigation bar, have an integer (i.e. pagePosition) which stores which page is currently in view. Depending on this value and an option selected, run a series of the storyboards that would navigate to the correct page, and then update the page position accordingly.
Now the problem is, apart from using the navigation bar, how do we allow users to navigate pages normally? Therefore, how do we implement flick gestures like in the official panorama controls?
Creating Flick Gestures
You need two event handlers for each rectangle placed on each canvas; one for mouseLeftButtonDown, and one for mouseLeftButtonUp. Within them, the code is very simple and just logs the mouse points on screen:
    1: Point mouseStart;
    2: Point mouseEnd;
    3:
    4: private void rectangeCanvas1_MouseLeftButtonDown(object sender, MouseButtonEventArgs e)
    5: {
    6:     mouseStart = e.GetPosition(this);
    7: }
    8:
    9: private void rectangleCanvas1_MouseLeftButtonUp(object sender, MouseButtonEventArgs e)
   10: {
   11:   mouseEnd = e.GetPosition(this);
   12:     calculate(mouseStart, mouseEnd);
   13: }
The above code simply stores the two mouse points (touch points on phone) from when the user presses down and then lifts up. After lifting up, another method, used to calculate the ‘flick’ action is needed:
    1: int pagePosition = 1;
    2:
    3: private void calculate(Point Point1, Point Point2)
    4: {
    5:     if (Point1.X > Point2.X)
    6:     {
    7:         double topTollerance;
    8:         double bottomTollerance;
    9:         topTollerance = double.Parse(Point2.Y.ToString());
   10:         bottomTollerance = double.Parse(Point2.Y.ToString());
   11:   topTollerance += 50;
   12:         bottomTollerance -= 50;
   13:
   14:         if (bottomTollerance <= Point1.Y && topTollerance >= Point1.Y)
   15:         {
   16:             if (pagePosition == 1)
   17:             {
   18:                 pageMoveLeft1.Begin();
   19:                 pagePosition = 2;
   20:             }
   21:             else if (pagePosition == 2)
   22:             {
   23:                 pageMoveLeft2.Begin();
   24:                 pagePosition = 3;
   25:             }
   26:             else if (pagePosition == 3)
   27:   {
   28:                 pageMoveLeft3.Begin();
   29:                 pagePosition = 4;
   30:             }
   31:             else if (pagePosition == 4)
   32:             {
   33:                 pageMoveToStart.Begin();
   34:                 pagePosition = 1;
   35:             }
   36:         }
   37:     }
   38:     else if (Point1.X < Point2.X)
   39:   {
   40:         double topTollerance;
   41:         double bottomTollerance;
   42:         topTollerance = double.Parse(Point2.Y.ToString());
   43:         bottomTollerance = double.Parse(Point2.Y.ToString());
   44:         topTollerance += 50;
   45:         bottomTollerance -= 50;
   46:
   47:         if (bottomTollerance <= Point1.Y && topTollerance >= Point1.Y)
   48:         {
   49:             if (pagePosition == 1)
   50:             {
   51:             }
   52:             else if (pagePosition == 2)
   53:             {
   54:                 pageMoveRight3.Begin();
   55:                 pagePosition = 1;
   56:             }
   57:             else if (pagePosition == 3)
   58:             {
   59:                 pageMoveRight2.Begin();
   60:                 pagePosition = 2;
   61:             }
   62:             else if (pagePosition == 4)
   63:             {
   64:                 pageMoveRight1.Begin();
   65:                 pagePosition = 3;
   66:             }
   67:         }
   68:   }
   69: }
This method analyses the location of the points to determine if it is a correct flick motion. It then analyses the location on the main page (pagePosition), to determine which storyboard to execute.
Accessing Multiple Pages
In terms of multiple pages (i.e. the game page) – from within Visual Studio, right click on your application and select ‘Add’, then ‘Class’. From the displayed window, select ‘Windows Phone Portrait Page’. Now name accordingly (i.e.’ gamePage.xaml’ ). Do this for every subsequent page added.
To link the pages, if you want the page to be displayed from a button press, have this snippet of code in the event handler for the button:
    1: private void button_Click(object sender, MouseButtonEventArgs e)
    2: {
    3:     //other code here
    4:
    5:     NavigationService.Navigate(new Uri("/gamePage.xaml", UriKind.Relative));
    6: }
This is a very quick and simple way of navigating to the requested page. There is no fancy transition.
Connecting to SharePoint
There are many different methods to connect windows phone 7 applications to SharePoint 2010. In our application we used the lists.asmx web service. This is the out of the box web service that first shipped with SharePoint 2007. The method is almost identical to the method used to connect a standard Silverlight application. There are many good blog posts on the web about this subject one of which is here. There is however some extra concerns which need to be address around the availability of the phones data connection.
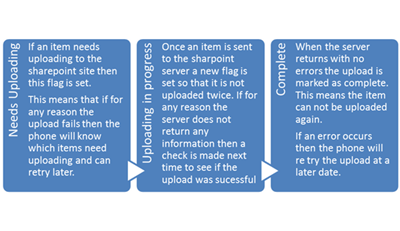
One of the main challenges that we faced when implementing this connection was the error handling needed. For example, what happens if the phone cannot physically connect to the SharePoint site (i.e. no signal on the phone)? In our case this was made much simpler because high scores were already being saved onto the phone. To save these back to the SharePoint server a flag is set on the high score which marks it for uploading to the server. This flag is removed once the phone has received a message back from the server with no error codes. The diagram below explains this detailing the three different states that are associated with each high score.
Writing the upload in this way also made it simple to allow users to choose which high scores to upload, and to change this option later. For example if a user creates a new score but doesn’t want to upload it for any reason then it is stored (in the same way as every other score) in the phones memory. The process to upload these high scores is exactly the same as uploading new ones, the completed flag allows us to check that the score has not been uploaded previously and the method needs no adaption.
Written by Michael Tsikkos and James Glading.
Comments
Anonymous
October 18, 2010
Yes Mike! - now I can go and create that WP7 calculator I've always wanted to do. Polynomials and all that...Anonymous
March 17, 2011
Hey, Any idea when part 2 will be published? Thanks.Anonymous
May 21, 2011
The comment has been removed


