Building PDF search preview in SharePoint 2013
The new Office Web Apps 2013 integrates very nicely with SharePoint 2013, both when viewing/editing office content as well as with the search preview of the documents. One very common format that is not supported is PDF, and in this article I will build my own WOPI App that supports PDFs by using a simple C# Wrapper for Ghostscript written by Matthew Ephraim.
I read Wictor Wilén’s blog series about Building your own WOPI Client and I got really inspired. It is highly recommended that you read Wictor’s blog series prior to continuing with the PDF previewer, since I will re-use most of the code from Wictor’s blog.
The discovery.xml, which describes the WOPI App (client) should hosted on /hosting/discovery in your APP, looks like this:
1: <?xml version="1.0" encoding="utf-8"?>
2: <wopi-discovery>
3: <net-zone name="internal-http">
4: <app name="GhostscriptPDF"
5: favIconUrl="https://spmurads:8888/images/pdf.ico"
6: checkLicense="false">
7: <action name="view"
8: ext="pdf"
9: default="true"
10: urlsrc="https://spmurads:8888/viewer.aspx?<theme=THEME_ID&>" />
11: <action name="interactivepreview"
12: ext="pdf"
13: default="false"
14: urlsrc="https://spmurads:8888/viewer.aspx?<ui=UI_LLCC&><rs=DC_LLCC&>&previewmode=true" />
15: </app>
16: </net-zone>
17: <proof-key oldvalue="" value="BgIAAA…." />
Note that the proof-key has been removed, so you need to generate your own. See Wictor’s article for the details there. My web app is hosted on my server called https://spmurads:8888 (yes it works on other ports than 80), which I just created on my SharePoint server.
Once https://spmurads:8888/hosting/discovery return the discovery.xml above, the add WOPI App can be added to my SharePoint server using powershell:
New-SPWOPIBinding -ServerName spmurads:8888 –AllowHTTP
To host discovery.xml on /hosting/discovery you need to add discovery.xml as a defaultDocument in your web.config:
  1: <configuration>
  2:     <system.web>
  3:       <compilation debug="true" targetFramework="4.5" />
  4:       <httpRuntime targetFramework="4.5" />
  5:       <customErrors mode="Off"/>
  6:     </system.web>
  7:     <system.webServer>
  8:     <defaultDocument enabled="true">
  9:       <files>
  10:         <add value="discovery.xml"/>
  11:       </files>
  12:     </defaultDocument>
  13:   </system.webServer>
  14:   <location path="hosting/discovery">
  15:     <system.web>
  16:       <authorization>
  17:         <allow users ="*" />
  18:       </authorization>
  19:     </system.web>
  20:   </location>
  21:   <location path="hosting/discovery/discovery.xml">
  22:     <system.web>
  23:       <authorization>
  24:         <allow users ="*" />
  25:       </authorization>
  26:     </system.web>
  27:   </location>
  28: </configuration>
I’ve also made sure the document is available for anonymous users.
Now to the viewer code. There is lots of magic around getting the file from the WOPI Server (SharePoint). This is explained very well in Wictor’s blog series, so it will not be repeated here. However I found that an additional step (in part 2) needs to be done to get it to work with the RTM version of SharePoint.
  1: $config = (Get-SPSecurityTokenServiceConfig)
  2: $config.AllowOAuthOverHttp = $true
  3: $config.Update()
I have modified Wictor’s viewer.aspx.cs to run GhostScript and create jpg previews and show the images to the user. It does some simple caching of the generated files, as well giving read access to the current user. The image files are written to the local \inetpub directory (my server on port 8888) which then easily can be shown to the user.
  1: namespace Microsoft.GhostWOPI
  2: {
  3:     public partial class viewer : System.Web.UI.Page
  4:     {
  5:         protected string images = "";
  6:         protected string metadata = "";
  7:         protected string origdoc = "";
  8:         protected bool previewMode = false;
  9:
  10:         protected void Page_Load(object sender, EventArgs e)
  11:         {
  12:             string src = Request.QueryString["WOPISrc"];
  13:
  14:             // Used in preview mode (search result)
  15:             string preview = Request.QueryString["previewmode"];
  16:
  17:             previewMode = !String.IsNullOrEmpty(preview);
  18:
  19:             if (!String.IsNullOrEmpty(src))
  20:             {
  21:                 string access_token = Request.Form["access_token"];
  22:                 string access_token_ttl = Request.Form["access_token_ttl"];
  23:                // Get the metadata
  24:                 string url = String.Format("{0}", src);
  25:
  26:                 string meta = "";
  27:                 using (WOPIWebClient client =
  28:                      new WOPIWebClient(url, access_token, access_token_ttl))
  29:                 {
  30:                     meta = client.DownloadString(url);
  31:                 }
  32:                 JsonTextReader jr = new JsonTextReader(new StringReader(meta));
  33:
  34:                 // Parse meta data
  35:                 string version = "";
  36:                 string propertyName = "";
  37:                 string userId = "";
  38:                 while (jr.Read())
  39:                 {
  40:                     if (jr.TokenType.ToString().Equals("PropertyName"))
  41:                         propertyName = (string)jr.Value;
  42:
  43:                     if (jr.TokenType.ToString().Equals("String"))
  44:                     {
  45:                         if (propertyName.Equals("Version"))
  46:                         {
  47:                             version = HttpUtility.UrlDecode(jr.Value.ToString());
  48:                         }
  49:                         else if (propertyName.Equals("UserId"))
  50:                         {
  51:                             userId = jr.Value.ToString();
  52:                         }
  53:                         else if (propertyName.Equals("ClientUrl"))
  54:                         {
  55:                             origdoc = jr.Value.ToString();
  56:                         }
  57:                     }
  58:                 }
  59:                 // Get the DOMAIN\user
  60:                 userId = userId.Split('|')[1];
  61:                 // Get the content
  62:                 url = String.Format("{0}/contents", src);
  63:
  64:                 // create a unique filename
  65:                 string fileName = version;
  66:
  67:                 // create filenames based with only legal characters
  68:                 string dirName = src.Replace("https://", "");
  69:                 fileName = fileName.Replace("\\", "_").Replace("/", "_").Replace(":", "_").Replace(".", "_").Replace("&", "_").Replace("{", "_").Replace("}", "_").Replace("\"", "_").Replace(",", "_");
  70:                 dirName = dirName.Replace("\\", "_").Replace("/", "_").Replace(":", "_").Replace(".", "_").Replace("&", "_").Replace("{", "_").Replace("}", "_").Replace("\"", "_").Replace(",", "_");
  71:                 string cacheDir = "C:\\inetpub\\ghostwopi\\cache\\" + dirName + "\\";
  72:
  73:                 // create directory
  74:                 if (!System.IO.Directory.Exists(cacheDir))
  75:                 {
  76:                     System.IO.Directory.CreateDirectory(cacheDir);
  77:                 }
  78:                 // make sure the user has read access
  79:                 AddFileSecurity(cacheDir, userId, FileSystemRights.Read, AccessControlType.Allow);
  80:
  81:                 string pdfName = cacheDir + fileName + ".pdf";
  82:
  83:                 // Download the PDF from SharePoint and cache it locally
  84:                 if(!File.Exists(pdfName)) {
  85:                     using (WOPIWebClient client =
  86:                         new WOPIWebClient(url, access_token, access_token_ttl))
  87:                     {
  88:                         byte[] data = client.DownloadData(url);
  89:                         File.WriteAllBytes(pdfName, data);
  90:                     }
  91:                 }
  92:
  93:                 // Call GhostScript to generate jpg previews
  94:                 if(!File.Exists(cacheDir + fileName + ".001.jpg")) {
  95:                     GhostscriptWrapper.GeneratePageThumbs(pdfName, cacheDir + fileName + ".%03d.jpg", 1, 300, 100, 100);
  96:                 }
  97:
  98:                 FileInfo[] files = (new DirectoryInfo(cacheDir)).GetFiles("*.jpg");
  99:
  100:                 // Create simple HTML
  101:                 for(int i=0;i<files.Length; i++) {
  102:                     // make sure the user has read access
  103:                     AddFileSecurity(files[i].FullName, userId, FileSystemRights.Read, AccessControlType.Allow);
  104:
  105:                     if (!previewMode)
  106:                     {
  107:                         images += "<img border=\"1\" src=\"https://spmurads:8888/cache/" + dirName + "/" + files[i].Name + "\"><hr>\n";
  108:                     }
  109:                     else
  110:                     {
  111:                         images += "<img border=\"1\" width=\"510\" src=\"https://spmurads:8888/cache/" + dirName + "/" + files[i].Name + "\"><hr>\n";
  112:                     }
  113:                 }
  114:             }
  115:         }
There are references to WOPIWebClient which you can get from Wictor’s blog, Ghostscript wrapper and Json.Net (get it from NuGet). Note that I modified the Ghostscript wrapper to use the gsdll64.dll instead of the gs32dll.dll to make it work more easily with my IIS.
The actual viewer.aspx are modifed to show the images:
1: <html xmlns="https://www.w3.org/1999/xhtml">
2: <head runat="server">
3: <title></title>
4: </head>
5: <body>
6: <form id="form1" runat="server">
7: <div>
8: <%
1: if(!previewMode) {
%>
9: <div style="position:fixed; top:0; background:#cccccc; width:100%; color:white;margin:3px; font-family:'Segoe UI', Calibri;"> PDF Preview <a href="<%=origdoc%>">Open PDF</a></div>
10: <%
1: }
%>
11: <%
1: =metadata
%>
12: <%
1: =images
%>
13: </div>
14: </form>
15: </body>
16: </html>
When done, go into your Search center and create a new result type for PDFs that uses the Word Item display template.
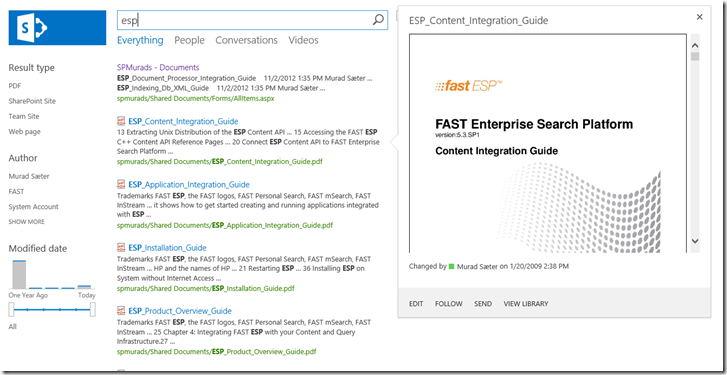
It will give a search result like this:
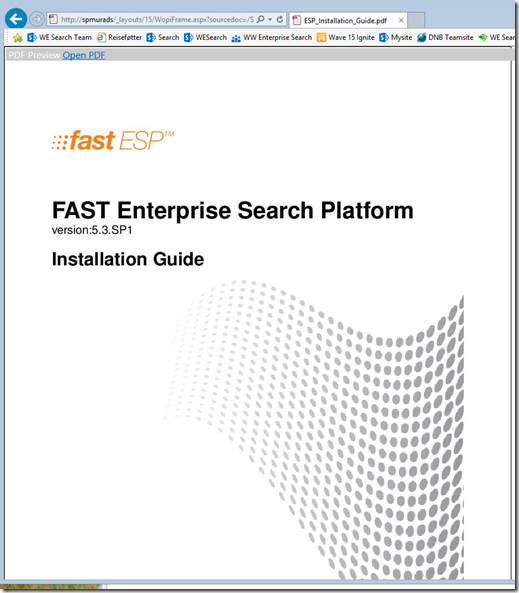
If you click on a PDF in a document library it will open in a full screen PDF previewer like this:
That’s it. Clicking the search result doesn’t work (since I’ve just used the Word Item templates and my WOPI App doesn’t support edit). I’ve left modifying the display template to fit properly as an exercise for the reader ![]()
If you read the original blog series you should get this working. If you didn’t go do it now (to make more sense of this ![]() )
)
If you have any questions don’t hesitate to contact me.
Comments
Anonymous
December 05, 2012
Great post Murad. Is it possible to enable this feature for non-SharePoint hosted content repositories? Or does the content host have to be WOPI/SP2013?Anonymous
December 09, 2012
You could probably make it work for other repositories as well, but there are some challenges. Mostly with authentication/authorization against the other repository. If you create a custom service that can get hold of the content and generate the previews, you need some custom display templates to which uses the custom service instead of the WOPI.Anonymous
January 13, 2013
So - what would be the advantage of taking this route compared ot client side rendering with whatever client user has like what Steve has in he's post? blogs.technet.com/.../create-an-easy-pdf-preview-for-search-results-in-sharepoint-2013.aspxAnonymous
January 13, 2013
The obvious advantage is that you don't need client rendering support. For PDF if might mean when browsing by phone or a pad. It's also faster than using client rendering. The advantage is larger if you implement it for a format that is not that common on the client, like AutoCAD.Anonymous
July 08, 2013
other way to get PDF previews is to take a 3rd party prouct like HarePoint Thumbnails: www.harepoint.com/.../Default.aspx

