Azure Table Storage
This Azure Table Storage tutorial/sample/walkthrough will get you using Azure Table Storage from ASP.NET MVC in 15 minutes. Tom Dykstra (of MVC/EF fame) and I are working on an Azure email service sample application. All the code was written by Tom.
Our first step was creating a Azure Table Storage account to contain the email distribution lists. This post contains the essential steps to get Azure Table Storage working with an ASP.NET application. You must first have an Azure account – you can get one free here.
Create a Windows Azure Storage account
Log into the Windows Azure Management Portal.
At the bottom of the navigation pane, click Storage, then click New.
Click QUICK CREATE.
Enter a subdomain name in the URL box at the top. In this screen shot I’ve entered 012, so that magic string is taken and you’ll need to enter something unique. Set the Region/Affinity group to your region. Disable Geo-Replication for this sample.
Click CREATE STORAGE ACCOUNT. The storage status page is displayed. It will take about a minute to create your storage account. The image below shows my status page.
Select the storage account you just created. On the bottom of the page, select MANAGE KEYS.

The image below shows my keys for account 012. Hackers take note, the keys are no good, I regenerated them right after taking this screenshot.You’ll need the storage account name and one of the keys later in this post.
Install Azure Storage Explorer
You can get Azure Storage Explorer here. Alternatively, you can use CloudBerry.
Start Azure Storage Explorer. Select Add Account.
Copy your storage account name and access key, then click Add Storage Account.
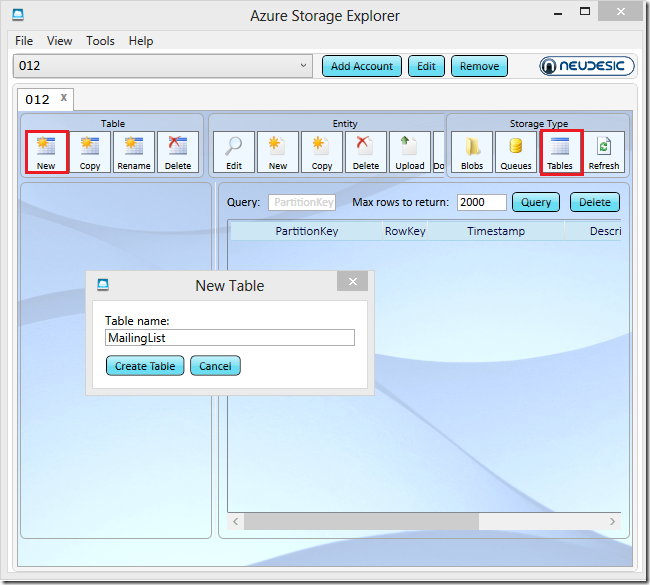
Click Tables, then click New. To use the code supplied with this post, name the table MailingList, then click Create Table.
You can go back to Azure Storage Explorer to see the data you insert in your application.
Open the ASP.NET MVC Application to use the Azure Table
Open the sample download. Alternatively, you can create a new ASP.NET MVC Internet Application, accept all the defaults.
Edit the root web.config file and add the storage connection string. The name doesn’t matter, our sample code uses “StorageConnectionString” for the name.
<connectionStrings> <add name="StorageConnectionString" connectionString="DefaultEndpointsProtocol=https; AccountName=012; AccountKey=psMemlbL0m+n6/9dKBogusKey+Zom8XWDPY+hIwLb5MnrVSubbY1+m3QlFLTWTIhRZJpeg==" /> </connectionStrings>Run the application and enter a couple email List names. You can see the data in both the application and in Azure Storage Explorer.
That was pretty cool – we just ran our ASP.NET MVC application in IIS Express and created data in the cloud!
Deploy the application to Azure
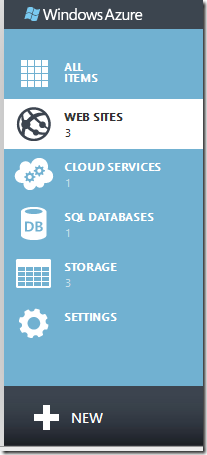
From the Azure Portal, click on WEB SITES then NEW.
Click QUICK CREATE, then enter a URL. Click on the Web Site you just created, then click Download publish profile.
Save the publish profile, you will import it in the next step.
In Visual Studio, right click on the MvcAES project, and select Publish.
In the Publish Web dialog, select Import.
Navigate to the profile you just downloaded. I like to select Next and review the Connection and Settings entries. Select Publish. Visual Studio automatically launch your deployed Web Site in your favorite browser.
You can see the data you entered from your desktop and you can edit the data from the cloud.
In addition to blogging, I use Twitter to make quick posts and share links. My Twitter handle is: @RickAndMSFT
Comments
Anonymous
September 20, 2012
Good Article.Anonymous
September 24, 2012
Good article... And what is chrome doing at the end?Anonymous
September 26, 2012
@Gregg Gilliam -- Thanks! I'm using FF too. FF/Chrome lets you see the entire URL.Anonymous
October 22, 2012
Good articleAnonymous
January 01, 2013
Great Article, This stuff really helps novice developers like myself!! Keep up the good work!


