SharePoint Designer’s new workflow editor: keyboard shortcuts
 Travis here again from the SharePoint Designer development team. In my last post, I introduced you to a few of the new features of the workflow editor in SharePoint Designer 2010. This time, I’d like to show some of the new keyboard features in the editor that can make you more productive if you’re the sort of person who would rather avoid using the mouse unless it’s necessary.
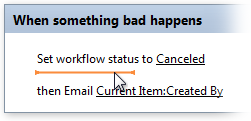
If you’d like, open the sample workflow you were building in my last post, or create a new one. It doesn’t really matter. Note that as you move your mouse cursor around on the page, various things light up. Before and after each action, condition, and step are orange insertion points that light up. If you click there, you’ll put your cursor there and then can insert things at that location. Try clicking on an insertion point now.

A variety of common keyboard commands all work in the new workflow editor. For example, you can use the cursor keys to move the insertion point around the document, or Shift+Up to select the object above your current insertion point, or Delete to delete the object that is currently selected, Home and End to get to the beginning or end of the object that contains the insertion point (such as a step), or Ctrl+Home or Ctrl+End to get to the beginning or end of the entire workflow. (Those are just examples; there are more.)
You can also insert things without using the mouse. Like all other ribbons in your favorite Office apps, you can use the keyboard to navigate the ribbon. Press Alt, then W for the Workflow tab, then T for Action. Choose an action from the list using the keyboard and press Enter to insert it. You can then use Tab and Shift+Tab to cycle through the hyperlinks in your action. It works, but it’s not very fast.
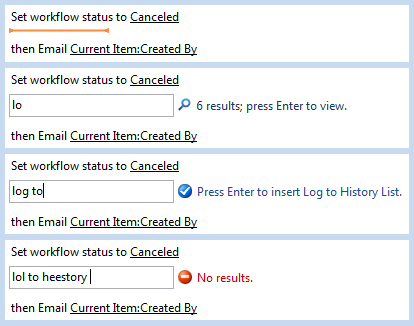
SharePoint Designer 2010 has a much faster way of inserting things once you know the name of the action or condition you want, such as “Log to History List” or “Send an Email.” Try this: click inside an empty step to move the insertion point there. Then, start typing “log to”—right there at the cursor. The cursor will expand into a search box, and tell you how many things match what you just typed.

Eventually, you’ll see a checkmark icon and the text “Press Enter to insert Log to History List.” Do just that, and watch the search box disappear and the Log to History List action take its place. This works for all actions and conditions, as well as the other things in the Insert group on the ribbon, such as steps and else-if branches. Once you remember the names of things you want to insert, using this search box is a very fast way to add new things to your workflow—inserting Log to History List only actually takes three keypresses: L, O, and Enter. If you don't remember the name of an action or condition, but remember that it includes the word “send,” you can type “send” into the search box and press Enter to see a list of everything that matches that word. Choose the one you want and press Enter again to insert it.

The ribbon and this new search box can help you find features that have been around for a while that you didn’t even know existed. For example, did you know that in SharePoint Designer 2007 you can set multiple actions to run in parallel, so that the server won't wait for the first action to finish before it starts on the second one? That can be especially useful if the first action involves requesting information from a person who’s really busy (or lazy). That feature was there in the last version but few people knew about it. You can do this easily in SharePoint Designer 2010 by inserting a Parallel Block and then putting actions inside of it. It’s right there on the ribbon, or just a few keypresses away.
These are just some of the enhancements we’ve made to the workflow editor in SharePoint Designer 2010. We hope that they’ll save you a lot of time and help you build even more powerful workflows to take advantage of new SharePoint features, in less time than you could before. We’d love to hear what you think, so please let us know in comments and the SharePoint Designer forums.
Comments
Anonymous
February 27, 2010
Thanks Travis, looks much easier to navigate. Asif Rehmani did some GREAT demos on this at SPC09 in Vegas. I built a VHD and will spend more hands on time to learn SPD 2010. It's a whole new ballgame and I appreciate the extra posts to help all of us get up to speed.Anonymous
April 05, 2010
The comment has been removedAnonymous
November 21, 2011
Btw, we make a set of 200 new workflow activites which can be used in SharePoint Designer, Visual Studio and even at Microsoft Visio: www.harepoint.com/.../HarePointWorkflowExtensions It is commercial product, but 30 activities are free.