Create an OData data service for use as a BCS external system on SharePoint Online
This post is a contribution from Jing Wang, an engineer with the SharePoint Developer Support team
Recently I worked with two customers who wanted to show their external data on SharePoint Online web sites, one from on-premise SQL Database and one from their secured internal data source.
They did not want to migrate their SQL Database to SQL Azure.
We researched for few possible options and chose the most feasible, easy to implement and secure solution - "Create custom OData WCF service accessing external data source and generate BDC external content type through SharePoint hosted Add-in.". Note this solution will also work for SharePoint On Premises but is especially suitable for SharePoint Online as we have some constraints on the kind of customization that can be done in SharePoint Online.
Here is the high level overview of the steps involved:
Step I - Create an Internet-addressable ASP.NET Windows Communication Foundation (WCF) Data Service to expose the SQL database.
Note: This article covers the steps before Visual Studio 2017.
If you use VS2017, it does not come with WCF Data Service by default, you need to install WCF Data Services Template for Visual Studio 2017: https://marketplace.visualstudio.com/items?itemName=CONWID.WcfDataServiceTemplateExtension#overview
WCF team also recommend to add a beta version of the WCF DataServices EntityProvider to your project: https://www.nuget.org/packages/Microsoft.OData.EntityFrameworkProvider/
Once the two things are installed, you can add WCF Data Service to the Project after you create ADO.NET Entity Data Model following the HowTo article above:
- Add New Item and search for WCF
- WCF Data Service 5.6.4
For Data Sources other than SQL Database, please refer to this article:
How to: Create a Data Service Using the Reflection Provider (WCF Data Services) -
/en-us/dotnet/framework/data/wcf/create-a-data-service-using-rp-wcf-data-services
Step II - Generate a Business Connectivity Services (BCS) external content type connecting to the OData WCF service above with SharePoint Hosted Add-in and extract the model file out:
If you don’t want to expose your OData data service anonymously, you need to continue with Step III and Step IV, otherwise, skip to Step V directly.
Step III - Create Target Application in SharePoint Central Admin site –Secure Store Service.
Step IV- Edit BDC model to use the Secure Store Target Application:
Highlighted lines are the ones you need to manually put in the model file.
-----------------------
 <?xml version="1.0" encoding="utf-16"?>
<Model xmlns:xsi="https://www.w3.org/2001/XMLSchema-instance" xmlns:xsd="https://www.w3.org/2001/XMLSchema" Name="BDCMetadata_AdventureWorks" xmlns="https://schemas.microsoft.com/windows/2007/BusinessDataCatalog">
<LobSystems>
<LobSystem Name="adventureworks" Type="OData">
<Properties>
<Property Name="ODataServiceMetadataUrl" Type="System.String">https://adventureworks.contoso.com/WcfODataService_AdventureWorks.svc/$metadata</Property>
<Property Name="ODataServiceMetadataAuthenticationMode" Type="System.String">WindowsCredentials</Property>
<Property Name="ODataServicesVersion" Type="System.String">2.0</Property>
<Property Name="SsoApplicationId" Type="System.String">SecureStoreTargentApplicationName</Property>
<Property Name="SsoProviderImplementation" Type="System.String">Microsoft.Office.SecureStoreService.Server.SecureStoreProvider, Microsoft.Office.SecureStoreService, Version=16.0.0.0, Culture=neutral, PublicKeyToken=71e9bce111e9429c</Property>
</Properties>
…
<LobSystemInstances>
<LobSystemInstance Name="adventureworks">
<Properties>
<Property Name="ODataServiceUrl" Type="System.String">https://adventureworks.contoso.com/WcfODataService_AdventureWorks.svc</Property>
<Property Name="ODataServiceAuthenticationMode" Type="System.String">WindowsCredentials</Property>
<Property Name="ODataFormat" Type="System.String">application/atom+xml</Property>
<Property Name="HttpHeaderSetAcceptLanguage" Type="System.Boolean">true</Property>
<Property Name="SsoApplicationId" Type="System.String"> SecureStoreTargentApplicationName</Property>
<Property Name="SsoProviderImplementation" Type="System.String">Microsoft.Office.SecureStoreService.Server.SecureStoreProvider, Microsoft.Office.SecureStoreService, Version=16.0.0.0, Culture=neutral, PublicKeyToken=71e9bce111e9429c</Property>
</Properties>
</LobSystemInstance>
</LobSystemInstances>
Step V - Import the External content type’s BDC model file to SPO BDC Service Application
To import the model file using SharePoint Central Administration pages
- Open SharePoint Online or SharePoint on-premises Central Administration pages.
- Choose Manage serve applications.
- Choose Business Data Connectivity Service.
- Choose the Import link on the server ribbon.
- Choose the Browse button to specify the location where you extracted the .bdcm file.
- Keep the default settings, and then choose Import.
Step VI - Create External List from the External Content Type created above.
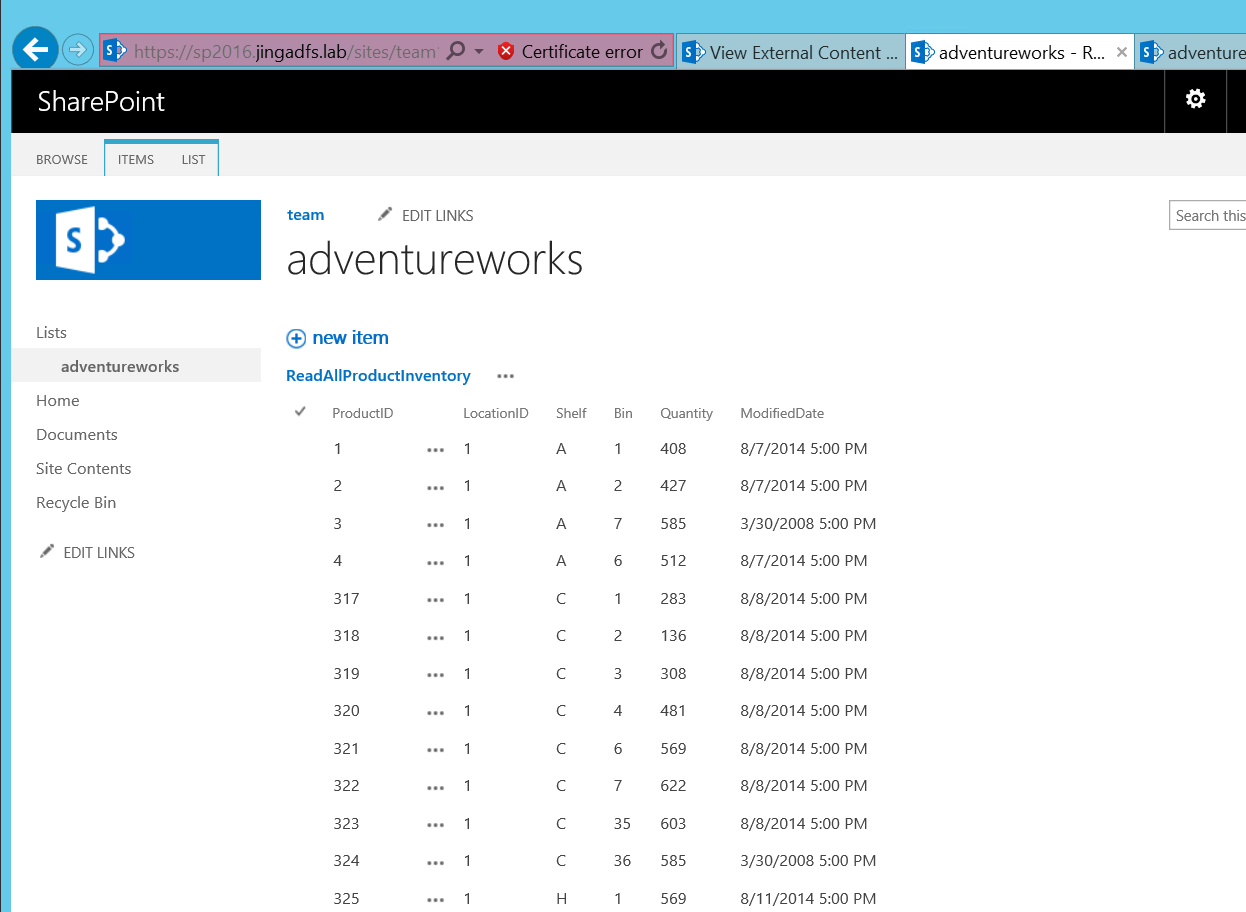
Here is a screen shot of the External List, showing the Microsoft sample AdventureWorks database – productInventory list:
