Configure OneDrive for Business as a Hybrid search vertical in SharePoint Onpremise search center : Part5
Part 4 of my post has steps to redirect On-Premises users to host their mysites in Office365 typically referred to as OneDrive for Business. Post this configuration a key ask from users would be to provide an easy way to search for documents from OneDrive in Office 365. This is where Hybrid Search comes into play. To achieve this, you will have to create a search vertical that fetches results from OneDrive. So let’s take a look at how to set up Search of OneDrive for Business in Office 365 from SharePoint Server 2013.
What Is a Search Vertical
When you install SharePoint 2013 and create or browse to a search center, you will see that the Search Navigation Web Part is configured to display links to the search verticals:
· Everything
· People
· Conversations
Videos
When users click a search vertical link, the search results are filtered and displayed following the configuration of the search vertical using search results from Search Results Web Part. Users can of course
create their own search vertical and add it to be displayed in the Search Navigation Web Part. This concept of Search vertical is used to get search results for SharePoint On-Premises users from OneDrive in Office365. To create and retrieve results from the Search Vertical from OneDrive and display within SharePoint Onpremise search center, there are a few prerequisites.
On-Premise SharePoint 2013 Environment
· Complete all of the prerequisites mentioned in Part 4 of this post to configure OneDrive for business
· Validate your SharePoint On-Premises has at least the following service applications:
o At least one web application with an Enterprise Search Service application site collection
o User Profile Service Application
o Subscription Settings Service Application
o App Management Service Application
· Replace the STS certificate of the On-Premises SharePoint Server and establish a Server-to-Server trust with Windows Azure ACS.
· Configure Search (Results Part and Query Rule) on the On-Premises SharePoint Server 2013.
· Configure Search Results Web Part and create a search-results page; typically a search vertical to display results from OneDrive for Business in Office 365
The rest of the configuration assumes that you have successfully replaced the STS certificate of the On-Premises SharePoint Server and established a Server-to-Server trust with Windows Azure ACS acting as a trust broker between your On-premise and Online environment. Complete steps are documented in Part 1 of my post.
Create Result Source to Retrieve Results from OneDrive for Business
You can create a result source for a Search service application, a site collection, or a site. The pre-configured default result source is Local SharePoint Results. However, additional result sources like SharePoint Online may be configured. The configuration can happen on different levels:
· Global in the Search Service Application
· Local per Site Collection or per Site Level
For this post, I will create a Global result source at Search service application.
1. Log on to your SharePoint 2013 environment with SPFarm Account or an account with equivalent privileges.
2. Browse to Central Administration and within Application Management click Manage service applications.
3. Click the Search service application to which you want to add a result source.
4. From the Search Administration page on the left navigation click New Result Source.
5. On the Search Result Sources page, do the following:
a. In the Name text box, type a name for the new result source (for example, SharePoint Online OneDrive)
b. For the Protocol, select Remote SharePoint.
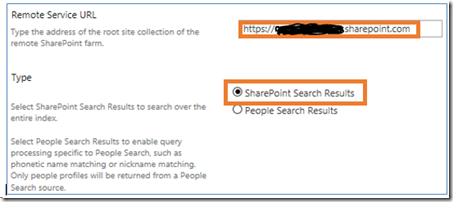
c. For Remote Service URL, type the address of the root site collection of SharePoint Online site collection from where results should be included (for example, https://mytenant.sharepoint.com).
d. For the Type, select SharePoint Search Results.
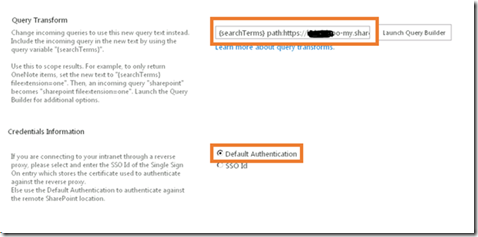
e. Within the Query Transform section, after {searchTerms} type a space. Type the My Site host URL for your SharePoint Online tenant path: https://tenant name-my.sharepoint.com/personal
Leave Credentials Information as default, which is Default Authentication and click Save to save the result source.
This completes the Result source creation. Next, we need to complete the configuration of search results page.
Create Search Results page to retrieve results from OneDrive for Business
Browse to Enterprise Search Centre for your On-Premises SharePoint 2013 environment. In case you do not have one, you can create a new site collection from Central Administration and use the Enterprise Search Centre Template.
Browse to the Enterprise Search Centre mentioned above, click Site Contents and click Pages library. You should see a list of all search pages available for your SharePoint 2013 environment. To create a new Page in this Pages Library, follow these steps mentioned below :
a. Click Files from the top navigation on the library, click New Document and click Page.
b. In the Create Page dialogue box, fill in the following details:
i. In the Title textbox type “ Results from OneDrive”
ii. Description is optional
iii. In the URL Name textbox, type OneDriveResults so the page would be OneDriveResults.aspx
iv. Click Save to create the page
v. Once you have created a new page, ensure that you Check in and Publish a major version of the page to the Pages library, as it will be checked out to the account your are logged in with to perform the configuration.
Add Search Results Web Part
Once you have created a New Search Result page following the steps above we need to add Search results Web Part to retrieve the results.
1. Browse to the search-results page OneDriveResults.aspx that you created in the previous step. To browse to the page click the page on the pages library.
2. Click on the gear icon and choose Edit page.
3. Choose Page tab from top navigation.
4. At the bottom of the list of webparts on the page, you should see Search Results WebPart. Hover in the right-hand corner and select Edit WebPart.
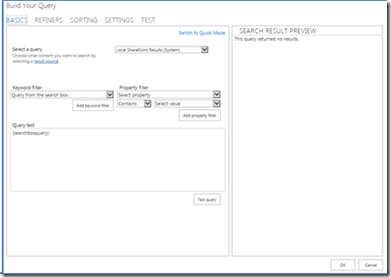
The Search Results Web Part editing tool appears. Select Change query. This should launch a new window to build your Query.
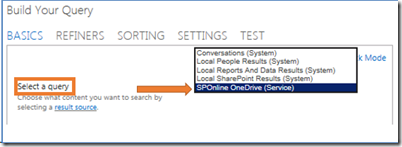
5. From within Build Your Query navigate to Select a Query section and select the Result source you created earlier. This should show up in the list of result sources in the drop-down menu.
6. Leave rest of the selection as defaults and click Apply and OK on the WebPart editing menu.
7. Save the Page and ensure you do a Check in and Publish the page.
The final step would be to create link in the Search Center for OneDrive as a search vertical . The out of box links within search results webparts are:
o Everything
o People
o Conversations
o Videos
Our goal is to have OneDrive as well so that users can easily retrieve the same.
Follow steps below to add OneDrive for Business as a search vertical:
1. Browse to the enterprise Search Center you created on your on-premise environment.
2. Click the gear icon and click Site Settings. Under Search, click Search Settings and fill in the following information.
a. Enter a Search Center URL (Optional).You can choose to leave this empty. If you decide to enter a URL of the Global search center, it displays a message to all users offering them the ability to search again from within that search center.
b. Select the Use the same results page settings as my parent checkbox.
c. Under Configure Search Navigation click Add a Link and fill in the following details:
i. In the Title textbox type in a name to describe the vertical (for example: OneDrive)
ii. In the URL textbox type the link to the results page you created above, for example, /sites/Search/Pages/onedriveresults.aspx
iii. If you want a new session to be open for the results, select the Open the Link in new Window check box.
iv. You can configure Audience so that this shows up only for people whose OneDrive you have redirected to Office 365 or leave it empty if you want to show it to all.
V. Clicking OK should show a new Navigation called OneDrive, which should now be available to users when they search in the enterprise search center for their On-Premises SharePoint 2013.
This completes the setup for OneDrive as a separate vertical that users can click to restrict the search results to OneDrive from SharePoint Online. The search retrieval experience varies based on if ADFS and single sign on has been deployed or if only DirSync with password sync has been configured as a sign in option for Onpremise users. With DirSync password sync, the users would be able to retrieve documents from their OneDrive. However, when they click on the document from within the results they would need to provide their username and password to retrieve the details from Sharepoint Online environment. Once single-sign on is deployed this experience changes. The steps to configure ADFS is described on part 3 of my post. Once single sign on is configured users should be able to seamlessly sign in and retrieve the document once they click on the document from within the search results block . Once they sign in and have a valid fedauth cookie for subsequent clicks on the results that are displayed document retrieval continues with the single sign on experience .
Retrieve Results
To validate your configuration browse to the Enterprise Search Center and you should see the OneDrive vertical. Type a keyword and click OneDrive vertical to see the results.
In my upcoming posts, I am going to talk about how to configure Business connectivity services and leverage an OData source and common error messages and their fixes while setting up Hybrid scenarios.
POST By Manas Biswas [MSFT]
Comments
Anonymous
September 16, 2014
Any update on when BCS article might show up? looking forward to it.. great series...Anonymous
October 08, 2014
I am working on it, should have BCS as well as couple of additional reverse proxies documented.


