Create a custom XML indexing connector for SharePoint 2013
Having a way to feed XML content from a network share or local file directory into the search index is highly useful. This blog post describes how to install and deploy a custom XML connector to the Search service application. The custom XML connector will enable you to crawl content from a network share or local directory, and feed it to the search index. When content is in the search index, it can be displayed in a public facing web site through search.
The follow-up blog post “Display XML content in a publishing site when using the custom XML indexing connector for SharePoint 2013” will describe how you can configure a publishing site to display your XML content through search.
The diagram below shows how a custom XML connector feeds XML content from a network share and local file directory to the search index. This content is then shown in Search Web Parts on a publishing site.

Required components
Before you begin, make sure that you have installed the following:
- SharePoint 2013 Server
- Visual studio 2012
Install and deploy a custom XML indexing connector for SharePoint Server 2013
In the procedure below, you will extract the files needed to create the custom XML extractor, and install this on your local SharePoint Server 2013 installation on the default Search service application.
Note: The user that performs this operation has to be an administrator for the Search service application.
To install the custom XML connector for SharePoint Server 2013
- Download the .zip file at the bottom of this blog. The file includes the following:
-A Microsoft Visual Studio Project to install and deploy the custom XML connector.
-A PowerShell script to create a term set on a publishing site.
-A text file that contains the taxonomy of the term set.
-An .xml file that contains sample .xml product data.
- Extract the contents to a folder on your computer, for example c:\CustomXMLConnector .
- On the Start menu, click All Programs, click Microsoft Visual Studio 2010, and then click Visual Studio Tools and open a Visual Studio command prompt.
- To install the XmlFileConnector.dll, at the command prompt, type the following command and run it:
gacutil /i <ExtractedFolderPath>\bin\Debug\XmlFileConnector.dll
where:
<ExtractedFolderPath> is the folder where your extracted files are located, for example c:\CustomXMLConnector.
Expected result after running this command is "Assembly successfully added to the cache".
- To add the correct key and values to the registry, double click the file named xmldoc.reg
- On the Start menu, click All Programs, then click Microsoft SharePoint 2013 Products and open a SharePoint 2013 Management Shell as an administrator.
- To configure the custom XML connector, at the command prompt, type the following command and run it:
- $searchapp = Get-SPEnterpriseSearchServiceApplication -Identity "Search Service Application"
- New-SPEnterpriseSearchCrawlCustomConnector -SearchApplication $searchapp –Protocol xmldoc -Name xmldoc –ModelFilePath "<ExtractedFolderPath>\Model.xml" where:
<ExtractedFolderPath> is the folder where your extracted files are located, for example c:\CustomXMLConnector. The Model.xml file is included in the Visual Studio project.
- To confirm the configuration, at the command prompt, type the following command and run it:
Get-SPEnterpriseSearchCrawlCustomConnector -SearchApplication $searchapp
Expected result:

- To restart the search service, at the command prompt, type the following commands and run them:
net stop osearch15
net start osearch15
Create new crawled property category for the custom XML connector
When the custom XML connector crawls content, the crawled properties discovered during crawl will have to be added to a crawled property category. You will have to create this category.
Note: The user that performs this operation has to be an administrator for the Search service application.
To create a new crawled property category for the custom XML connector
- On the Start menu, click All Programs, then click Microsoft SharePoint 2013 Products and open a SharePoint 2013 Management Shell as an administrator.
- To create a new crawled property category, at the command prompt type the following commands and run them, where: <ConnectorName> is the name you want to give the custom XML connector, for example Custom XML Connector:
- $searchapp = Get-SPEnterpriseSearchServiceApplication -Identity "Search Service Application"
- New-SPEnterpriseSearchMetadataCategory -Name "<ConnectorName>" -Propset "BCC9619B-BFBD-4BD6-8E51-466F9241A27A" -searchApplication $searchapp
The Propset GUID, BCC9619B-BFBD-4BD6-8E51-466F9241A27A, is hardcoded in the file XmlDocumentNamingContainer.cs and should not be changed.
- To specify that if there are unknown properties in the newly created crawled property category, these should be discovered during crawl, at the command prompt, type and run the following:
$c = Get-SPEnterpriseSearchMetadataCategory -SearchApplication $searchapp -Identity "<ConnectorName>"
$c.DiscoverNewProperties = $true
$c.Update()
where:
<ConnectorName> is the name you want to give the custom XML connector, for example Custom XML Connector.
- To confirm the creation of the crawled property category, on the home page of the SharePoint Central Administration website, in the Application Management section, click Manage service applications, and then Search service application. On the Search Service Application page, in the Queries and Results section, click Search Schema and then Categories.

Create new content source for the XML content
To specify what, when and how the XML content should be crawled, you have to create a new content source for your XML content.
Note: The user that performs this operation has to be an administrator for the Search service application.
To create a new content source for the XML content
- On the home page of the SharePoint Central Administration website, in the Application Management section, click Manage service applications
- On the Manage Service Applications page, click Search service application.
- On the Search Service Administration Page, in the Crawling section, click Content Sources.
- On the Manage Content Sources page, click New Content Source.

- On the Add Content Source page, in the Name section, in the Name box, type a name for the new content source, for example XML Connector.
- In the Content Source Type section, select Custom repository.
- In the Type of Repository section, select xmldoc.
- In the Start Address section, in the Type start addresses below (one per line) box, type the address from where the crawler should being crawling the XML content. The start address syntax is different depending on where the XML content is located:
- If the XML content is located on a local drive, use the following syntax:
xmldoc://localhost/<XMLcontentfolder>/#x=doc:id;;urielm=url;;titleelm=title# where:
<XMLcontentfolder> is the location of your XML content, for example C$/XMLCATALOG.
You can also change the variables doc:id,url and title. To use our example file, you should type: xmldoc://localhost/C$/XMLCATALOG/#x=Product:ID;;titleelm=Title;;urlelm=Url#
- If the XML content is located on a local drive, use the following syntax:
-
If the XML content is located on a network drive, use the following syntax:
xmldoc://<SharedNetworkPath>/#x=doc:id;;urielm=url;;titleelm=title#
where:
<SharedNetworkPath> is the location of your XML content, for example C$/XMLCATALOG.
You can also change the variables doc:id,url and title. To use our example file, you should type: xmldoc://localhost/C$/XMLCATALOG/#x=Product:ID;;titleelm=Title;;urlelm=Url#
Important: Make sure the crawler account has access to the local drive or network share.
Note: In the specified address, xmldoc is a protocol that was added to the registry. The part enclosed in #, contains properties that will be extracted from the document and will be associated with document ID, title and navigation url. #x=Product:ID matches the content in the .xml sample file that you will use later.

- Verify that your newly created content source is shown on the Search Service Application page.

Create sample XML content
Now that you have successfully installed and deployed the custom XML connector, you can use it to extract XML content and display this through search on a publishing site.
To create XML sample content
- Create a folder on your computer, for example C:/xmlcatalog.
- Create an .xml sample file with following content, and store it in your newly created folder.
<?xml version="1.0" encoding="utf-8" ?>
<Products>
<Product>
<ID>C234</ID>
<Title>Contoso series2</Title>
<ItemCategoryText>Cameras</ItemCategoryText>
<Url>https://<server_name>/sites/pub1/Pages/DetailsPage.aspx?id=C234</Url>
<Category>Cameras/SLR</Category>
<Price>799</Price>
<Description>This camera is making great pictures. Easy to use to an affordable price. </Description>
</Product>
<Product>
<ID>C235</ID>
<Title>Contoso Camera</Title>
<ItemCategoryText>Cameras</ItemCategoryText>
<Url>https://<server_name>/sites/pub1/Pages/DetailsPage.aspx?id=C235</Url>
<Category>Cameras/compact</Category>
<Price>350</Price>
<Description>This camera is making great pictures. Easy to use to an affordable price. </Description>
</Product>
</Products>
To enable crawled items from XML document to appear in CBS with managed navigation make sure to include a field ( e.g. ItemCategoryText.) which will be mapped to the taxonomy term set.
Each record should include a field which will point to the associated category. An item called “Contoso series2” should point to “Cameras”.Then it will be possible to associate menu selection and results in CBS.
The publishing site, on which you want to display this content, uses managed navigation (I will show you how to import a term set to drive managed navigation later in this blog). By specifying a query in a Content Search Web Part that contains terms from your managed navigation term set, you can display indexed items that are associated with each term. To do this, a field in the .xml file has to have the same value as a term in the term set that drives your managed navigation. In our sample .xml file, the field ItemCategoryText contains this value. This value specifies to which term in the term set the entry belongs. For example, for the item with the title “Contoso series2”, the value for ItemCategoryText is “Cameras”.So, when users navigate to the "Cameras" page on the publishing site, the Content Search Web Part can display all entries that have the value "Cameras" for ItemCategoryText (I will show you how to specify the query in the Content Search Web Part later in this blog).
To crawl newly created content source
Now that you have some sample .xml content, you will need to crawl this content.
- On the home page of the SharePoint Central Administration website, in the Application Management section, click Manage service applications
- On the Manage Service Applications page, click Search Service Application.
- On the Search Service Administration Page, in the Crawling section, click Content Sources.
- Start a full crawl of the content source you created earlier.

- When crawling is complete, ensure that crawled properties where created. On the Search Service Application page, in the section Queries and Results, click Search Schema, and then Categories. Your newly created category should contain 17 crawled properties.

To see the crawled properties, click on the category name.

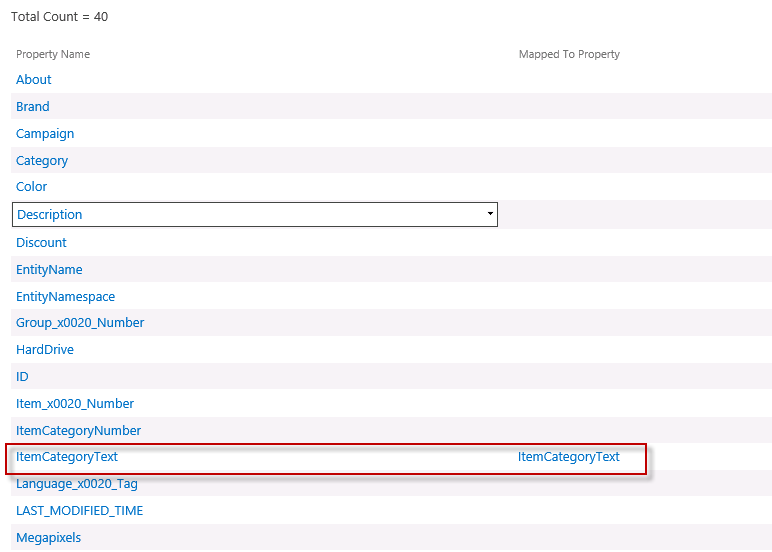
- Verify that a crawled property was created for the ItemCategoryText field by typing ItemCategoryText in the Crawled properties box, and then click thesearch arrow.
To create a new managed property for ItemCategoryText
Now that you have crawled properties for the .xml content, you have to create a managed property for the field ItemCategoryText. You will use this managed property when you define the query in a Content Search Web Part.
- On the Search Service Application page, click Managed Properties.
- On the Managed Properties page, click New Managed Property.
- In the Property name field, type a name for the managed property, for example ItemCategoryText.
- Check the following check boxes:
- Searchable
- Queryable
- Retrievable
- Allow multiple values

- In the Mappings to crawled properties section, click the button Add a Mapping.
- In the Search for a crawled property name section, type ItemCategoryText, and click Find.
- In the Select a crawled property section, click ItemCategoryText, and OK.
Verify the mapping by searching for the managed property ItemCategoryText, and see that it is mapped to ItemCategoryText property.
In order to add the new managed property to the search index, you have to do an incremental of the content source.
To start an incremental crawl
- On the home page of the SharePoint Central Administration website, in the Application Management section, click Manage service applications
- On the Manage Service Applications page, click Search Service Application.
- On the Search Service Administration Page, in the Crawling section, click Content Sources.
- Start an incremental crawl of the content source you created earlier.(see figure below)
- When the incremental crawl has complete, verify that the crawl completed without any errors. In the Diagnostics section, click Crawl Log, and verify that no errors were found.

Using a bigger product set.
The .zip file also includes a bigger product set, containing 800 items.
As you now have a custom XML connector that works:
- Copy the Product.xml file to your content source location (C:\XMLCATALOG\)
- Initiate a new incremental crawl as stated in the previous section.
- When the incremental crawl has complete, verify that the crawl completed without any errors. In the Diagnostics section, click Crawl Log, and verify that no errors were found.
You have now crawled the xml document from your local drive, created and mapped the proper managed property (ItemCategorytext) to the field Itemcategirytext in the xml file, and indexed it.
This blog post ends here.
If you are interested in seeing how you can set up a publishing site to display your XML content through search, please visit our blog post: “Display XML content in a publishing site when using the custom XML indexing connector for SharePoint 2013”.
Acknowledgements
Authors: Anders Fagerhaug (andersfa) and Armen Kirakosyan (armenk)
Please also see the blog post from Nadeem Ishqair on the same subject for SharePoint 2010.
Comments
Anonymous
April 29, 2013
You have to run the registry entry on all the servers where the Search service is running, else you will see errors saying did not understand the protocol. Secondly, the model file also needs to be placed in the same file path on all servers where Search service is running, else you will see errors in Crawl log saying Could not find the Model file. I wonder why it is not kept in the DB itself.Anonymous
August 28, 2013
Will this implementation work in a SharePoint 2010 Enterprise environment as well? (are there any 2013-specific steps in this post?)Anonymous
April 24, 2014
Excellent article. Thank you. I have a slight problem though. In my case the crawler calls GetAccessUri(IEntity, ILobSystemInstance) which throws a NotSupportedException. Am I missing something here? How would I go about implementing that method?Anonymous
July 21, 2014
Hi david, I have exact same issue with GetAccessUri throwing not supported exception. Did you find out why this is happening?Anonymous
September 01, 2014
Hi , Excellent Article, Everything worked for me . But i have an issue , whenever i make some changes to the source xml file and do an increment or full crawl the changes do not reflect in the search results . I even tried the index reset . Still it shows the old XML data . Can you please let me know what might be the issue ?Anonymous
August 06, 2015
Hi, This is working fine with the XML format given in the blog. But somehow its NOTworking with my XML format (see below) which is having "=" and different compare to blog example XML file. Is this solution designed for only for blog example XML format ? Please let me know, your response will be much appreciated. <?xml version="1.0" encoding="UTF-8" standalone="yes"?> <healthRecords> <Pdata> DocFile="837-4392-b557-b1bb7e7ea5a6.pdf" Graph="Chart" MonthOfService="10" Surname="TestR" MiddleName="TestTH" GICN="046281131A" </Pdata> </healtRecords> Thank you! ChanduAnonymous
August 09, 2015
The comment has been removedAnonymous
October 18, 2015
Dear Anders, thank you for the detailed post. I have been able to successfully set this up in my SharePoint VM. However on the UAT environment, I run into error where the call is being made to the GetAccessUri(IEntity, ILobSystemInstance) method (which is not implemented and throws an "System.NotSupportedException Specified method is not supported exception") I am not sure why the crawler is calling this method instead of the implemented GetAccessUrl(IEntityInstance) method. I have tried creating a search service application from scratch as well as trying to generate the access uri in the not implemented method without any luck. I would really appreciate if you could point me in the right direction please? Thanks, Arc.Anonymous
December 14, 2015
The comment has been removedAnonymous
December 14, 2015
Hi All, I found the solution. I installed the connector DLL on both the application servers and both the crawl-index servers and performed a restart on search service. It worked. Thanks, Hemil