Dans ce guide de démarrage rapide, nous allons vous guider dans la configuration de votre environnement de développement local avec le Kit de développement logiciel (SDK) Azure AI Foundry . Nous écrivons une invite, nous l’exécutons dans le cadre de votre code d’application, suivons les appels LLM en cours et exécutons une évaluation de base sur les sorties du LLM.
Conseil / Astuce
Le reste de cet article montre comment utiliser un projet hub. Sélectionnez Le projet Foundry en haut de cet article si vous souhaitez utiliser un projet Foundry à la place.
Conditions préalables
- Un abonnement Azure. Si vous n’avez pas d’abonnement Azure, créez un compte gratuit avant de commencer.
- Un projet basé sur un centre. Si vous débutez avec Azure AI Foundry et que vous n’avez pas de projet hub, sélectionnez Le projet Foundry en haut de cet article pour utiliser un projet Foundry à la place.
Configurer votre environnement de développement
configurer votre environnement de développement
Veillez à installer ces packages :
pip install azure-ai-projects azure-ai-inference azure-identity
Déployer un modèle
Conseil / Astuce
Étant donné que vous pouvez personnaliser le volet gauche dans le portail Azure AI Foundry, vous pouvez voir différents éléments que ceux indiqués dans ces étapes. Si vous ne voyez pas ce que vous recherchez, sélectionnez ... Plus en bas du volet gauche.
Connectez-vous à Azure AI Foundry.
Sélectionnez un projet basé sur un hub. Si vous n’avez pas de projet hub, sélectionnez Le projet Foundry en haut de cet article pour utiliser un projet Foundry à la place.
Sélectionnez Catalogue de modèles dans le volet gauche.
Sélectionnez le modèle gpt-4o-mini dans la liste des modèles. Vous pouvez utiliser la barre de recherche pour la trouver.
Dans la page détails du modèle, sélectionnez Déployer.
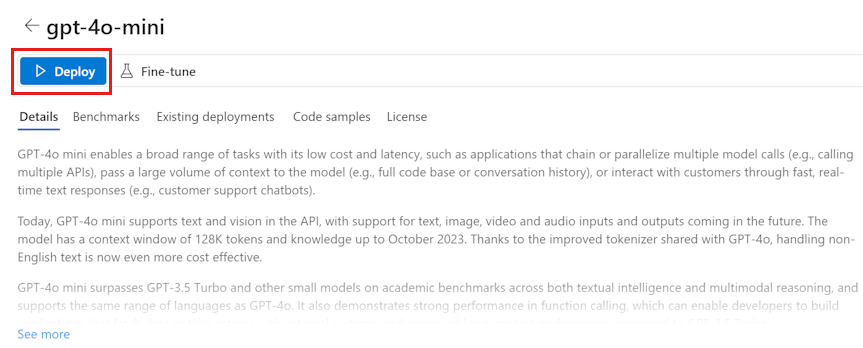
Laissez par défaut le nom de déploiement . Sélectionnez Déployer.
Une fois le modèle déployé, sélectionnez Ouvrir dans le terrain de jeu pour tester votre modèle.
Créer votre application de conversation
Créez un fichier nommé chat.py. Copiez et collez le code suivant dans celui-ci.
from azure.ai.projects import AIProjectClient
from azure.identity import DefaultAzureCredential

project_connection_string = "<your-connection-string-goes-here>"

project = AIProjectClient.from_connection_string(
    conn_str=project_connection_string, credential=DefaultAzureCredential()
)

chat = project.inference.get_chat_completions_client()
response = chat.complete(
    model="gpt-4o-mini",
    messages=[
        {
            "role": "system",
            "content": "You are an AI assistant that speaks like a techno punk rocker from 2350. Be cool but not too cool. Ya dig?",
        },
        {"role": "user", "content": "Hey, can you help me with my taxes? I'm a freelancer."},
    ],
)

print(response.choices[0].message.content)
Insérer votre chaîne de connexion
Votre chaîne de connexion de projet est nécessaire pour appeler Azure OpenAI dans Azure AI Foundry Models à partir de votre code.
Recherchez votre chaîne de connexion dans le projet Azure AI Foundry que vous avez créé dans le guide de démarrage rapide sur le terrain de jeu Azure AI Foundry. Ouvrez le projet, puis recherchez la chaîne de connexion dans la page vue d’ensemble Vue d’ensemble.

Copiez la chaîne de connexion et remplacez <your-connection-string-goes-here> dans le fichier chat.py.
Exécuter votre script de conversation
Exécutez le script pour afficher la réponse du modèle.
python chat.py
Le script utilise des messages d’entrée et de sortie codés en dur. Dans une application réelle, vous allez prendre l’entrée d’une application cliente, générer un message système avec des instructions internes au modèle, puis appeler le LLM avec tous les messages.
Nous allons modifier le script pour prendre l’entrée d’une application cliente et générer un message système à l’aide d’un modèle d’invite.
Supprimez la dernière ligne du script qui imprime une réponse.
À présent, définissez une fonction get_chat_response qui accepte les messages et le contexte, génère un message système à l’aide d’un modèle d’invite et appelle un modèle. Ajoutez ce code à votre fichier chat.py existant :
from azure.ai.inference.prompts import PromptTemplate


def get_chat_response(messages, context):
    # create a prompt template from an inline string (using mustache syntax)
    prompt_template = PromptTemplate.from_string(
        prompt_template="""
        system:
        You are an AI assistant that speaks like a techno punk rocker from 2350. Be cool but not too cool. Ya dig? Refer to the user by their first name, try to work their last name into a pun.

        The user's first name is {{first_name}} and their last name is {{last_name}}.
        """
    )

    # generate system message from the template, passing in the context as variables
    system_message = prompt_template.create_messages(data=context)

    # add the prompt messages to the user messages
    return chat.complete(
        model="gpt-4o-mini",
        messages=system_message + messages,
        temperature=1,
        frequency_penalty=0.5,
        presence_penalty=0.5,
    )
Remarque
Le modèle d’invite utilise le format mustache.
La fonction get_chat_response peut être facilement ajoutée en tant qu’itinéraire vers une application FastAPI ou Flask pour activer l’appel de cette fonction à partir d’une application web frontale.
À présent, simulez la transmission d’informations d’une application frontale à cette fonction. Ajoutez le code suivant à la fin de votre fichier chat.py. N’hésitez pas à jouer avec le message et à ajouter votre propre nom.
if __name__ == "__main__":
    response = get_chat_response(
        messages=[{"role": "user", "content": "what city has the best food in the world?"}],
        context={"first_name": "Jessie", "last_name": "Irwin"},
    )
    print(response.choices[0].message.content)
Exécutez le script révisé pour voir la réponse du modèle avec cette nouvelle entrée.
python chat.py
Étape suivante
Dans ce guide de démarrage rapide, vous utilisez Azure AI Foundry pour :
- Création d’un projet
- Déployer un modèle
- Exécuter une saisie semi-automatique de conversation
- Créer et exécuter un agent
- Charger des fichiers dans l’agent
Le SDK Azure AI Foundry est disponible dans plusieurs langages, notamment Python, Java, JavaScript et C#. Ce guide de démarrage rapide fournit des instructions pour chacune de ces langues.
Conseil / Astuce
Le reste de cet article montre comment utiliser un projet Foundry. Sélectionnez un projet hub en haut de cet article si vous souhaitez utiliser un projet hub à la place.
Conditions préalables
- Un abonnement Azure. Si vous n’avez pas d’abonnement Azure, créez un compte gratuit avant de commencer.
- Vous devez être propriétaire de l’abonnement pour recevoir le contrôle d’accès approprié nécessaire pour utiliser votre projet.
Commencer par un projet et un modèle
Connectez-vous au portail Azure AI Foundry.
Dans la page d’accueil, recherchez, puis sélectionnez le modèle gpt-4o .
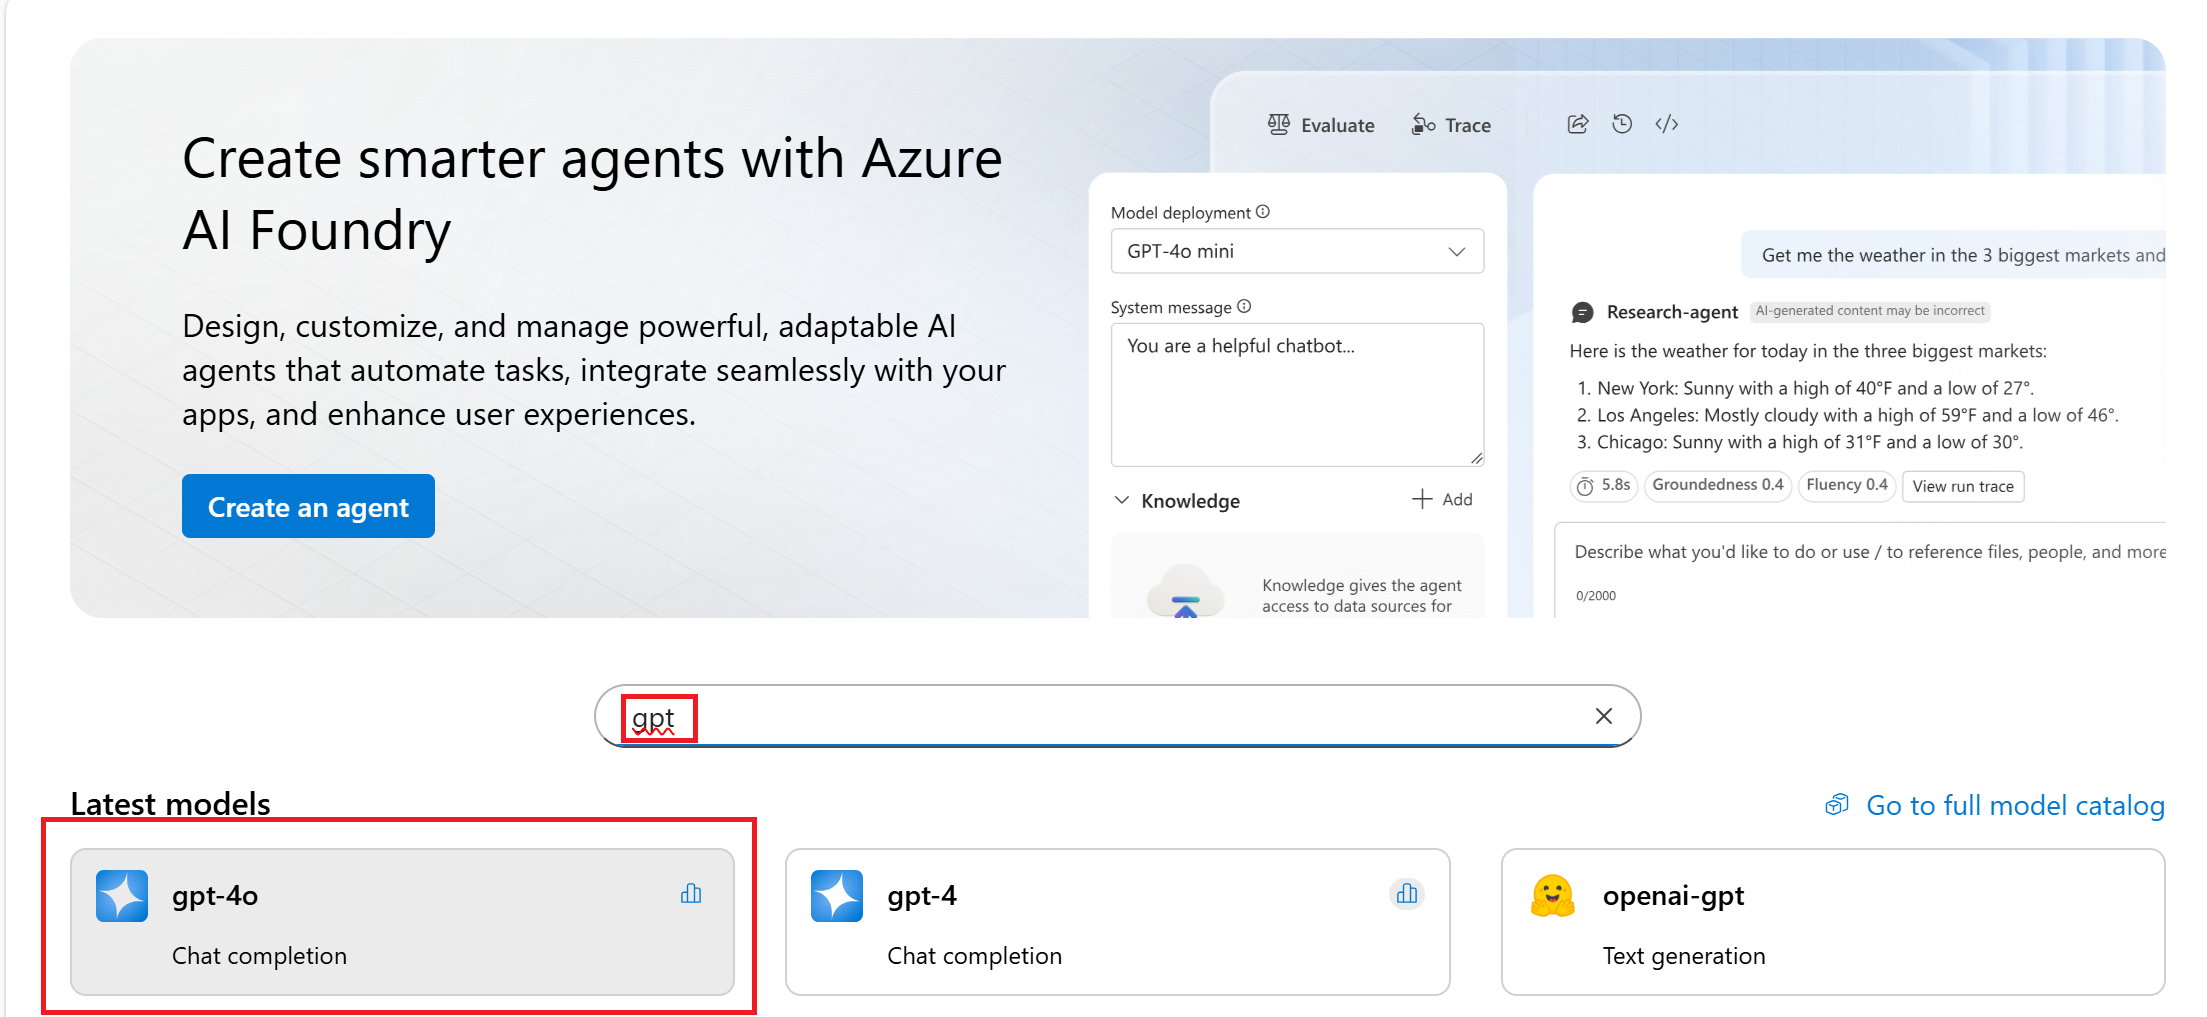
Dans la page détails du modèle, sélectionnez Utiliser ce modèle.
Renseignez un nom à utiliser pour votre projet, puis sélectionnez Créer.
Une fois vos ressources créées, vous êtes dans l'espace de discussion.
Configurer votre environnement
Aucune installation n’est nécessaire pour utiliser le portail Azure AI Foundry.
Installer Python et Azure CLI
Installez ces packages :
pip install openai azure-ai-projects azure-identity
-
Copiez le point de terminaison du projet Azure AI Foundry dans la section Vue d’ensemble de votre projet. Vous l’utiliserez en un instant.

Conseil / Astuce
Si vous ne voyez pas le point de terminaison du projet Azure AI Foundry, vous utilisez un projet hub. (Voir Types de projets). Basculez vers un projet Foundry ou utilisez les étapes précédentes pour en créer un.
Veillez à vous connecter à l’aide de la commande CLI az login (ou az login --use-device-code) pour vous authentifier avant d’exécuter vos scripts Python.
Installez Java et Azure CLI.
-
Copiez le point de terminaison du projet Azure AI Foundry dans la section Vue d’ensemble de votre projet. Vous l’utiliserez en un instant.
Conseil / Astuce
Si vous ne voyez pas le point de terminaison du projet Azure AI Foundry, vous utilisez un projet hub. (Voir Types de projets). Basculez vers un projet Foundry ou utilisez les étapes précédentes pour en créer un.
Définissez ces variables d’environnement à utiliser dans vos scripts :
# Azure AI Foundry Endpoint
AZURE_ENDPOINT=your_endpoint_here

# Azure AI Foundry Model Deployment Name
AZURE_DEPLOYMENT=your_deployment_name_here

# Project ID (Optional - will be generated if not provided)
PROJECT_ID=your_project_id_here
MODEL_DEPLOYMENT_NAME=gpt-4o

# Note: This sample uses DefaultAzureCredential for authentication
# Please ensure you are logged in with Azure CLI using 'az login'
# For more authentication options, see: https://learn.microsoft.com/en-us/java/api/overview/azure/identity-readme?view=azure-java-stable
Veillez à vous connecter à l’aide de la commande CLI az login (ou az login --use-device-code) pour vous authentifier avant d’exécuter vos scripts Java.
Téléchargez POM.XML dans votre IDE Java.
Installer Node.js et Azure CLI
Veillez à vous connecter à l’aide de la commande CLI az login (ou az login --use-device-code) pour vous authentifier avant d’exécuter vos scripts JavaScript.
Téléchargez package.json.
Installer des packages avec npm install
-
Copiez le point de terminaison du projet Azure AI Foundry dans la section Vue d’ensemble de votre projet. Vous l’utiliserez en un instant.
Conseil / Astuce
Si vous ne voyez pas le point de terminaison du projet Azure AI Foundry, vous utilisez un projet hub. (Voir Types de projets). Basculez vers un projet Foundry ou utilisez les étapes précédentes pour en créer un.
Définissez ces variables d’environnement à utiliser dans vos scripts :
MODEL_DEPLOYMENT_NAME=gpt-4o
PROJECT_ENDPOINT=https://<your-foundry-resource-name>.services.ai.azure.com/api/projects/<your-foundry-project-name>
Installer C# et Azure CLI
Installer des packages :
Pour utiliser des services Azure AI dans votre projet .NET, vous devez installer plusieurs packages NuGet. Ajoutez des packages NuGet à l’aide de l’interface CLI .NET dans le terminal intégré :
# Add Azure AI SDK packages
dotnet add package Azure.Identity
dotnet add package Azure.AI.Projects
dotnet add package Azure.AI.Agents.Persistent
dotnet add package Azure.AI.Inference
-
Copiez le point de terminaison du projet Azure AI Foundry dans la section Vue d’ensemble de votre projet. Vous l’utiliserez en un instant.
Conseil / Astuce
Si vous ne voyez pas le point de terminaison du projet Azure AI Foundry, vous utilisez un projet hub. (Voir Types de projets). Basculez vers un projet Foundry ou utilisez les étapes précédentes pour en créer un.
Définissez ces variables d’environnement à utiliser dans vos scripts :
AZURE_AI_ENDPOINT=https://your.services.ai.azure.com/api/projects/project
AZURE_AI_MODEL=your_model_name
Veillez à vous connecter à l’aide de la commande CLI az login (ou az login --use-device-code) pour vous authentifier avant d’exécuter vos scripts C#.
Installation de l’interface de ligne de commande Azure
Veillez à vous connecter à l’aide de la commande CLI az login (ou az login --use-device-code) pour vous authentifier avant d’exécuter la commande suivante.
Obtenir un jeton d’accès temporaire. Il expirera en 60 à 90 minutes, vous devrez l’actualiser après cela.
az account get-access-token --scope https://ai.azure.com/.default
Enregistrez les résultats sous forme de variable AZURE_AI_AUTH_TOKENd’environnement.
Exécuter une saisie semi-automatique de conversation
Les achèvements de conversation sont le bloc de construction de base des applications IA. À l’aide des complétions de chat, vous pouvez envoyer une liste de messages et obtenir une réponse du modèle.
- Dans le terrain de jeu de conversation, renseignez l’invite et sélectionnez le bouton Envoyer .
- Le modèle retourne une réponse dans le volet Réponse .
Remplacez votre point de terminaison pour le endpoint dans le code suivant :
from azure.ai.projects import AIProjectClient
from azure.identity import DefaultAzureCredential

project = AIProjectClient(
    endpoint="https://your-foundry-resource-name.ai.azure.com/api/projects/project-name",
    credential=DefaultAzureCredential(),
)

models = project.inference.get_azure_openai_client(api_version="2024-10-21")
response = models.chat.completions.create(
    model="gpt-4o",
    messages=[
        {"role": "system", "content": "You are a helpful writing assistant"},
        {"role": "user", "content": "Write me a poem about flowers"},
    ],
)

print(response.choices[0].message.content)
package com.azure.ai.foundry.samples;

import com.azure.ai.foundry.samples.utils.ConfigLoader;
import com.azure.ai.projects.ProjectsClient;
import com.azure.ai.projects.ProjectsClientBuilder;
import com.azure.ai.projects.models.chat.ChatClient;
import com.azure.ai.projects.models.chat.ChatCompletion;
import com.azure.ai.projects.models.chat.ChatCompletionOptions;
import com.azure.ai.projects.models.chat.ChatMessage;
import com.azure.ai.projects.models.chat.ChatRole;
import com.azure.identity.DefaultAzureCredential;
import com.azure.identity.DefaultAzureCredentialBuilder;
import com.azure.ai.projects.models.chat.ChatCompletionResponse;


import java.util.Arrays;
import java.util.List;

/**
 * This sample demonstrates how to use the chat completion API with the Azure AI Foundry SDK.
 *
 * Chat completions allow you to have interactive, conversational interactions with AI models
 * by providing a list of messages and receiving AI-generated responses that maintain context
 * across the conversation.
 *
 * This sample shows:
 * 1. How to authenticate with Azure AI Foundry using DefaultAzureCredential
 * 2. How to create a chat client for a specific model deployment
 * 3. How to structure a conversation with system and user messages
 * 4. How to configure and send a chat completion request
 * 5. How to process and display the AI-generated response
 *
 * Prerequisites:
 * - An Azure account with access to Azure AI Foundry
 * - Azure CLI installed and logged in ('az login')
 * - Environment variables set in .env file (AZURE_ENDPOINT, AZURE_DEPLOYMENT)
 */
public class ChatCompletionSample {
    public static void main(String[] args) {
        // Load configuration values from the .env file
        // These include the service endpoint and the deployment name of the model to use
        String endpoint = ConfigLoader.getAzureEndpoint();
        String deploymentName = ConfigLoader.getAzureDeployment();

        // Get DefaultAzureCredential for authentication
        // This uses the most appropriate authentication method based on the environment
        // For local development, it will use your Azure CLI login credentials
        DefaultAzureCredential credential = ConfigLoader.getDefaultCredential();

        // Create a projects client to interact with Azure AI Foundry services
        // The client requires an authentication credential and an endpoint
        ProjectsClient client = new ProjectsClientBuilder()
            .credential(credential)
            .endpoint(endpoint)
            .buildClient();

        // Get a chat client for the specified model deployment
        // This client provides access to chat completion functionality
        ChatClient chatClient = client.getChatClient(deploymentName);

        // Create a list of chat messages to form the conversation
        // This includes a system message to set the assistant's behavior
        // and a user message containing the user's question or prompt
        List<ChatMessage> messages = Arrays.asList(
            new ChatMessage(ChatRole.SYSTEM, "You are a helpful assistant."),
            new ChatMessage(ChatRole.USER, "Tell me about Azure AI Foundry.")
        );

        // Configure chat completion options including the messages, temperature, and token limit
        // - Temperature controls randomness: lower values (like 0.2) give more focused responses,
        //   higher values (like 0.8) give more creative responses
        // - MaxTokens limits the length of the response
        ChatCompletionOptions options = new ChatCompletionOptions(messages)
            .setTemperature(0.7)  // Balanced between deterministic and creative
            .setMaxTokens(800);   // Limit response length

        System.out.println("Sending chat completion request...");

        // Send the request and get the AI-generated completion
        ChatCompletion completion = chatClient.getChatCompletion(options);

        // Display the response
        System.out.println("\nResponse from assistant:");
        System.out.println(completion.getChoices().get(0).getMessage().getContent());

        // Display usage statistics
        System.out.println("\nUsage Statistics:");
        System.out.println("Prompt Tokens: " + completion.getUsage().getPromptTokens());
        System.out.println("Completion Tokens: " + completion.getUsage().getCompletionTokens());
        System.out.println("Total Tokens: " + completion.getUsage().getTotalTokens());
    }
}
// Get the Azure AI endpoint and deployment name from environment variables
const endpoint = process.env.PROJECT_ENDPOINT;
const deployment = process.env.MODEL_DEPLOYMENT_NAME || 'gpt-4o';

// Create an Azure OpenAI Client
const project = new AIProjectClient(endpoint, new DefaultAzureCredential());
const client = await project.inference.azureOpenAI({
    // The API version should match the version of the Azure OpenAI resource
    apiVersion: "2024-12-01-preview"
});

// Create a chat completion
const chatCompletion = await client.chat.completions.create({
    model: deployment,
    messages: [
        { role: "system", content: "You are a helpful writing assistant" },
        { role: "user", content: "Write me a poem about flowers" },
    ],
});
console.log(`\n==================== 🌷 COMPLETIONS POEM ====================\n`);
console.log(chatCompletion.choices[0].message.content);
using Azure;
using Azure.Identity;
using Azure.AI.Projects;
using Azure.AI.Inference;

var projectEndpoint = new Uri(System.Environment.GetEnvironmentVariable("AZURE_AI_ENDPOINT"));
var modelDeploymentName = System.Environment.GetEnvironmentVariable("AZURE_AI_MODEL");
var credential = new DefaultAzureCredential();

AIProjectClient client = new AIProjectClient(projectEndpoint, credential);

ChatCompletionsClient chatClient = client.GetChatCompletionsClient();

var requestOptions = new ChatCompletionsOptions()
{
    Messages =
        {
            new ChatRequestSystemMessage("You are a helpful assistant."),
            new ChatRequestUserMessage("How many feet are in a mile?"),
        },
    Model = modelDeploymentName
};
Response<ChatCompletions> response = chatClient.Complete(requestOptions);
Console.WriteLine(response.Value.Content);
Remplacez YOUR-FOUNDRY-RESOURCE-NAME par vos valeurs :
curl --request POST --url 'https://YOUR-FOUNDRY-RESOURCE-NAME.services.ai.azure.com/openai/deployments/gpt-4o/chat/completions?api-version=2024-10-21' \
-h 'authorization: Bearer $AZURE_AI_AUTH_TOKEN' \
-h 'content-type: application/json' \
-d '{
        "messages": [
            {"role": "system",
            "content": "You are a helpful writing assistant"},
            {"role": "user",
            "content": "Write me a poem about flowers"}
        ],
        "model": "gpt-4o"
    }'
Discuter avec un agent
Les agents disposent de fonctionnalités puissantes grâce à l’utilisation d’outils. Commencez par discuter avec un agent.
Lorsque vous êtes prêt à essayer un agent, un agent par défaut est créé pour vous. Pour discuter avec cet agent :
- Dans le volet gauche, sélectionnez Terrains de jeux.
- Dans la carte de terrain de jeu Agents , sélectionnez Allons-y.
- Ajoutez des instructions, telles que « Vous êtes un assistant d’écriture utile ».
- Commencez à discuter avec votre agent, par exemple « Écrire un poème sur les fleurs ».
Remplacez votre point de terminaison pour le endpoint dans le code suivant :
from azure.ai.projects import AIProjectClient
from azure.identity import DefaultAzureCredential
from azure.ai.agents.models import ListSortOrder, FilePurpose

project = AIProjectClient(
    endpoint="https://your-foundry-resource-name.ai.azure.com/api/projects/project-name",
    credential=DefaultAzureCredential(),
)

agent = project.agents.create_agent(
    model="gpt-4o",
    name="my-agent",
    instructions="You are a helpful writing assistant")

thread = project.agents.threads.create()
message = project.agents.messages.create(
    thread_id=thread.id,
    role="user",
    content="Write me a poem about flowers")

run = project.agents.runs.create_and_process(thread_id=thread.id, agent_id=agent.id)
if run.status == "failed":
    # Check if you got "Rate limit is exceeded.", then you want to get more quota
    print(f"Run failed: {run.last_error}")

# Get messages from the thread
messages = project.agents.messages.list(thread_id=thread.id)

# Get the last message from the sender
messages = project.agents.messages.list(thread_id=thread.id, order=ListSortOrder.ASCENDING)
for message in messages:
    if message.run_id == run.id and message.text_messages:
        print(f"{message.role}: {message.text_messages[-1].text.value}")

# Delete the agent once done
project.agents.delete_agent(agent.id)
print("Deleted agent")
package com.azure.ai.foundry.samples;

import com.azure.ai.foundry.samples.utils.ConfigLoader;
import com.azure.ai.projects.ProjectsClient;
import com.azure.ai.projects.ProjectsClientBuilder;
import com.azure.ai.projects.models.agent.Agent;
import com.azure.ai.projects.models.agent.AgentClient;
import com.azure.ai.projects.models.agent.AgentMessage;
import com.azure.ai.projects.models.agent.AgentOptions;
import com.azure.ai.projects.models.agent.AgentRole;
import com.azure.ai.projects.models.agent.AgentRun;
import com.azure.ai.projects.models.agent.AgentRunStatus;
import com.azure.ai.projects.models.agent.AgentThread;
import com.azure.identity.DefaultAzureCredential;

import java.util.List;

/**
 * This sample demonstrates how to create and run an agent using the Azure AI Foundry SDK.
 *
 * Agents in Azure AI Foundry are specialized AI assistants that can be customized with
 * specific instructions and capabilities to perform particular tasks. They maintain conversation
 * history in threads and can be deployed for various use cases.
 *
 * This sample shows:
 * 1. How to authenticate with Azure AI Foundry using DefaultAzureCredential
 * 2. How to create an agent with specific instructions and capabilities
 * 3. How to create a thread for conversation with the agent
 * 4. How to send messages to the agent and run it
 * 5. How to wait for the agent to complete its execution
 * 6. How to retrieve and display the agent's response
 *
 * Prerequisites:
 * - An Azure account with access to Azure AI Foundry
 * - Azure CLI installed and logged in ('az login')
 * - Environment variables set in .env file (AZURE_ENDPOINT, AZURE_DEPLOYMENT)
 */
public class AgentSample {
    public static void main(String[] args) {
        // Load configuration values from the .env file
        // These include the service endpoint and the deployment name of the model to use
        String endpoint = ConfigLoader.getAzureEndpoint();
        String deploymentName = ConfigLoader.getAzureDeployment();

        // Get DefaultAzureCredential for authentication
        // This uses the most appropriate authentication method based on the environment
        // For local development, it will use your Azure CLI login credentials
        DefaultAzureCredential credential = ConfigLoader.getDefaultCredential();

        // Create a projects client to interact with Azure AI Foundry services
        // The client requires an authentication credential and an endpoint
        ProjectsClient client = new ProjectsClientBuilder()
            .credential(credential)
            .endpoint(endpoint)
            .buildClient();

        // Get an agent client, which provides operations for working with AI agents
        // This includes creating, configuring, and running agents
        AgentClient agentClient = client.getAgentClient();

        // Create a new agent with specialized capabilities and instructions
        // The agent is configured with a name, description, instructions, and underlying model
        System.out.println("Creating agent...");
        Agent agent = agentClient.createAgent(new AgentOptions()
            .setName("Research Assistant")                       // Descriptive name for the agent
            .setDescription("An agent that helps with research tasks")  // Brief description of the agent's purpose
            .setInstructions("You are a research assistant. Help users find information and summarize content.") // Detailed instructions for the agent's behavior
            .setModel(deploymentName));                          // The underlying AI model to power the agent

        System.out.println("Agent created: " + agent.getName() + " (ID: " + agent.getId() + ")");

        // Create a thread for the conversation with the agent
        // Threads maintain conversation history and state across multiple interactions
        System.out.println("Creating thread...");
        AgentThread thread = agentClient.createThread();
        System.out.println("Thread created: " + thread.getId());

        // Create a user message
        AgentMessage userMessage = new AgentMessage()
            .setRole(AgentRole.USER)
            .setContent("Explain what cloud computing is and list three benefits.");

        // Run the agent
        System.out.println("Running agent...");
        AgentRun run = agentClient.createRun(thread.getId(), agent.getId(), userMessage);
        System.out.println("Run created: " + run.getId());

        // Wait for the run to complete
        AgentRun completedRun = waitForRunCompletion(agentClient, thread.getId(), run.getId());
        System.out.println("Run completed with status: " + completedRun.getStatus());

        // Get messages from the thread
        List<AgentMessage> messages = agentClient.getMessages(thread.getId());

        // Display the assistant's response
        System.out.println("\nConversation:");
        for (AgentMessage message : messages) {
            System.out.println(message.getRole() + ": " + message.getContent());
        }
    }

    private static AgentRun waitForRunCompletion(AgentClient agentClient, String threadId, String runId) {
        AgentRun run = agentClient.getRun(threadId, runId);

        while (run.getStatus() == AgentRunStatus.QUEUED || run.getStatus() == AgentRunStatus.IN_PROGRESS) {
            try {
                System.out.println("Run status: " + run.getStatus() + " - waiting...");
                Thread.sleep(1000); // Wait for 1 second before checking again
                run = agentClient.getRun(threadId, runId);
            } catch (InterruptedException e) {
                Thread.currentThread().interrupt();
                throw new RuntimeException("Thread was interrupted", e);
            }
        }

        return run;
    }
}
const endpoint = process.env.PROJECT_ENDPOINT;
const deployment = process.env.MODEL_DEPLOYMENT_NAME || 'gpt-4o';
const client = new AIProjectClient(endpoint, new DefaultAzureCredential());

// Create an Agent
const agent = await client.agents.createAgent(deployment, {
    name: 'my-agent',
    instructions: 'You are a helpful agent'
});
console.log(`\n==================== 🕵️  POEM AGENT ====================`);

// Create a thread and message
const thread = await client.agents.threads.create();
const prompt = 'Write me a poem about flowers';
console.log(`\n---------------- 📝 User Prompt ---------------- \n${prompt}`);
await client.agents.messages.create(thread.id, 'user', prompt);

// Create run
let run = await client.agents.runs.create(thread.id, agent.id);

// Wait for run to complete
console.log(`\n---------------- 🚦 Run Status ----------------`);
while (['queued', 'in_progress', 'requires_action'].includes(run.status)) {
    // Avoid adding a lot of messages to the console
    await new Promise((resolve) => setTimeout(resolve, 1000));
    run = await client.agents.runs.get(thread.id, run.id);
    console.log(`Run status: ${run.status}`);
}

console.log('\n---------------- 📊 Token Usage ----------------');
console.table([run.usage]);

const messagesIterator = await client.agents.messages.list(thread.id);
const assistantMessage = await getAssistantMessage(messagesIterator);
console.log('\n---------------- 💬 Response ----------------');
printAssistantMessage(assistantMessage);

// Clean up
console.log(`\n---------------- 🧹 Clean Up Poem Agent ----------------`);
await client.agents.deleteAgent(agent.id);
console.log(`Deleted Agent, Agent ID: ${agent.id}`);
using Azure;
using Azure.Identity;
using Azure.AI.Agents.Persistent;

// Creating the Client for agents
var projectEndpoint = System.Environment.GetEnvironmentVariable("AZURE_AI_ENDPOINT");
var modelDeploymentName = System.Environment.GetEnvironmentVariable("AZURE_AI_MODEL");
PersistentAgentsClient client = new(projectEndpoint, new DefaultAzureCredential());

// Create an Agent with toolResources and process Agent run
PersistentAgent agent = client.Administration.CreateAgent(
        model: modelDeploymentName,
        name: "SDK Test Agent - Tutor",
        instructions: "You are a personal electronics tutor. Write and run code to answer questions.",
        tools: new List<ToolDefinition> { new CodeInterpreterToolDefinition() });

// Create thread for communication
PersistentAgentThread thread = client.Threads.CreateThread();

// Create message to thread
PersistentThreadMessage messageResponse = client.Messages.CreateMessage(
    thread.Id,
    MessageRole.User,
    "I need to solve the equation `3x + 11 = 14`. Can you help me?");

// Run the Agent
ThreadRun run = client.Runs.CreateRun(thread, agent);

// Wait for the run to complete
do
{
    Thread.Sleep(TimeSpan.FromMilliseconds(500));
    run = client.Runs.GetRun(thread.Id, run.Id);
}
while (run.Status == RunStatus.Queued
    || run.Status == RunStatus.InProgress);
Pageable<PersistentThreadMessage> messages = client.Messages.GetMessages(
    threadId: thread.Id,
    order: ListSortOrder.Ascending
);
// Print the messages in the thread
WriteMessages(messages);

// Delete the thread and agent after use
client.Threads.DeleteThread(thread.Id);
client.Administration.DeleteAgent(agent.Id);

// Temporary function to use a list of messages in the thread and write them to the console.
static void WriteMessages(IEnumerable<PersistentThreadMessage> messages)
{
    foreach (PersistentThreadMessage threadMessage in messages)
    {
        Console.Write($"{threadMessage.CreatedAt:yyyy-MM-dd HH:mm:ss} - {threadMessage.Role,10}: ");
        foreach (MessageContent contentItem in threadMessage.ContentItems)
        {
            if (contentItem is MessageTextContent textItem)
            {
                Console.Write(textItem.Text);
            }
            else if (contentItem is MessageImageFileContent imageFileItem)
            {
                Console.Write($"<image from ID: {imageFileItem.FileId}");
            }
            Console.WriteLine();
        }
    }
}
Remplacez YOUR-FOUNDRY-RESOURCE-NAME et YOUR-PROJECT-NAME par vos valeurs :
# Create agent
curl --request POST --url "https://YOUR-FOUNDRY-RESOURCE-NAME.services.ai.azure.com/api/projects/YOUR-PROJECT-NAME/assistants?api-version=v1" \
    -h "authorization: Bearer $AZURE_AI_AUTH_TOKEN" \
    -h "content-type: application/json" \
    -d '{
            "model": "gpt-4o",
            "name": "my-agent",
            "instructions": "You are a helpful writing assistant"
        }'
#Lets say agent ID created is asst_123456789. Use this to run the agent

# Create thread
curl --request POST --url 'https://YOUR-FOUNDRY-RESOURCE-NAME.services.ai.azure.com/api/projects/YOUR-PROJECT-NAME/threads?api-version=v1' \
    -h 'authorization: Bearer $AZURE_AI_AUTH_TOKEN' \
    -h 'content-type: application/json'

#Lets say thread ID created is thread_123456789. Use this in the next step

# Create message using thread ID
curl --request POST --url 'https://YOUR-FOUNDRY-RESOURCE-NAME.services.ai.azure.com/api/projects/YOUR-PROJECT-NAME/threads/thread_123456789/messages?api-version=v1' \
    -h 'authorization: Bearer $AZURE_AI_AUTH_TOKEN' \
    -h 'content-type: application/json' \
    -d '{
            "role": "user",
            "content": "Write me a poem about flowers"
        }'

# Run thread with the agent - use both agent id and thread id
curl --request POST --url 'https://YOUR-FOUNDRY-RESOURCE-NAME.services.ai.azure.com/api/projects/YOUR-PROJECT-NAME/threads/thread_123456789/runs?api-version=v1' \
    -h 'authorization: Bearer $AZURE_AI_AUTH_TOKEN' \
    -h 'content-type: application/json' \
    --data '{
        "assistant_id": "asst_123456789"
    }'

# List the messages in the thread using thread ID
curl --request GET --url 'https://YOUR-FOUNDRY-RESOURCE-NAME.services.ai.azure.com/api/projects/YOUR-PROJECT-NAME/threads/thread_123456789/messages?api-version=v1' \
    -h 'authorization: Bearer $AZURE_AI_AUTH_TOKEN' \
    -h 'content-type: application/json'

# Delete agent once done using agent id
curl --request DELETE --url 'https://YOUR-FOUNDRY-RESOURCE-NAME.services.ai.azure.com/api/projects/YOUR-PROJECT-NAME/assistants/asst_123456789?api-version=v1' \
    -h 'authorization: Bearer $AZURE_AI_AUTH_TOKEN' \
    -h 'content-type: application/json'
Ajouter des fichiers à l’agent
Nous allons maintenant ajouter un outil de recherche de fichiers qui nous permet d’effectuer une récupération des connaissances.
- Dans le volet Configuration de votre agent, faites défiler vers le bas si nécessaire pour trouver Connaissances.
- Sélectionnez Ajouter.
- Sélectionnez Fichiers pour charger le fichier product_info_1.md .
- Sélectionnez Sélectionner des fichiers locaux sous Ajouter des fichiers.
- Sélectionnez Charger et enregistrer.
- Modifiez les instructions de vos agents, telles que « Vous êtes un assistant utile et pouvez rechercher des informations à partir de fichiers chargés ».
- Posez une question, telle que « Bonjour, quels produits Contoso connaissez-vous ? »
- Pour ajouter d’autres fichiers, sélectionnez ... dans AgentVectorStore, puis sélectionnez Gérer.
Remplacez votre point de terminaison pour le endpoint dans le code suivant :
from azure.ai.projects import AIProjectClient
from azure.identity import DefaultAzureCredential
from azure.ai.agents.models import ListSortOrder, FileSearchTool

project = AIProjectClient(
    endpoint="https://your-foundry-resource-name.ai.azure.com/api/projects/project-name",
    credential=DefaultAzureCredential(),
)

# Upload file and create vector store
file = project.agents.files.upload(file_path="./product_info_1.md", purpose=FilePurpose.AGENTS)
vector_store = project.agents.vector_stores.create_and_poll(file_ids=[file.id], name="my_vectorstore")

# Create file search tool and agent
file_search = FileSearchTool(vector_store_ids=[vector_store.id])
agent = project.agents.create_agent(
    model="gpt-4o",
    name="my-assistant",
    instructions="You are a helpful assistant and can search information from uploaded files",
    tools=file_search.definitions,
    tool_resources=file_search.resources,
)

# Create thread and process user message
thread = project.agents.threads.create()
project.agents.messages.create(thread_id=thread.id, role="user", content="Hello, what Contoso products do you know?")
run = project.agents.runs.create_and_process(thread_id=thread.id, agent_id=agent.id)

# Handle run status
if run.status == "failed":
    print(f"Run failed: {run.last_error}")

# Print thread messages
messages = project.agents.messages.list(thread_id=thread.id, order=ListSortOrder.ASCENDING)
for message in messages:
    if message.run_id == run.id and message.text_messages:
        print(f"{message.role}: {message.text_messages[-1].text.value}")

# Cleanup resources
project.agents.vector_stores.delete(vector_store.id)
project.agents.files.delete(file_id=file.id)
project.agents.delete_agent(agent.id)
package com.azure.ai.foundry.samples;

import com.azure.ai.foundry.samples.utils.ConfigLoader;
import com.azure.ai.projects.ProjectsClient;
import com.azure.ai.projects.ProjectsClientBuilder;
import com.azure.ai.projects.models.agent.Agent;
import com.azure.ai.projects.models.agent.AgentClient;
import com.azure.ai.projects.models.agent.AgentMessage;
import com.azure.ai.projects.models.agent.AgentOptions;
import com.azure.ai.projects.models.agent.AgentRole;
import com.azure.ai.projects.models.agent.AgentRun;
import com.azure.ai.projects.models.agent.AgentRunStatus;
import com.azure.ai.projects.models.agent.AgentThread;
import com.azure.ai.projects.models.agent.FileTool;
import com.azure.ai.projects.models.file.File;
import com.azure.ai.projects.models.file.FileClient;
import com.azure.identity.DefaultAzureCredential;

import java.io.IOException;
import java.nio.file.Files;
import java.nio.file.Path;
import java.util.List;

/**
 * This sample demonstrates how to create an agent with file search capability using the Azure AI Foundry SDK.
 *
 * File search agents can analyze and extract information from documents, allowing users to ask
 * questions about the content of those documents. This extends the capabilities of regular agents
 * by giving them access to specific information contained in files.
 *
 * This sample shows:
 * 1. How to authenticate with Azure AI Foundry using DefaultAzureCredential
 * 2. How to create and upload a sample document
 * 3. How to create an agent with file search capabilities
 * 4. How to configure the agent with access to specific files
 * 5. How to run the agent and ask questions about the document content
 * 6. How to retrieve and display the agent's responses
 *
 * Use cases for file search agents include:
 * - Document analysis and summarization
 * - Question answering from technical documentation
 * - Data extraction from structured files
 * - Research assistance across multiple documents
 *
 * Prerequisites:
 * - An Azure account with access to Azure AI Foundry
 * - Azure CLI installed and logged in ('az login')
 * - Environment variables set in .env file (AZURE_ENDPOINT, AZURE_DEPLOYMENT)
 */
public class FileSearchAgentSample {
    public static void main(String[] args) {
        // Load configuration values from the .env file
        // These include the service endpoint and the deployment name of the model to use
        String endpoint = ConfigLoader.getAzureEndpoint();
        String deploymentName = ConfigLoader.getAzureDeployment();

        // Get DefaultAzureCredential for authentication
        // This uses the most appropriate authentication method based on the environment
        // For local development, it will use your Azure CLI login credentials
        DefaultAzureCredential credential = ConfigLoader.getDefaultCredential();

        // Create a projects client to interact with Azure AI Foundry services
        // The client requires an authentication credential and an endpoint
        ProjectsClient client = new ProjectsClientBuilder()
            .credential(credential)
            .endpoint(endpoint)
            .buildClient();

        try {
            // Create a sample document containing information about cloud computing
            // In a real application, you would use your own existing documents
            Path tempFile = createSampleDocument();

            // Get a file client to handle file operations
            // This is used to upload files that the agent will search through
            FileClient fileClient = client.getFileClient();

            // Upload the file to Azure AI Foundry
            // The uploaded file will be available for the agent to search and analyze
            System.out.println("Uploading file: " + tempFile);
            File uploadedFile = fileClient.uploadFile(tempFile.toString());
            System.out.println("File uploaded with ID: " + uploadedFile.getId());

            // Get an agent client
            AgentClient agentClient = client.getAgentClient();

            // Create an agent with file search capability
            System.out.println("Creating agent with file search capability...");
            Agent agent = agentClient.createAgent(new AgentOptions()
                .setName("Document Assistant")
                .setDescription("An agent that helps with document searching")
                .setInstructions("You are a document assistant. Help users find information in their documents.")
                .setModel(deploymentName)
                .addTool(new FileTool()
                    .addFile(uploadedFile.getId())));

            System.out.println("Agent created: " + agent.getName() + " (ID: " + agent.getId() + ")");

            // Create a thread for the conversation
            System.out.println("Creating thread...");
            AgentThread thread = agentClient.createThread();
            System.out.println("Thread created: " + thread.getId());

            // Create a user message
            AgentMessage userMessage = new AgentMessage()
                .setRole(AgentRole.USER)
                .setContent("Find and list the benefits of cloud computing from my document.");

            // Run the agent
            System.out.println("Running agent...");
            AgentRun run = agentClient.createRun(thread.getId(), agent.getId(), userMessage);
            System.out.println("Run created: " + run.getId());

            // Wait for the run to complete
            AgentRun completedRun = waitForRunCompletion(agentClient, thread.getId(), run.getId());
            System.out.println("Run completed with status: " + completedRun.getStatus());

            // Get messages from the thread
            List<AgentMessage> messages = agentClient.getMessages(thread.getId());

            // Display the assistant's response
            System.out.println("\nConversation:");
            for (AgentMessage message : messages) {
                System.out.println(message.getRole() + ": " + message.getContent());
            }

            // Clean up the temporary file
            Files.deleteIfExists(tempFile);

        } catch (IOException e) {
            System.err.println("Error working with files: " + e.getMessage());
            e.printStackTrace();
        }
    }

    private static Path createSampleDocument() throws IOException {
        String content = "# Cloud Computing Overview\n\n" +
                "Cloud computing is the delivery of computing services—including servers, storage, databases, networking, software, analytics, and intelligence—over the Internet ("the cloud") to offer faster innovation, flexible resources, and economies of scale.\n\n" +
                "## Benefits of Cloud Computing\n\n" +
                "1. **Cost Savings**: Cloud computing eliminates the capital expense of buying hardware and software and setting up and running on-site data centers.\n\n" +
                "2. **Scalability**: Cloud services can be scaled up or down based on demand, providing businesses with flexibility as their needs change.\n\n" +
                "3. **Performance**: The biggest cloud computing services run on a worldwide network of secure data centers, which are regularly upgraded to the latest generation of fast and efficient computing hardware.\n\n" +
                "4. **Reliability**: Cloud computing makes data backup, disaster recovery, and business continuity easier and less expensive because data can be mirrored at multiple redundant sites on the cloud provider's network.\n\n" +
                "5. **Security**: Many cloud providers offer a broad set of policies, technologies, and controls that strengthen your security posture overall.";

        Path tempFile = Files.createTempFile("cloud-computing-info-", ".md");
        Files.writeString(tempFile, content);
        return tempFile;
    }

    private static AgentRun waitForRunCompletion(AgentClient agentClient, String threadId, String runId) {
        AgentRun run = agentClient.getRun(threadId, runId);

        while (run.getStatus() == AgentRunStatus.QUEUED || run.getStatus() == AgentRunStatus.IN_PROGRESS) {
            try {
                System.out.println("Run status: " + run.getStatus() + " - waiting...");
                Thread.sleep(1000); // Wait for 1 second before checking again
                run = agentClient.getRun(threadId, runId);
            } catch (InterruptedException e) {
                Thread.currentThread().interrupt();
                throw new RuntimeException("Thread was interrupted", e);
            }
        }

        return run;
    }
}
// Upload a file named product_info_1.md
console.log(`\n==================== 🕵️  FILE AGENT ====================`);
const __dirname = path.dirname(fileURLToPath(import.meta.url));
const filePath = path.join(__dirname, '../data/product_info_1.md');
const fileStream = fs.createReadStream(filePath);
fileStream.on('data', (chunk) => {
    console.log(`Read ${chunk.length} bytes of data.`);
});
const file = await client.agents.files.upload(fileStream, 'assistants', {
    fileName: 'product_info_1.md'
});
console.log(`Uploaded file, ID: ${file.id}`);
const vectorStore = await client.agents.vectorStores.create({
    fileIds: [file.id],
    name: 'my_vectorstore'
});
console.log('\n---------------- 🗃️ Vector Store Info ----------------');
console.table([
    {
        'Vector Store ID': vectorStore.id,
        'Usage (bytes)': vectorStore.usageBytes,
        'File Count': vectorStore.fileCounts?.total ?? 'N/A'
    }
]);

// Create an Agent and a FileSearch tool
const fileSearchTool = ToolUtility.createFileSearchTool([vectorStore.id]);
const fileAgent = await client.agents.createAgent(deployment, {
    name: 'my-file-agent',
    instructions: 'You are a helpful assistant and can search information from uploaded files',
    tools: [fileSearchTool.definition],
    toolResources: fileSearchTool.resources,
});

// Create a thread and message
const fileSearchThread = await client.agents.threads.create({ toolResources: fileSearchTool.resources });
const filePrompt = 'What are the steps to setup the TrailMaster X4 Tent?';
console.log(`\n---------------- 📝 User Prompt ---------------- \n${filePrompt}`);
await client.agents.messages.create(fileSearchThread.id, 'user', filePrompt);

// Create run
let fileSearchRun = await client.agents.runs.create(fileSearchThread.id, fileAgent.id).stream();

for await (const eventMessage of fileSearchRun) {
    if (eventMessage.event === DoneEvent.Done) {
        console.log(`Run completed: ${eventMessage.data}`);
    }
    if (eventMessage.event === ErrorEvent.Error) {
        console.log(`An error occurred. ${eventMessage.data}`);
    }
}

const fileSearchMessagesIterator = await client.agents.messages.list(fileSearchThread.id);
const fileAssistantMessage = await getAssistantMessage(fileSearchMessagesIterator);
console.log(`\n---------------- 💬 Response ---------------- \n`);
printAssistantMessage(fileAssistantMessage);

// Clean up
console.log(`\n---------------- 🧹 Clean Up File Agent ----------------`);
client.agents.vectorStores.delete(vectorStore.id);
client.agents.files.delete(file.id);
client.agents.deleteAgent(fileAgent.id);
console.log(`Deleted VectorStore, File, and FileAgent. FileAgent ID: ${fileAgent.id}`);
using Azure;
using Azure.Identity;
using Azure.AI.Agents.Persistent;

// Creating the Client for agents and vector stores
var projectEndpoint = System.Environment.GetEnvironmentVariable("AZURE_AI_ENDPOINT");
var modelDeploymentName = System.Environment.GetEnvironmentVariable("AZURE_AI_MODEL");
PersistentAgentsClient client = new(projectEndpoint, new DefaultAzureCredential());

PersistentAgentFileInfo uploadedAgentFile = client.Files.UploadFile(
    filePath: "product_info_1.md",
    purpose: PersistentAgentFilePurpose.Agents);

// Create a vector store with the file and wait for it to be processed.
// If you do not specify a vector store, create_message will create a vector store with a default expiration policy of seven days after they were last active

Dictionary<string, string> fileIds = new()
{
    { uploadedAgentFile.Id, uploadedAgentFile.Filename }
};

PersistentAgentsVectorStore vectorStore = client.VectorStores.CreateVectorStore(
    name: "my_vector_store");

// Add file ID to vector store.
VectorStoreFile vctFile = client.VectorStores.CreateVectorStoreFile(
    vectorStoreId: vectorStore.Id,
    fileId: uploadedAgentFile.Id
);

Console.WriteLine($"Added file to vector store. The id file in the vector store is {vctFile.Id}.");

FileSearchToolResource fileSearchToolResource = new FileSearchToolResource();
fileSearchToolResource.VectorStoreIds.Add(vectorStore.Id);

// Create an Agent with toolResources and process Agent run
PersistentAgent agent = client.Administration.CreateAgent(
        model: modelDeploymentName,
        name: "SDK Test Agent - Retrieval",
        instructions: "You are a helpful agent that can help fetch data from files you know about.",
        tools: new List<ToolDefinition> { new FileSearchToolDefinition() },
        toolResources: new ToolResources() { FileSearch = fileSearchToolResource });

// Create thread for communication
PersistentAgentThread thread = client.Threads.CreateThread();

// Create message to thread
PersistentThreadMessage messageResponse = client.Messages.CreateMessage(
    thread.Id,
    MessageRole.User,
    "Can you give me information on how to mount the product?");

// Run the Agent
ThreadRun run = client.Runs.CreateRun(thread, agent);

// Wait for the run to complete
// This is a blocking call, so it will wait until the run is completed
do
{
    Thread.Sleep(TimeSpan.FromMilliseconds(500));
    run = client.Runs.GetRun(thread.Id, run.Id);
}
while (run.Status == RunStatus.Queued
    || run.Status == RunStatus.InProgress);

// Create a list of messages in the thread and write them to the console.
Pageable<PersistentThreadMessage> messages = client.Messages.GetMessages(
    threadId: thread.Id,
    order: ListSortOrder.Ascending
);
WriteMessages(messages, fileIds);

// Delete the thread and agent after use
client.VectorStores.DeleteVectorStore(vectorStore.Id);
client.Files.DeleteFile(uploadedAgentFile.Id);
client.Threads.DeleteThread(thread.Id);
client.Administration.DeleteAgent(agent.Id);

// Helper method to write messages to the console
static void WriteMessages(IEnumerable<PersistentThreadMessage> messages, Dictionary<string, string> fileIds)
{
    foreach (PersistentThreadMessage threadMessage in messages)
    {
        Console.Write($"{threadMessage.CreatedAt:yyyy-MM-dd HH:mm:ss} - {threadMessage.Role,10}: ");
        foreach (MessageContent contentItem in threadMessage.ContentItems)
        {
            if (contentItem is MessageTextContent textItem)
            {
                if (threadMessage.Role == MessageRole.Agent && textItem.Annotations.Count > 0)
                {
                    string strMessage = textItem.Text;
                    foreach (MessageTextAnnotation annotation in textItem.Annotations)
                    {
                        if (annotation is MessageTextFilePathAnnotation pathAnnotation)
                        {
                            strMessage = replaceReferences(fileIds, pathAnnotation.FileId, pathAnnotation.Text, strMessage);
                        }
                        else if (annotation is MessageTextFileCitationAnnotation citationAnnotation)
                        {
                            strMessage = replaceReferences(fileIds, citationAnnotation.FileId, citationAnnotation.Text, strMessage);
                        }
                    }
                    Console.Write(strMessage);
                }
                else
                {
                    Console.Write(textItem.Text);
                }
            }
            else if (contentItem is MessageImageFileContent imageFileItem)
            {
                Console.Write($"<image from ID: {imageFileItem.FileId}");
            }
            Console.WriteLine();
        }
    }
}

// Helper method to replace file references in the text
static string replaceReferences(Dictionary<string, string> fileIds, string fileID, string placeholder, string text)
{
    if (fileIds.TryGetValue(fileID, out string replacement))
        return text.Replace(placeholder, $" [{replacement}]");
    else
        return text.Replace(placeholder, $" [{fileID}]");
}
Remplacez YOUR-FOUNDRY-RESOURCE-NAME et YOUR-PROJECT-NAME par vos valeurs :
#Upload the file
curl --request POST --url 'https://YOUR-FOUNDRY-RESOURCE-NAME.services.ai.azure.com/api/projects/YOUR-PROJECT-NAME/files?api-version=v1' \
    -h 'authorization: Bearer $AZURE_AI_AUTH_TOKEN' \
    -f purpose="assistant" \
    -f file="@product_info_1.md" #File object (not file name) to be uploaded.
#Lets say file ID created is assistant-123456789. Use this in the next step

# create vector store
curl --request POST --url 'https://YOUR-FOUNDRY-RESOURCE-NAME.services.ai.azure.com/api/projects/YOUR-PROJECT-NAME/vector_stores?api-version=v1' \
-h 'authorization: Bearer $AZURE_AI_AUTH_TOKEN' \
-h 'content-type: application/json' \
-d '{
        "name": "my_vectorstore",
        "file_ids": ["assistant-123456789"]
    }'
#Lets say Vector Store ID created is vs_123456789. Use this in the next step

# Create Agent for File Search
curl --request POST --url 'https://YOUR-FOUNDRY-RESOURCE-NAME.services.ai.azure.com/api/projects/YOUR-PROJECT-NAME/assistants?api-version=v1' \
    -h 'authorization: Bearer $AZURE_AI_AUTH_TOKEN' \
    -h 'content-type: application/json' \
    -d '{
        "model": "gpt-4o",
        "name": "my-assistant",
        "instructions": "You are a helpful assistant and can search information from uploaded files",
        "tools": [{"type": "file_search"}],
        "tool_resources": {"file_search": {"vector_store_ids": ["vs_123456789"]}}
    }'
#Lets say agent ID created is asst_123456789. Use this to run the agent

# Create thread
curl --request POST --url 'https://YOUR-FOUNDRY-RESOURCE-NAME.services.ai.azure.com/api/projects/YOUR-PROJECT-NAME/threads?api-version=v1' \
    -h 'authorization: Bearer $AZURE_AI_AUTH_TOKEN' \
    -h 'content-type: application/json'
#Lets say thread ID created is thread_123456789. Use this in the next step

# Create message using thread ID
curl --request POST --url 'https://YOUR-FOUNDRY-RESOURCE-NAME.services.ai.azure.com/api/projects/YOUR-PROJECT-NAME/threads/thread_123456789/messages?api-version=v1' \
    -h 'authorization: Bearer $AZURE_AI_AUTH_TOKEN' \
    -h 'content-type: application/json' \
    -d '{
            "role": "user",
            "content": "Hello, what Contoso products do you know?"
        }'

# Run thread with the agent - use both agent id and thread id
curl --request POST --url 'https://YOUR-FOUNDRY-RESOURCE-NAME.services.ai.azure.com/api/projects/YOUR-PROJECT-NAME/threads/thread_123456789/runs?api-version=v1' \
    -h 'authorization: Bearer $AZURE_AI_AUTH_TOKEN' \
    -h 'content-type: application/json' \
    --data '{
        "assistant_id": "asst_123456789"
    }'

# List the messages in the thread using thread ID
curl --request GET --url 'https://YOUR-FOUNDRY-RESOURCE-NAME.services.ai.azure.com/api/projects/YOUR-PROJECT-NAME/threads/thread_123456789/messages?api-version=v1' \
    -h 'authorization: Bearer $AZURE_AI_AUTH_TOKEN' \
    -h 'content-type: application/json'

# Delete agent once done using agent id
curl --request DELETE --url 'https://YOUR-FOUNDRY-RESOURCE-NAME.services.ai.azure.com/api/projects/YOUR-PROJECT-NAME/assistants/asst_123456789?api-version=v1' \
    -h 'authorization: Bearer $AZURE_AI_AUTH_TOKEN' \
    -h 'content-type: application/json'
Nettoyer les ressources
Si vous n’en avez plus besoin, supprimez le groupe de ressources associé à votre projet.
Dans le portail Azure AI Foundry, sélectionnez le nom de votre projet dans le coin supérieur droit. Sélectionnez ensuite le lien du groupe de ressources pour l’ouvrir dans le portail Azure. Sélectionnez le groupe de ressources, puis sélectionnez Supprimer. Vérifiez que vous souhaitez supprimer le groupe de ressources.
Contenu connexe
Vue d’ensemble de la bibliothèque de client Azure AI Foundry
