Notes
L’accès à cette page nécessite une autorisation. Vous pouvez essayer de vous connecter ou de modifier des répertoires.
L’accès à cette page nécessite une autorisation. Vous pouvez essayer de modifier des répertoires.
Vue d’ensemble
Pour attirer les utilisateurs avec des contenus riches instantanés, une application peut souhaiter envoyer des notifications Push plus sophistiquées que du texte brut. Ces notifications promeuvent les interactions entre utilisateurs et présentent du contenu comme des URL, des sons, des images/coupons et bien plus encore. Ce tutoriel se base sur le tutoriel Envoi de notifications aux utilisateurs et montre comment envoyer des notifications Push qui incorporent des charges utiles (par exemple, des images).
Ce tutoriel est compatible avec iOS 7 et 8.
À un niveau élevé :
- Le serveur principal :
- Stocke la charge utile enrichie (dans ce cas, l’image) dans la base de données du serveur principal/stockage local.
- Envoie un ID de cette notification enrichie à l’appareil.
- L'application sur l'appareil :
- Contacte le serveur principal en demandant la charge utile enrichie avec l’ID qu’elle reçoit.
- Envoie des notifications aux utilisateurs sur l’appareil lorsque la récupération de données est terminée, et affiche la charge utile immédiatement lorsque les utilisateurs cliquent pour en savoir plus.
Projet WebAPI
Dans Visual Studio, ouvrez le projet AppBackend que vous avez créé dans le didacticiel Notification des utilisateurs .
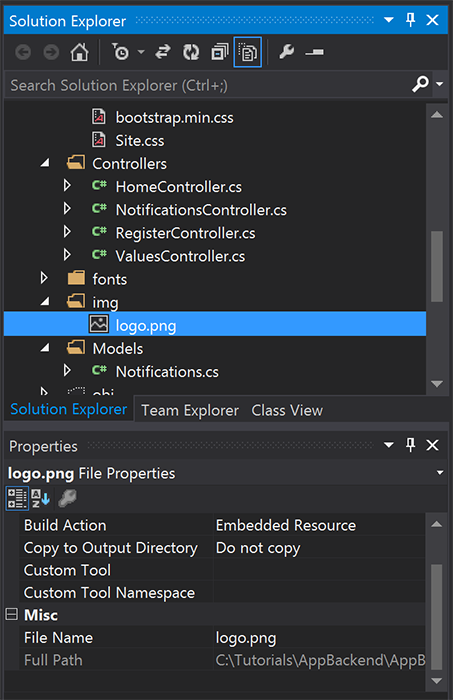
Obtenez l’image que vous souhaitez utiliser pour avertir les utilisateurs et placez-la dans un dossier img dans votre répertoire de projet.
Cliquez sur Afficher tous les fichiers dans l’Explorateur de solutions et cliquez sur le dossier à Inclure dans le projet.
L’image étant sélectionnée, modifiez son action de génération dans la fenêtre Propriétés de la ressource incorporée.
Dans
Notifications.cs, ajoutez l’instructionusingsuivante :using System.Reflection;Remplacez la classe
Notificationspar le code suivant : Veillez à remplacer les espaces réservés par les informations d’identification de votre hub de notification et le nom du fichier image :public class Notification { public int Id { get; set; } // Initial notification message to display to users public string Message { get; set; } // Type of rich payload (developer-defined) public string RichType { get; set; } public string Payload { get; set; } public bool Read { get; set; } } public class Notifications { public static Notifications Instance = new Notifications(); private List<Notification> notifications = new List<Notification>(); public NotificationHubClient Hub { get; set; } private Notifications() { // Placeholders: replace with the connection string (with full access) for your notification hub and the hub name from the Azure Classics Portal Hub = NotificationHubClient.CreateClientFromConnectionString("{conn string with full access}", "{hub name}"); } public Notification CreateNotification(string message, string richType, string payload) { var notification = new Notification() { Id = notifications.Count, Message = message, RichType = richType, Payload = payload, Read = false }; notifications.Add(notification); return notification; } public Stream ReadImage(int id) { var assembly = Assembly.GetExecutingAssembly(); // Placeholder: image file name (for example, logo.png). return assembly.GetManifestResourceStream("AppBackend.img.{logo.png}"); } }Dans
NotificationsController.cs, redéfinissezNotificationsControlleravec le code suivant. Un ID initial de notification enrichie est alors envoyé automatiquement à l’appareil, ce qui permet l’extraction de l’image côté client :// Return http response with image binary public HttpResponseMessage Get(int id) { var stream = Notifications.Instance.ReadImage(id); var result = new HttpResponseMessage(HttpStatusCode.OK); result.Content = new StreamContent(stream); // Switch in your image extension for "png" result.Content.Headers.ContentType = new System.Net.Http.Headers.MediaTypeHeaderValue("image/{png}"); return result; } // Create rich notification and send initial silent notification (containing id) to client public async Task<HttpResponseMessage> Post() { // Replace the placeholder with image file name var richNotificationInTheBackend = Notifications.Instance.CreateNotification("Check this image out!", "img", "{logo.png}"); var usernameTag = "username:" + HttpContext.Current.User.Identity.Name; // Silent notification with content available var aboutUser = "{\"aps\": {\"content-available\": 1, \"sound\":\"\"}, \"richId\": \"" + richNotificationInTheBackend.Id.ToString() + "\", \"richMessage\": \"" + richNotificationInTheBackend.Message + "\", \"richType\": \"" + richNotificationInTheBackend.RichType + "\"}"; // Send notification to apns await Notifications.Instance.Hub.SendAppleNativeNotificationAsync(aboutUser, usernameTag); return Request.CreateResponse(HttpStatusCode.OK); }Redéployez maintenant cette application sur un site web Azure afin de la rendre accessible à tous les appareils. Cliquez avec le bouton droit sur le projet AppBackend, puis sélectionnez Publier.
Sélectionnez Site web Azure comme cible de publication. Connectez-vous avec votre compte Azure, sélectionnez un site web (nouveau ou existant), puis notez la valeur de la propriété URL de destination dans l’onglet Connexion. Plus loin dans ce tutoriel, nous allons utiliser cette URL comme point de terminaison back-end. Sélectionnez Publier.
Modification du projet iOS
Maintenant que vous avez modifié votre back-end d’application pour qu’il envoie uniquement l’ID d’une notification, modifiez votre application iOS pour gérer cet ID, puis récupérez le message enrichi à partir de votre back-end :
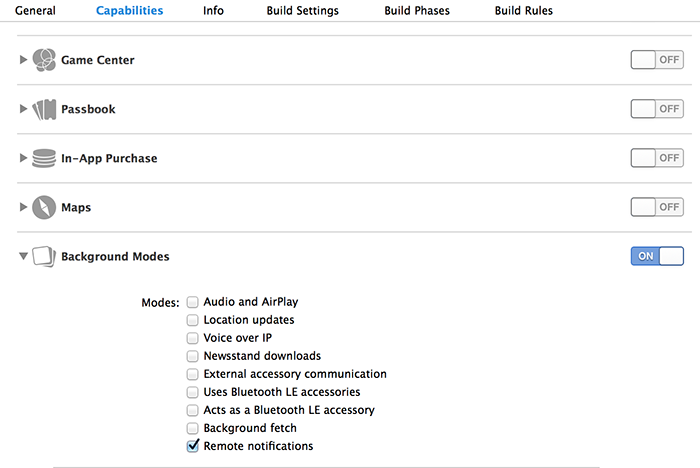
Ouvrez votre projet iOS et activez les notifications à distance en accédant à votre cible d’application principale dans la section Cibles .
Sélectionnez Capacités, activez Modes d’arrière-plan et cochez la case Notifications à distance.
Ouvrez
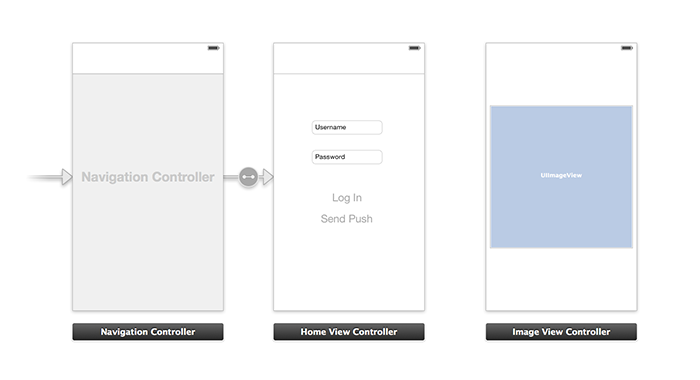
Main.storyboardet assurez-vous d’avoir un contrôleur d’affichage (dénommé Contrôle d’affichage d’accueil dans ce tutoriel) provenant du tutoriel Envoi de notifications aux utilisateurs.Ajoutez un Contrôleur de navigation à votre table de montage séquentiel et faites-le glisser vers le contrôleur d’affichage d’accueil pour en faire l’affichage racine de la navigation. Vérifiez que l’option Est contrôleur d’affichage initial est sélectionnée dans l’inspecteur d’attributs pour le contrôleur de navigation uniquement.
Ajoutez un contrôleur d’affichage à la table de montage séquentiel et ajoutez un affichage d’image. Il s’agit de la page que les utilisateurs verront une fois qu’ils souhaiteront en savoir plus en cliquant sur la notification. Votre storyboard doit ressembler à ce qui suit :
Cliquez sur le contrôleur d’affichage d’accueil dans la table de montage séquentiel et vérifiez que homeViewController est défini en tant que classe personnalisée et que ID de table de montage séquentiel figure sous l’inspecteur d’identité.
Faites de même pour le contrôleur d’affichage d’image avec imageViewController.
Ensuite, créez une classe de contrôleur d’affichage nommée imageViewController pour gérer l’interface utilisateur que vous venez de créer.
Dans imageViewController.h, ajoutez le code suivant aux déclarations d’interface du contrôleur. Effectuez un glisser-déplacer, tout en appuyant sur la touche Ctrl, depuis l’affichage de l’image dans la table de montage séquentiel vers ces propriétés pour lier les deux :
@property (weak, nonatomic) IBOutlet UIImageView *myImage;
@property (strong) UIImage* imagePayload;
Dans
imageViewController.m, ajoutez ce qui suit à la fin deviewDidload:// Display the UI Image in UI Image View [self.myImage setImage:self.imagePayload];Dans
AppDelegate.m, importez le contrôleur d’image que vous avez créé :#import "imageViewController.h"Ajoutez une section d’interface avec la déclaration suivante :
@interface AppDelegate ()

@property UIImage* imagePayload;
@property NSDictionary* userInfo;
@property BOOL iOS8;

// Obtain content from backend with notification id
- (void)retrieveRichImageWithId:(int)richId completion: (void(^)(NSError*)) completion;

// Redirect to Image View Controller after notification interaction
- (void)redirectToImageViewWithImage: (UIImage *)img;

@end
Dans
AppDelegate, vérifiez que votre application est inscrite aux notifications en mode silencieux dansapplication: didFinishLaunchingWithOptions:// Software version self.iOS8 = [[UIApplication sharedApplication] respondsToSelector:@selector(registerUserNotificationSettings:)] && [[UIApplication sharedApplication] respondsToSelector:@selector(registerForRemoteNotifications)]; // Register for remote notifications for iOS8 and previous versions if (self.iOS8) { NSLog(@"This device is running with iOS8."); // Action UIMutableUserNotificationAction *richPushAction = [[UIMutableUserNotificationAction alloc] init]; richPushAction.identifier = @"richPushMore"; richPushAction.activationMode = UIUserNotificationActivationModeForeground; richPushAction.authenticationRequired = NO; richPushAction.title = @"More"; // Notification category UIMutableUserNotificationCategory* richPushCategory = [[UIMutableUserNotificationCategory alloc] init]; richPushCategory.identifier = @"richPush"; [richPushCategory setActions:@[richPushAction] forContext:UIUserNotificationActionContextDefault]; // Notification categories NSSet* richPushCategories = [NSSet setWithObjects:richPushCategory, nil]; UIUserNotificationSettings *settings = [UIUserNotificationSettings settingsForTypes:UIUserNotificationTypeSound | UIUserNotificationTypeAlert | UIUserNotificationTypeBadge categories:richPushCategories]; [[UIApplication sharedApplication] registerUserNotificationSettings:settings]; [[UIApplication sharedApplication] registerForRemoteNotifications]; } else { // Previous iOS versions NSLog(@"This device is running with iOS7 or earlier versions."); [[UIApplication sharedApplication] registerForRemoteNotificationTypes: UIRemoteNotificationTypeAlert | UIRemoteNotificationTypeBadge | UIRemoteNotificationTypeSound | UIRemoteNotificationTypeNewsstandContentAvailability]; } return YES;Insérez l’implémentation suivante pour
application:didRegisterForRemoteNotificationsWithDeviceTokenafin de prendre en compte les modifications d’interface utilisateur du tableau de montage séquentiel :// Access navigation controller which is at the root of window UINavigationController *nc = (UINavigationController *)self.window.rootViewController; // Get home view controller from stack on navigation controller homeViewController *hvc = (homeViewController *)[nc.viewControllers objectAtIndex:0]; hvc.deviceToken = deviceToken;Ensuite, ajoutez les méthodes ci-après à
AppDelegate.mpour récupérer l’image à partir de votre point de terminaison et envoyer une notification locale à la fin de la récupération. Prenez soin de remplacer l’espace réservé{backend endpoint}par le point de terminaison de votre serveur principal :NSString *const GetNotificationEndpoint = @"{backend endpoint}/api/notifications"; // Helper: retrieve notification content from backend with rich notification id - (void)retrieveRichImageWithId:(int)richId completion: (void(^)(NSError*)) completion { UINavigationController *nc = (UINavigationController *)self.window.rootViewController; homeViewController *hvc = (homeViewController *)[nc.viewControllers objectAtIndex:0]; NSString* authenticationHeader = hvc.registerClient.authenticationHeader; // Check if authenticated if (!authenticationHeader) return; NSURLSession* session = [NSURLSession sessionWithConfiguration:[NSURLSessionConfiguration defaultSessionConfiguration] delegate:nil delegateQueue:nil]; NSURL* requestURL = [NSURL URLWithString:[NSString stringWithFormat:@"%@/%d", GetNotificationEndpoint, richId]]; NSMutableURLRequest* request = [NSMutableURLRequest requestWithURL:requestURL]; [request setHTTPMethod:@"GET"]; NSString* authorizationHeaderValue = [NSString stringWithFormat:@"Basic %@", authenticationHeader]; [request setValue:authorizationHeaderValue forHTTPHeaderField:@"Authorization"]; NSURLSessionDataTask* dataTask = [session dataTaskWithRequest:request completionHandler:^(NSData *data, NSURLResponse *response, NSError *error) { NSHTTPURLResponse* httpResponse = (NSHTTPURLResponse*) response; if (!error && httpResponse.statusCode == 200) { // From NSData to UIImage self.imagePayload = [UIImage imageWithData:data]; completion(nil); } else { NSLog(@"Error status: %ld, request: %@", (long)httpResponse.statusCode, error); if (error) completion(error); else { completion([NSError errorWithDomain:@"APICall" code:httpResponse.statusCode userInfo:nil]); } } }]; [dataTask resume]; } // Handle silent push notifications when id is sent from backend - (void)application:(UIApplication *)application didReceiveRemoteNotification:(NSDictionary *)userInfo fetchCompletionHandler:(void (^)(UIBackgroundFetchResult result))handler { self.userInfo = userInfo; int richId = [[self.userInfo objectForKey:@"richId"] intValue]; NSString* richType = [self.userInfo objectForKey:@"richType"]; // Retrieve image data if ([richType isEqualToString:@"img"]) { [self retrieveRichImageWithId:richId completion:^(NSError* error) { if (!error){ // Send local notification UILocalNotification* localNotification = [[UILocalNotification alloc] init]; // "5" is arbitrary here to give you enough time to quit out of the app and receive push notifications localNotification.fireDate = [NSDate dateWithTimeIntervalSinceNow:5]; localNotification.userInfo = self.userInfo; localNotification.alertBody = [self.userInfo objectForKey:@"richMessage"]; localNotification.timeZone = [NSTimeZone defaultTimeZone]; // iOS8 categories if (self.iOS8) { localNotification.category = @"richPush"; } [[UIApplication sharedApplication] scheduleLocalNotification:localNotification]; handler(UIBackgroundFetchResultNewData); } else{ handler(UIBackgroundFetchResultFailed); } }]; } // Add "else if" here to handle more types of rich content such as url, sound files, etc. }Gérez la notification locale précédente en ouvrant le contrôleur d’affichage d’image dans
AppDelegate.mavec les méthodes suivantes :// Helper: redirect users to image view controller - (void)redirectToImageViewWithImage: (UIImage *)img { UINavigationController *navigationController = (UINavigationController*) self.window.rootViewController; UIStoryboard *mainStoryboard = [UIStoryboard storyboardWithName:@"Main" bundle: nil]; imageViewController *imgViewController = [mainStoryboard instantiateViewControllerWithIdentifier: @"imageViewController"]; // Pass data/image to image view controller imgViewController.imagePayload = img; // Redirect [navigationController pushViewController:imgViewController animated:YES]; } // Handle local notification sent above in didReceiveRemoteNotification - (void)application:(UIApplication *)application didReceiveLocalNotification:(UILocalNotification *)notification { if (application.applicationState == UIApplicationStateActive) { // Show in-app alert with an extra "more" button UIAlertView *alert = [[UIAlertView alloc] initWithTitle:@"Notification" message:notification.alertBody delegate:self cancelButtonTitle:@"OK" otherButtonTitles:@"More", nil]; [alert show]; } // App becomes active from user's tap on notification else { [self redirectToImageViewWithImage:self.imagePayload]; } } // Handle buttons in in-app alerts and redirect with data/image - (void)alertView:(UIAlertView *)alertView clickedButtonAtIndex:(NSInteger)buttonIndex { // Handle "more" button if (buttonIndex == 1) { [self redirectToImageViewWithImage:self.imagePayload]; } // Add "else if" here to handle more buttons } // Handle notification setting actions in iOS8 - (void)application:(UIApplication *)application handleActionWithIdentifier:(NSString *)identifier forLocalNotification:(UILocalNotification *)notification completionHandler:(void (^)())completionHandler { // Handle richPush related buttons if ([identifier isEqualToString:@"richPushMore"]) { [self redirectToImageViewWithImage:self.imagePayload]; } completionHandler(); }
Exécution de l’application
- Dans XCode, exécutez l’application sur un appareil iOS physique (les notifications Push ne fonctionnent pas dans le simulateur).
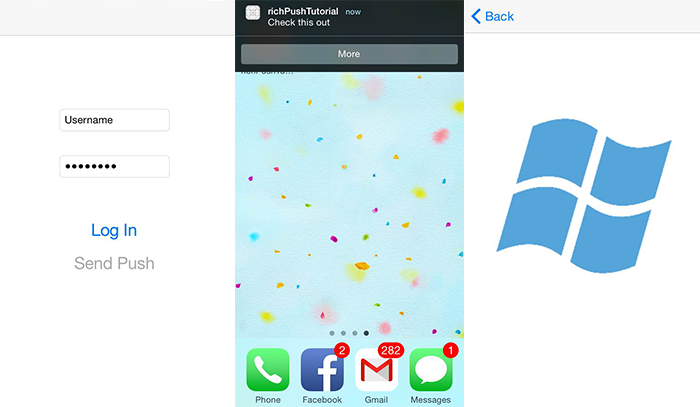
- Dans l’interface utilisateur de l’application iOS, entrez un nom d’utilisateur et un mot de passe de la même valeur pour l’authentification et cliquez sur Se connecter.
- Cliquez sur Envoyer des notifications Push : une alerte dans l’application doit s’afficher. Si vous cliquez sur Plus, l’image que vous avez choisi d’inclure dans votre serveur principal d’application s’affiche.
- Vous pouvez également cliquer sur Envoyer des notifications Push et appuyer immédiatement sur le bouton Accueil de votre appareil. Dans quelques instants, vous allez recevoir une notification Push. Si vous cliquez dessus ou si vous cliquez sur Plus, votre application et le contenu d’images enrichi apparaissent.