Notes
L’accès à cette page nécessite une autorisation. Vous pouvez essayer de vous connecter ou de modifier des répertoires.
L’accès à cette page nécessite une autorisation. Vous pouvez essayer de modifier des répertoires.
 Parcourez l’exemple. Parcourir l'exemple
Les notifications locales sont des alertes envoyées par les applications installées sur un appareil. Les notifications locales sont souvent utilisées pour les fonctionnalités telles que :
- Événements de calendrier
- Rappels
- Déclencheurs basés sur l’emplacement
Chaque plateforme nécessite sa propre implémentation de code natif pour envoyer et recevoir des notifications locales. Toutefois, chaque implémentation de plateforme peut être abstraite au niveau de la couche multiplateforme afin qu’il existe une API cohérente pour envoyer et recevoir des notifications locales dans une application .NET Multi-Platform App UI (.NET MAUI).
Créer une abstraction multiplateforme
Une application .NET MAUI doit envoyer et recevoir des notifications locales sans préoccupation pour les implémentations de plateforme sous-jacentes. L’interface INotificationManagerService suivante permet de définir une API multiplateforme qui peut être utilisée pour interagir avec les notifications locales :
public interface INotificationManagerService
{
    event EventHandler NotificationReceived;
    void SendNotification(string title, string message, DateTime? notifyTime = null);
    void ReceiveNotification(string title, string message);
}
Cette interface définit les opérations suivantes :
- L’événement
NotificationReceivedpermet à une application de gérer les notifications entrantes. - La méthode
SendNotificationenvoie une notification à uneDateTimefacultative. - La méthode
ReceiveNotificationtraite une notification lorsqu’elle est reçue par la plateforme sous-jacente.
L’interface doit être implémentée sur chaque plateforme sur lesquelles vous souhaitez prendre en charge les notifications locales.
Implémenter des notifications locales sur Android
Sur Android, une notification locale est un message qui s’affiche en dehors de l’interface utilisateur de votre application pour fournir des rappels ou d’autres informations provenant de votre application. Les utilisateurs peuvent appuyer sur la notification pour ouvrir votre application ou éventuellement effectuer une action directement à partir de la notification. Pour plus d’informations sur les notifications locales sur Android, consultez Vue d’ensemble des notifications sur developer.android.com.
Pour qu’une application .NET MAUI envoie et reçoive des notifications sur Android, l’application doit fournir une implémentation de l’interface INotificationManagerService.
Envoyer et recevoir des notifications locales
Sur Android, la classe NotificationManagerService implémente l’interface INotificationManagerService et contient la logique qui permet d’envoyer et de recevoir des notifications locales :
using Android.App;
using Android.Content;
using Android.Graphics;
using Android.OS;
using AndroidX.Core.App;

namespace LocalNotificationsDemo.Platforms.Android;

public class NotificationManagerService : INotificationManagerService
{
    const string channelId = "default";
    const string channelName = "Default";
    const string channelDescription = "The default channel for notifications.";

    public const string TitleKey = "title";
    public const string MessageKey = "message";

    bool channelInitialized = false;
    int messageId = 0;
    int pendingIntentId = 0;

    NotificationManagerCompat compatManager;

    public event EventHandler NotificationReceived;

    public static NotificationManagerService Instance { get; private set; }

    public NotificationManagerService()
    {
        if (Instance == null)
        {
            CreateNotificationChannel();
            compatManager = NotificationManagerCompat.From(Platform.AppContext);
            Instance = this;
        }
    }

    public void SendNotification(string title, string message, DateTime? notifyTime = null)
    {
        if (!channelInitialized)
        {
            CreateNotificationChannel();
        }

        if (notifyTime != null)
        {
            Intent intent = new Intent(Platform.AppContext, typeof(AlarmHandler));
            intent.PutExtra(TitleKey, title);
            intent.PutExtra(MessageKey, message);
            intent.SetFlags(ActivityFlags.SingleTop | ActivityFlags.ClearTop);

            var pendingIntentFlags = (Build.VERSION.SdkInt >= BuildVersionCodes.S)
                ? PendingIntentFlags.CancelCurrent | PendingIntentFlags.Immutable
                : PendingIntentFlags.CancelCurrent;

            PendingIntent pendingIntent = PendingIntent.GetBroadcast(Platform.AppContext, pendingIntentId++, intent, pendingIntentFlags);
            long triggerTime = GetNotifyTime(notifyTime.Value);
            AlarmManager alarmManager = Platform.AppContext.GetSystemService(Context.AlarmService) as AlarmManager;
            alarmManager.Set(AlarmType.RtcWakeup, triggerTime, pendingIntent);
        }
        else
        {
            Show(title, message);
        }
    }

    public void ReceiveNotification(string title, string message)
    {
        var args = new NotificationEventArgs()
        {
            Title = title,
            Message = message,
        };
        NotificationReceived?.Invoke(null, args);
    }

    public void Show(string title, string message)
    {
        Intent intent = new Intent(Platform.AppContext, typeof(MainActivity));
        intent.PutExtra(TitleKey, title);
        intent.PutExtra(MessageKey, message);
        intent.SetFlags(ActivityFlags.SingleTop | ActivityFlags.ClearTop);

        var pendingIntentFlags = (Build.VERSION.SdkInt >= BuildVersionCodes.S)
            ? PendingIntentFlags.UpdateCurrent | PendingIntentFlags.Immutable
            : PendingIntentFlags.UpdateCurrent;

        PendingIntent pendingIntent = PendingIntent.GetActivity(Platform.AppContext, pendingIntentId++, intent, pendingIntentFlags);
        NotificationCompat.Builder builder = new NotificationCompat.Builder(Platform.AppContext, channelId)
            .SetContentIntent(pendingIntent)
            .SetContentTitle(title)
            .SetContentText(message)
            .SetLargeIcon(BitmapFactory.DecodeResource(Platform.AppContext.Resources, Resource.Drawable.dotnet_logo))
            .SetSmallIcon(Resource.Drawable.message_small);

        Notification notification = builder.Build();
        compatManager.Notify(messageId++, notification);
    }

    void CreateNotificationChannel()
    {
        // Create the notification channel, but only on API 26+.
        if (Build.VERSION.SdkInt >= BuildVersionCodes.O)
        {
            var channelNameJava = new Java.Lang.String(channelName);
            var channel = new NotificationChannel(channelId, channelNameJava, NotificationImportance.Default)
            {
                Description = channelDescription
            };
            // Register the channel
            NotificationManager manager = (NotificationManager)Platform.AppContext.GetSystemService(Context.NotificationService);
            manager.CreateNotificationChannel(channel);
            channelInitialized = true;
        }
    }

    long GetNotifyTime(DateTime notifyTime)
    {
        DateTime utcTime = TimeZoneInfo.ConvertTimeToUtc(notifyTime);
        double epochDiff = (new DateTime(1970, 1, 1) - DateTime.MinValue).TotalSeconds;
        long utcAlarmTime = utcTime.AddSeconds(-epochDiff).Ticks / 10000;
        return utcAlarmTime; // milliseconds
    }
}
La classe NotificationManagerService doit être placée dans le dossier Plateformes > Android de votre application. Vous pouvez également effectuer le multi-ciblage en fonction de vos propres critères de nom de fichier et de dossier, plutôt que d’utiliser le dossier Plateformes > Android. Pour plus d’informations, consultez Configurer le multi-ciblage.
Android permet aux applications de définir plusieurs canaux pour les notifications. Le constructeur NotificationManagerService crée un canal de base utilisé pour envoyer des notifications. La méthode SendNotification définit la logique spécifique à la plateforme nécessaire pour créer et envoyer une notification. La méthode ReceiveNotification est appelée par le système d’exploitation Android lorsqu’un message est reçu et appelle le gestionnaire d’événements NotificationReceived. Pour plus d’informations, consultez Créer une notification sur developer.android.com.
La méthode SendNotification crée immédiatement une notification locale, ou à une DateTime exacte. Une notification peut être planifiée pour une DateTime exacte à l’aide de la classe AlarmManager, et la notification est reçue par un objet qui dérive de la classe BroadcastReceiver :
[BroadcastReceiver(Enabled = true, Label = "Local Notifications Broadcast Receiver")]
public class AlarmHandler : BroadcastReceiver
{
    public override void OnReceive(Context context, Intent intent)
    {
        if (intent?.Extras != null)
        {
            string title = intent.GetStringExtra(NotificationManagerService.TitleKey);
            string message = intent.GetStringExtra(NotificationManagerService.MessageKey);

            NotificationManagerService manager = NotificationManagerService.Instance ?? new NotificationManagerService();
            manager.Show(title, message);
        }
    }
}
Important
Par défaut, les notifications planifiées à l’aide de la classe AlarmManager ne survivront pas au redémarrage de l’appareil. Toutefois, vous pouvez concevoir votre application pour replanifier automatiquement les notifications si l’appareil est redémarré. Pour plus d’informations, consultez Démarrer une alarme lorsque l’appareil redémarre dans Planifier des alarmes répétées sur developer.android.com. Pour plus d’informations sur le traitement en arrière-plan sur Android, consultez Guide de traitement en arrière-plan sur developer.android.com.
Gérer les notifications entrantes
L’application Android doit détecter les notifications entrantes et notifier l’instance NotificationManagerService. L’une des façons d’y parvenir consiste à modifier la classe MainActivity.
L’attribut Activity de la classe MainActivity doit spécifier une valeur LaunchMode de LaunchMode.SingleTop :
[Activity(Theme = "@style/Maui.SplashTheme", MainLauncher = true, LaunchMode = LaunchMode.SingleTop, //... )]
public class MainActivity : MauiAppCompatActivity
{
}
Le mode SingleTop empêche le démarrage de plusieurs instances d’une Activity pendant que l’application est au premier plan. Ce LaunchMode peut ne pas convenir aux applications qui lancent plusieurs activités dans des scénarios de notification plus complexes. Pour plus d’informations sur les valeurs d’énumération LaunchMode, consultez LaunchMode d’activité Android sur developer.android.com.
La classe MainActivity doit également être modifiée pour recevoir des notifications entrantes :
public class MainActivity : MauiAppCompatActivity
{
    protected override void OnCreate(Bundle? savedInstanceState)
    {
        base.OnCreate(savedInstanceState);

        CreateNotificationFromIntent(Intent);
    }

    protected override void OnNewIntent(Intent? intent)
    {
        base.OnNewIntent(intent);

        CreateNotificationFromIntent(intent);
    }

    static void CreateNotificationFromIntent(Intent intent)
    {
        if (intent?.Extras != null)
        {
            string title = intent.GetStringExtra(LocalNotificationsDemo.Platforms.Android.NotificationManagerService.TitleKey);
            string message = intent.GetStringExtra(LocalNotificationsDemo.Platforms.Android.NotificationManagerService.MessageKey);

            var service = IPlatformApplication.Current.Services.GetService<INotificationManagerService>();
            service.ReceiveNotification(title, message);
        }
    }
}
La méthode CreateNotificationFromIntent extrait les données de notification de l’argument intent et les transmet à la méthode ReceiveNotification dans la classe NotificationManagerService. La méthode CreateNotificationFromIntent est appelée à partir de la méthode OnCreate et de la méthode OnNewIntent :
- Lorsque l’application est démarrée par des données de notification, les données
Intentsont transmises à la méthodeOnCreate. - Si l’application est déjà au premier plan, les données
Intentsont transmises à la méthodeOnNewIntent.
Vérifier l’autorisation
Android 13 (API 33) et versions ultérieures nécessitent l’autorisation POST_NOTIFICATIONS pour envoyer des notifications à partir d’une application. Cette autorisation doit être déclarée dans votre fichier AndroidManifest.xml :
<uses-permission android:name="android.permission.POST_NOTIFICATIONS" />
Pour plus d’informations sur l’autorisation POST_NOTIFICATIONS, consultez Autorisation de runtime de notification sur developer.android.com.
Vous devez implémenter une classe d’autorisation qui vérifie la déclaration d’autorisation au moment du runtime :
using Android;

namespace LocalNotificationsDemo.Platforms.Android;

public class NotificationPermission : Permissions.BasePlatformPermission
{
    public override (string androidPermission, bool isRuntime)[] RequiredPermissions
    {
        get
        {
            var result = new List<(string androidPermission, bool isRuntime)>();
            if (OperatingSystem.IsAndroidVersionAtLeast(33))
                result.Add((Manifest.Permission.PostNotifications, true));
            return result.ToArray();
        }
    }
}
Une fois l’application lancée, vous devez demander à l’utilisateur d’octroyer cette autorisation avant de tenter d’envoyer une notification locale :
PermissionStatus status = await Permissions.RequestAsync<NotificationPermission>();
Pour plus d’informations sur les autorisations .NET MAUI, consultez Autorisations.
Implémenter des notifications locales sur iOS et Mac Catalyst
Sur les plateformes Apple, une notification locale est un message qui transmet des informations importantes aux utilisateurs. Le système gère la remise des notifications en fonction d’une heure ou d’un emplacement spécifié. Pour plus d’informations sur les notifications locales sur les plateformes Apple, consultez Planification d’une notification localement à partir de votre application sur developer.apple.com.
Pour qu’une application .NET MAUI envoie et reçoive des notifications sur des plateformes Apple, l’application doit fournir une implémentation de l’interface INotificationManagerService.
Envoyer et recevoir des notifications locales
Sur les plateformes Apple, la classe NotificationManagerService implémente l’interface INotificationManagerService et contient la logique qui permet d’envoyer et de recevoir des notifications locales :
using Foundation;
using UserNotifications;

namespace LocalNotificationsDemo.Platforms.iOS;

public class NotificationManagerService : INotificationManagerService
{
    int messageId = 0;
    bool hasNotificationsPermission;

    public event EventHandler? NotificationReceived;

    public NotificationManagerService()
    {
        // Create a UNUserNotificationCenterDelegate to handle incoming messages.
        UNUserNotificationCenter.Current.Delegate = new NotificationReceiver();

        // Request permission to use local notifications.
        UNUserNotificationCenter.Current.RequestAuthorization(UNAuthorizationOptions.Alert, (approved, err) =>
        {
            hasNotificationsPermission = approved;
        });
    }

    public void SendNotification(string title, string message, DateTime? notifyTime = null)
    {
        // App doesn't have permissions.
        if (!hasNotificationsPermission)
            return;

        messageId++;
        var content = new UNMutableNotificationContent()
        {
            Title = title,
            Subtitle = "",
            Body = message,
            Badge = 1
        };

        UNNotificationTrigger trigger;
        if (notifyTime != null)
            // Create a calendar-based trigger.
            trigger = UNCalendarNotificationTrigger.CreateTrigger(GetNSDateComponents(notifyTime.Value), false);
        else
            // Create a time-based trigger, interval is in seconds and must be greater than 0.
            trigger = UNTimeIntervalNotificationTrigger.CreateTrigger(0.25, false);

        var request = UNNotificationRequest.FromIdentifier(messageId.ToString(), content, trigger);
        UNUserNotificationCenter.Current.AddNotificationRequest(request, (err) =>
        {
            if (err != null)
                throw new Exception($"Failed to schedule notification: {err}");
        });
    }

    public void ReceiveNotification(string title, string message)
    {
        var args = new NotificationEventArgs()
        {
            Title = title,
            Message = message
        };
        NotificationReceived?.Invoke(null, args);
    }

    NSDateComponents GetNSDateComponents(DateTime dateTime)
    {
        return new NSDateComponents
        {
            Month = dateTime.Month,
            Day = dateTime.Day,
            Year = dateTime.Year,
            Hour = dateTime.Hour,
            Minute = dateTime.Minute,
            Second = dateTime.Second
        };
    }
}
La classe NotificationManagerService doit être placée dans le dossier Plateformes > iOS ou Plateformes > Mac Catalyst de votre application. Vous pouvez également effectuer le multi-ciblage en fonction de vos propres critères de nom de fichier et de dossier, plutôt que d’utiliser les dossiers Plateformes. Pour plus d’informations, consultez Configurer le multi-ciblage.
Sur les plateformes Apple, vous devez demander l’autorisation d’utiliser des notifications avant de tenter de planifier une notification. Cela se produit dans le constructeur NotificationManagerService. Pour plus d’informations sur l’autorisation de notification locale, consultez Demander l’autorisation d’utiliser des notifications sur developer.apple.com.
La méthode SendNotification définit la logique nécessaire pour créer et envoyer une notification, et crée une notification locale immédiate à l’aide d’un objet UNTimeIntervalNotificationTrigger, ou à une DateTime exacte à l’aide d’un objet UNCalendarNotificationTrigger. La méthode ReceiveNotification est appelée par le iOS lorsqu’un message est reçu et appelle le gestionnaire d’événements NotificationReceived.
Gérer les notifications entrantes
Sur les plateformes Apple, pour gérer les messages entrants, vous devez créer un délégué qui sous-classe UNUserNotificationCenterDelegate :
using UserNotifications;

namespace LocalNotificationsDemo.Platforms.iOS;

public class NotificationReceiver : UNUserNotificationCenterDelegate
{
    // Called if app is in the foreground.
    public override void WillPresentNotification(UNUserNotificationCenter center, UNNotification notification, Action<UNNotificationPresentationOptions> completionHandler)
    {
        ProcessNotification(notification);

        var presentationOptions = (OperatingSystem.IsIOSVersionAtLeast(14))
            ? UNNotificationPresentationOptions.Banner
            : UNNotificationPresentationOptions.Alert;

        completionHandler(presentationOptions);
    }

    // Called if app is in the background, or killed state.
    public override void DidReceiveNotificationResponse(UNUserNotificationCenter center, UNNotificationResponse response, Action completionHandler)
    {
        if (response.IsDefaultAction)
            ProcessNotification(response.Notification);

        completionHandler();
    }

    void ProcessNotification(UNNotification notification)
    {
        string title = notification.Request.Content.Title;
        string message = notification.Request.Content.Body;

        var service = IPlatformApplication.Current?.Services.GetService<INotificationManagerService>();
        service?.ReceiveNotification(title, message);
    }
}
La classe NotificationReceiver est inscrite en tant que délégué UNUserNotificationCenter dans le constructeur NotificationManagerService et fournit des données de notification entrantes à la méthode ReceiveNotification dans la classe NotificationManagerService.
Implémenter des notifications locales sur Windows
Les notifications locales dans le Kit de développement logiciel (SDK) d’application Windows sont des messages que votre application peut envoyer à vos utilisateurs alors qu’ils ne sont pas actuellement dans votre application. Le contenu de la notification s’affiche dans une fenêtre temporaire dans le coin en bas à droite de l’écran et dans le centre de notification. Les notifications locales peuvent être utilisées pour informer l’utilisateur de l’état de l’application ou pour inviter l’utilisateur à effectuer une action.
Pour plus d’informations sur les notifications locales sur Windows, y compris les détails de l’implémentation pour les applications empaquetées et non empaquetées, consultez Vue d’ensemble des notifications d’application.
Avertissement
Actuellement, les notifications planifiées ne sont pas prises en charge dans le Kit de développement logiciel (SDK) d’application Windows. Pour plus d’informations, consultez Demande de nouvelle fonctionnalité : planifier des notifications éphémères.
Inscrire des implémentations d’une plateforme
Chaque implémentation NotificationManagerService doit être inscrite sur l’interface INotificationManagerService, afin que les opérations exposées par l’interface puissent être appelées à partir du code multiplateforme. Pour ce faire, inscrivez les types avec la propriété Services de l’objet MauiAppBuilder dans la méthode CreateMauiApp dans la classe MauiProgram :
#if ANDROID
            builder.Services.AddTransient<INotificationManagerService, LocalNotificationsDemo.Platforms.Android.NotificationManagerService>();
#elif IOS
            builder.Services.AddTransient<INotificationManagerService, LocalNotificationsDemo.Platforms.iOS.NotificationManagerService>();
#elif MACCATALYST
            builder.Services.AddTransient<INotificationManagerService, LocalNotificationsDemo.Platforms.MacCatalyst.NotificationManagerService>();
#elif WINDOWS
            builder.Services.AddTransient<INotificationManagerService, LocalNotificationsDemo.Platforms.Windows.NotificationManagerService>();
#endif
Pour plus d’informations sur l’injection de dépendances dans .NET MAUI, consultez Injection de dépendances.
Envoyer et recevoir des notifications locales
Une implémentation INotificationManagerService peut être résolue via une résolution des dépendances automatique ou par le biais d’une résolution de dépendance explicite. L’exemple suivant montre l’utilisation de la résolution de dépendance explicite pour résoudre une implémentation INotificationManagerService :
// Assume the app uses a single window.
INotificationManagerService notificationManager =
    Application.Current?.Windows[0].Page?.Handler?.MauiContext?.Services.GetService<INotificationManagerService>();
Pour plus d’informations sur la résolution des types inscrits, consultez Résolution.
Une fois l’implémentation INotificationManagerService résolue, ses opérations peuvent être appelées :
// Send
notificationManager.SendNotification();

// Scheduled send
notificationManager.SendNotification("Notification title goes here", "Notification messages goes here.", DateTime.Now.AddSeconds(10));

// Receive
notificationManager.NotificationReceived += (sender, eventArgs) =>
{
    var eventData = (NotificationEventArgs)eventArgs;

    MainThread.BeginInvokeOnMainThread(() =>
    {
        // Take required action in the app once the notification has been received.
    });
};
}
Le gestionnaire d’événements NotificationReceived convertit ses arguments d’événement en NotificationEventArgs, ce qui définit les propriétés Title et Message :
public class NotificationEventArgs : EventArgs
{
    public string Title { get; set; }
    public string Message { get; set; }
}
Sur Android, lorsqu’une notification est envoyée, elle apparaît sous forme d’icône dans la barre d’état :
 Icône de notification dans la barre d’état sur Android.
Lorsque vous balayez vers le bas la barre d’état, le tiroir de notification s’ouvre :
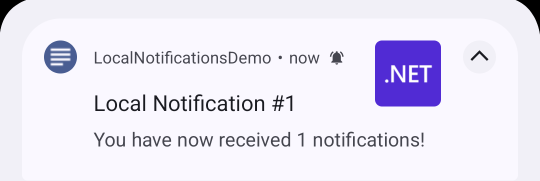 Notification locale dans le tiroir de notification sur Android.
Appuyer sur la notification lance l’application. Une notification reste visible dans le tiroir de notification jusqu’à ce qu’elle soit ignorée par l’application ou l’utilisateur.
Sur iOS, les notifications entrantes sont automatiquement reçues par une application sans avoir besoin d’une entrée utilisateur :
 Notification sur iOS.
Sur Mac Catalyst, les notifications entrantes sont automatiquement reçues par le centre de notification :
 Notification dans le centre de notifications sur macOS.
Pour plus d’informations sur le centre de notification, consultez Utiliser le centre de notification sur Mac sur support.apple.com.
Collaborer avec nous sur GitHub
La source de ce contenu se trouve sur GitHub, où vous pouvez également créer et examiner les problèmes et les demandes de tirage. Pour plus d’informations, consultez notre guide du contributeur.