Define migration table mappings
Migration table mapping can be used to rename the table during the cloud migration or to move a subset of fields to a different table or table extension. Table mapping is a process that allows you to define the relationship between source tables in an on-premises database and destination tables in the online environment. In other words, table mapping lets you specify which tables in the on-premises database are migrated to which tables in the online environment.
Tip
You can use the Import and Export actions to import or export the definition done in the UI.
Design constraints
It's not possible to have multiple source tables mapping to the same destination (target) table. The destination table must have a single on-premises source table.
For example, the following mappings together aren't supported:
| Source table | Destination table |
|---|---|
| Customer | MyTable |
| MyTable | MyTable |
But the following mappings are supported:
| Source table | Destination table |
|---|---|
| Customer | Customer |
| Customer | MyTable |
This limitation also applies to tables that are automatically included into the replication, which means tables enabled for cloud migration by the ReplicateData property. If these tables exist in the on-premises database, they're automatically included in the cloud migration. So, no table mappings can define these tables as the destination table.
Rename the table during the cloud migration
This scenario supports adding the prefix or changing the table name during cloud migration.
For example, suppose the Business Central on-premises table is named My Custom Table. But in Business Central online, the name needs to be prefixed (or suffixed) with 3 letters, so the table name is ABC My Custom Table.
Prerequisites
- The keys in on-premises table and online table must match.
- The online target table must have the ReplicateData property set to
true.
Create the table mapping for renaming
Sign in to Business Cental online.
Search for and open the Cloud Migration Management page.
Select Manage Custom Tables to open the Migration Table Mapping page.
Set the following fields:
Fields Value Target Type Table Extension Names Set to the name of the extension that contains the table. Table Name Set to the table in the extension. Setting these three fields specifies the target table. Source Table Name Enter the full name as it appears in SQL. The system parses the values.
C/AL table example:[CRONUS COMPANY$ABC My Custom Table]
AL table example:[CRONUS COMPANY$ABC My Custom Table$437dbf0e-84ff-417a-965d-ed2bb9650972]. The GUID437dbf0e-84ff-417a-965d-ed2bb9650972is the extension ID, which in this case is for base app.
The following figure illustrates an example of the Migrate Table Mappings page for an AL table:

Move a set of fields out of the main table to another table or table extension
Note
This type of table mapping is only supported for cloud migrations from Business Central. Dynamics GP and SL don't support table extensions.
For example, suppose that you've added two custom fields to the Customer table in Business Central on-premises. You want to move these two custom fields to a table extension in Business Central online. If you define a table extension mapping, then the engine will move a subset of fields to the table extension.
Prerequisite
Fields to be moved to a table extension must have the same name and type as in the source table in the Business Central. If the name is different, the fields are ignored by the engine, and won't be moved to Business Central online.
Create the table mapping for moving fields
To create the table mapping, follow the same steps as in Scenario 1, except set the Target Table Type to Table Extension.
If you're moving a table that is per-database table, clear the Data Per Company check box.
The following figure illustrates an example of the Migrate Table Mappings page for a C/AL table:

Add multiple table mappings
Follow these steps if you need multiple table mappings.
On the Migration Table Mapping page, select Add Table Mappings.
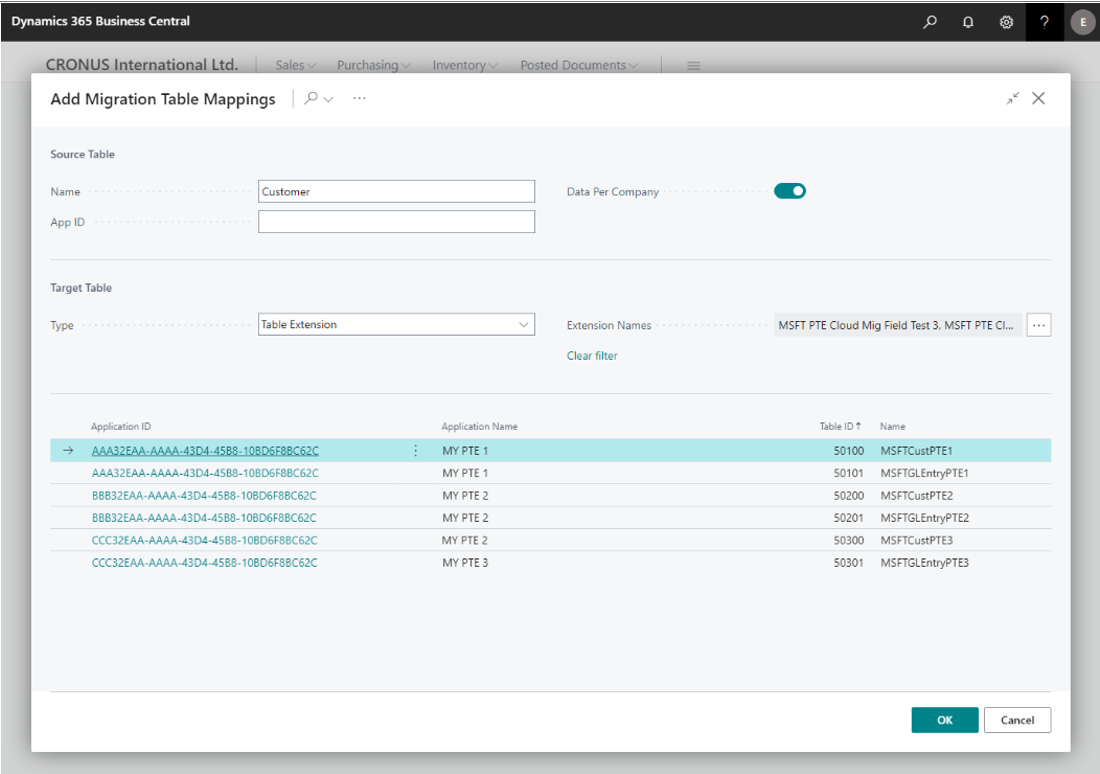
On the Add Migrate Table Mappings page, in the Source Table section, enter the table name in the Name field.
It's best to enter the full name as it appears in SQL Management Studio as in the following examples:
C/AL table:
[CRONUS COMPANY$ABC My Custom Table]AL table:
[CRONUS COMPANY$ABC My Custom Table$437dbf0e-84ff-417a-965d-ed2bb9650972]The GUID
437dbf0e-84ff-417a-965d-ed2bb9650972is the extension ID, which in this case is for base app.To set the target table, go to the Target Table section and set the Type to Table or Extension.
The list shows all the tables available for mapping to the target table. You can filter the list by setting an extension in the Extension Name field.
Select all rows that you want to map to the target table.
The following figure illustrates an example of the Add Migrate Table Mappings page:
Close the page.
After you close the page, the multiple table mappings will be inserted. This step is useful when you want to split a single source table into multiple table extensions.

Provide table mappings programmatically
We recommend that you provide the table mappings programmatically. To do table mappings programmatically, subscribe to OnInsertDefaultTableMappings event from codeunit 4001 "Hybrid Cloud Management".
Table mappings will be inserted after the setup wizard is completed or if you run the Restore Default Mappings from Migration Table Mapping page.