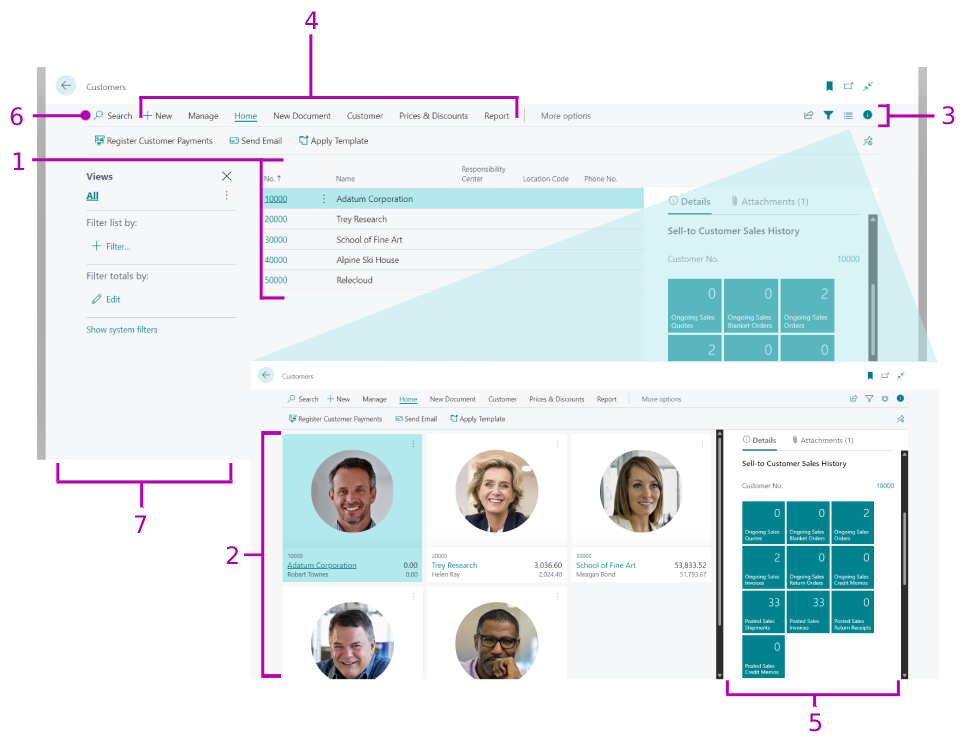
| 1 |
List |
Displays records of the source table as rows and columns, where each row is a record and the columns are the fields. You define the list by adding a repeater() control within the area(Content) control of the page, and then add field() controls for each field that you want to display. For more information about the repeater control, see Work with repeater controls. |
The order of the field controls determines the order they appear on the page. |
| 2 |
Tile view |
Renders records in a list as tiles (or bricks). Client users can toggle between the list and tile view.
As a developer, to enable a list to be displayed as tiles, you must specify the table fields that you want to include in the tiles. You do this by adding a fieldgroup(Brick; <Field>) keyword in the code of the source table.
For more information, see Displaying Data as Tiles. |
You can design any list page to display as tiles. The tile view is particularly beneficial for lists with records that include media or images, such a customers, contacts, and items lists. For more information about adding media to records, see Working With Media on Records. |
| 3 |
Action bar |
The action bar provides links to other pages, reports, and codeunits. The action bar is defined by an actions control in the page code, and individual actions are defined by an action() control.
Actions can be displayed on three standard menus in the action bar, Actions, Navigate, and Report, or in promoted categories, which are like custom menus that you define. You can arrange actions on these menus in the root-level or grouped in a sub-menu.
The objects targeted by these links will open in a separate window.
For more information, see Adding Actions to a Page. |
Organize the action bar to contain the actions that users need to complete a task, such as posting, running a report, and opening another page with related information. Place the most important action at the root-level, and group closely related actions in a sub-menu. |
| 4 |
Promoted actions |
Promoted actions are actions that are defined in the area() control like any other action in code, but are configured to display on a higher level in the action bar, in a specific category that you define. You promote actions by setting various Promoted-related properties on action() controls.
For more information, see Promoted Actions. |
Promote an action to give it the most prominent placement for users to find it easily. Actions that are promoted appear first in the actions bar. Actions that are not promoted are available to the user by selecting More options in the action bar. |
| 5 |
FactBoxes |
FactBoxes are located on the right-most side of a page and it is divided into one or more parts that are arranged vertically. Each part can display different content including other pages, charts, and system parts such as Microsoft Outlook, Notes, and Record Links.
For more information, see Adding a FactBox to a Page. |
Typically, you can use a FactBox to display information that is related to an item on the main content page. For example, on a page that shows a sales order list, you can use a FactBox to show sell-to customer sales history for a selected sales order in the list. |
| 6 |
Search |
A cross-column, text-based search box at the top of the page that provides users a quick and easy way to reduce the records in a list and display only those records that contain the data that they are interested in seeing. The Search appears on all list pages, and requires no additional coding.
For more information, see Searching, Filtering, and Sorting Data in the user help for Business Central. |
|
| 7 |
Filter pane |
The filter pane enables users to apply filters on one or more fields in the list to limit the records that are displayed. Client users can toggle the filter pane on and off as needed. For more information about how to use the filter pane, see Searching, Filtering, and Sorting Data |
The Filter pane is available on all list pages, with no extra coding required. However, as a developer, you can define sets of special words, called filter tokens, which are kind of like predefined filters. Users can then enter these filter tokens in the filter pane to quickly filter the list to display the desired data. For more information, see Adding Filter Tokens.
Also, you can set FlowFilters on the list that enable users to adjust various dimensions that influence calculated fields. The FlowFilters appear in the Filter totals by section of the filter pane. For information about adding FlowFilters, see FlowFilters. |
