Création d’applications Android avec Microsoft Graph
Ce didacticiel vous apprend à créer une application Android qui utilise l’API Microsoft Graph pour récupérer les informations de calendrier d’un utilisateur.
Conseil
Si vous préférez simplement télécharger le didacticiel terminé, vous pouvez télécharger ou cloner le GitHub complet.
Prerequisites
Avant de commencer ce didacticiel, Android Studio doit être installé sur votre ordinateur de développement.
Vous devez également avoir un compte Microsoft personnel avec une boîte aux lettres sur Outlook.com, ou un compte scolaire ou scolaire Microsoft. Si vous n’avez pas de compte Microsoft, deux options s’offrent à vous pour obtenir un compte gratuit :
- Vous pouvez vous inscrire à un nouveau compte Microsoft personnel.
- Vous pouvez vous inscrire au programme Microsoft 365 développeur pour obtenir un abonnement Microsoft 365 gratuit.
Notes
Ce didacticiel a été écrit avec Android Studio version 4.1.3 et le SDK Android 10.0. Les étapes de ce guide peuvent fonctionner avec d’autres versions, mais elles n’ont pas été testées.
Commentaires
N’hésitez pas à nous faire part de vos commentaires sur ce didacticiel dans GitHub référentiel.
Créer une application Android
Commencez par créer un projet Android Studio.
Ouvrez Android Studio, puis sélectionnez Démarrer un nouveau projet Android Studio sur l’écran d’accueil.
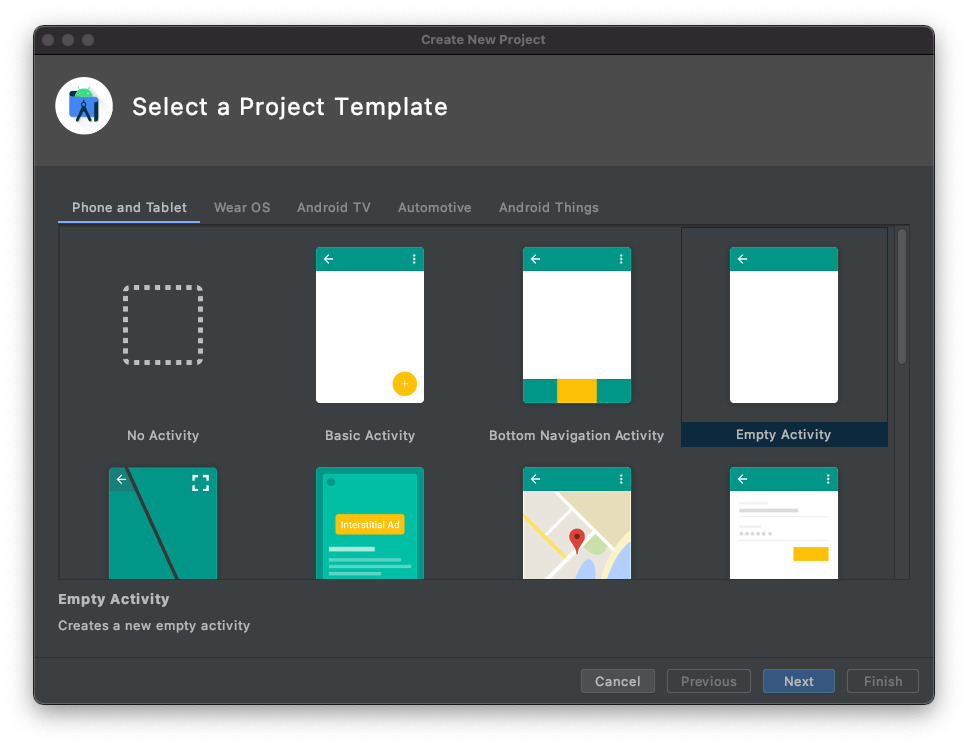
Dans la boîte de dialogue Créer un Project, sélectionnez Activité vide, puis Suivant.
Dans la boîte de dialogue Configurer votre projet,
Graph Tutorialdéfinissez le nom sur ,Javaassurez-vous que le champ Langue est configuré sur , et assurez-vous que le niveau d’API minimum est configuré surAPI 29: Android 10.0 (Q). Modifiez le nom du package et l’emplacement d’enregistrer selon vos besoins. Sélectionnez Terminer.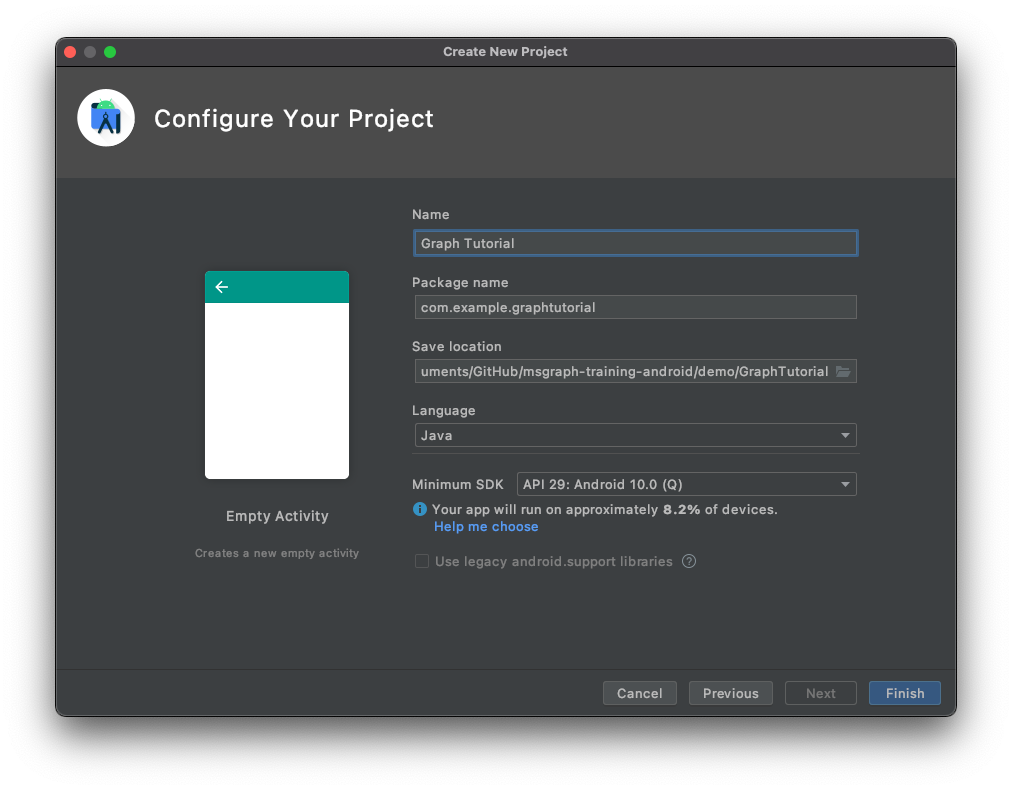
Important
Le code et les instructions de ce didacticiel utilisent le nom du package com.example.graphtutorial. Si vous utilisez un autre nom de package lors de la création du projet, n’oubliez pas d’utiliser votre nom de package partout où vous voyez cette valeur.
Installer les dépendances
Avant de passer à autre chose, installez des dépendances supplémentaires que vous utiliserez ultérieurement.
com.google.android.material:materialpour rendre l’affichage de navigation disponible pour l’application.- Bibliothèque d’authentification Microsoft (MSAL) pour Android pour gérer l Azure AD’authentification et la gestion des jetons.
- Microsoft Graph SDK pour les Java pour effectuer des appels au microsoft Graph.
Développez Gradle Scripts, puis ouvrez build.gradle (Module : Graph_Tutorial.app).
Ajoutez les lignes suivantes à l’intérieur de la
dependenciesvaleur.implementation 'com.google.android.material:material:1.3.0' implementation 'com.microsoft.identity.client:msal:2.0.8' implementation ('com.microsoft.graph:microsoft-graph:3.1.0') { exclude group: 'javax.activation' }Ajoutez une
packagingOptionsvaleur à l’intérieurandroidde la valeur dans build.gradle (Module: Graph_Tutorial.app)..packagingOptions { pickFirst 'META-INF/*' }Ajoutez le référentiel Azure Maven pour la bibliothèque MicrosoftDeviceSDK, une dépendance de MSAL. Ouvrez build.gradle (Project : Graph_Tutorial). Ajoutez ce qui suit à la
repositoriesvaleur à l’intérieur de laallprojectsvaleur.maven { url 'https://pkgs.dev.azure.com/MicrosoftDeviceSDK/DuoSDK-Public/_packaging/Duo-SDK-Feed/maven/v1' }Enregistrez vos modifications. Dans le menu Fichier, sélectionnez Synchroniser Project fichiers Gradle.
Concevoir l’application
L’application utilise un bac de navigation pour naviguer entre les différents affichages. Dans cette étape, vous allez mettre à jour l’activité pour utiliser une disposition de caisse de navigation et ajouter des fragments pour les vues.
Créer un caisse de navigation
Dans cette section, vous allez créer des icônes pour le menu de navigation de l’application, créer un menu pour l’application et mettre à jour le thème et la disposition de l’application pour qu’ils soient compatibles avec un bac de navigation.
Créer des icônes
Cliquez avec le bouton droit sur le dossier application/res/dessinable , puis sélectionnez Nouvelle, puis Ressources vectorielles.
Cliquez sur le bouton d’icône en haut de la clipart.
Dans la fenêtre Sélectionner une icône, tapez
homedans la barre de recherche, puis sélectionnez l’icône Accueil et sélectionnez OK.Changez le nom en
ic_menu_home.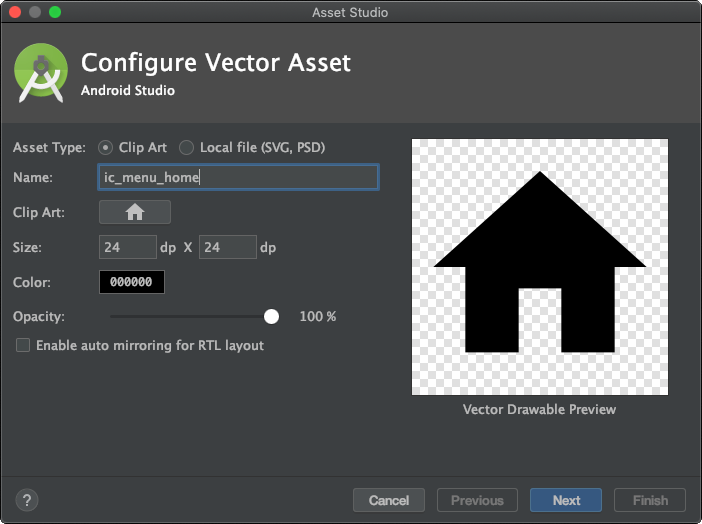
Sélectionnez Suivant, puis Terminer.
Répétez l’étape précédente pour créer quatre autres icônes.
- Name:
ic_menu_calendar, Icon:event - Name:
ic_menu_add_event, Icon:add box - Name:
ic_menu_signout, Icon:exit to app - Name:
ic_menu_signin, Icon:person add
- Name:
Créer le menu
Cliquez avec le bouton droit sur le dossier res et sélectionnez Nouveau, puis Répertoire de ressources Android.
Modifiez le type de ressource et
menusélectionnez OK.Cliquez avec le bouton droit sur le nouveau dossier de menu et sélectionnez Nouveau, puis fichier de ressources menu.
Nommez le fichier
drawer_menuet sélectionnez OK.Lorsque le fichier s’ouvre, sélectionnez l’onglet Code pour afficher le code XML, puis remplacez tout le contenu par ce qui suit.
<?xml version="1.0" encoding="utf-8"?>
<menu xmlns:android="http://schemas.android.com/apk/res/android"
    xmlns:tools="http://schemas.android.com/tools"
    tools:showIn="navigation_view">

    <group android:checkableBehavior="single">
        <item
            android:id="@+id/nav_home"
            android:icon="@drawable/ic_menu_home"
            android:title="Home" />

        <item
            android:id="@+id/nav_calendar"
            android:icon="@drawable/ic_menu_calendar"
            android:title="Calendar" />

        <item
            android:id="@+id/nav_create_event"
            android:icon="@drawable/ic_menu_add_event"
            android:title="New Event" />

        <item
            android:id="@+id/nav_signout"
            android:icon="@drawable/ic_menu_signout"
            android:title="Sign Out" />

        <item
            android:id="@+id/nav_signin"
            android:icon="@drawable/ic_menu_signin"
            android:title="Sign In" />
    </group>
</menu>
Mettre à jour le thème et la disposition de l’application
Ouvrez le fichier app/res/values/themes.xml et ajoutez les lignes suivantes à l’intérieur de l’élément
style.<item name="windowActionBar">false</item> <item name="windowNoTitle">true</item>Ouvrez le fichier app/res/values-night/themes.xml et ajoutez les lignes suivantes à l’intérieur de l’élément
style.<item name="windowActionBar">false</item> <item name="windowNoTitle">true</item>Cliquez avec le bouton droit sur le dossier application/res/layout .
Sélectionnez Nouveau, puis Fichier de ressources de disposition.
Nommez le fichier
nav_headeret modifiez l’élément Racine enLinearLayout, puis sélectionnez OK.Ouvrez lenav_header.xml et sélectionnez l’onglet Code . Remplacez tout le contenu par ce qui suit.
<?xml version="1.0" encoding="utf-8"?>
<LinearLayout xmlns:android="http://schemas.android.com/apk/res/android"
    android:layout_width="match_parent"
    android:layout_height="176dp"
    android:background="?colorPrimary"
    android:gravity="bottom"
    android:orientation="vertical"
    android:padding="16dp"
    android:theme="@style/Theme.GraphTutorial">

    <ImageView
        android:id="@+id/user_profile_pic"
        android:layout_width="wrap_content"
        android:layout_height="wrap_content"
        android:src="@mipmap/ic_launcher" />

    <TextView
        android:id="@+id/user_name"
        android:layout_width="wrap_content"
        android:layout_height="wrap_content"
        android:paddingTop="8dp"
        android:text="Test User"
        android:textColor="?colorOnPrimary"
        android:textAppearance="@style/TextAppearance.AppCompat.Body1" />

    <TextView
        android:id="@+id/user_email"
        android:layout_width="wrap_content"
        android:layout_height="wrap_content"
        android:text="test@contoso.com"
        android:textColor="?colorOnPrimary" />

</LinearLayout>
Ouvrez le fichier app/res/layout/activity_main.xml et mettez à jour la disposition en A
DrawerLayouten remplaçant le XML existant par ce qui suit.<?xml version="1.0" encoding="utf-8"?> <androidx.drawerlayout.widget.DrawerLayout xmlns:android="http://schemas.android.com/apk/res/android" xmlns:app="http://schemas.android.com/apk/res-auto" xmlns:tools="http://schemas.android.com/tools" android:id="@+id/drawer_layout" android:layout_width="match_parent" android:layout_height="match_parent" android:fitsSystemWindows="true" tools:context=".MainActivity" tools:openDrawer="start"> <RelativeLayout android:layout_width="match_parent" android:layout_height="match_parent" android:orientation="vertical"> <ProgressBar android:id="@+id/progressbar" android:layout_width="75dp" android:layout_height="75dp" android:layout_centerInParent="true" android:visibility="gone"/> <androidx.appcompat.widget.Toolbar android:id="@+id/toolbar" android:layout_width="match_parent" android:layout_height="?attr/actionBarSize" android:background="?colorPrimary" app:titleTextColor="?colorOnPrimary" android:elevation="4dp" android:theme="@style/Theme.GraphTutorial" /> <FrameLayout android:id="@+id/fragment_container" android:layout_width="match_parent" android:layout_height="match_parent" android:layout_below="@+id/toolbar" /> </RelativeLayout> <com.google.android.material.navigation.NavigationView android:id="@+id/nav_view" android:layout_width="wrap_content" android:layout_height="match_parent" android:layout_gravity="start" app:headerLayout="@layout/nav_header" app:menu="@menu/drawer_menu" /> </androidx.drawerlayout.widget.DrawerLayout>Ouvrez app/res/values/strings.xml et ajoutez les éléments suivants à l’intérieur de l’élément
resources.<string name="navigation_drawer_open">Open navigation drawer</string> <string name="navigation_drawer_close">Close navigation drawer</string>Ouvrez le fichier app/java/com.example/graphtutorial/MainActivity et remplacez tout le contenu par ce qui suit.
package com.example.graphtutorial;

import android.os.Bundle;
import android.view.Menu;
import android.view.MenuItem;
import android.view.View;
import android.widget.FrameLayout;
import android.widget.ProgressBar;
import android.widget.TextView;
import androidx.annotation.NonNull;
import androidx.appcompat.app.ActionBarDrawerToggle;
import androidx.appcompat.app.AppCompatActivity;
import androidx.appcompat.widget.Toolbar;
import androidx.core.view.GravityCompat;
import androidx.drawerlayout.widget.DrawerLayout;
import com.google.android.material.navigation.NavigationView;

public class MainActivity extends AppCompatActivity implements NavigationView.OnNavigationItemSelectedListener {
    private static final String SAVED_IS_SIGNED_IN = "isSignedIn";
    private static final String SAVED_USER_NAME = "userName";
    private static final String SAVED_USER_EMAIL = "userEmail";
    private static final String SAVED_USER_TIMEZONE = "userTimeZone";

    private DrawerLayout mDrawer;
    private NavigationView mNavigationView;
    private View mHeaderView;
    private boolean mIsSignedIn = false;
    private String mUserName = null;
    private String mUserEmail = null;
    private String mUserTimeZone = null;

    @Override
    protected void onCreate(Bundle savedInstanceState) {
        super.onCreate(savedInstanceState);
        setContentView(R.layout.activity_main);

        // Set the toolbar
        Toolbar toolbar = findViewById(R.id.toolbar);
        setSupportActionBar(toolbar);

        mDrawer = findViewById(R.id.drawer_layout);

        // Add the hamburger menu icon
        ActionBarDrawerToggle toggle = new ActionBarDrawerToggle(this, mDrawer, toolbar,
                R.string.navigation_drawer_open, R.string.navigation_drawer_close);
        mDrawer.addDrawerListener(toggle);
        toggle.syncState();

        mNavigationView = findViewById(R.id.nav_view);

        // Set user name and email
        mHeaderView = mNavigationView.getHeaderView(0);
        setSignedInState(mIsSignedIn);

        // Listen for item select events on menu
        mNavigationView.setNavigationItemSelectedListener(this);

        if (savedInstanceState == null) {
            // Load the home fragment by default on startup
            openHomeFragment(mUserName);
        } else {
            // Restore state
            mIsSignedIn = savedInstanceState.getBoolean(SAVED_IS_SIGNED_IN);
            mUserName = savedInstanceState.getString(SAVED_USER_NAME);
            mUserEmail = savedInstanceState.getString(SAVED_USER_EMAIL);
            mUserTimeZone = savedInstanceState.getString(SAVED_USER_TIMEZONE);
            setSignedInState(mIsSignedIn);
        }
    }

    @Override
    protected void onSaveInstanceState(@NonNull Bundle outState) {
        super.onSaveInstanceState(outState);
        outState.putBoolean(SAVED_IS_SIGNED_IN, mIsSignedIn);
        outState.putString(SAVED_USER_NAME, mUserName);
        outState.putString(SAVED_USER_EMAIL, mUserEmail);
        outState.putString(SAVED_USER_TIMEZONE, mUserTimeZone);
    }

    @Override
    public boolean onNavigationItemSelected(@NonNull MenuItem menuItem) {
        // TEMPORARY
        return false;
    }

    @Override
    public void onBackPressed() {
        if (mDrawer.isDrawerOpen(GravityCompat.START)) {
            mDrawer.closeDrawer(GravityCompat.START);
        } else {
            super.onBackPressed();
        }
    }

    public void showProgressBar()
    {
        FrameLayout container = findViewById(R.id.fragment_container);
        ProgressBar progressBar = findViewById(R.id.progressbar);
        container.setVisibility(View.GONE);
        progressBar.setVisibility(View.VISIBLE);
    }

    public void hideProgressBar()
    {
        FrameLayout container = findViewById(R.id.fragment_container);
        ProgressBar progressBar = findViewById(R.id.progressbar);
        progressBar.setVisibility(View.GONE);
        container.setVisibility(View.VISIBLE);
    }

    // Update the menu and get the user's name and email
    private void setSignedInState(boolean isSignedIn) {
        mIsSignedIn = isSignedIn;

        mNavigationView.getMenu().clear();
        mNavigationView.inflateMenu(R.menu.drawer_menu);

        Menu menu = mNavigationView.getMenu();

        // Hide/show the Sign in, Calendar, and Sign Out buttons
        if (isSignedIn) {
            menu.removeItem(R.id.nav_signin);
        } else {
            menu.removeItem(R.id.nav_home);
            menu.removeItem(R.id.nav_calendar);
            menu.removeItem(R.id.nav_create_event);
            menu.removeItem(R.id.nav_signout);
        }

        // Set the user name and email in the nav drawer
        TextView userName = mHeaderView.findViewById(R.id.user_name);
        TextView userEmail = mHeaderView.findViewById(R.id.user_email);

        if (isSignedIn) {
            // For testing
            mUserName = "Lynne Robbins";
            mUserEmail = "lynner@contoso.com";
            mUserTimeZone = "Pacific Standard Time";

            userName.setText(mUserName);
            userEmail.setText(mUserEmail);
        } else {
            mUserName = null;
            mUserEmail = null;
            mUserTimeZone = null;

            userName.setText("Please sign in");
            userEmail.setText("");
        }
    }
}
Ajouter des fragments
Dans cette section, vous allez créer des fragments pour les affichages d’accueil et de calendrier.
Cliquez avec le bouton droit sur le dossier application/res/layout , puis sélectionnez Nouveau, puis fichier de ressources de disposition.
Nommez le fichier
fragment_homeet modifiez l’élément Racine enRelativeLayout, puis sélectionnez OK.Ouvrez fragment_home.xml fichier et remplacez son contenu par ce qui suit.
<?xml version="1.0" encoding="utf-8"?>
<RelativeLayout xmlns:android="http://schemas.android.com/apk/res/android"
    android:layout_width="match_parent"
    android:layout_height="match_parent">

    <LinearLayout
        android:layout_width="wrap_content"
        android:layout_height="wrap_content"
        android:layout_centerInParent="true"
        android:orientation="vertical">

        <TextView
            android:layout_width="wrap_content"
            android:layout_height="wrap_content"
            android:layout_gravity="center_horizontal"
            android:text="Welcome!"
            android:textSize="30sp" />

        <TextView
            android:id="@+id/home_page_username"
            android:layout_width="wrap_content"
            android:layout_height="wrap_content"
            android:layout_gravity="center_horizontal"
            android:paddingTop="8dp"
            android:text="Please sign in"
            android:textSize="20sp" />
    </LinearLayout>

</RelativeLayout>
Cliquez avec le bouton droit sur le dossier application/res/layout , puis sélectionnez Nouveau, puis fichier de ressources de disposition.
Nommez le fichier
fragment_calendaret modifiez l’élément Racine enRelativeLayout, puis sélectionnez OK.Ouvrez fragment_calendar.xml fichier et remplacez son contenu par ce qui suit.
<?xml version="1.0" encoding="utf-8"?>
<RelativeLayout xmlns:android="http://schemas.android.com/apk/res/android"
    android:layout_width="match_parent"
    android:layout_height="match_parent">

    <TextView
        android:layout_width="wrap_content"
        android:layout_height="wrap_content"
        android:layout_centerInParent="true"
        android:text="Calendar"
        android:textSize="30sp" />

</RelativeLayout>
Cliquez avec le bouton droit sur le dossier application/res/layout , puis sélectionnez Nouveau, puis fichier de ressources de disposition.
Nommez le fichier
fragment_new_eventet modifiez l’élément Racine enRelativeLayout, puis sélectionnez OK.Ouvrez fragment_new_event.xml fichier et remplacez son contenu par ce qui suit.
<?xml version="1.0" encoding="utf-8"?>
<RelativeLayout xmlns:android="http://schemas.android.com/apk/res/android"
    android:layout_width="match_parent"
    android:layout_height="match_parent">

    <TextView
        android:layout_width="wrap_content"
        android:layout_height="wrap_content"
        android:layout_centerInParent="true"
        android:text="New Event"
        android:textSize="30sp" />

</RelativeLayout>
Cliquez avec le bouton droit sur le dossier app/java/com.example.graphtutorial et sélectionnez Nouveau, puis Java Classe.
Nommez la classe
HomeFragment, puis sélectionnez OK.Ouvrez le fichier HomeFragment et remplacez son contenu par ce qui suit.
package com.example.graphtutorial;

import android.os.Bundle;
import android.view.LayoutInflater;
import android.view.View;
import android.view.ViewGroup;
import android.widget.TextView;
import androidx.annotation.NonNull;
import androidx.annotation.Nullable;
import androidx.fragment.app.Fragment;

public class HomeFragment extends Fragment {
    private static final String USER_NAME = "userName";

    private String mUserName;

    public HomeFragment() {

    }

    public static HomeFragment createInstance(String userName) {
        HomeFragment fragment = new HomeFragment();

        // Add the provided username to the fragment's arguments
        Bundle args = new Bundle();
        args.putString(USER_NAME, userName);
        fragment.setArguments(args);
        return fragment;
    }

    @Override
    public void onCreate(@Nullable Bundle savedInstanceState) {
        super.onCreate(savedInstanceState);
        if (getArguments() != null) {
            mUserName = getArguments().getString(USER_NAME);
        }
    }

    @Nullable
    @Override
    public View onCreateView(@NonNull LayoutInflater inflater, @Nullable ViewGroup container, @Nullable Bundle savedInstanceState) {
        View homeView = inflater.inflate(R.layout.fragment_home, container, false);

        // If there is a username, replace the "Please sign in" with the username
        if (mUserName != null) {
            TextView userName = homeView.findViewById(R.id.home_page_username);
            userName.setText(mUserName);
        }

        return homeView;
    }
}
Cliquez avec le bouton droit sur le dossier app/java/com.example.graphtutorial et sélectionnez Nouveau, puis Java Classe.
Nommez la classe
CalendarFragment, puis sélectionnez OK.Ouvrez le fichier CalendarFragment et remplacez son contenu par ce qui suit.
package com.example.graphtutorial;

import android.os.Bundle;
import android.view.LayoutInflater;
import android.view.View;
import android.view.ViewGroup;
import androidx.annotation.NonNull;
import androidx.annotation.Nullable;
import androidx.fragment.app.Fragment;

public class CalendarFragment extends Fragment {
    private static final String TIME_ZONE = "timeZone";

    private String mTimeZone;

    public CalendarFragment() {}

    public static CalendarFragment createInstance(String timeZone) {
        CalendarFragment fragment = new CalendarFragment();

        // Add the provided time zone to the fragment's arguments
        Bundle args = new Bundle();
        args.putString(TIME_ZONE, timeZone);
        fragment.setArguments(args);
        return fragment;
    }

    @Override
    public void onCreate(@Nullable Bundle savedInstanceState) {
        super.onCreate(savedInstanceState);
        if (getArguments() != null) {
            mTimeZone = getArguments().getString(TIME_ZONE);
        }
    }

    @Nullable
    @Override
    public View onCreateView(@NonNull LayoutInflater inflater, @Nullable ViewGroup container, @Nullable Bundle savedInstanceState) {
        return inflater.inflate(R.layout.fragment_calendar, container, false);
    }
}
Cliquez avec le bouton droit sur le dossier app/java/com.example.graphtutorial et sélectionnez Nouveau, puis Java Classe.
Nommez la classe
NewEventFragment, puis sélectionnez OK.Ouvrez le fichier NewEventFragment et remplacez son contenu par ce qui suit.
package com.example.graphtutorial;

import android.os.Bundle;
import android.view.LayoutInflater;
import android.view.View;
import android.view.ViewGroup;
import androidx.annotation.NonNull;
import androidx.annotation.Nullable;
import androidx.fragment.app.Fragment;

public class NewEventFragment extends Fragment {
    private static final String TIME_ZONE = "timeZone";

    private String mTimeZone;

    public NewEventFragment() {}

    public static NewEventFragment createInstance(String timeZone) {
        NewEventFragment fragment = new NewEventFragment();

        // Add the provided time zone to the fragment's arguments
        Bundle args = new Bundle();
        args.putString(TIME_ZONE, timeZone);
        fragment.setArguments(args);
        return fragment;
    }

    @Override
    public void onCreate(@Nullable Bundle savedInstanceState) {
        super.onCreate(savedInstanceState);
        if (getArguments() != null) {
            mTimeZone = getArguments().getString(TIME_ZONE);
        }
    }

    @Nullable
    @Override
    public View onCreateView(@NonNull LayoutInflater inflater, @Nullable ViewGroup container, @Nullable Bundle savedInstanceState) {
        return inflater.inflate(R.layout.fragment_new_event, container, false);
    }
}
Ouvrez le fichier MainActivity.java et ajoutez les fonctions suivantes à la classe.
// Load the "Home" fragment
public void openHomeFragment(String userName) {
    HomeFragment fragment = HomeFragment.createInstance(userName);
    getSupportFragmentManager().beginTransaction()
            .replace(R.id.fragment_container, fragment)
            .commit();
    mNavigationView.setCheckedItem(R.id.nav_home);
}

// Load the "Calendar" fragment
private void openCalendarFragment(String timeZone) {
    CalendarFragment fragment = CalendarFragment.createInstance(timeZone);
    getSupportFragmentManager().beginTransaction()
            .replace(R.id.fragment_container, fragment)
            .commit();
    mNavigationView.setCheckedItem(R.id.nav_calendar);
}

// Load the "New Event" fragment
private void openNewEventFragment(String timeZone) {
    NewEventFragment fragment = NewEventFragment.createInstance(timeZone);
    getSupportFragmentManager().beginTransaction()
            .replace(R.id.fragment_container, fragment)
            .commit();
    mNavigationView.setCheckedItem(R.id.nav_create_event);
}

private void signIn() {
    setSignedInState(true);
    openHomeFragment(mUserName);
}

private void signOut() {
    setSignedInState(false);
    openHomeFragment(mUserName);
}
Remplacez la fonction
onNavigationItemSelectedexistante par ce qui suit.@Override public boolean onNavigationItemSelected(@NonNull MenuItem menuItem) { // Load the fragment that corresponds to the selected item switch (menuItem.getItemId()) { case R.id.nav_home: openHomeFragment(mUserName); break; case R.id.nav_calendar: openCalendarFragment(mUserTimeZone); break; case R.id.nav_create_event: openNewEventFragment(mUserTimeZone); break; case R.id.nav_signin: signIn(); break; case R.id.nav_signout: signOut(); break; } mDrawer.closeDrawer(GravityCompat.START); return true; }Enregistrez toutes vos modifications.
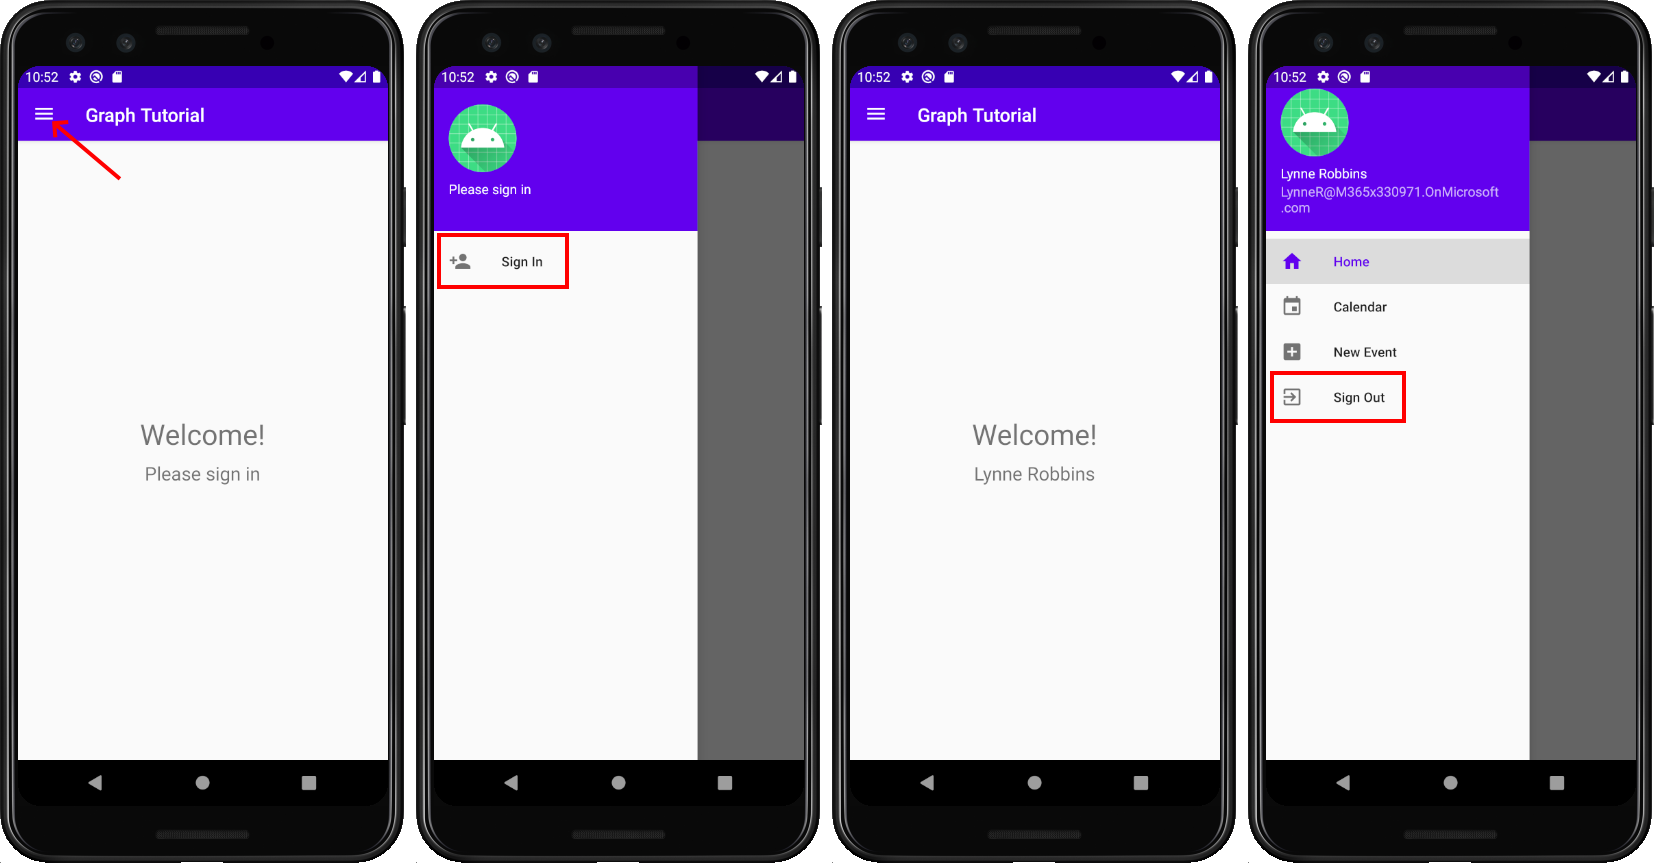
Dans le menu Exécuter, sélectionnez Exécuter « application ».
Le menu de l’application doit fonctionner pour naviguer entre les deux fragments et changer lorsque vous appuyez sur les boutons Se connectez ou se connectez.
Inscrire l’application sur le portail
Dans cet exercice, vous allez créer une application Azure AD à l’aide du centre d Azure Active Directory’administration.
Ouvrez un navigateur, accédez au Centre d’administration Azure Active Directory et connectez-vous à l’aide d’un compte personnel (ou compte Microsoft) ou d’un compte professionnel ou scolaire.
Sélectionnez Azure Active Directory dans le volet de navigation gauche, puis sélectionnez Inscriptions d’applications sous Gérer.

Sélectionnez Nouvelle inscription. Sur la page Inscrire une application, définissez les valeurs comme suit.
- Définissez le Nom sur
Android Graph Tutorial. - Définissez les Types de comptes pris en charge sur Comptes dans un annuaire organisationnel et comptes personnels Microsoft.
- Sous URI de redirection, définissez la liste dropdown sur Client public/natif (bureau mobile &)
msauth://YOUR_PACKAGE_NAME/callbacket définissez la valeur sur ,YOUR_PACKAGE_NAMEen remplaçant par le nom du package de votre projet.
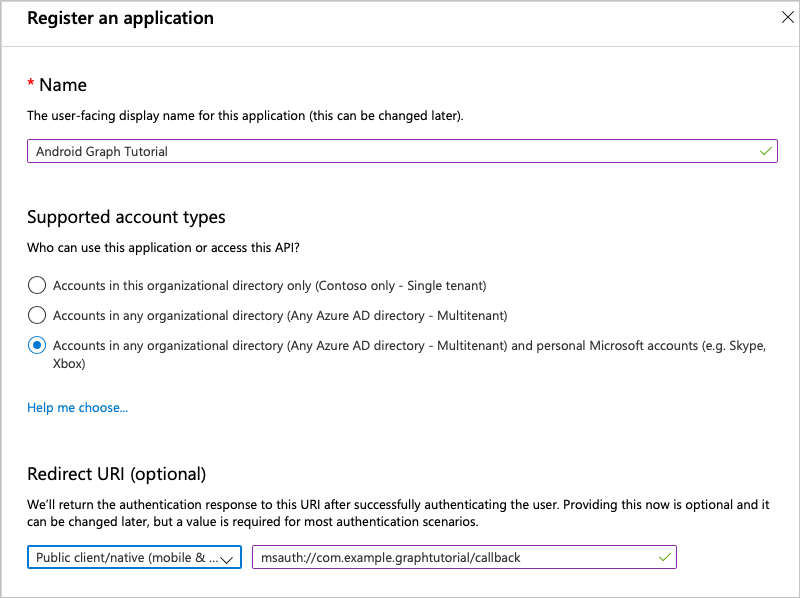
- Définissez le Nom sur
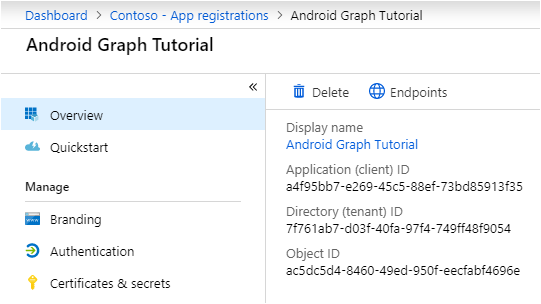
Sélectionner Inscription. Dans la page didacticiel Graph Android, copiez la valeur de l’ID de l’application (client) et enregistrez-la. Vous en aurez besoin à l’étape suivante.
Ajouter une authentification Azure AD
Dans cet exercice, vous allez étendre l’application de l’exercice précédent pour prendre en charge l’authentification avec Azure AD. Cette étape est nécessaire pour obtenir le jeton d’accès OAuth nécessaire pour appeler l’Graph Microsoft. Pour ce faire, vous allez intégrer la bibliothèque d’authentification Microsoft (MSAL) pour Android dans l’application.
Cliquez avec le bouton droit sur le dossier res et sélectionnez Nouveau, puis Répertoire de ressources Android.
Modifiez le type de ressource et
rawsélectionnez OK.Cliquez avec le bouton droit sur le nouveau dossier brut et sélectionnez Nouveau, puis Fichier.
Nommez le fichier
msal_config.jsonet sélectionnez OK.Ajoutez ce qui suit au fichier msal_config.json .
{
  "client_id" : "YOUR_APP_ID_HERE",
  "redirect_uri" : "msauth://com.example.graphtutorial/callback",
  "broker_redirect_uri_registered": false,
  "account_mode": "SINGLE",
  "authorities" : [
    {
      "type": "AAD",
      "audience": {
        "type": "AzureADandPersonalMicrosoftAccount"
      },
      "default": true
    }
  ]
}
Remplacez
YOUR_APP_ID_HEREpar l’ID d’application de l’inscription de votre application etcom.example.graphtutorialpar le nom du package de votre projet.Important
Si vous utilisez un contrôle source tel que Git,
msal_config.jsonil est temps d’exclure le fichier du contrôle source afin d’éviter toute fuite accidentelle de votre ID d’application.
Implémentation de la connexion
Dans cette section, vous allez mettre à jour le manifeste pour permettre à MSAL d’utiliser un navigateur pour authentifier l’utilisateur, inscrire votre URI de redirection comme étant géré par l’application, créer une classe d’aide à l’authentification et mettre à jour l’application pour se connecter et se dé dévier.
Développez le dossier application/manifestes et ouvrez AndroidManifest.xml. Ajoutez les éléments suivants au-dessus de l’élément
application.<uses-permission android:name="android.permission.INTERNET" /> <uses-permission android:name="android.permission.ACCESS_NETWORK_STATE" />Notes
Ces autorisations sont requises pour que la bibliothèque MSAL authentifier l’utilisateur.
Ajoutez l’élément suivant à l’intérieur
applicationde l’élément, en remplaçant la chaîneYOUR_PACKAGE_NAME_HEREpar le nom de votre package.<!--Intent filter to capture authorization code response from the default browser on the device calling back to the app after interactive sign in --> <activity android:name="com.microsoft.identity.client.BrowserTabActivity"> <intent-filter> <action android:name="android.intent.action.VIEW" /> <category android:name="android.intent.category.DEFAULT" /> <category android:name="android.intent.category.BROWSABLE" /> <data android:scheme="msauth" android:host="YOUR_PACKAGE_NAME_HERE" android:path="/callback" /> </intent-filter> </activity>Cliquez avec le bouton droit sur le dossier app/java/com.example.graphtutorial et sélectionnez Nouveau, puis Java Classe. Modifiez le type en interface. Nommez l’interface
IAuthenticationHelperCreatedListeneret sélectionnez OK.Ouvrez le nouveau fichier et remplacez son contenu par ce qui suit.
package com.example.graphtutorial;

import com.microsoft.identity.client.exception.MsalException;

public interface IAuthenticationHelperCreatedListener {
    void onCreated(final AuthenticationHelper authHelper);
    void onError(final MsalException exception);
}
Cliquez avec le bouton droit sur le dossier app/java/com.example.graphtutorial et sélectionnez Nouveau, puis Java Classe. Nommez la classe
AuthenticationHelperet sélectionnez OK.Ouvrez le nouveau fichier et remplacez son contenu par ce qui suit.
package com.example.graphtutorial;

import android.app.Activity;
import android.content.Context;
import android.util.Log;

import androidx.annotation.NonNull;

import com.microsoft.graph.authentication.BaseAuthenticationProvider;
import com.microsoft.identity.client.AuthenticationCallback;
import com.microsoft.identity.client.IAuthenticationResult;
import com.microsoft.identity.client.IPublicClientApplication;
import com.microsoft.identity.client.ISingleAccountPublicClientApplication;
import com.microsoft.identity.client.PublicClientApplication;
import com.microsoft.identity.client.exception.MsalException;

import java.net.URL;
import java.util.concurrent.CompletableFuture;

import javax.annotation.Nonnull;

// Singleton class - the app only needs a single instance
// of PublicClientApplication
public class AuthenticationHelper extends BaseAuthenticationProvider {
    private static AuthenticationHelper INSTANCE = null;
    private ISingleAccountPublicClientApplication mPCA = null;
    private String[] mScopes = { "User.Read", "MailboxSettings.Read", "Calendars.ReadWrite" };

    private AuthenticationHelper(Context ctx, final IAuthenticationHelperCreatedListener listener) {
        PublicClientApplication.createSingleAccountPublicClientApplication(ctx, R.raw.msal_config,
                new IPublicClientApplication.ISingleAccountApplicationCreatedListener() {
                    @Override
                    public void onCreated(ISingleAccountPublicClientApplication application) {
                        mPCA = application;
                        listener.onCreated(INSTANCE);
                    }

                    @Override
                    public void onError(MsalException exception) {
                        Log.e("AUTHHELPER", "Error creating MSAL application", exception);
                        listener.onError(exception);
                    }
                });
    }

    public static synchronized CompletableFuture<AuthenticationHelper> getInstance(Context ctx) {

        if (INSTANCE == null) {
            CompletableFuture<AuthenticationHelper> future = new CompletableFuture<>();
            INSTANCE = new AuthenticationHelper(ctx, new IAuthenticationHelperCreatedListener() {
                @Override
                public void onCreated(AuthenticationHelper authHelper) {
                    future.complete(authHelper);
                }

                @Override
                public void onError(MsalException exception) {
                    future.completeExceptionally(exception);
                }
            });

            return future;
        } else {
            return CompletableFuture.completedFuture(INSTANCE);
        }
    }

    // Version called from fragments. Does not create an
    // instance if one doesn't exist
    public static synchronized AuthenticationHelper getInstance() {
        if (INSTANCE == null) {
            throw new IllegalStateException(
                    "AuthenticationHelper has not been initialized from MainActivity");
        }

        return INSTANCE;
    }

    public CompletableFuture<IAuthenticationResult> acquireTokenInteractively(Activity activity) {
        CompletableFuture<IAuthenticationResult> future = new CompletableFuture<>();
        mPCA.signIn(activity, null, mScopes, getAuthenticationCallback(future));

        return future;
    }

    public CompletableFuture<IAuthenticationResult> acquireTokenSilently() {
        // Get the authority from MSAL config
        String authority = mPCA.getConfiguration()
            .getDefaultAuthority().getAuthorityURL().toString();

        CompletableFuture<IAuthenticationResult> future = new CompletableFuture<>();
        mPCA.acquireTokenSilentAsync(mScopes, authority, getAuthenticationCallback(future));
        return future;
    }

    public void signOut() {
        mPCA.signOut(new ISingleAccountPublicClientApplication.SignOutCallback() {
            @Override
            public void onSignOut() {
                Log.d("AUTHHELPER", "Signed out");
            }

            @Override
            public void onError(@NonNull MsalException exception) {
                Log.d("AUTHHELPER", "MSAL error signing out", exception);
            }
        });
    }

    private AuthenticationCallback getAuthenticationCallback(
        CompletableFuture<IAuthenticationResult> future) {
        return new AuthenticationCallback() {
            @Override
            public void onCancel() {
                future.cancel(true);
            }

            @Override
            public void onSuccess(IAuthenticationResult authenticationResult) {
                future.complete(authenticationResult);
            }

            @Override
            public void onError(MsalException exception) {
                future.completeExceptionally(exception);
            }
        };
    }

    @Nonnull
    @Override
    public CompletableFuture<String> getAuthorizationTokenAsync(@Nonnull URL requestUrl) {
        if (shouldAuthenticateRequestWithUrl(requestUrl) == true) {
            return acquireTokenSilently()
                .thenApply(result -> result.getAccessToken());
        }

        return CompletableFuture.completedFuture(null);
    }
}
Ouvrez MainActivity et ajoutez les instructions
importsuivantes.import android.util.Log; import com.microsoft.identity.client.IAuthenticationResult; import com.microsoft.identity.client.exception.MsalClientException; import com.microsoft.identity.client.exception.MsalServiceException; import com.microsoft.identity.client.exception.MsalUiRequiredException;Ajoutez la propriété membre suivante à la
MainActivityclasse.private AuthenticationHelper mAuthHelper = null;Ajoutez la fonction suivante à la fin de la fonction
onCreate.showProgressBar(); // Get the authentication helper AuthenticationHelper.getInstance(getApplicationContext()) .thenAccept(authHelper -> { mAuthHelper = authHelper; if (!mIsSignedIn) { doSilentSignIn(false); } else { hideProgressBar(); } }) .exceptionally(exception -> { Log.e("AUTH", "Error creating auth helper", exception); return null; });Ajoutez les fonctions suivantes à la
MainActivityclasse.// Silently sign in - used if there is already a // user account in the MSAL cache private void doSilentSignIn(boolean shouldAttemptInteractive) { mAuthHelper.acquireTokenSilently() .thenAccept(authenticationResult -> { handleSignInSuccess(authenticationResult); }) .exceptionally(exception -> { // Check the type of exception and handle appropriately Throwable cause = exception.getCause(); if (cause instanceof MsalUiRequiredException) { Log.d("AUTH", "Interactive login required"); if (shouldAttemptInteractive) doInteractiveSignIn(); } else if (cause instanceof MsalClientException) { MsalClientException clientException = (MsalClientException)cause; if (clientException.getErrorCode() == "no_current_account" || clientException.getErrorCode() == "no_account_found") { Log.d("AUTH", "No current account, interactive login required"); if (shouldAttemptInteractive) doInteractiveSignIn(); } } else { handleSignInFailure(cause); } hideProgressBar(); return null; }); } // Prompt the user to sign in private void doInteractiveSignIn() { mAuthHelper.acquireTokenInteractively(this) .thenAccept(authenticationResult -> { handleSignInSuccess(authenticationResult); }) .exceptionally(exception -> { handleSignInFailure(exception); hideProgressBar(); return null; }); } // Handles the authentication result private void handleSignInSuccess(IAuthenticationResult authenticationResult) { // Log the token for debug purposes String accessToken = authenticationResult.getAccessToken(); Log.d("AUTH", String.format("Access token: %s", accessToken)); hideProgressBar(); setSignedInState(true); openHomeFragment(mUserName); } private void handleSignInFailure(Throwable exception) { if (exception instanceof MsalServiceException) { // Exception when communicating with the auth server, likely config issue Log.e("AUTH", "Service error authenticating", exception); } else if (exception instanceof MsalClientException) { // Exception inside MSAL, more info inside MsalError.java Log.e("AUTH", "Client error authenticating", exception); } else { Log.e("AUTH", "Unhandled exception authenticating", exception); } }Remplacez les fonctions
signInexistantessignOutet existantes par ce qui suit.private void signIn() { showProgressBar(); // Attempt silent sign in first // if this fails, the callback will handle doing // interactive sign in doSilentSignIn(true); } private void signOut() { mAuthHelper.signOut(); setSignedInState(false); openHomeFragment(mUserName); }Notes
Notez que la
signInméthode effectue une connectez-vous silencieuse (viadoSilentSignIn). Le rappel de cette méthode se connecte de manière interactive en cas d’échec du mode silencieux. Cela évite d’avoir à inviter l’utilisateur chaque fois qu’il lance l’application.Enregistrez vos modifications et exécutez l’application.
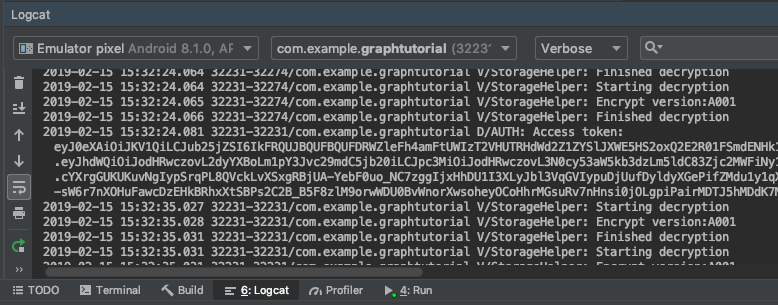
Lorsque vous appuyez sur l’élément de menu Connexion, un navigateur s’ouvre sur la page Azure AD connexion. Connectez-vous à votre compte.
Une fois l’application reprise, vous devez voir un jeton d’accès imprimé dans le journal de débogage dans Android Studio.
Obtenir les détails de l’utilisateur
Dans cette section, vous allez créer une classe d’aide pour contenir tous les appels à Microsoft Graph MainActivity et mettre à jour la classe pour utiliser cette nouvelle classe afin d’obtenir l’utilisateur connecté.
Cliquez avec le bouton droit sur le dossier app/java/com.example.graphtutorial et sélectionnez Nouveau, puis Java Classe. Nommez la classe
GraphHelperet sélectionnez OK.Ouvrez le nouveau fichier et remplacez son contenu par ce qui suit.
package com.example.graphtutorial;

import com.microsoft.graph.models.extensions.User;
import com.microsoft.graph.requests.GraphServiceClient;

import java.util.concurrent.CompletableFuture;

// Singleton class - the app only needs a single instance
// of the Graph client
public class GraphHelper implements IAuthenticationProvider {
    private static GraphHelper INSTANCE = null;
    private GraphServiceClient mClient = null;

    private GraphHelper() {
        AuthenticationHelper authProvider = AuthenticationHelper.getInstance();

        mClient = GraphServiceClient.builder()
            .authenticationProvider(authProvider).buildClient();
    }

    public static synchronized GraphHelper getInstance() {
        if (INSTANCE == null) {
            INSTANCE = new GraphHelper();
        }

        return INSTANCE;
    }

    public CompletableFuture<User> getUser() {
        // GET /me (logged in user)
        return mClient.me().buildRequest()
            .select("displayName,mail,mailboxSettings,userPrincipalName")
            .getAsync();
    }
}
Notes
Prenez en compte ce que fait ce code.
- Il expose une fonction
getUserpour obtenir les informations de l’utilisateur/meconnecté à partir du point Graph terminaison.- Il utilise pour
.selectdemander uniquement les propriétés de l’utilisateur dont l’application a besoin.
- Il utilise pour
- Il expose une fonction
Supprimez les lignes suivantes qui définissent le nom d’utilisateur et le courrier électronique :
// For testing
mUserName = "Lynne Robbins";
mUserEmail = "lynner@contoso.com";
mUserTimeZone = "Pacific Standard Time";
Remplacez la fonction
handleSignInSuccessexistante par ce qui suit.// Handles the authentication result private void handleSignInSuccess(IAuthenticationResult authenticationResult) { // Log the token for debug purposes String accessToken = authenticationResult.getAccessToken(); Log.d("AUTH", String.format("Access token: %s", accessToken)); // Get Graph client and get user GraphHelper graphHelper = GraphHelper.getInstance(); graphHelper.getUser() .thenAccept(user -> { mUserName = user.displayName; mUserEmail = user.mail == null ? user.userPrincipalName : user.mail; mUserTimeZone = user.mailboxSettings.timeZone; runOnUiThread(() -> { hideProgressBar(); setSignedInState(true); openHomeFragment(mUserName); }); }) .exceptionally(exception -> { Log.e("AUTH", "Error getting /me", exception); runOnUiThread(()-> { hideProgressBar(); setSignedInState(false); }); return null; }); }Enregistrez vos modifications et exécutez l’application. Une fois que l’interface utilisateur est mise à jour avec le nom d’affichage et l’adresse e-mail de l’utilisateur.
Obtenir un affichage Calendrier
Dans cet exercice, vous allez incorporer le Graph Microsoft dans l’application. Pour cette application, vous allez utiliser le SDK Microsoft Graph pour Java pour effectuer des appels à Microsoft Graph.
Récupérer les événements de calendrier à partir d’Outlook
Dans cette section, vous GraphHelper allez étendre la classe pour ajouter une fonction afin d’obtenir les événements de l’utilisateur CalendarFragment pour la semaine en cours et mettre à jour pour utiliser ces nouvelles fonctions.
Ouvrez GraphHelper et ajoutez les instructions
importsuivantes en haut du fichier.import com.microsoft.graph.options.Option; import com.microsoft.graph.options.HeaderOption; import com.microsoft.graph.options.QueryOption; import com.microsoft.graph.requests.EventCollectionPage; import com.microsoft.graph.requests.EventCollectionRequestBuilder; import java.time.ZonedDateTime; import java.time.format.DateTimeFormatter; import java.util.LinkedList; import java.util.List; import java.util.concurrent.CompletableFuture;Ajoutez les fonctions suivantes à la
GraphHelperclasse.public CompletableFuture<List<Event>> getCalendarView(ZonedDateTime viewStart, ZonedDateTime viewEnd, String timeZone) { final List<Option> options = new LinkedList<Option>(); options.add(new QueryOption("startDateTime", viewStart.format(DateTimeFormatter.ISO_OFFSET_DATE_TIME))); options.add(new QueryOption("endDateTime", viewEnd.format(DateTimeFormatter.ISO_OFFSET_DATE_TIME))); // Start and end times adjusted to user's time zone options.add(new HeaderOption("Prefer", "outlook.timezone=\"" + timeZone + "\"")); final List<Event> allEvents = new LinkedList<Event>(); // Create a separate list of options for the paging requests // paging request should not include the query parameters from the initial // request, but should include the headers. final List<Option> pagingOptions = new LinkedList<Option>(); pagingOptions.add(new HeaderOption("Prefer", "outlook.timezone=\"" + timeZone + "\"")); return mClient.me().calendarView() .buildRequest(options) .select("subject,organizer,start,end") .orderBy("start/dateTime") .top(5) .getAsync() .thenCompose(eventPage -> processPage(eventPage, allEvents, pagingOptions)); } private CompletableFuture<List<Event>> processPage(EventCollectionPage currentPage, List<Event> eventList, List<Option> options) { eventList.addAll(currentPage.getCurrentPage()); // Check if there is another page of results EventCollectionRequestBuilder nextPage = currentPage.getNextPage(); if (nextPage != null) { // Request the next page and repeat return nextPage.buildRequest(options) .getAsync() .thenCompose(eventPage -> processPage(eventPage, eventList, options)); } else { // No more pages, complete the future // with the complete list return CompletableFuture.completedFuture(eventList); } } // Debug function to get the JSON representation of a Graph // object public String serializeObject(Object object) { return mClient.getSerializer().serializeObject(object); }Notes
Réfléchissez à ce que fait le
getCalendarViewcode.- L’URL qui sera appelée est
/v1.0/me/calendarview.- Les
startDateTimeparamètresendDateTimede requête définissent le début et la fin de l’affichage Calendrier. - L’en-tête
Prefer: outlook.timezoneentraîne le Graph Microsoft à renvoyer les heures de début et de fin de chaque événement dans le fuseau horaire de l’utilisateur. - La fonction
selectlimite les champs renvoyés pour chaque événement à ceux que la vue utilise réellement. - La
orderbyfonction trie les résultats par heure de début. - La
topfonction demande 25 résultats par page.
- Les
- La
processPagefonction vérifie si d’autres résultats sont disponibles et demande des pages supplémentaires si nécessaire.
- L’URL qui sera appelée est
Cliquez avec le bouton droit sur le dossier app/java/com.example.graphtutorial et sélectionnez Nouveau, puis Java Classe. Nommez la classe
GraphToIanaet sélectionnez OK.Ouvrez le nouveau fichier et remplacez son contenu par ce qui suit.
package com.example.graphtutorial;

import java.time.ZoneId;
import java.util.HashMap;

// Basic lookup for mapping Windows time zone identifiers to
// IANA identifiers
// Mappings taken from
// https://github.com/unicode-org/cldr/blob/master/common/supplemental/windowsZones.xml
public class GraphToIana {
    private static final HashMap<String, String> timeZoneIdMap = new HashMap<String, String>();
    static {
        timeZoneIdMap.put("Dateline Standard Time", "Etc/GMT+12");
        timeZoneIdMap.put("UTC-11", "Etc/GMT+11");
        timeZoneIdMap.put("Aleutian Standard Time", "America/Adak");
        timeZoneIdMap.put("Hawaiian Standard Time", "Pacific/Honolulu");
        timeZoneIdMap.put("Marquesas Standard Time", "Pacific/Marquesas");
        timeZoneIdMap.put("Alaskan Standard Time", "America/Anchorage");
        timeZoneIdMap.put("UTC-09", "Etc/GMT+9");
        timeZoneIdMap.put("Pacific Standard Time (Mexico)", "America/Tijuana");
        timeZoneIdMap.put("UTC-08", "Etc/GMT+8");
        timeZoneIdMap.put("Pacific Standard Time", "America/Los_Angeles");
        timeZoneIdMap.put("US Mountain Standard Time", "America/Phoenix");
        timeZoneIdMap.put("Mountain Standard Time (Mexico)", "America/Chihuahua");
        timeZoneIdMap.put("Mountain Standard Time", "America/Denver");
        timeZoneIdMap.put("Central America Standard Time", "America/Guatemala");
        timeZoneIdMap.put("Central Standard Time", "America/Chicago");
        timeZoneIdMap.put("Easter Island Standard Time", "Pacific/Easter");
        timeZoneIdMap.put("Central Standard Time (Mexico)", "America/Mexico_City");
        timeZoneIdMap.put("Canada Central Standard Time", "America/Regina");
        timeZoneIdMap.put("SA Pacific Standard Time", "America/Bogota");
        timeZoneIdMap.put("Eastern Standard Time (Mexico)", "America/Cancun");
        timeZoneIdMap.put("Eastern Standard Time", "America/New_York");
        timeZoneIdMap.put("Haiti Standard Time", "America/Port-au-Prince");
        timeZoneIdMap.put("Cuba Standard Time", "America/Havana");
        timeZoneIdMap.put("US Eastern Standard Time", "America/Indianapolis");
        timeZoneIdMap.put("Turks And Caicos Standard Time", "America/Grand_Turk");
        timeZoneIdMap.put("Paraguay Standard Time", "America/Asuncion");
        timeZoneIdMap.put("Atlantic Standard Time", "America/Halifax");
        timeZoneIdMap.put("Venezuela Standard Time", "America/Caracas");
        timeZoneIdMap.put("Central Brazilian Standard Time", "America/Cuiaba");
        timeZoneIdMap.put("SA Western Standard Time", "America/La_Paz");
        timeZoneIdMap.put("Pacific SA Standard Time", "America/Santiago");
        timeZoneIdMap.put("Newfoundland Standard Time", "America/St_Johns");
        timeZoneIdMap.put("Tocantins Standard Time", "America/Araguaina");
        timeZoneIdMap.put("E. South America Standard Time", "America/Sao_Paulo");
        timeZoneIdMap.put("SA Eastern Standard Time", "America/Cayenne");
        timeZoneIdMap.put("Argentina Standard Time", "America/Buenos_Aires");
        timeZoneIdMap.put("Greenland Standard Time", "America/Godthab");
        timeZoneIdMap.put("Montevideo Standard Time", "America/Montevideo");
        timeZoneIdMap.put("Magallanes Standard Time", "America/Punta_Arenas");
        timeZoneIdMap.put("Saint Pierre Standard Time", "America/Miquelon");
        timeZoneIdMap.put("Bahia Standard Time", "America/Bahia");
        timeZoneIdMap.put("UTC-02", "Etc/GMT+2");
        timeZoneIdMap.put("Azores Standard Time", "Atlantic/Azores");
        timeZoneIdMap.put("Cape Verde Standard Time", "Atlantic/Cape_Verde");
        timeZoneIdMap.put("UTC", "Etc/GMT");
        timeZoneIdMap.put("GMT Standard Time", "Europe/London");
        timeZoneIdMap.put("Greenwich Standard Time", "Atlantic/Reykjavik");
        timeZoneIdMap.put("Sao Tome Standard Time", "Africa/Sao_Tome");
        timeZoneIdMap.put("Morocco Standard Time", "Africa/Casablanca");
        timeZoneIdMap.put("W. Europe Standard Time", "Europe/Berlin");
        timeZoneIdMap.put("Central Europe Standard Time", "Europe/Budapest");
        timeZoneIdMap.put("Romance Standard Time", "Europe/Paris");
        timeZoneIdMap.put("Central European Standard Time", "Europe/Warsaw");
        timeZoneIdMap.put("W. Central Africa Standard Time", "Africa/Lagos");
        timeZoneIdMap.put("Jordan Standard Time", "Asia/Amman");
        timeZoneIdMap.put("GTB Standard Time", "Europe/Bucharest");
        timeZoneIdMap.put("Middle East Standard Time", "Asia/Beirut");
        timeZoneIdMap.put("Egypt Standard Time", "Africa/Cairo");
        timeZoneIdMap.put("E. Europe Standard Time", "Europe/Chisinau");
        timeZoneIdMap.put("Syria Standard Time", "Asia/Damascus");
        timeZoneIdMap.put("West Bank Standard Time", "Asia/Hebron");
        timeZoneIdMap.put("South Africa Standard Time", "Africa/Johannesburg");
        timeZoneIdMap.put("FLE Standard Time", "Europe/Kiev");
        timeZoneIdMap.put("Israel Standard Time", "Asia/Jerusalem");
        timeZoneIdMap.put("Kaliningrad Standard Time", "Europe/Kaliningrad");
        timeZoneIdMap.put("Sudan Standard Time", "Africa/Khartoum");
        timeZoneIdMap.put("Libya Standard Time", "Africa/Tripoli");
        timeZoneIdMap.put("Namibia Standard Time", "Africa/Windhoek");
        timeZoneIdMap.put("Arabic Standard Time", "Asia/Baghdad");
        timeZoneIdMap.put("Turkey Standard Time", "Europe/Istanbul");
        timeZoneIdMap.put("Arab Standard Time", "Asia/Riyadh");
        timeZoneIdMap.put("Belarus Standard Time", "Europe/Minsk");
        timeZoneIdMap.put("Russian Standard Time", "Europe/Moscow");
        timeZoneIdMap.put("E. Africa Standard Time", "Africa/Nairobi");
        timeZoneIdMap.put("Iran Standard Time", "Asia/Tehran");
        timeZoneIdMap.put("Arabian Standard Time", "Asia/Dubai");
        timeZoneIdMap.put("Astrakhan Standard Time", "Europe/Astrakhan");
        timeZoneIdMap.put("Azerbaijan Standard Time", "Asia/Baku");
        timeZoneIdMap.put("Russia Time Zone 3", "Europe/Samara");
        timeZoneIdMap.put("Mauritius Standard Time", "Indian/Mauritius");
        timeZoneIdMap.put("Saratov Standard Time", "Europe/Saratov");
        timeZoneIdMap.put("Georgian Standard Time", "Asia/Tbilisi");
        timeZoneIdMap.put("Volgograd Standard Time", "Europe/Volgograd");
        timeZoneIdMap.put("Caucasus Standard Time", "Asia/Yerevan");
        timeZoneIdMap.put("Afghanistan Standard Time", "Asia/Kabul");
        timeZoneIdMap.put("West Asia Standard Time", "Asia/Tashkent");
        timeZoneIdMap.put("Ekaterinburg Standard Time", "Asia/Yekaterinburg");
        timeZoneIdMap.put("Pakistan Standard Time", "Asia/Karachi");
        timeZoneIdMap.put("Qyzylorda Standard Time", "Asia/Qyzylorda");
        timeZoneIdMap.put("India Standard Time", "Asia/Calcutta");
        timeZoneIdMap.put("Sri Lanka Standard Time", "Asia/Colombo");
        timeZoneIdMap.put("Nepal Standard Time", "Asia/Katmandu");
        timeZoneIdMap.put("Central Asia Standard Time", "Asia/Almaty");
        timeZoneIdMap.put("Bangladesh Standard Time", "Asia/Dhaka");
        timeZoneIdMap.put("Omsk Standard Time", "Asia/Omsk");
        timeZoneIdMap.put("Myanmar Standard Time", "Asia/Rangoon");
        timeZoneIdMap.put("SE Asia Standard Time", "Asia/Bangkok");
        timeZoneIdMap.put("Altai Standard Time", "Asia/Barnaul");
        timeZoneIdMap.put("W. Mongolia Standard Time", "Asia/Hovd");
        timeZoneIdMap.put("North Asia Standard Time", "Asia/Krasnoyarsk");
        timeZoneIdMap.put("N. Central Asia Standard Time", "Asia/Novosibirsk");
        timeZoneIdMap.put("Tomsk Standard Time", "Asia/Tomsk");
        timeZoneIdMap.put("China Standard Time", "Asia/Shanghai");
        timeZoneIdMap.put("North Asia East Standard Time", "Asia/Irkutsk");
        timeZoneIdMap.put("Singapore Standard Time", "Asia/Singapore");
        timeZoneIdMap.put("W. Australia Standard Time", "Australia/Perth");
        timeZoneIdMap.put("Taipei Standard Time", "Asia/Taipei");
        timeZoneIdMap.put("Ulaanbaatar Standard Time", "Asia/Ulaanbaatar");
        timeZoneIdMap.put("Aus Central W. Standard Time", "Australia/Eucla");
        timeZoneIdMap.put("Transbaikal Standard Time", "Asia/Chita");
        timeZoneIdMap.put("Tokyo Standard Time", "Asia/Tokyo");
        timeZoneIdMap.put("North Korea Standard Time", "Asia/Pyongyang");
        timeZoneIdMap.put("Korea Standard Time", "Asia/Seoul");
        timeZoneIdMap.put("Yakutsk Standard Time", "Asia/Yakutsk");
        timeZoneIdMap.put("Cen. Australia Standard Time", "Australia/Adelaide");
        timeZoneIdMap.put("AUS Central Standard Time", "Australia/Darwin");
        timeZoneIdMap.put("E. Australia Standard Time", "Australia/Brisbane");
        timeZoneIdMap.put("AUS Eastern Standard Time", "Australia/Sydney");
        timeZoneIdMap.put("West Pacific Standard Time", "Pacific/Port_Moresby");
        timeZoneIdMap.put("Tasmania Standard Time", "Australia/Hobart");
        timeZoneIdMap.put("Vladivostok Standard Time", "Asia/Vladivostok");
        timeZoneIdMap.put("Lord Howe Standard Time", "Australia/Lord_Howe");
        timeZoneIdMap.put("Bougainville Standard Time", "Pacific/Bougainville");
        timeZoneIdMap.put("Russia Time Zone 10", "Asia/Srednekolymsk");
        timeZoneIdMap.put("Magadan Standard Time", "Asia/Magadan");
        timeZoneIdMap.put("Norfolk Standard Time", "Pacific/Norfolk");
        timeZoneIdMap.put("Sakhalin Standard Time", "Asia/Sakhalin");
        timeZoneIdMap.put("Central Pacific Standard Time", "Pacific/Guadalcanal");
        timeZoneIdMap.put("Russia Time Zone 11", "Asia/Kamchatka");
        timeZoneIdMap.put("New Zealand Standard Time", "Pacific/Auckland");
        timeZoneIdMap.put("UTC+12", "Etc/GMT-12");
        timeZoneIdMap.put("Fiji Standard Time", "Pacific/Fiji");
        timeZoneIdMap.put("Chatham Islands Standard Time", "Pacific/Chatham");
        timeZoneIdMap.put("UTC+13", "Etc/GMT-13");
        timeZoneIdMap.put("Tonga Standard Time", "Pacific/Tongatapu");
        timeZoneIdMap.put("Samoa Standard Time", "Pacific/Apia");
        timeZoneIdMap.put("Line Islands Standard Time", "Pacific/Kiritimati");
    }

    public static String getIanaFromWindows(String windowsTimeZone) {
        String iana = timeZoneIdMap.get(windowsTimeZone);

        // If a mapping was not found, assume the value passed
        // was already an IANA identifier
        return (iana == null) ? windowsTimeZone : iana;
    }

    public static ZoneId getZoneIdFromWindows(String windowsTimeZone) {
        String timeZoneId = getIanaFromWindows(windowsTimeZone);

        return ZoneId.of(timeZoneId);
    }
}
Ajoutez les instructions
importsuivantes en haut du fichier CalendarFragment .import android.util.Log; import android.widget.ListView; import com.google.android.material.snackbar.BaseTransientBottomBar; import com.google.android.material.snackbar.Snackbar; import com.microsoft.graph.core.ClientException; import com.microsoft.graph.models.Event; import com.microsoft.identity.client.AuthenticationCallback; import com.microsoft.identity.client.IAuthenticationResult; import com.microsoft.identity.client.exception.MsalException; import java.time.DayOfWeek; import java.time.ZoneId; import java.time.ZonedDateTime; import java.time.temporal.ChronoUnit; import java.time.temporal.TemporalAdjusters; import java.util.List;Ajoutez le membre suivant à la
CalendarFragmentclasse.private List<Event> mEventList = null;Ajoutez les fonctions suivantes à la classe
CalendarFragmentpour masquer et afficher la barre de progression.private void showProgressBar() { getActivity().runOnUiThread(new Runnable() { @Override public void run() { getActivity().findViewById(R.id.progressbar) .setVisibility(View.VISIBLE); getActivity().findViewById(R.id.fragment_container) .setVisibility(View.GONE); } }); } private void hideProgressBar() { getActivity().runOnUiThread(new Runnable() { @Override public void run() { getActivity().findViewById(R.id.progressbar) .setVisibility(View.GONE); getActivity().findViewById(R.id.fragment_container) .setVisibility(View.VISIBLE); } }); }Ajoutez la fonction suivante pour obtenir la liste des événements à des fins de débogage.
private void addEventsToList() { // Temporary for debugging String jsonEvents = GraphHelper.getInstance().serializeObject(mEventList); Log.d("GRAPH", jsonEvents); }Remplacez la fonction existante
onCreateViewdans la classeCalendarFragmentpar ce qui suit.@Nullable @Override public View onCreateView(@NonNull LayoutInflater inflater, @Nullable ViewGroup container, @Nullable Bundle savedInstanceState) { View view = inflater.inflate(R.layout.fragment_calendar, container, false); showProgressBar(); final GraphHelper graphHelper = GraphHelper.getInstance(); ZoneId tzId = GraphToIana.getZoneIdFromWindows(mTimeZone); // Get midnight of the first day of the week (assumed Sunday) // in the user's timezone, then convert to UTC ZonedDateTime startOfWeek = ZonedDateTime.now(tzId) .with(TemporalAdjusters.previousOrSame(DayOfWeek.SUNDAY)) .truncatedTo(ChronoUnit.DAYS) .withZoneSameInstant(ZoneId.of("UTC")); // Add 7 days to get the end of the week ZonedDateTime endOfWeek = startOfWeek.plusDays(7); // Get the user's events graphHelper .getCalendarView(startOfWeek, endOfWeek, mTimeZone) .thenAccept(eventList -> { mEventList = eventList; addEventsToList(); hideProgressBar(); }) .exceptionally(exception -> { hideProgressBar(); Log.e("GRAPH", "Error getting events", exception); Snackbar.make(getView(), exception.getMessage(), BaseTransientBottomBar.LENGTH_LONG).show(); return null; }); return view; }Exécutez l’application, connectez-vous et appuyez sur l’élément de navigation Calendrier dans le menu. Vous devriez voir un vidage JSON des événements dans le journal de débogage dans Android Studio.
Afficher les résultats
Vous pouvez désormais remplacer le vidage JSON par un autre qui permet d’afficher les résultats de manière conviviale. Dans cette section, ListView vous allez ajouter un élément au fragment de calendrier, Event ListView``ListView TextView créer une disposition pour chaque élément de l’affichage et créer une carte de liste personnalisée pour celle qui mase les champs de chacun d’eux à l’élément approprié dans l’affichage.
Remplacez l’application/res/layout/fragment_calendar.xml par un
ListView.TextView<?xml version="1.0" encoding="utf-8"?> <RelativeLayout xmlns:android="http://schemas.android.com/apk/res/android" android:layout_width="match_parent" android:layout_height="match_parent"> <ListView android:id="@+id/eventlist" android:layout_width="match_parent" android:layout_height="match_parent" android:divider="?colorPrimary" android:dividerHeight="1dp" /> </RelativeLayout>Cliquez avec le bouton droit sur le dossier application/res/layout , puis sélectionnez Nouveau, puis fichier de ressources de disposition.
Nommez le fichier
event_list_item, modifiez l’élément racine etRelativeLayoutsélectionnez OK.Ouvrez event_list_item.xml fichier et remplacez son contenu par ce qui suit.
<?xml version="1.0" encoding="utf-8"?> <RelativeLayout xmlns:android="http://schemas.android.com/apk/res/android" android:layout_width="match_parent" android:layout_height="match_parent" android:padding="10dp"> <TextView android:id="@+id/eventsubject" android:layout_width="match_parent" android:layout_height="wrap_content" android:text="Subject" android:textSize="20sp" /> <TextView android:id="@+id/eventorganizer" android:layout_width="match_parent" android:layout_height="wrap_content" android:layout_below="@id/eventsubject" android:text="Adele Vance" android:textSize="15sp" /> <LinearLayout android:layout_width="match_parent" android:layout_height="wrap_content" android:layout_below="@id/eventorganizer" android:orientation="horizontal"> <TextView android:layout_width="wrap_content" android:layout_height="wrap_content" android:paddingEnd="2sp" android:text="Start:" android:textSize="15sp" android:textStyle="bold" /> <TextView android:id="@+id/eventstart" android:layout_width="wrap_content" android:layout_height="wrap_content" android:text="1:30 PM 2/19/2019" android:textSize="15sp" /> <TextView android:layout_width="wrap_content" android:layout_height="wrap_content" android:paddingStart="5sp" android:paddingEnd="2sp" android:text="End:" android:textSize="15sp" android:textStyle="bold" /> <TextView android:id="@+id/eventend" android:layout_width="wrap_content" android:layout_height="wrap_content" android:text="1:30 PM 2/19/2019" android:textSize="15sp" /> </LinearLayout> </RelativeLayout>Cliquez avec le bouton droit sur le dossier app/java/com.example.graphtutorial et sélectionnez Nouveau, puis Java Classe.
Nommez la classe
EventListAdapteret sélectionnez OK.Ouvrez le fichier EventListAdapter et remplacez son contenu par ce qui suit.
package com.example.graphtutorial; import android.content.Context; import android.view.LayoutInflater; import android.view.View; import android.view.ViewGroup; import android.widget.ArrayAdapter; import android.widget.TextView; import androidx.annotation.NonNull; import com.microsoft.graph.models.DateTimeTimeZone; import com.microsoft.graph.models.Event; import java.time.LocalDateTime; import java.time.ZoneId; import java.time.ZonedDateTime; import java.time.format.DateTimeFormatter; import java.time.format.FormatStyle; import java.util.List; import java.util.TimeZone; public class EventListAdapter extends ArrayAdapter<Event> { private Context mContext; private int mResource; // Used for the ViewHolder pattern // https://developer.android.com/training/improving-layouts/smooth-scrolling static class ViewHolder { TextView subject; TextView organizer; TextView start; TextView end; } public EventListAdapter(Context context, int resource, List<Event> events) { super(context, resource, events); mContext = context; mResource = resource; } @NonNull @Override public View getView(int position, View convertView, ViewGroup parent) { Event event = getItem(position); ViewHolder holder; if (convertView == null) { LayoutInflater inflater = LayoutInflater.from(mContext); convertView = inflater.inflate(mResource, parent, false); holder = new ViewHolder(); holder.subject = convertView.findViewById(R.id.eventsubject); holder.organizer = convertView.findViewById(R.id.eventorganizer); holder.start = convertView.findViewById(R.id.eventstart); holder.end = convertView.findViewById(R.id.eventend); convertView.setTag(holder); } else { holder = (ViewHolder) convertView.getTag(); } holder.subject.setText(event.subject); holder.organizer.setText(event.organizer.emailAddress.name); holder.start.setText(getLocalDateTimeString(event.start)); holder.end.setText(getLocalDateTimeString(event.end)); return convertView; } // Convert Graph's DateTimeTimeZone format to // a LocalDateTime, then return a formatted string private String getLocalDateTimeString(DateTimeTimeZone dateTime) { ZonedDateTime localDateTime = LocalDateTime.parse(dateTime.dateTime) .atZone(GraphToIana.getZoneIdFromWindows(dateTime.timeZone)); return String.format("%s %s", localDateTime.format(DateTimeFormatter.ofLocalizedDate(FormatStyle.MEDIUM)), localDateTime.format(DateTimeFormatter.ofLocalizedTime(FormatStyle.SHORT))); } }Ouvrez la classe CalendarFragment et remplacez la fonction
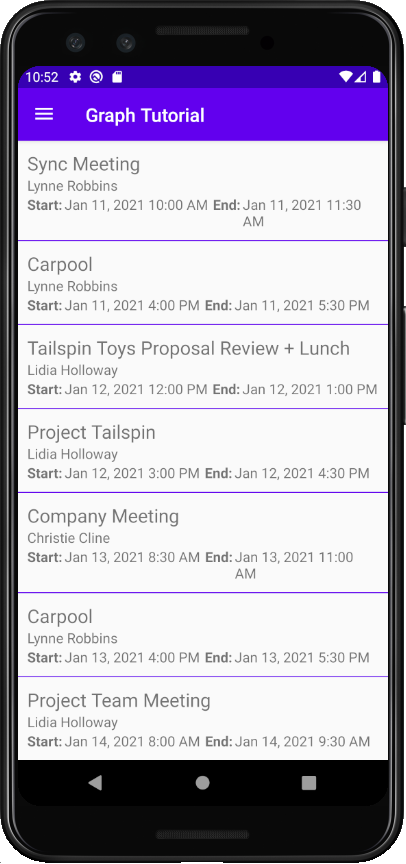
addEventsToListexistante par ce qui suit.private void addEventsToList() { getActivity().runOnUiThread(new Runnable() { @Override public void run() { ListView eventListView = getView().findViewById(R.id.eventlist); EventListAdapter listAdapter = new EventListAdapter(getActivity(), R.layout.event_list_item, mEventList); eventListView.setAdapter(listAdapter); } }); }Exécutez l’application, connectez-vous et appuyez sur l’élément de navigation Calendrier. Vous devriez voir la liste des événements.
Créer un événement
Dans cette section, vous allez ajouter la possibilité de créer des événements sur le calendrier de l’utilisateur.
Ouvrez GraphHelper et ajoutez les instructions
importsuivantes en haut du fichier.import com.microsoft.graph.models.Attendee; import com.microsoft.graph.models.DateTimeTimeZone; import com.microsoft.graph.models.EmailAddress; import com.microsoft.graph.models.ItemBody; import com.microsoft.graph.models.AttendeeType; import com.microsoft.graph.models.BodyType;Ajoutez la fonction suivante à la
GraphHelperclasse pour créer un événement.public CompletableFuture<Event> createEvent(String subject, ZonedDateTime start, ZonedDateTime end, String timeZone, String[] attendees, String body) { Event newEvent = new Event(); // Set properties on the event // Subject newEvent.subject = subject; // Start newEvent.start = new DateTimeTimeZone(); // DateTimeTimeZone has two parts: // The date/time expressed as an ISO 8601 Local date/time // Local meaning there is no UTC or UTC offset designation // Example: 2020-01-12T09:00:00 newEvent.start.dateTime = start.format(DateTimeFormatter.ISO_LOCAL_DATE_TIME); // The time zone - can be either a Windows time zone name ("Pacific Standard Time") // or an IANA time zone identifier ("America/Los_Angeles") newEvent.start.timeZone = timeZone; // End newEvent.end = new DateTimeTimeZone(); newEvent.end.dateTime = end.format(DateTimeFormatter.ISO_LOCAL_DATE_TIME); newEvent.end.timeZone = timeZone; // Add attendees if any were provided if (attendees.length > 0) { newEvent.attendees = new LinkedList<>(); for (String attendeeEmail : attendees) { Attendee newAttendee = new Attendee(); // Set the attendee type, in this case required newAttendee.type = AttendeeType.REQUIRED; // Create a new EmailAddress object with the address // provided newAttendee.emailAddress = new EmailAddress(); newAttendee.emailAddress.address = attendeeEmail; newEvent.attendees.add(newAttendee); } } // Add body if provided if (!body.isEmpty()) { newEvent.body = new ItemBody(); // Set the content newEvent.body.content = body; // Specify content is plain text newEvent.body.contentType = BodyType.TEXT; } return mClient.me().events().buildRequest() .postAsync(newEvent); }
Mettre à jour un nouveau fragment d’événement
Cliquez avec le bouton droit sur le dossier app/java/com.example.graphtutorial et sélectionnez Nouveau, puis Java Classe. Nommez la classe
EditTextDateTimePickeret sélectionnez OK.Ouvrez le nouveau fichier et remplacez son contenu par ce qui suit.
package com.example.graphtutorial; import android.app.DatePickerDialog; import android.app.TimePickerDialog; import android.content.Context; import android.view.View; import android.widget.DatePicker; import android.widget.EditText; import android.widget.TimePicker; import java.time.ZoneId; import java.time.ZonedDateTime; import java.time.format.DateTimeFormatter; import java.time.format.FormatStyle; // Class to wrap an EditText control to act as a date/time picker // When the user taps it, a date picker is shown, followed by a time picker // The values selected are combined to create a date/time value, which is then // displayed in the EditText public class EditTextDateTimePicker implements View.OnClickListener, DatePickerDialog.OnDateSetListener, TimePickerDialog.OnTimeSetListener { private Context mContext; private EditText mEditText; private ZonedDateTime mDateTime; EditTextDateTimePicker(Context context, EditText editText, ZoneId zoneId) { mContext = context; mEditText = editText; mEditText.setOnClickListener(this); // Initialize to now mDateTime = ZonedDateTime.now(zoneId).withSecond(0).withNano(0); // Round time to closest upcoming half-hour int offset = 30 - (mDateTime.getMinute() % 30); if (offset > 0) { mDateTime = mDateTime.plusMinutes(offset); } updateText(); } @Override public void onClick(View v) { // First, show a date picker DatePickerDialog dialog = new DatePickerDialog(mContext, this, mDateTime.getYear(), mDateTime.getMonthValue(), mDateTime.getDayOfMonth()); dialog.show(); } @Override public void onDateSet(DatePicker view, int year, int month, int dayOfMonth) { // Update the stored date/time with the new date mDateTime = mDateTime.withYear(year).withMonth(month).withDayOfMonth(dayOfMonth); // Show a time picker TimePickerDialog dialog = new TimePickerDialog(mContext, this, mDateTime.getHour(), mDateTime.getMinute(), false); dialog.show(); } @Override public void onTimeSet(TimePicker view, int hourOfDay, int minute) { // Update the stored date/time with the new time mDateTime = mDateTime.withHour(hourOfDay).withMinute(minute); // Update the text in the EditText updateText(); } public ZonedDateTime getZonedDateTime() { return mDateTime; } private void updateText() { mEditText.setText(String.format("%s %s", mDateTime.format(DateTimeFormatter.ofLocalizedDate(FormatStyle.MEDIUM)), mDateTime.format(DateTimeFormatter.ofLocalizedTime(FormatStyle.SHORT)))); } }Cette classe encapsule
EditTextun contrôle, affichant un s picker de date et d’heure lorsque l’utilisateur l’appuye, et mettant à jour la valeur avec la date et l’heure de sélection.Ouvrez app/res/layout/fragment_new_event.xml et remplacez son contenu par ce qui suit.
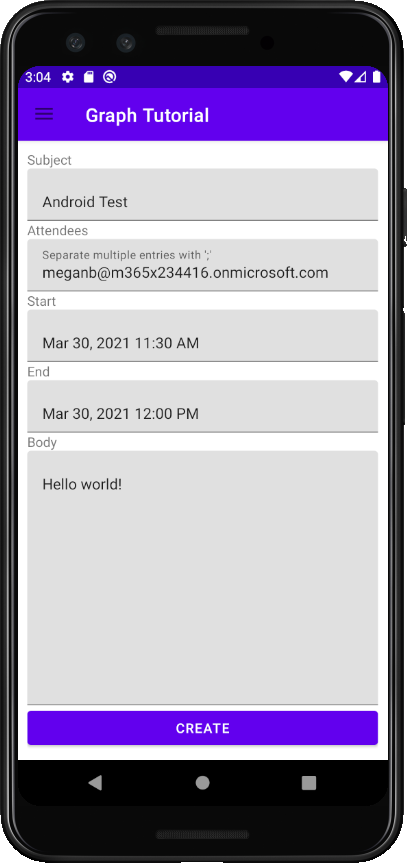
<?xml version="1.0" encoding="utf-8"?> <LinearLayout xmlns:android="http://schemas.android.com/apk/res/android" android:layout_width="match_parent" android:layout_height="match_parent" android:orientation="vertical" android:padding="10dp"> <TextView android:layout_width="wrap_content" android:layout_height="wrap_content" android:text="Subject" /> <com.google.android.material.textfield.TextInputLayout android:id="@+id/neweventsubject" android:layout_width="match_parent" android:layout_height="wrap_content"> <com.google.android.material.textfield.TextInputEditText android:layout_width="match_parent" android:layout_height="wrap_content" /> </com.google.android.material.textfield.TextInputLayout> <TextView android:layout_width="match_parent" android:layout_height="wrap_content" android:text="Attendees" /> <com.google.android.material.textfield.TextInputLayout android:id="@+id/neweventattendees" android:layout_width="match_parent" android:layout_height="wrap_content"> <com.google.android.material.textfield.TextInputEditText android:layout_width="match_parent" android:layout_height="wrap_content" android:hint="Separate multiple entries with ';'" /> </com.google.android.material.textfield.TextInputLayout> <TextView android:layout_width="match_parent" android:layout_height="wrap_content" android:text="Start" /> <com.google.android.material.textfield.TextInputLayout android:id="@+id/neweventstartdatetime" android:layout_width="match_parent" android:layout_height="wrap_content"> <com.google.android.material.textfield.TextInputEditText android:layout_width="match_parent" android:layout_height="wrap_content" android:focusable="false" android:clickable="true" /> </com.google.android.material.textfield.TextInputLayout> <TextView android:layout_width="match_parent" android:layout_height="wrap_content" android:text="End" /> <com.google.android.material.textfield.TextInputLayout android:id="@+id/neweventenddatetime" android:layout_width="match_parent" android:layout_height="wrap_content"> <com.google.android.material.textfield.TextInputEditText android:layout_width="match_parent" android:layout_height="wrap_content" android:focusable="false" android:clickable="true" /> </com.google.android.material.textfield.TextInputLayout> <TextView android:layout_width="match_parent" android:layout_height="wrap_content" android:text="Body" /> <com.google.android.material.textfield.TextInputLayout android:id="@+id/neweventbody" android:layout_width="match_parent" android:layout_height="0dp" android:layout_weight="1"> <com.google.android.material.textfield.TextInputEditText android:layout_width="match_parent" android:layout_height="match_parent" android:inputType="textMultiLine" android:gravity="top" /> </com.google.android.material.textfield.TextInputLayout> <Button android:id="@+id/createevent" android:layout_width="match_parent" android:layout_height="wrap_content" android:text="Create" /> </LinearLayout>Ouvrez NewEventFragment et ajoutez les instructions
importsuivantes en haut du fichier.import android.util.Log; import android.widget.Button; import com.google.android.material.snackbar.BaseTransientBottomBar; import com.google.android.material.snackbar.Snackbar; import com.google.android.material.textfield.TextInputLayout; import java.time.ZoneId; import java.time.ZonedDateTime;Ajoutez les membres suivants à la
NewEventFragmentclasse.private TextInputLayout mSubject; private TextInputLayout mAttendees; private TextInputLayout mStartInputLayout; private TextInputLayout mEndInputLayout; private TextInputLayout mBody; private EditTextDateTimePicker mStartPicker; private EditTextDateTimePicker mEndPicker;Ajoutez les fonctions suivantes pour afficher et masquer une barre de progression.
private void showProgressBar() {
    getActivity().runOnUiThread(new Runnable() {
        @Override
        public void run() {
            getActivity().findViewById(R.id.progressbar)
                .setVisibility(View.VISIBLE);
            getActivity().findViewById(R.id.fragment_container)
                .setVisibility(View.GONE);
        }
    });
}

private void hideProgressBar() {
    getActivity().runOnUiThread(new Runnable() {
        @Override
        public void run() {
            getActivity().findViewById(R.id.progressbar)
                .setVisibility(View.GONE);
            getActivity().findViewById(R.id.fragment_container)
                .setVisibility(View.VISIBLE);
        }
    });
}
Ajoutez les fonctions suivantes pour obtenir les valeurs des contrôles d’entrée et appeler la
GraphHelper.createEventfonction.private void createEvent() { String subject = mSubject.getEditText().getText().toString(); String attendees = mAttendees.getEditText().getText().toString(); String body = mBody.getEditText().getText().toString(); ZonedDateTime startDateTime = mStartPicker.getZonedDateTime(); ZonedDateTime endDateTime = mEndPicker.getZonedDateTime(); // Validate boolean isValid = true; // Subject is required if (subject.isEmpty()) { isValid = false; mSubject.setError("You must set a subject"); } // End must be after start if (!endDateTime.isAfter(startDateTime)) { isValid = false; mEndInputLayout.setError("The end must be after the start"); } if (isValid) { // Split the attendees string into an array String[] attendeeArray = attendees.split(";"); GraphHelper.getInstance() .createEvent(subject, startDateTime, endDateTime, mTimeZone, attendeeArray, body) .thenAccept(newEvent -> { hideProgressBar(); Snackbar.make(getView(), "Event created", BaseTransientBottomBar.LENGTH_SHORT).show(); }) .exceptionally(exception -> { hideProgressBar(); Log.e("GRAPH", "Error creating event", exception); Snackbar.make(getView(), exception.getMessage(), BaseTransientBottomBar.LENGTH_LONG).show(); return null; }); } }Remplacez l’existant
onCreateViewpar ce qui suit.@Nullable @Override public View onCreateView(@NonNull LayoutInflater inflater, @Nullable ViewGroup container, @Nullable Bundle savedInstanceState) { View newEventView = inflater.inflate(R.layout.fragment_new_event, container, false); ZoneId userTimeZone = GraphToIana.getZoneIdFromWindows(mTimeZone); mSubject = newEventView.findViewById(R.id.neweventsubject); mAttendees = newEventView.findViewById(R.id.neweventattendees); mBody = newEventView.findViewById(R.id.neweventbody); mStartInputLayout = newEventView.findViewById(R.id.neweventstartdatetime); mStartPicker = new EditTextDateTimePicker(getContext(), mStartInputLayout.getEditText(), userTimeZone); mEndInputLayout = newEventView.findViewById(R.id.neweventenddatetime); mEndPicker = new EditTextDateTimePicker(getContext(), mEndInputLayout.getEditText(), userTimeZone); Button createButton = newEventView.findViewById(R.id.createevent); createButton.setOnClickListener(v -> { // Clear any errors mSubject.setErrorEnabled(false); mEndInputLayout.setErrorEnabled(false); showProgressBar(); createEvent(); }); return newEventView; }Enregistrez vos modifications, puis redémarrez l’application. Sélectionnez l’élément de menu Nouvel événement, remplissez le formulaire, puis sélectionnez CRÉER.
Félicitations !
Vous avez terminé le didacticiel d’Graph Microsoft Android. Maintenant que vous disposez d’une application de travail qui appelle Microsoft Graph, vous pouvez expérimenter et ajouter de nouvelles fonctionnalités. Consultez la vue d’ensemble de Microsoft Graph pour voir toutes les données accessibles avec Microsoft Graph.
Commentaires
N’hésitez pas à nous faire part de vos commentaires sur ce didacticiel dans GitHub référentiel.
Vous avez un problème avec cette section ? Si c'est le cas, faites-nous part de vos commentaires pour que nous puissions l'améliorer.