Notes
L’accès à cette page nécessite une autorisation. Vous pouvez essayer de vous connecter ou de modifier des répertoires.
L’accès à cette page nécessite une autorisation. Vous pouvez essayer de modifier des répertoires.
Configuration requise pour ajouter des nœuds de calcul IaaS Azure avec Microsoft HPC Pack
Cette section décrit les conditions requises pour ajouter des nœuds de calcul Azure IaaS à votre cluster HPC.
Version prise en charge du cluster Microsoft HPC Pack
Pour déployer des nœuds de calcul IaaS Azure sur votre cluster HPC Pack, vous devez exécuter Microsoft HPC Pack 2016 Update 1 ou une version ultérieure.
Si vous souhaitez créer un cluster HPC Pack entièrement dans Azure, accédez à Déployer un cluster HPC Pack 2016 dans Azure et choisissez un modèle à déployer. Sinon, vous devez d’abord créer un cluster HPC Pack local. Pour obtenir les instructions d’installation d’un cluster HPC Pack hybride, consultez les rubriques ci-dessous :
Compte d’abonnement Azure
Vous devez obtenir un abonnement Azure ou être affecté au rôle Owner de l’abonnement.
Pour créer un abonnement Azure, accédez au site Azure.
Pour accéder à un abonnement existant, accédez au portail Azure .
Remarque
Il existe certaines limites (également appelées quotas) pour chaque abonnement Azure. Les cœurs de machine virtuelle ont une limite totale régionale ainsi qu’une limite régionale par série de tailles (Dv2, F, etc.) qui sont appliquées séparément. Vous pouvez accéder à portail Azure pour vérifier les quotas et l’utilisation de votre abonnement Azure. Si vous souhaitez augmenter le quota, ouvrir une demande de support client en ligne.
Infrastructure réseau
Vous devez fournir un réseau virtuel et un sous-réseau Azure pour les nœuds de calcul IaaS Azure.
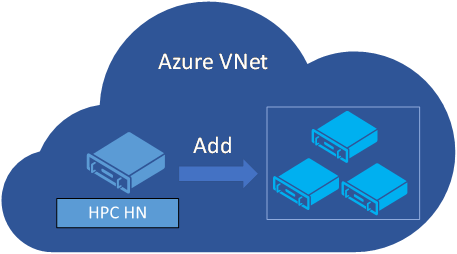
Si vous envisagez de créer un cluster HPC Pack entièrement dans Azure, vous devez créer les nœuds principaux et les nœuds de calcul IaaS Azure dans un seul réseau virtuel Azure.
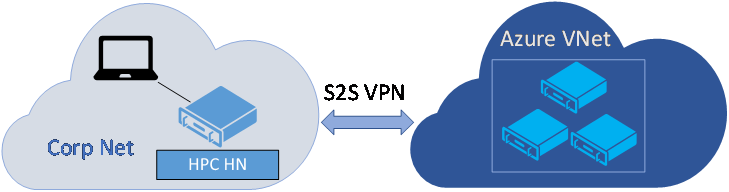
Si, toutefois, vous envisagez de créer un cluster HPC Pack hybride avec des nœuds principaux dans votre réseau d’entreprise local et de créer des nœuds de calcul IaaS Azure dans Azure, vous devez configurer un vpn de site à site ou connexion ExpressRoute de votre réseau local vers le réseau virtuel Azure. Le ou les nœuds principaux doivent également être en mesure de se connecter via Internet aux services Azure. Vous devrez peut-être contacter votre administrateur réseau pour configurer cette connectivité.
Configurer le groupe de sécurité réseau pour le réseau virtuel Azure
Il est recommandé de configurer un groupe de sécurité réseau pour le sous-réseau de réseau virtuel Azure. La table de ports HPC suivante répertorie les ports d’écoute pour chaque type de nœud HPC. Pour plus d’informations sur les ports, reportez-vous à ce document.
| Rôle | Port | Protocole |
|---|---|---|
| nœud de calcul Linux | 40000, 40002 | TCP |
| nœud de calcul Windows | 1856, 6729, 6730, 7998, 8677, 9096, 9100-9611, 42323, 42324 | TCP |
| nœud Broker | 9087, 9091, 9095, 80, 443 et ports pour nœud de calcul Windows | TCP |
| nœud principal | 445, 5800, 5802, 5969, 5970, 5974, 5999, 7997, 9090, 9092, 9094, 9892-9894 et ports pour nœud Broker; 1433 pour bases de données locales; 10100, 10101, 10200, 10300, 10400 pour le cluster Service Fabric (haute disponibilité) | TCP |
| nœud principal | 9894 | UDP (User Datagram Protocol) |
Pour un cluster HPC Pack avec des nœuds principaux dans Azure
Pour un cluster HPC Pack entièrement dans Azure, les règles de groupe de sécurité réseau suivantes doivent être configurées.
1. Règles de sécurité entrantes
La règle de sécurité entrante par défaut AllowVNetInBound autorise tout le trafic entrant intra-virtuel. Toutefois, si vous avez ajouté des règles pour refuser le trafic avec le VirtualNetwork source
Si vous souhaitez envoyer des travaux à partir d’un client local via Internet, vous devez ajouter les règles de sécurité entrantes suivantes.
| Nom | Port | Protocole | Origine | Destination | Action |
|---|---|---|---|---|---|
| AllowHttpsInBound | 443 | TCP | N'importe lequel | N'importe lequel | Permettre |
| AllowHpcSoaInbound | 9087,9090,9091,9094 | TCP | N'importe lequel | N'importe lequel | Permettre |
2. Règles de sécurité sortantes
La règle de sécurité sortante par défaut AllowVNetOutBound autorise tout le trafic réseau intra-virtuel sortant. Toutefois, si vous avez ajouté des règles pour refuser le trafic avec VirtualNetwork ou tout avec une priorité plus élevée, vérifiez que les ports répertoriés dans table de ports HPC ne sont pas refusés.
La règle de sécurité sortante par défaut AllowInternetOutBound autorise tout le trafic sortant vers Internet . Toutefois, si vous avez ajouté des règles pour refuser le trafic avec destination Internet ou tout avec une priorité plus élevée, les règles de trafic sortant suivantes doivent être ajoutées avec des priorités plus élevées :
| Nom | Port | Protocole | Origine | Destination | Action |
|---|---|---|---|---|---|
| AllowKeyVaultOutBound | N'importe lequel | N'importe lequel | VirtualNetwork | AzureKeyVault | Permettre |
| AllowAzureCloudOutBound | N'importe lequel | N'importe lequel | VirtualNetwork | AzureCloud | Permettre |
| AllowHttpsOutBound | 443 | TCP | VirtualNetwork | N'importe lequel | Permettre |
Pour un cluster HPC Pack hybride avec des nœuds principaux locaux
Pour le cluster HPC Pack hybride avec des nœuds principaux locaux et des nœuds de répartiteur et des nœuds de calcul IaaS Azure, les règles de groupe de sécurité réseau suivantes doivent être configurées du point de vue des nœuds de calcul IaaS Azure.
1. Règles de sécurité entrantes
La règle de sécurité entrante par défaut AllowVNetInBound autorise tout le trafic entrant intra-virtuel. Toutefois, si vous avez ajouté des règles pour refuser le trafic avec VirtualNetwork ou n’importe quelle avec une priorité plus élevée, assurez-vous que les ports pour nœud de calcul Linux et nœud de calcul Windows répertoriés dans table de ports HPC ne sont pas refusés.
Remarque
S’il existe des pare-feu assis entre votre réseau de société et votre réseau virtuel Azure, configurez règles de pare-feu sortantes pour autoriser ces ports du point de vue du ou des nœuds principaux.
2. Règles de sécurité sortantes
La règle de sécurité sortante par défaut AllowVNetOutBound autorise tout le trafic réseau intra-virtuel sortant. Toutefois, si vous avez ajouté des règles pour refuser le trafic avec destination VirtualNetwork ou Tout avec une priorité plus élevée, les règles de trafic sortant suivantes doivent être ajoutées avec des priorités plus élevées, afin que les nœuds de calcul Azure IaaS puissent se connecter au ou aux nœuds principaux locaux.
| Nom | Port | Protocole | Origine | Destination | Action |
|---|---|---|---|---|---|
| AllowHpcIntraVNetTcpOutBound | 443, 5970, 6729, 6730, 8677, 9892, 9893, 9894 | TCP | N'importe lequel | VirtualNetwork | Permettre |
| AllowHpcIntraVNetUdpOutBound | 9894 | UDP (User Datagram Protocol) | N'importe lequel | VirtualNetwork | Permettre |
Remarque
S’il existe des pare-feu assis entre votre réseau de société et votre réseau virtuel Azure, configurez règles de pare-feu entrantes pour autoriser ces ports du point de vue du ou des nœuds principaux.
La règle de sécurité sortante par défaut AllowInternetOutBound autorise tout le trafic sortant vers Internet . Toutefois, si vous avez ajouté des règles pour refuser le trafic avec destination Internet ou tout avec une priorité plus élevée, les règles de trafic sortant suivantes doivent être ajoutées avec des priorités plus élevées :
| Nom | Port | Protocole | Origine | Destination | Action |
|---|---|---|---|---|---|
| AllowKeyVaultOutBound | N'importe lequel | N'importe lequel | VirtualNetwork | AzureKeyVault | Permettre |
| AllowAzureCloudOutBound | N'importe lequel | N'importe lequel | VirtualNetwork | AzureCloud | Permettre |
| AllowHttpsOutBound | 443 | TCP | VirtualNetwork | N'importe lequel | Permettre |
Le ou les nœuds principaux HPC Pack peuvent accéder aux URL publiques suivantes à l’étape Définir la configuration du déploiement Azure et Créer et gérer des nœuds de calcul IaaS Azure étape, vous devez les ajouter à la liste verte de vos pare-feu locaux.
https://management.core.windows.net
https://management.azure.com
https://login.microsoftonline.com
https://hpcazuresasdispatcher.azurewebsites.net
https://hpcazureconsumptionsb.servicebus.windows.net
https ://*.vault.azure.net
https ://*.microsoft.com
https ://*.msauth.net
https ://*.msftauth.net
https ://*.core.windows.net
Étape 1. Configurer le cluster pour prendre en charge les déploiements de nœuds de calcul IaaS Azure
Ouvrez le gestionnaire de cluster HPC sur un nœud principal , dans la liste de tâches de déploiement , effectuez les trois tâches de déploiement requises . Le nom d’utilisateur et le mot de passe des informations d’identification d’installation de que vous avez fournies seront utilisés comme nom d’utilisateur administrateur et mot de passe des machines virtuelles Azure.
Étape 1.1 Définir la configuration du déploiement Azure
Vous pouvez définir la configuration du déploiement Azure avec HPC Cluster Manager ou commandes PowerShell.
Définir la configuration du déploiement Azure avec HPC Cluster Manager
Remarque
L’Assistant Définir la configuration du déploiement Azure dans cet article est basé sur HPC Pack 2016 Update 2 (et version ultérieure).
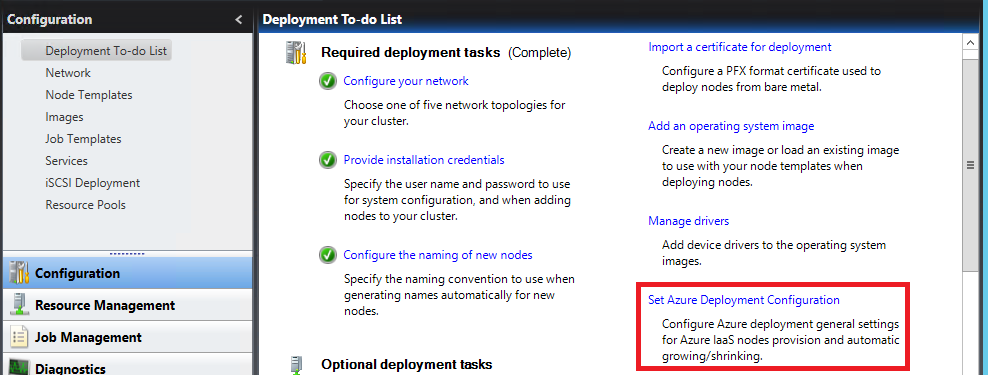
Vous pouvez cliquer sur définir la configuration du déploiement Azure et suivre l’Assistant pour terminer la configuration.
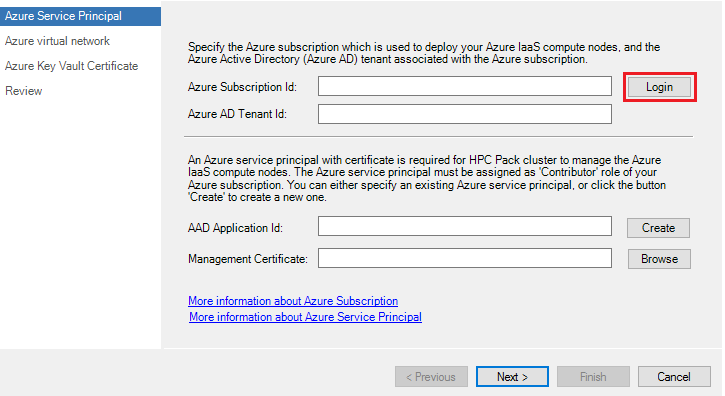
1. Configurer le principal de service Azure
Le principal de service Azure est utilisé par le service HPC Pack pour provisionner, démarrer, arrêter et supprimer une machine virtuelle IaaS Azure. Pour configurer le principal de service Azure, cliquez sur le bouton connexion pour vous connecter à votre compte Azure dans la page principal de service Azure.
Remarque
Vous devez vous connecter avec le compte Microsoft Entra ID(Azure AD). Si vous vous connectez avec votre compte Microsoft personnel, vous rencontrerez l’erreur « Ce nom d’utilisateur peut être incorrect. Assurez-vous que vous l’avez tapé correctement. Sinon, contactez votre administrateur. »
Pour confirmer le type de votre compte, connectez-vous au portail Azure, cliquez sur Microsoft Entra ID ->Utilisateurs et groupes, seach et recherchez votre compte. Si son identité est MicrosoftAccount plutôt que le nom de domaine de votre annuaire, votre compte est un compte personnel Microsoft. Le workarround consiste à rechercher le nom d’utilisateur principal de votre compte et à se connecter avec celui-ci.
Si votre compte vous donne accès à plusieurs locataires Azure AD, cliquez sur votre compte dans le coin supérieur droit. Définissez ensuite votre session portail sur le locataire souhaité. Vous devez avoir l’autorisation d’accéder aux ressources dans le répertoire.
Cliquez sur Microsoft Entra ID dans le volet de navigation services gauche, cliquez sur Utilisateurs et groupes, puis vérifiez qu’il existe déjà des comptes d’utilisateur créés ou configurés.
Si vous avez plusieurs abonnements Azure associés à votre compte Azure, cliquez sur le bouton Sélectionner pour choisir l’abonnement utilisé pour déployer les nœuds de calcul IaaS Azure.
Vous pouvez choisir un principal de service Azure existant dans liste nom du principal de service, puis cliquer sur le bouton Parcourir pour choisir le certificat de gestion approprié utilisé pour créer le principal du service Azure, ou cliquer sur le bouton Créer pour créer un principal de service Azure.
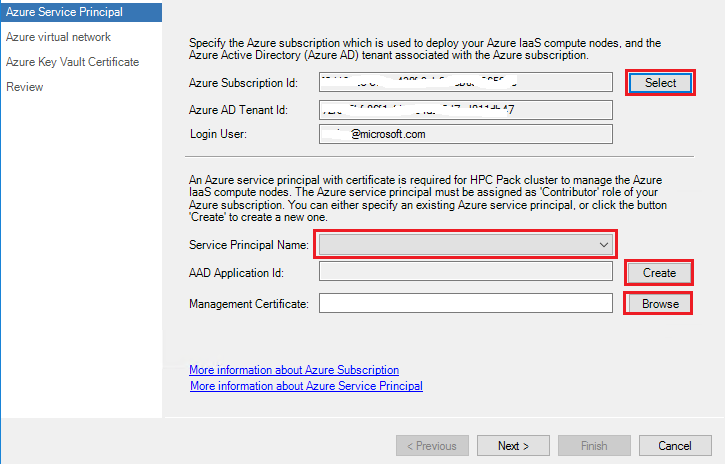
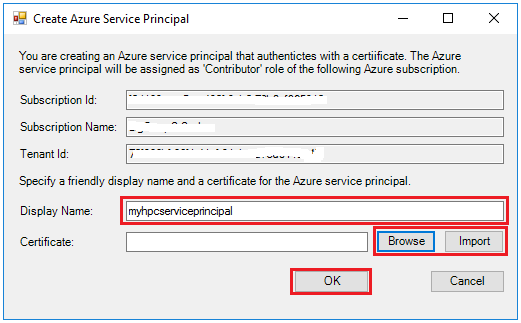
Si vous choisissez de créer un principal de service Azure, dans
Remarque
Le certificat du principal de service Azure doit être différent du certificat utilisé pour sécuriser la communication entre les nœuds HPC.
Pour créer le principal de service Azure, votre compte Azure doit être un rôle Propriétaire de l’abonnement Azure, et le principal de service Azure sera accordé en tant que rôle Contributeur de l’abonnement Azure par défaut, vous pouvez faire référence à contrôle d’accès pour les ressources Azure dans le cluster HPC Pack pour configurer manuellement les autorisations d’accès pour le principal du service Azure en fonction de votre scénario d’utilisateur.
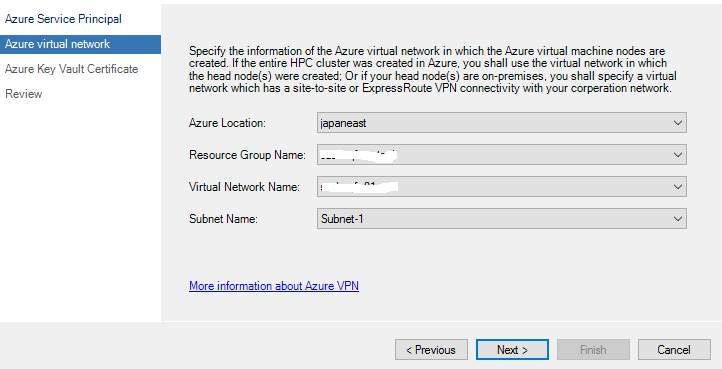
2. Spécifier un réseau virtuel Azure
Sur la page réseau virtuel Azure, spécifiez les informations du réseau virtuel Azure dans lequel vos nœuds de calcul Azure IaaS seront créés.
emplacement Azure: emplacement Azure dans lequel le réseau virtuel se trouve
nom du groupe de ressources: groupe de ressources dans lequel le réseau virtuel a été créé
nom de réseau virtuel: nom du réseau virtuel dans lequel vos nœuds de calcul IaaS Azure seront créés.
nom du sous-réseau: nom du sous-réseau dans lequel vos nœuds de calcul IaaS Azure seront créés.
Remarque
Le réseau virtuel que vous avez spécifié doit avoir un site à site VPN ou une connexion Express Route au réseau local où se trouve votre nœud principal.
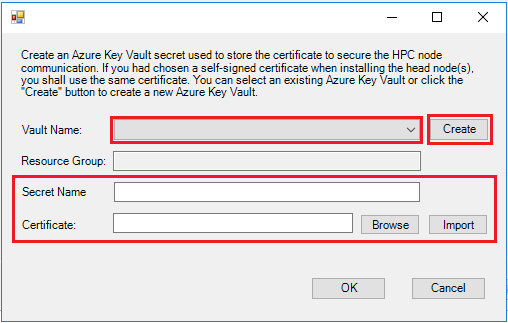
3. Configurer le certificat Azure Key Vault
Le service HPC Pack utilise un certificat X.509 pour sécuriser la communication du nœud HPC. Par conséquent, nous avons besoin d’importer ce certificat dans Azure Key Vault afin qu’il puisse être installé sur la machine virtuelle IaaS Azure lors de l’approvisionnement. Dans page certificat Azure Key Vault, cliquez sur le bouton Sélectionner pour choisir le nom d’Azure Key Vault et nom du secret si vous avez déjà créé le secret Azure Key Vault. Vous pouvez également cliquer sur le bouton Créer pour en créer un nouveau.
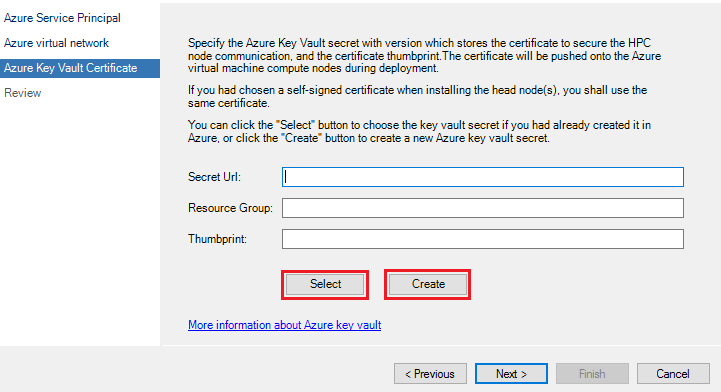
Si vous choisissez de créer un secret Key Vault, vous pouvez sélectionner un nom de coffre de clés Azure existant dans la liste nom du coffre de
Remarque
Si vous utilisez un certificat auto-signé sur le ou les nœuds principaux pour la communication de nœud HPC, vous devez charger le même certificat (celui utilisé lors de l’installation du nœud principal) dans le secret Azure Key Vault. Si vous ne le faites pas, les nœuds de calcul IaaS Azure ne sont pas accessibles pour le ou les nœuds principaux en raison d’un problème de certificat non approuvé. Vous pouvez également utiliser la commande PowerShell suivante pour obtenir l’empreinte numérique du certificat utilisée pour la communication de nœud : Get-HPCClusterRegistry -propertyName SSLThumbprint
Passez en revue les paramètres, puis cliquez sur Terminer pour terminer la configuration.
Définir la configuration du déploiement Azure avec PowerShell
Vous pouvez également choisir d’exécuter les commandes PowerShell suivantes pour définir la configuration du déploiement Azure si vous avez déjà :
- Créez le principal de service Azure et le certificat Azure Key Vault.
- Installé le certificat du principal de service Azure pour ordinateur local\Magasin de certificats personnel avec une clé privée sur tous les ordinateurs de nœud principal.
Add-PSSnapin Microsoft.Hpc
# Set Azure subscription and Service Principal information
Set-HpcClusterRegistry -PropertyName SubscriptionId -PropertyValue <subscriptionId>
Set-HpcClusterRegistry -PropertyName TenantId -PropertyValue <tenantId>
Set-HpcClusterRegistry -PropertyName ApplicationId -PropertyValue <ServiceprincipalApplicationId>
Set-HpcClusterRegistry -PropertyName Thumbprint -PropertyValue <ServiceprincipalCertThumbprint>

# Set Virtual network information
Set-HpcClusterRegistry -PropertyName VNet -PropertyValue <VNetName>
Set-HpcClusterRegistry -PropertyName Subnet -PropertyValue <SubnetName>
Set-HpcClusterRegistry -PropertyName Location -PropertyValue <VNetLocation>
Set-HpcClusterRegistry -PropertyName ResourceGroup -PropertyValue <VNetResourceGroup>

# Set Azure Key vault certificate
Set-HpcKeyVaultCertificate -ResourceGroup <KeyVaultResourceGroupName> -CertificateUrl <KeyVaultSecretUrlWithVersion> -CertificateThumbprint <KeyVaultCertificateThumbprint>
Étape 1.2 Configurer d’autres propriétés de cluster
Si vous envisagez de créer nœuds de calcul Windows Azure IaaS non joints à un domaine ou des nœuds de calcul Linux dans un autre sous-réseau où le ou les nœuds principaux sont localisés, exécutez la commande PowerShell suivante sur un nœud principal pour ajouter des entrées d’hôte pour les nœuds dans différents sous-réseaux. Si vous n’avez pas pu le faire, les nœuds sont inaccessibles pour le ou les nœuds principaux, car le ou les nœuds principaux ne peuvent pas résoudre leur nom d’hôte.
Set-HpcClusterRegistry -PropertyName HostFileForOtherSubnet -PropertyValue 1
if($env:CCP_CONNECTIONSTRING -like "*,*,*") {
    Connect-ServiceFabricCluster
    $opId = [Guid]::NewGuid()
    Start-ServiceFabricPartitionRestart -OperationId $opId -RestartPartitionMode AllReplicasOrInstances -ServiceName fabric:/HpcApplication/ManagementStatelessService -ErrorAction Stop
}
Si vous exécutez HPC Pack 2016 Update 2 ou version antérieure, et envisagez de créer des nœuds de calcul Linux Azure IaaS créés avec le modèle de nœud IaaS Azure, exécutez la commande PowerShell suivante sur un nœud principal pour activer la communication sur Http entre les nœuds principaux et les nœuds de calcul Linux.
Set-HpcClusterRegistry -PropertyName LinuxHttps -PropertyValue 0
if($env:CCP_CONNECTIONSTRING -like "*,*,*") {
    Connect-ServiceFabricCluster
    $opId = [Guid]::NewGuid()
    Start-ServiceFabricPartitionRestart -OperationId $opId -RestartPartitionMode AllReplicasOrInstances -ServiceName fabric:/HpcApplication/SchedulerStatefulService -ErrorAction Stop
} else {
    Restart-Service -Name HpcScheduler
}
Si vous exécutez HPC Pack 2019 Update 2 ou version antérieure, et envisagez de créer nœuds de calcul Linux Azure IaaS créés avec le modèle de nœud IaaS Azure, reportez-vous à Gérer la clé d’authentification Linux pour HPC Pack pour vous assurer que vous avez défini la clé d’authentification Linux pour les nœuds de calcul Linux.
Étape 2. Créer un modèle de nœud IaaS Azure
Important
- Si vous choisissez d’utiliser une image personnalisée ou une image partagée, le système d’exploitation de l’image de machine virtuelle doit répondre aux exigences .
- d’image partagée n’est pas prise en charge dans HPC Pack 2016 Update 2 ou version antérieure.
- Les machines virtuelles Azure Spot sont prises en charge à partir de HPC Pack 2019
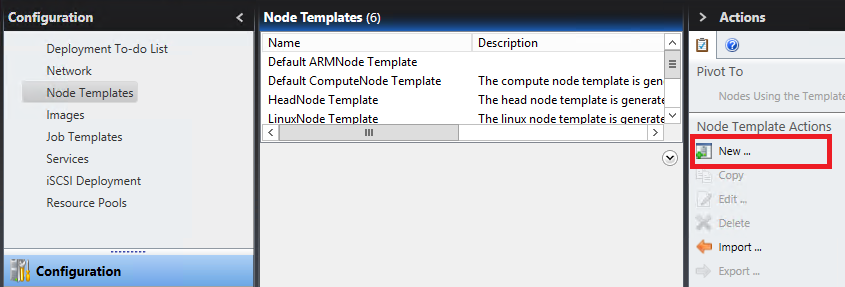
Dans le panneau Configuration, cliquez sur modèles de nœud, puis sur Nouveau dans la liste Actions pour créer un modèle de nœud IaaS Azure.
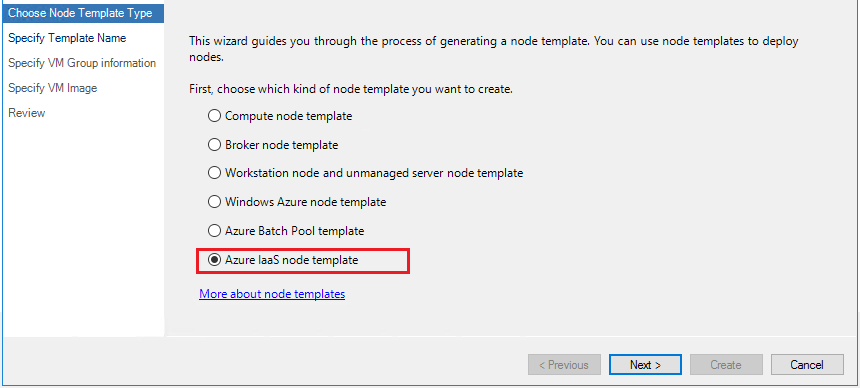
Dans page Choisir le type de modèle de nœud, choisissez le type de modèle de nœud comme modèle de nœud IaaS Azure.
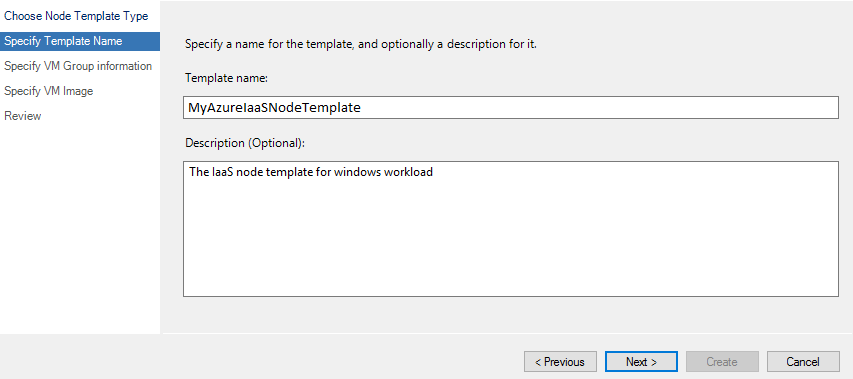
Dans la page Spécifier le nom du modèle, spécifiez un nom de modèle et spécifiez éventuellement la Description.
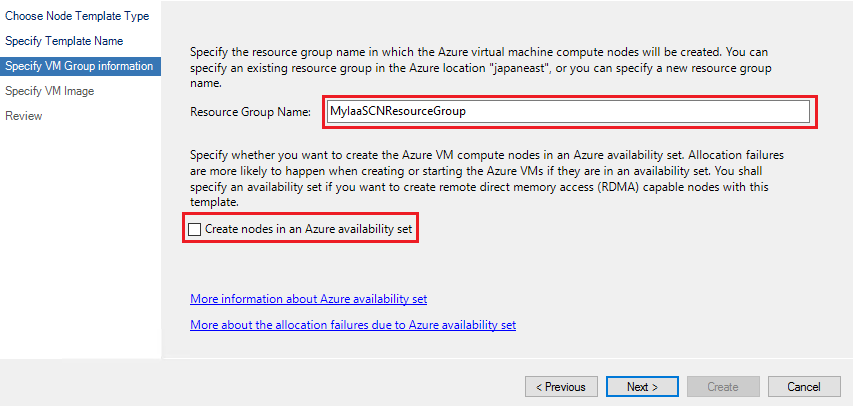
Dans la page Spécifier les informations du groupe de machines virtuelles, spécifiez nom du groupe de ressources du groupe de ressources Azure dans lequel les nœuds de calcul IaaS seront créés. Vous pouvez sélectionner un groupe de ressources existant ou spécifier un nouveau nom de groupe de ressources. Si vous spécifiez un nouveau nom de groupe de ressources, le cluster HPC Pack crée le groupe de ressources lors du déploiement du premier nœud de calcul IaaS Azure avec ce modèle de nœud.
Spécifiez si vous souhaitez créer des nœuds dans un groupe à haute disponibilité Azure et spécifiez le nom du groupe à haute disponibilité si nécessaire. Si vous spécifiez un nouveau nom de groupe à haute disponibilité, le cluster HPC Pack le crée lors du déploiement du premier nœud de calcul IaaS Azure avec ce modèle de nœud.
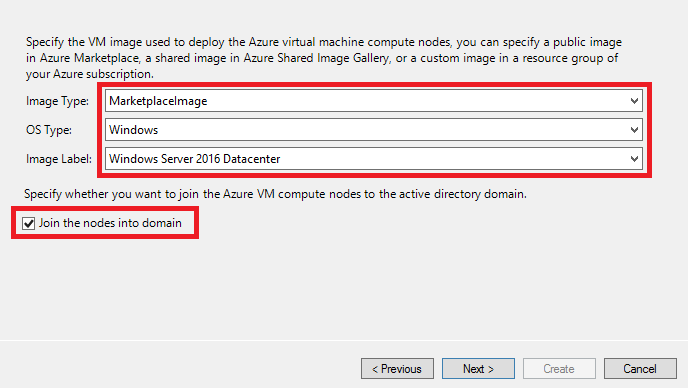
Dans la page Spécifier l’image de machine virtuelle, spécifiez l’image de machine virtuelle utilisée pour déployer les nœuds de calcul IaaS. Vous pouvez sélectionner l’un destypes d’images
Si vous choisissez type d’image comme MarketplaceImage, sélectionnez type de système d’exploitation et étiquette d’image choisir une image de machine virtuelle publique dans la Place de marché Azure.
Si le type de système d’exploitation est avec Windows et que vos nœuds principaux HPC Pack sont joints à un domaine, spécifiez si vous souhaitez joindre les nœuds au domaine. Il est recommandé de joindre les nœuds de calcul Windows dans le domaine.
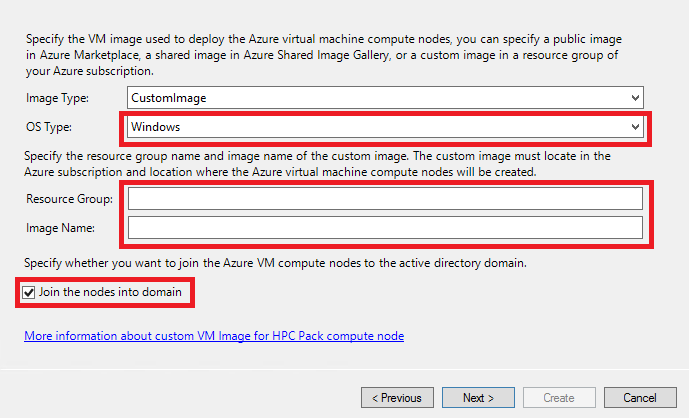
Si vous choisissez type d’image comme CustomImage, spécifiez le type de système d’exploitation , le nom d’image de l’image de machine virtuelle personnalisée et le groupe de ressources dans lequel l’image est stockée. L’image de machine virtuelle doit avoir été créée dans le même emplacement Azure dans lequel les nœuds de calcul IaaS Azure seront créés, et assurez-vous que le principal de service Azure que vous avez spécifié à l’étape 1.1 est autorisé à lire l’image personnalisée. Suivez Créer une image personnalisée pour créer votre propre image personnalisée pour votre machine virtuelle IaaS.
Vous pouvez cliquer sur le lien Plus d’informations sur l’image de machine virtuelle personnalisée pour le nœud de calcul HPC Pack pour découvrir comment créer une image de machine virtuelle de nœud de calcul HPC Pack personnalisée.
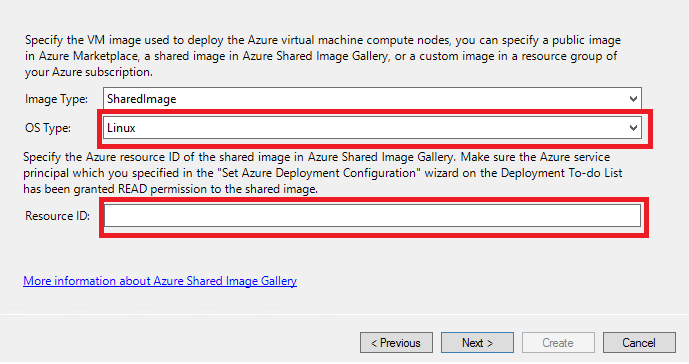
Si vous choisissez type d’image comme SharedImage, spécifiez le type de système d’exploitation , l’ID de ressource Azure de l’image de machine virtuelle partagée dans la galerie d’images partagées Azure. Vérifiez que le principal de service Azure que vous avez spécifié à l’étape 1.1 est accordé autorisation lire à la galerie d’images partagées.
Dans la page Vérifier, passez en revue les paramètres que vous avez spécifiés, puis cliquez sur Créer pour créer le modèle de nœud.
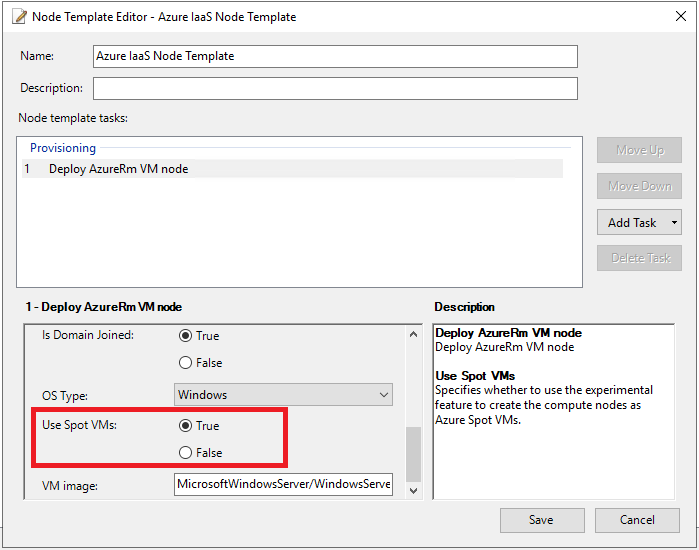
Avant de créer des nœuds de calcul IaaS Azure avec le modèle de nœud, si vous souhaitez spécifier certaines options avancées, par exemple, utilisez des machines virtuelles Azure Spot, reportez-vous aux options avancées pour le modèle de nœud IaaS.
Étape 3. Créer les nœuds de calcul IaaS et les gérer
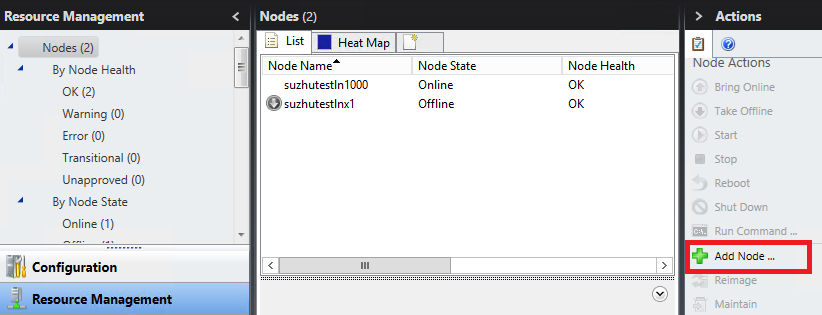
Ouvrez la console HPC Cluster Manager, cliquez sur barre de gestion des ressources, puis sur Ajouter un nœud pour démarrer l’Assistant Ajouter un nœud.
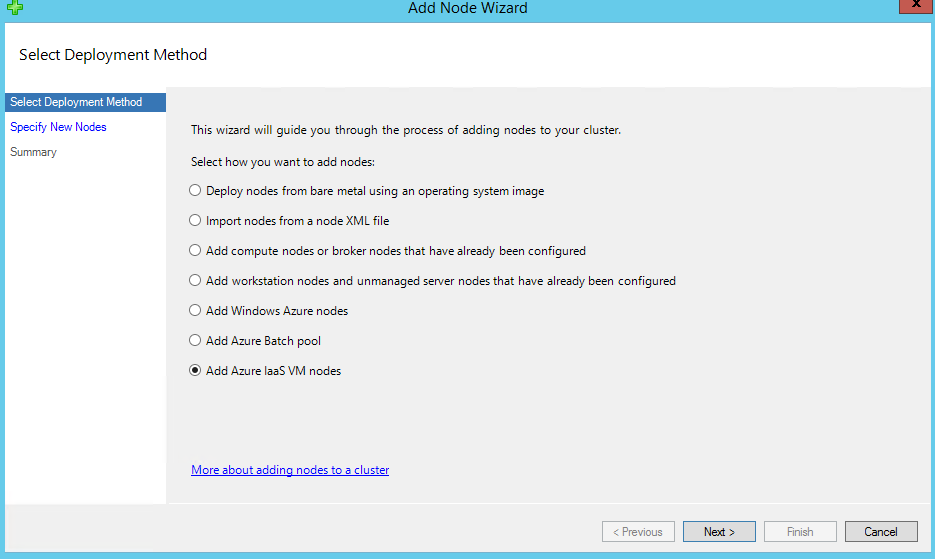
Dans la page Sélectionner la méthode de déploiement, sélectionnez Ajouter des nœuds de machine virtuelle IaaS Azure.
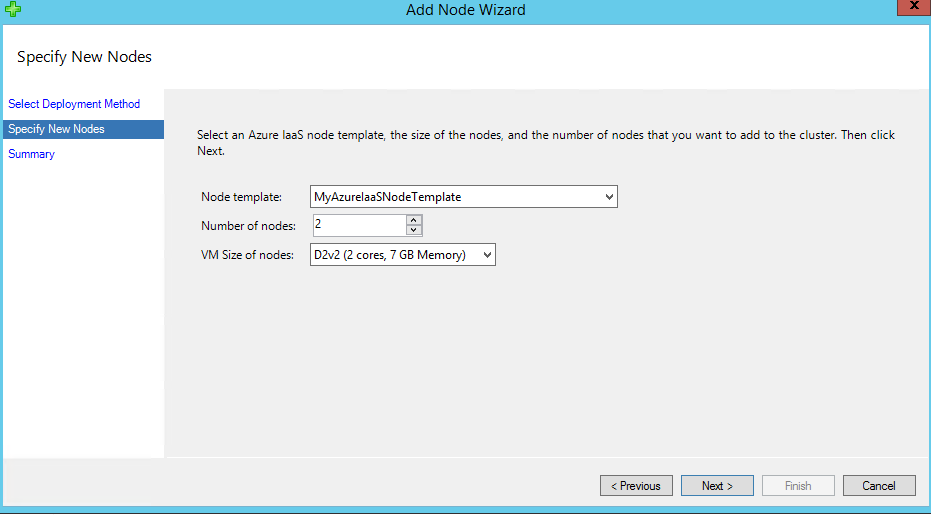
Dans la page Spécifier de nouveaux nœuds, sélectionnez le modèle de nœud que nous venons de créer à l’étape 2, puis spécifiez nombre de nœuds et taille de machine virtuelle des nœuds, puis cliquez sur Suivant.
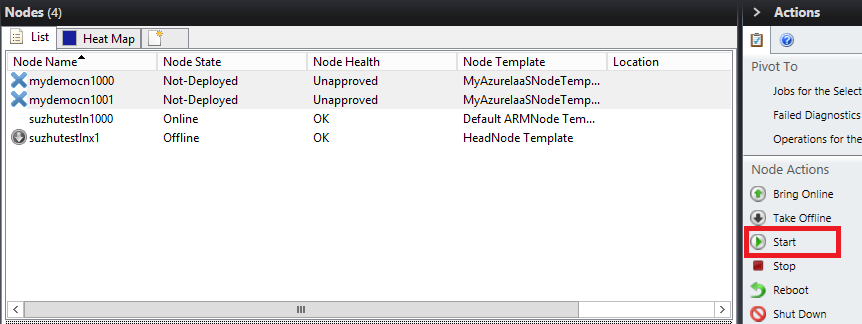
Une fois que vous avez cliqué sur Terminer, vous trouverez deux nouveaux nœuds dans liste des nœuds. Les machines virtuelles Azure correspondantes pour ces deux nœuds ne sont en fait pas encore créées côté Azure.
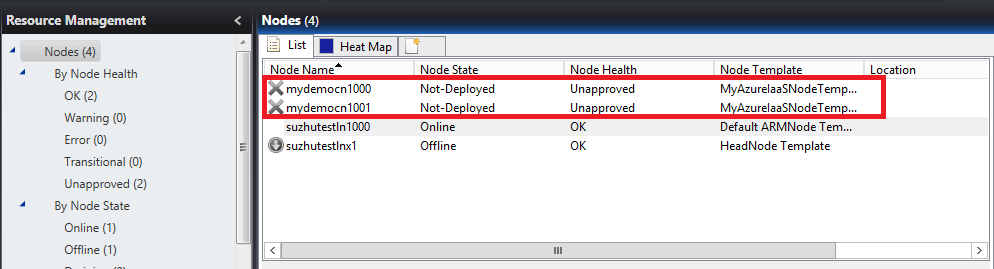
Vous pouvez ensuite choisir les nœuds, puis cliquer sur Démarrer pour créer les machines virtuelles dans Azure.
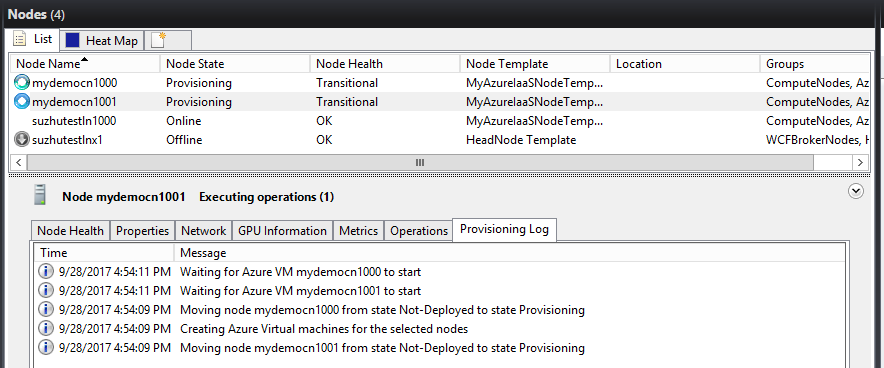
Attendez l’approvisionnement des nœuds de calcul IaaS Azure.
Une fois le déploiement de nœuds de calcul IaaS Azure terminé et que le d’intégrité des nœuds
Vous pouvez arrêter manuellement les nœuds en cliquant sur Arrêter, et les machines virtuelles dans Azure seront dé-allouées.
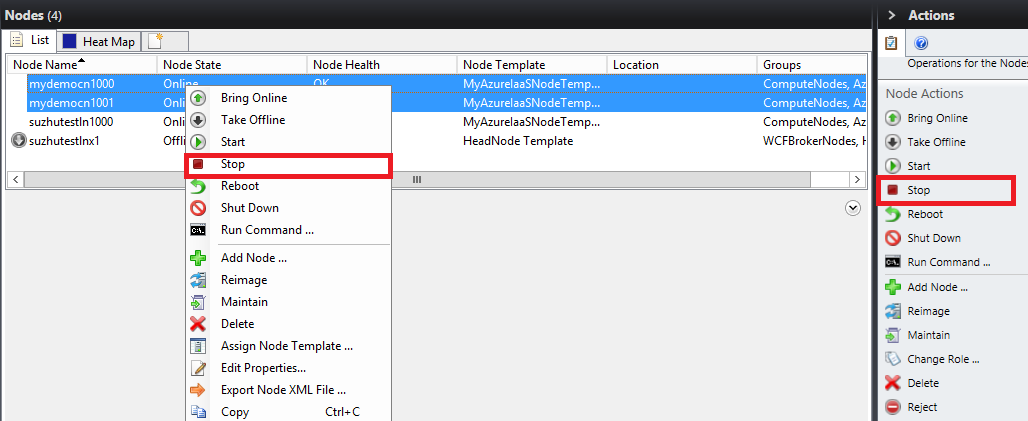
Vous pouvez également Supprimer les nœuds si vous n’en avez plus besoin, les machines virtuelles Azure seront également supprimées si vous le faites.
Si vous avez activé la fonctionnalité croissance automatique et réduire automatiquement les nœuds Azure fonctionnalité, les nœuds IaaS Azure sont automatiquement démarrés ou arrêtés en fonction de la charge de travail du cluster, consultez croissance automatique pour les ressources Azure.
Options avancées pour le modèle de nœud IaaS
Dans la plupart des scénarios, vous pouvez utiliser directement le modèle de nœud créé à l’étape 2 pour créer des nœuds de calcul IaaS Azure, il n’est pas nécessaire de spécifier des options avancées. Si vous souhaitez spécifier des options avancées, accédez à Configuration ->Node Templates, sélectionnez le modèle de nœud que vous venez de créer, puis cliquez sur Modifier.
Remarque
Le modèle de nœud IaaS Azure ne peut être modifié qu’en l’absence de nœud de calcul créé.
Utiliser des machines virtuelles Azure Spot
La création de nœuds de calcul IaaS Azure avec des machines virtuelles Azure Spot est une fonctionnalité introduite dans HPC Pack 2019. L’utilisation de machines virtuelles Azure Spot vous permet de tirer parti de la capacité de calcul Azure inutilisée à des coûts significatifs. Toutefois, il n’existe aucun contrat SLA pour les machines virtuelles Azure Spot.
Le déploiement du nœud de calcul IaaS peut échouer s’il n’existe aucune capacité Spot disponible dans la région Azure spécifiée.
Toute machine virtuelle Azure Spot en cours d’exécution peut être supprimée et déplacée vers un état arrêté à tout moment lorsque l’infrastructure Azure a besoin de la capacité. Dans ce cas, le nœud de calcul HPC correspondant s’affiche dans l’état d’intégrité du nœud d’erreur , et toutes les tâches exécutées sur le nœud sont interrompues et réinitulées.
L’infrastructure Azure ne redéploie pas automatiquement une machine virtuelle Azure Spot supprimée lorsque la capacité Spot est à nouveau disponible. Vous pouvez essayer manuellement de mettre le nœud hors connexion , puis le redémarrer sur HPC Cluster Manager pour redéployer la machine virtuelle Azure Spot ultérieurement, mais le redéploiement peut toujours échouer en raison d’aucune capacité Spot disponible.
Serveurs DNS
Par défaut, l’option Serveurs DNS n’est pas définie et les interfaces réseau des machines virtuelles Azure obtiennent les paramètres du serveur DNS à partir du réseau virtuel. Si vous souhaitez définir explicitement les serveurs DNS pour les interfaces réseau, spécifiez la liste des serveurs DNS séparés par des virgules.
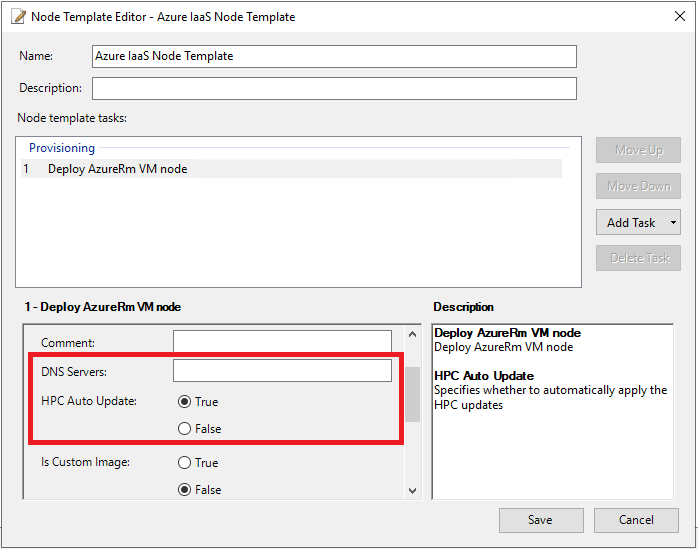
Mise à jour automatique HPC
HPC Pack utilise l’extension de machine virtuelle Azure pour déployer des composants HPC Pack dans les machines virtuelles Azure. L’option Mise à jour automatique HPC spécifie si l’agent de machine virtuelle Azure doit mettre à niveau automatiquement la version HPC Pack si une nouvelle version de l’extension de machine virtuelle du nœud de calcul HPC Pack est publiée. La valeur par défaut est False, nous vous recommandons vivement de ne pas la définir sur True, car les tâches en cours d’exécution sont interrompues et les travaux HPC peuvent également échouer.