Exercice : ajouter des volets de tâches aux compléments Outlook
Les volets des tâches sont utiles dans les compléments Outlook lorsque vous voulez présenter plusieurs choix à l’utilisateur ou implémenter une interface utilisateur. Dans cet exercice, vous allez ajouter une expérience de volet des tâches à votre complément Outlook existant.
Importante
Cet exercice suppose que vous avez créé le projet de complément Office Outlook avec le générateur Yeoman et vérifié qu’il fonctionne dans Outlook dans l’exercice précédent dans ce module.
Implémentation d’un volet de tâches
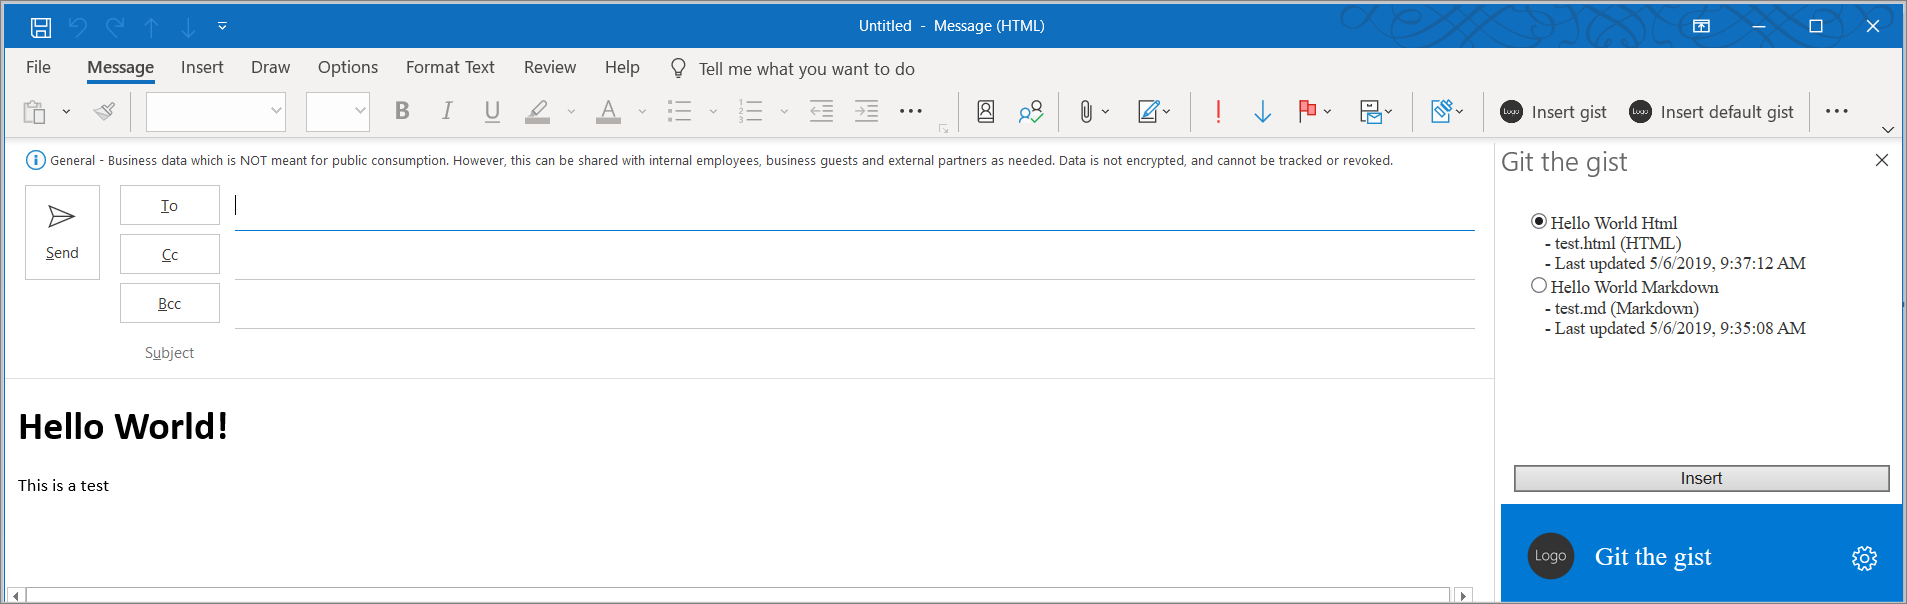
Le bouton de ce complément Insérer gist ouvre un volet de tâches et affiche les gists de l’utilisateur. L’utilisateur peut sélectionner un des gists à insérer dans le corps du message. Si l’utilisateur n’a pas encore configuré le complément, il sera invité à le faire.
Spécifier le code HTML pour le volet de tâches
Dans le projet que vous avez créé, le code HTML du volet de tâches est spécifié dans le fichier ./src/taskpane/taskpane.html. Ouvrez ce fichier et remplacez l’intégralité de son contenu par le balisage suivant.
<!DOCTYPE html>
<html>

<head>
  <meta charset="UTF-8" />
  <meta http-equiv="X-UA-Compatible" content="IE=Edge" />
  <meta name="viewport" content="width=device-width, initial-scale=1">
  <title>Contoso Task Pane Add-in</title>

  <!-- Office JavaScript API -->
  <script type="text/javascript" src="https://appsforoffice.microsoft.com/lib/1.1/hosted/office.js"></script>

  <!-- For more information on Fluent UI, visit https://developer.microsoft.com/fluentui. -->
  <link rel="stylesheet" href="https://static2.sharepointonline.com/files/fabric/office-ui-fabric-core/9.6.1/css/fabric.min.css"/>

  <!-- Template styles -->
  <link href="taskpane.css" rel="stylesheet" type="text/css" />
</head>

<body class="ms-font-l ms-landing-page">
  <main class="ms-landing-page__main">
    <section class="ms-landing-page__content ms-font-m ms-fontColor-neutralPrimary">
      <div id="not-configured" style="display: none;">
        <div class="centered ms-font-xxl ms-u-textAlignCenter">Welcome!</div>
        <div class="ms-font-xl" id="settings-prompt">Please choose the <strong>Settings</strong> icon at the bottom of this window to configure this add-in.</div>
      </div>
      <div id="gist-list-container" style="display: none;">
        <form>
          <div id="gist-list">
          </div>
        </form>
      </div>
      <div id="error-display" style="display: none;" class="ms-u-borderBase ms-fontColor-error ms-font-m ms-bgColor-error ms-borderColor-error">
      </div>
    </section>
    <button class="ms-Button ms-Button--primary" id="insert-button" tabindex=0 disabled>
      <span class="ms-Button-label">Insert</span>
    </button>
  </main>
  <footer class="ms-landing-page__footer ms-bgColor-themePrimary">
    <div class="ms-landing-page__footer--left">
      <img src="../../assets/logo-filled.png" />
      <h1 class="ms-font-xl ms-fontWeight-semilight ms-fontColor-white">Git the gist</h1>
    </div>
    <div id="settings-icon" class="ms-landing-page__footer--right" aria-label="Settings" tabindex=0>
      <i class="ms-Icon enlarge ms-Icon--Settings ms-fontColor-white"></i>
    </div>
  </footer>

  <script type="text/javascript" src="../../node_modules/jquery/dist/jquery.js"></script>
  <script type="text/javascript" src="../../node_modules/showdown/dist/showdown.min.js"></script>
  <script type="text/javascript" src="../../node_modules/urijs/src/URI.min.js"></script>
  <script type="text/javascript" src="../helpers/addin-config.js"></script>
  <script type="text/javascript" src="../helpers/gist-api.js"></script>
  <script type="text/javascript" src="taskpane.js"></script>
</body>

</html>
Spécifier le style CSS pour le volet de tâches
Dans le projet que vous avez créé, le style CSS du volet de tâches est spécifié dans le fichier ./src/taskpane/taskpane.css. Ouvrez ce fichier et remplacez l’intégralité de son contenu par le code suivant.
html, body {
  width: 100%;
  height: 100%;
  margin: 0;
  padding: 0;
  overflow: auto;
}

body {
  position: relative;
  font-size: 16px;
}

main {
  height: 100%;
  overflow-y: auto;
}

footer {
  width: 100%;
  position: relative;
  bottom: 0;
  margin-top: 10px;
}

p, h1, h2, h3, h4, h5, h6 {
  margin: 0;
  padding: 0;
}

ul {
  padding: 0;
}

#settings-prompt {
  margin: 10px 0;
}

#error-display {
  padding: 10px;
}

#insert-button {
  margin: 0 10px;
}

.clearfix {
  display: block;
  clear: both;
  height: 0;
}

.pointerCursor {
  cursor: pointer;
}

.invisible {
  visibility: hidden;
}

.undisplayed {
  display: none;
}

.ms-Icon.enlarge {
  position: relative;
  font-size: 20px;
  top: 4px;
}

.ms-ListItem-secondaryText,
.ms-ListItem-tertiaryText {
  padding-left: 15px;
}

.ms-landing-page {
  display: -webkit-flex;
  display: flex;
  -webkit-flex-direction: column;
  flex-direction: column;
  -webkit-flex-wrap: nowrap;
  flex-wrap: nowrap;
  height: 100%;
}

.ms-landing-page__main {
  display: -webkit-flex;
  display: flex;
  -webkit-flex-direction: column;
  flex-direction: column;
  -webkit-flex-wrap: nowrap;
  flex-wrap: nowrap;
  -webkit-flex: 1 1 0;
  flex: 1 1 0;
  height: 100%;
}

.ms-landing-page__content {
  display: -webkit-flex;
  display: flex;
  -webkit-flex-direction: column;
  flex-direction: column;
  -webkit-flex-wrap: nowrap;
  flex-wrap: nowrap;
  height: 100%;
  -webkit-flex: 1 1 0;
  flex: 1 1 0;
  padding: 20px;
}

.ms-landing-page__content h2 {
  margin-bottom: 20px;
}

.ms-landing-page__footer {
  display: -webkit-inline-flex;
  display: inline-flex;
  -webkit-justify-content: center;
  justify-content: center;
  -webkit-align-items: center;
  align-items: center;
}

.ms-landing-page__footer--left {
  transition: background ease 0.1s, color ease 0.1s;
  display: -webkit-inline-flex;
  display: inline-flex;
  -webkit-justify-content: flex-start;
  justify-content: flex-start;
  -webkit-align-items: center;
  align-items: center;
  -webkit-flex: 1 0 0px;
  flex: 1 0 0px;
  padding: 20px;
}

.ms-landing-page__footer--left:active {
  cursor: default;
}

.ms-landing-page__footer--left--disabled {
  opacity: 0.6;
  pointer-events: none;
  cursor: not-allowed;
}

.ms-landing-page__footer--left--disabled:active,
.ms-landing-page__footer--left--disabled:hover {
  background: transparent;
}

.ms-landing-page__footer--left img {
  width: 40px;
  height: 40px;
}

.ms-landing-page__footer--left h1 {
  -webkit-flex: 1 0 0px;
  flex: 1 0 0px;
  margin-left: 15px;
  text-align: left;
  width: auto;
  max-width: auto;
  overflow: hidden;
  white-space: nowrap;
  text-overflow: ellipsis;
}

.ms-landing-page__footer--right {
  transition: background ease 0.1s, color ease 0.1s;
  padding: 29px 20px;
}

.ms-landing-page__footer--right:active,
.ms-landing-page__footer--right:hover {
  background: #005ca4;
  cursor: pointer;
}

.ms-landing-page__footer--right:active {
  background: #005ca4;
}

.ms-landing-page__footer--right--disabled {
  opacity: 0.6;
  pointer-events: none;
  cursor: not-allowed;
}

.ms-landing-page__footer--right--disabled:active,
.ms-landing-page__footer--right--disabled:hover {
  background: transparent;
}
Spécifier le code JavaScript pour le volet de tâches
Dans le projet que vous avez créé, le code JavaScript du volet de tâches est spécifié dans le fichier ./src/taskpane/taskpane.js. Ouvrez ce fichier et remplacez l’intégralité de son contenu par le code suivant.
(function(){
  'use strict';

  let config;
  let settingsDialog;

  Office.initialize = function(reason){

    jQuery(document).ready(function(){

      config = getConfig();

      // Check if add-in is configured.
      if (config && config.gitHubUserName) {
        // If configured, load the gist list.
        loadGists(config.gitHubUserName);
      } else {
        // Not configured yet.
        $('#not-configured').show();
      }

      // When insert button is selected, build the content
      // and insert into the body.
      $('#insert-button').on('click', function(){
        const gistId = $('.ms-ListItem.is-selected').val();
        getGist(gistId, function(gist, error) {
          if (gist) {
            buildBodyContent(gist, function (content, error) {
              if (content) {
                Office.context.mailbox.item.body.setSelectedDataAsync(content,
                  {coercionType: Office.CoercionType.Html}, function(result) {
                    if (result.status === Office.AsyncResultStatus.Failed) {
                      showError('Could not insert gist: ' + result.error.message);
                    }
                });
              } else {
                showError('Could not create insertable content: ' + error);
              }
            });
          } else {
            showError('Could not retrieve gist: ' + error);
          }
        });
      });

      // When the settings icon is selected, open the settings dialog.
      $('#settings-icon').on('click', function(){
        // Display settings dialog.
        let url = new URI('../src/settings/dialog.html').absoluteTo(window.location).toString();
        if (config) {
          // If the add-in has already been configured, pass the existing values
          // to the dialog.
          url = url + '?gitHubUserName=' + config.gitHubUserName + '&defaultGistId=' + config.defaultGistId;
        }

        const dialogOptions = { width: 20, height: 40, displayInIframe: true };

        Office.context.ui.displayDialogAsync(url, dialogOptions, function(result) {
          settingsDialog = result.value;
          settingsDialog.addEventHandler(Microsoft.Office.WebExtension.EventType.DialogMessageReceived, receiveMessage);
          settingsDialog.addEventHandler(Microsoft.Office.WebExtension.EventType.DialogEventReceived, dialogClosed);
        });
      })
    });
  };

  function loadGists(user) {
    $('#error-display').hide();
    $('#not-configured').hide();
    $('#gist-list-container').show();

    getUserGists(user, function(gists, error) {
      if (error) {

      } else {
        $('#gist-list').empty();
        buildGistList($('#gist-list'), gists, onGistSelected);
      }
    });
  }

  function onGistSelected() {
    $('#insert-button').removeAttr('disabled');
    $('.ms-ListItem').removeClass('is-selected').removeAttr('checked');
    $(this).children('.ms-ListItem').addClass('is-selected').attr('checked', 'checked');
  }

  function showError(error) {
    $('#not-configured').hide();
    $('#gist-list-container').hide();
    $('#error-display').text(error);
    $('#error-display').show();
  }

  function receiveMessage(message) {
    config = JSON.parse(message.message);
    setConfig(config, function(result) {
      settingsDialog.close();
      settingsDialog = null;
      loadGists(config.gitHubUserName);
    });
  }

  function dialogClosed(message) {
    settingsDialog = null;
  }
})();
Tester le bouton
Enregistrez toutes vos modifications. Si le serveur n’est pas déjà en cours d’exécution, exécutez npm start à partir de l’invite de commandes, puis effectuez les étapes suivantes pour tester le bouton Insérer gist.
- Ouvrez Outlook et rédigez un nouveau message.
- Dans la fenêtre composer un message, sélectionnez le boutonInsérer gist. Vous devriez voir un volet des tâches qui s’ouvre à droite du formulaire Composer.
- Dans le volet des tâches, sélectionnez le gistHello World Html, puis sélectionnez insérer pour insérer ce gist dans le corps du message.
Synthèse
Les volets des tâches sont utiles dans les compléments Outlook lorsque vous voulez présenter plusieurs choix à l’utilisateur ou implémenter une interface utilisateur. Dans cet exercice, vous avez ajouté une expérience de volet des tâches à votre complément Outlook existant.