Nóta
Teastaíonn údarú chun rochtain a fháil ar an leathanach seo. Is féidir leat triail a bhaint as shíniú isteach nó eolairí a athrú.
Teastaíonn údarú chun rochtain a fháil ar an leathanach seo. Is féidir leat triail a bhaint as eolairí a athrú.
Important
Azure Cosmos DB for PostgreSQL is no longer supported for new projects. Don't use this service for new projects. Instead, use one of these two services:
Use Azure Cosmos DB for NoSQL for a distributed database solution designed for high-scale scenarios with a 99.999% availability service level agreement (SLA), instant autoscale, and automatic failover across multiple regions.
Use the Elastic Clusters feature of Azure Database For PostgreSQL for sharded PostgreSQL using the open-source Citus extension.
In this tutorial, you use Azure Cosmos DB for PostgreSQL to learn how to:
- Create a cluster
- Use psql utility to create a schema
- Shard tables across nodes
- Generate sample data
- Perform rollups
- Query raw and aggregated data
- Expire data
Prerequisites
If you don't have an Azure subscription, create a free account before you begin.
Create a cluster
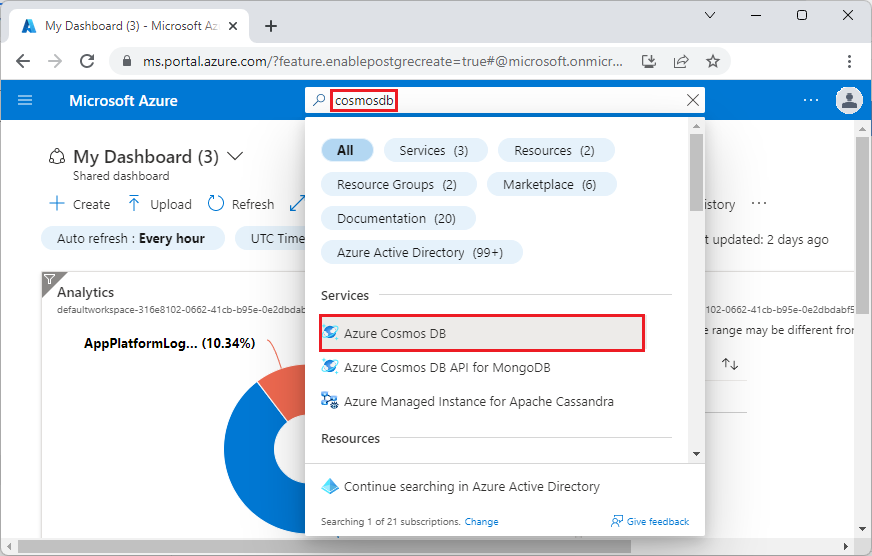
Sign in to the Azure portal and follow these steps to create an Azure Cosmos DB for PostgreSQL cluster:
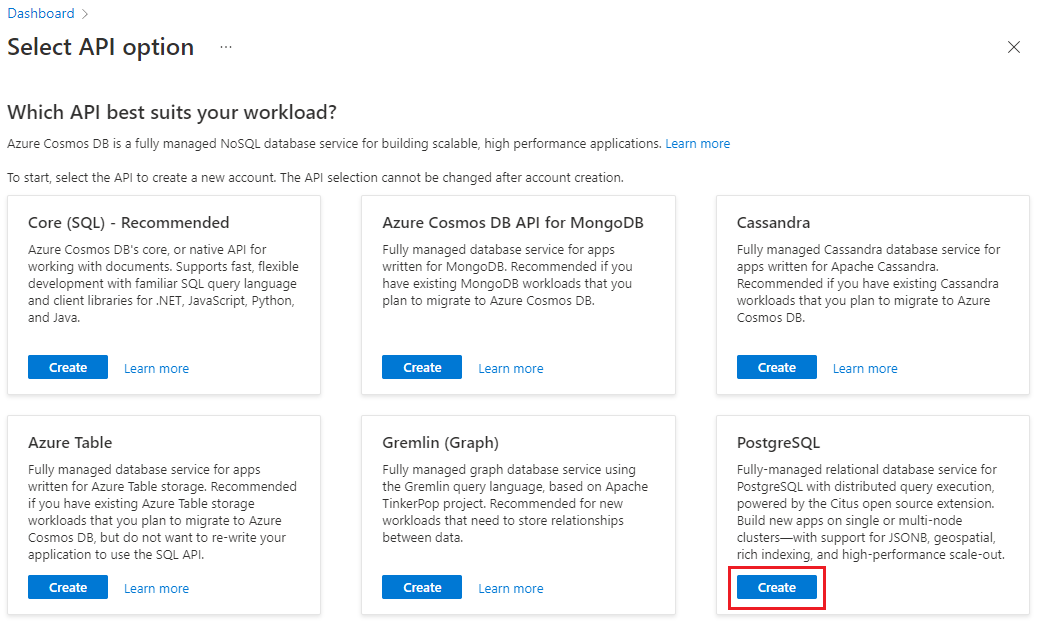
Go to Create an Azure Cosmos DB for PostgreSQL cluster in the Azure portal.
On the Create an Azure Cosmos DB for PostgreSQL cluster form:
Fill out the information on the Basics tab.

Most options are self-explanatory, but keep in mind:
- The cluster name determines the DNS name your applications use to connect, in the form
<node-qualifier>-<clustername>.<uniqueID>.postgres.cosmos.azure.com. - You can choose a major PostgreSQL version such as 15. Azure Cosmos DB for PostgreSQL always supports the latest Citus version for the selected major Postgres version.
- The admin username must be the value
citus. - You can leave database name at its default value 'citus' or define your only database name. You can't rename database after cluster provisioning.
- The cluster name determines the DNS name your applications use to connect, in the form
Select Next : Networking at the bottom of the screen.
On the Networking screen, select Allow public access from Azure services and resources within Azure to this cluster.

Select Review + create, and when validation passes, select Create to create the cluster.
Provisioning takes a few minutes. The page redirects to monitor deployment. When the status changes from Deployment is in progress to Your deployment is complete, select Go to resource.
Use psql utility to create a schema
Once connected to the Azure Cosmos DB for PostgreSQL using psql, you can complete some basic tasks. This tutorial walks you through ingesting traffic data from web analytics, then rolling up the data to provide real-time dashboards based on that data.
Let's create a table that will consume all of our raw web traffic data. Run the following commands in the psql terminal:
CREATE TABLE http_request (
  site_id INT,
  ingest_time TIMESTAMPTZ DEFAULT now(),

  url TEXT,
  request_country TEXT,
  ip_address TEXT,

  status_code INT,
  response_time_msec INT
);
We're also going to create a table that will hold our per-minute aggregates, and a table that maintains the position of our last rollup. Run the following commands in psql as well:
CREATE TABLE http_request_1min (
  site_id INT,
  ingest_time TIMESTAMPTZ, -- which minute this row represents

  error_count INT,
  success_count INT,
  request_count INT,
  average_response_time_msec INT,
  CHECK (request_count = error_count + success_count),
  CHECK (ingest_time = date_trunc('minute', ingest_time))
);

CREATE INDEX http_request_1min_idx ON http_request_1min (site_id, ingest_time);

CREATE TABLE latest_rollup (
  minute timestamptz PRIMARY KEY,

  CHECK (minute = date_trunc('minute', minute))
);
You can see the newly created tables in the list of tables now with this psql command:
\dt
Shard tables across nodes
A Azure Cosmos DB for PostgreSQL deployment stores table rows on different nodes based on the value of a user-designated column. This "distribution column" marks how data is sharded across nodes.
Let's set the distribution column to be site_id, the shard key. In psql, run these functions:
SELECT create_distributed_table('http_request',      'site_id');
SELECT create_distributed_table('http_request_1min', 'site_id');
Important
Distributing tables or using schema-based sharding is necessary to take advantage of Azure Cosmos DB for PostgreSQL performance features. If you don't distribute tables or schemas then worker nodes can't help run queries involving their data.
Generate sample data
Now our cluster should be ready to ingest some data. We can run the
following locally from our psql connection to continuously insert data.
DO $$
  BEGIN LOOP
    INSERT INTO http_request (
      site_id, ingest_time, url, request_country,
      ip_address, status_code, response_time_msec
    ) VALUES (
      trunc(random()*32), clock_timestamp(),
      concat('http://example.com/', md5(random()::text)),
      ('{China,India,USA,Indonesia}'::text[])[ceil(random()*4)],
      concat(
        trunc(random()*250 + 2), '.',
        trunc(random()*250 + 2), '.',
        trunc(random()*250 + 2), '.',
        trunc(random()*250 + 2)
      )::inet,
      ('{200,404}'::int[])[ceil(random()*2)],
      5+trunc(random()*150)
    );
    COMMIT;
    PERFORM pg_sleep(random() * 0.25);
  END LOOP;
END $$;
The query inserts approximately eight rows every second. The rows are stored on different worker nodes as directed by the distribution column, site_id.
Note
Leave the data generation query running, and open a second psql connection for the remaining commands in this tutorial.
Query
Azure Cosmos DB for PostgreSQL allows multiple nodes to process queries in parallel for speed. For instance, the database calculates aggregates like SUM and COUNT on worker nodes, and combines the results into a final answer.
Here's a query to count web requests per minute along with a few statistics. Try running it in psql and observe the results.
SELECT
  site_id,
  date_trunc('minute', ingest_time) as minute,
  COUNT(1) AS request_count,
  SUM(CASE WHEN (status_code between 200 and 299) THEN 1 ELSE 0 END) as success_count,
  SUM(CASE WHEN (status_code between 200 and 299) THEN 0 ELSE 1 END) as error_count,
  SUM(response_time_msec) / COUNT(1) AS average_response_time_msec
FROM http_request
WHERE date_trunc('minute', ingest_time) > now() - '5 minutes'::interval
GROUP BY site_id, minute
ORDER BY minute ASC;
Rolling up data
The previous query works fine in the early stages, but its performance degrades as your data scales. Even with distributed processing, it's faster to pre-compute the data than to recalculate it repeatedly.
We can ensure our dashboard stays fast by regularly rolling up the raw data into an aggregate table. You can experiment with the aggregation duration. We used a per-minute aggregation table, but you could break data into 5, 15, or 60 minutes instead.
To run this roll-up more easily, we're going to put it into a plpgsql function. Run these commands in psql to create the rollup_http_request function.
-- initialize to a time long ago
INSERT INTO latest_rollup VALUES ('10-10-1901');

-- function to do the rollup
CREATE OR REPLACE FUNCTION rollup_http_request() RETURNS void AS $$
DECLARE
  curr_rollup_time timestamptz := date_trunc('minute', now());
  last_rollup_time timestamptz := minute from latest_rollup;
BEGIN
  INSERT INTO http_request_1min (
    site_id, ingest_time, request_count,
    success_count, error_count, average_response_time_msec
  ) SELECT
    site_id,
    date_trunc('minute', ingest_time),
    COUNT(1) as request_count,
    SUM(CASE WHEN (status_code between 200 and 299) THEN 1 ELSE 0 END) as success_count,
    SUM(CASE WHEN (status_code between 200 and 299) THEN 0 ELSE 1 END) as error_count,
    SUM(response_time_msec) / COUNT(1) AS average_response_time_msec
  FROM http_request
  -- roll up only data new since last_rollup_time
  WHERE date_trunc('minute', ingest_time) <@
          tstzrange(last_rollup_time, curr_rollup_time, '(]')
  GROUP BY 1, 2;

  -- update the value in latest_rollup so that next time we run the
  -- rollup it will operate on data newer than curr_rollup_time
  UPDATE latest_rollup SET minute = curr_rollup_time;
END;
$$ LANGUAGE plpgsql;
With our function in place, execute it to roll up the data:
SELECT rollup_http_request();
And with our data in a pre-aggregated form we can query the rollup table to get the same report as earlier. Run the following query:
SELECT site_id, ingest_time as minute, request_count,
       success_count, error_count, average_response_time_msec
  FROM http_request_1min
 WHERE ingest_time > date_trunc('minute', now()) - '5 minutes'::interval;
Expiring old data
The rollups make queries faster, but we still need to expire old data to avoid unbounded storage costs. Decide how long you’d like to keep data for each granularity, and use standard queries to delete expired data. In the following example, we decided to keep raw data for one day, and per-minute aggregations for one month:
DELETE FROM http_request WHERE ingest_time < now() - interval '1 day';
DELETE FROM http_request_1min WHERE ingest_time < now() - interval '1 month';
In production, you could wrap these queries in a function and call it every minute in a cron job.
Clean up resources
In the preceding steps, you created Azure resources in a cluster. If you don't expect to need these resources in the future, delete the cluster. Press the Delete button in the Overview page for your cluster. When prompted on a pop-up page, confirm the name of the cluster and click the final Delete button.
Next steps
In this tutorial, you learned how to provision a cluster. You connected to it with psql, created a schema, and distributed data. You learned to query data in the raw form, regularly aggregate that data, query the aggregated tables, and expire old data.
- Learn about cluster node types
- Determine the best initial size for your cluster


