Configure Microsoft Defender for Endpoint on Android risk signals using App Protection Policies (MAM)
Applies to:
- Microsoft Defender for Endpoint Plan 1
- Microsoft Defender for Endpoint Plan 2
- Microsoft Defender XDR
Microsoft Defender for Endpoint on Android, which already protects enterprise users on Mobile Device Management (MDM) scenarios, now extends support to Mobile App Management (MAM), for devices that aren't enrolled using Intune mobile device management (MDM). It also extends this support to customers who use other enterprise mobility management solutions, while still using Intune for mobile application management (MAM). This capability allows you to manage and protect your organization's data within an application.
Microsoft Defender for Endpoint on Android threat information is applied by Intune App Protection Policies to protect these apps. App protection policies (APP) are rules that ensure an organization's data remains safe or contained in a managed app. A managed application has app protection policies applied to it and can be managed by Intune.
Microsoft Defender for Endpoint on Android supports both the configurations of MAM.
- Intune MDM + MAM: IT administrators can only manage apps using App Protection Policies on devices that are enrolled with Intune mobile device management (MDM).
- MAM without device enrollment: MAM without device enrollment, or MAM-WE, allows IT administrators to manage apps using App Protection Policies on devices not enrolled with Intune MDM. This provision means that apps can be managed by Intune on devices enrolled with third-party EMM providers. To manage apps in both these configurations customers should use Intune in the Microsoft Intune admin center.
To enable this capability an administrator needs to configure the connection between Microsoft Defender for Endpoint and Intune, create the app protection policy, and apply the policy on targeted devices and applications.
End users also need to take steps to install Microsoft Defender for Endpoint on their device and activate the onboarding flow.
Admin prerequisites
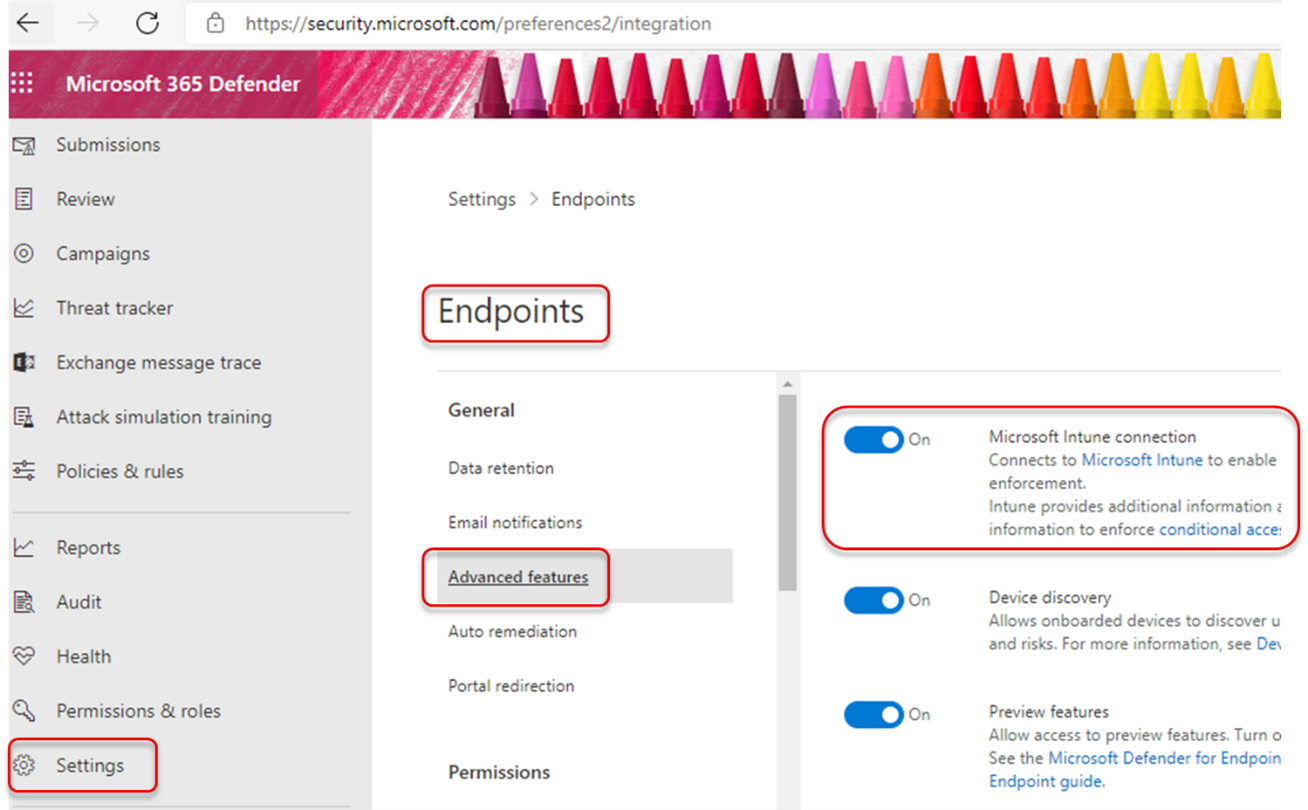
Validate that the Microsoft Defender for Endpoint-Intune connector is enabled.
Go to security.microsoft.com.
Select Settings > Endpoints > Advanced Features > Microsoft Intune Connection is turned on.
If the connection isn't turned on, select the toggle to turn it on and then select Save Preferences.
Go to the Microsoft Intune admin center and Validate whether Microsoft Defender for Endpoint-Intune connector is enabled.
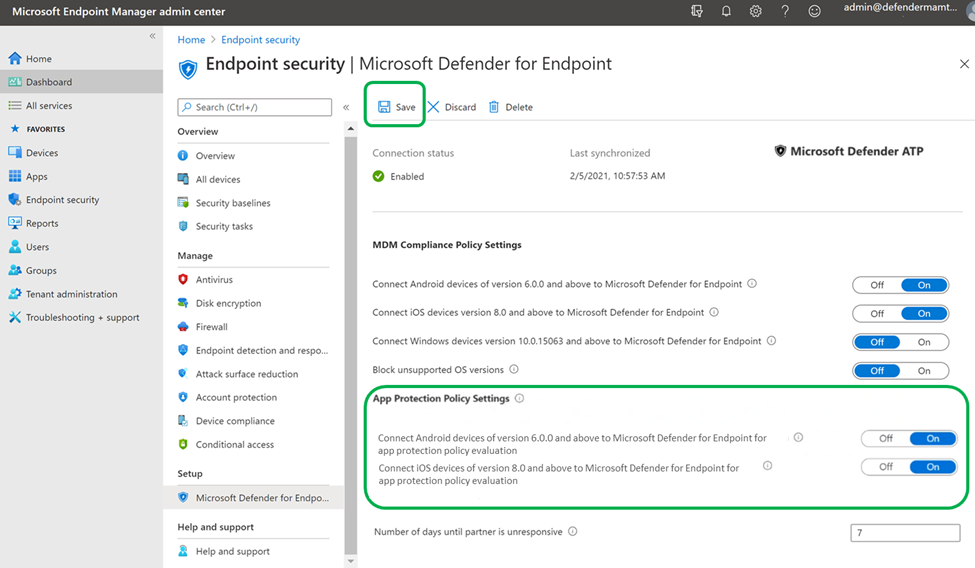
Enable Microsoft Defender for Endpoint on Android Connector for App Protection Policy (APP).
Configure the connector on Microsoft Intune for App protection policies:
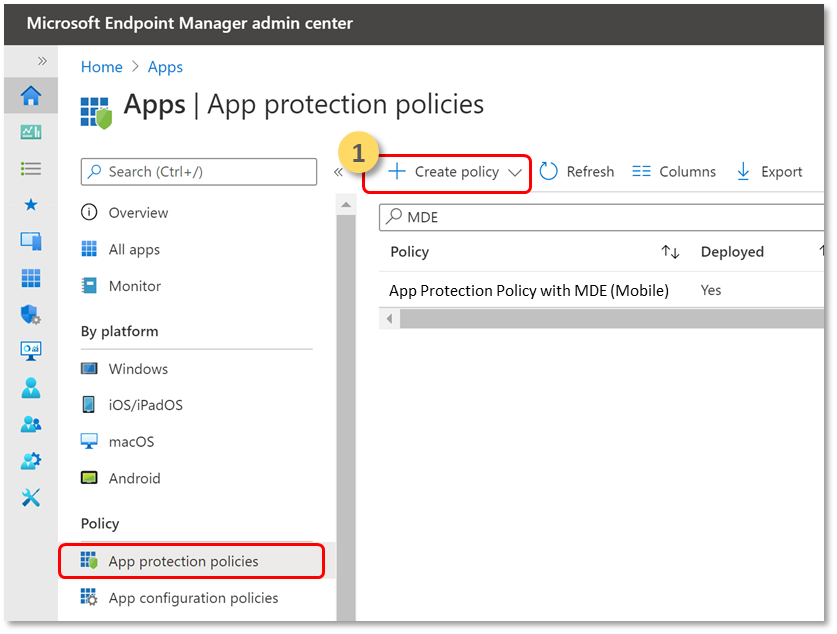
Create an app protection policy.
Block access or wipe data of a managed app based on Microsoft Defender for Endpoint risk signals by creating an app protection policy.
Microsoft Defender for Endpoint can be configured to send threat signals to be used in app protection policies (APP, also known as MAM). With this capability, you can use Microsoft Defender for Endpoint to protect managed apps.
Create a policy.
App protection policies (APP) are rules that ensure an organization's data remains safe or contained in a managed app. A policy can be a rule that is enforced when the user attempts to access or move "corporate" data, or a set of actions that are prohibited or monitored when the user is inside the app.
Add apps.
Choose how you want to apply this policy to apps on different devices. Then add at least one app.
Use this option to specify whether this policy applies to unmanaged devices. In Android, you can specify the policy applies to Android Enterprise, Device Admin, or Unmanaged devices. You can also choose to target your policy to apps on devices of any management state.
Because mobile app management doesn't require device management, you can protect company data on both managed and unmanaged devices. The management is centered on the user identity, which removes the requirement for device management. Companies can use app protection policies with or without MDM at the same time. For example, consider an employee that uses both a phone issued by the company, and their own personal tablet. The company phone is enrolled in MDM and protected by app protection policies while the personal device is protected by app protection policies only.
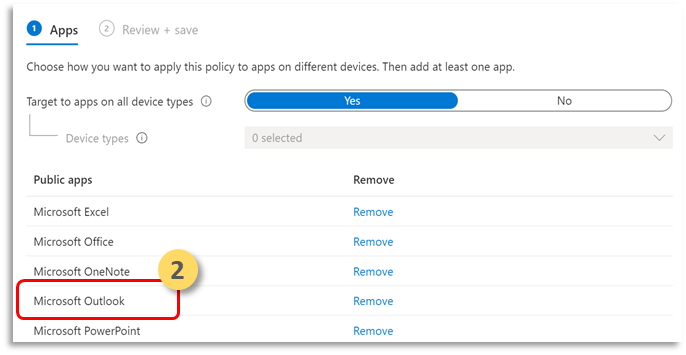
Select Apps.
A managed app is an app that has app protection policies applied to it, and can be managed by Intune. Any app that has been integrated with the Intune SDK or wrapped by the Intune App Wrapping Tool can be managed using Intune app protection Policies. See the official list of Microsoft Intune protected apps that have been built using these tools and are available for public use.
Example: Outlook as a managed app
Set sign-in security requirements for your protection policy.
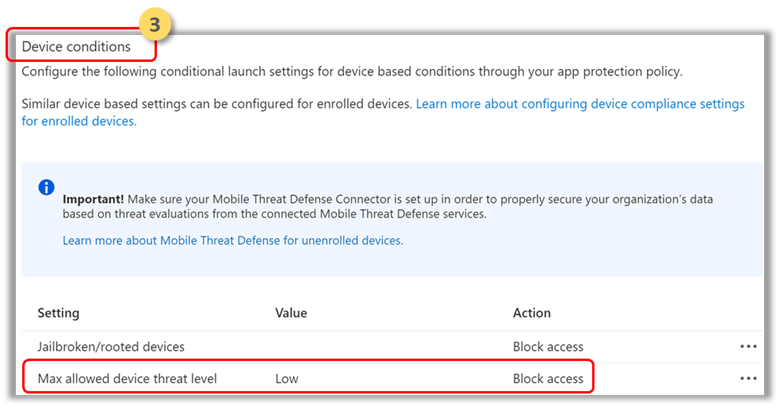
Select Setting > Max allowed device threat level in Device Conditions and enter a value. Then select Action: "Block Access". Microsoft Defender for Endpoint on Android shares this Device Threat Level.
Assign user groups for whom the policy needs to be applied.
Select Included groups. Then add the relevant groups.
Note
If a config policy is to be targeted at unenrolled devices (MAM), the recommendation is to deploy the general app configuration settings in Managed Apps instead of using Managed Devices.
When deploying app configuration policies to devices, issues can occur when multiple policies have different values for the same configuration key and are targeted for the same app and user. These issues are due to the lack of a conflict resolution mechanism for resolving the differing values. You can prevent these issues by ensuring that only a single app configuration policy for devices is defined and targeted for the same app and user.
End-user prerequisites
The broker app must be installed.
- Intune Company Portal
Users have the required licenses for the managed app and have the app installed.
End-user onboarding
Sign in to a managed application, for example, Outlook. The device is registered and the application protection policy is synchronized to the device. The application protection policy recognizes the device's health state.
Select Continue. A screen is presented which recommends downloading and setting up of the Microsoft Defender: Antivirus (Mobile) app.
Select Download. You'll be redirected to the app store (Google play).
Install the Microsoft Defender: Antivirus (Mobile) app and go back to the managed app onboarding screen.
Click Continue > Launch. The Microsoft Defender for Endpoint app onboarding/activation flow is initiated. Follow the steps to complete onboarding. You'll automatically be redirected back to Managed app onboarding screen, which now indicates that the device is healthy.
Select Continue to log into the managed application.
Configure Web protection
Defender for Endpoint on Android allows IT Administrators to configure web protection. Web protection is available within the Microsoft Intune admin center.
Web protection helps to secure devices against web threats and protect users from phishing attacks. Note that anti-phishing and custom indicators (URL and IP addresses) are supported as part of web protection. Web content filtering is currently not supported on mobile platforms.
In the Microsoft Intune admin center, go to Apps > App configuration policies > Add > Managed apps.
Give the policy a name.
Under Select Public Apps, choose Microsoft Defender for Endpoint as the target app.
In the Settings page, under the General Configuration Settings, add the following keys and set their value as required.
- antiphishing
- vpn
To disable web protection, enter 0 for the antiphishing and VPN values.
To disable only the use of VPN by web protection, enter these values:
- 0 for vpn
- 1 for antiphishing
Add DefenderMAMConfigs key and set the value as 1.
Assign this policy to users. By default, this value is set to false.
Review and create the policy.
Configure Network Protection
In Microsoft Intune admin center, navigate to Apps > App configuration policies. Create a new App configuration policy. Click Managed Apps.
Provide a name and description to uniquely identify the policy. Target the policy to 'Selected apps' and search for 'Microsoft Defender Endpoint for Android'. Click the entry and then click Select and then Next.
Add the key and value from the following table. Ensure that the "DefenderMAMConfigs" key is present in every policy that you create using Managed Apps route. For Managed Devices route, this key shouldn't exist. When you're done, click Next.
Key Value Type Default (1-enable, 0-disable) Description DefenderNetworkProtectionEnableInteger 1 1 - Enable, 0 - Disable; This setting is used by IT admins to enable or disable the network protection capabilities in the defender app. DefenderAllowlistedCACertificatesString None None-Disable; This setting is used by IT admins to establish trust for root CA and self-signed certificates. DefenderCertificateDetectionInteger 0 2-Enable, 1 - Audit mode, 0 - Disable; When this feature is enabled with value as 2, end user notifications are sent to the user when Defender detects a bad certificate. Alerts are also sent to SOC Admins. In audit mode (1), notification alerts are sent to SOC admins, but no end user notifications are displayed to the user when Defender detects a bad certificate. Admins can disable this detection with 0 as the value and enable full feature functionality by setting 2 as the value. DefenderOpenNetworkDetectionInteger 2 2-Enable, 1 - Audit mode, 0 - Disable; This setting is used by IT Admins to enable or disable open network detection. If switched to audit mode with value 1, notification alert is sent to SOC admin, but no end user notification is displayed to the user when defender detects an open network. If it's enabled with value 2, then end user notification is displayed and also alerts to SOC admins is sent. DefenderEndUserTrustFlowEnableInteger 0 1 - Enable, 0 - Disable; This setting is used by IT admins to enable or disable the end user in-app experience to trust and untrust the unsecure and suspicious networks. DefenderNetworkProtectionAutoRemediationInteger 1 1 - Enable, 0 - Disable; This setting is used by IT admins to enable or disable the remediation alerts that are sent when a user performs remediation activities like switching to safer Wi-Fi access points or deleting suspicious certificates detected by Defender. DefenderNetworkProtectionPrivacyInteger 1 1 - Enable, 0 - Disable; This setting is used by IT admins to enable or disable privacy in network protection. If privacy is disabled with value 0, then user consent is shown to share the malicious wifi or certs data. If its in enabled state with value 1, then no user consent is shown and no app data is collected. Include or exclude the groups you want the policy to apply to. Proceed to review and submit the policy.
Note
- The other config keys of Network Protection will only work if the parent key 'DefenderNetworkProtectionEnable' is enabled.
- Users need to enable location permission (which is an optional permission) and need to grant "Allow All the Time" permission to ensure protection against Wi-Fi threat, even when the app is not actively in use. If the location permission is denied by the user, Defender for Endpoint will only be able to provide limited protection against network threats and will only protect the users from rogue certificates.
Configure privacy controls
Admins can use the following steps to enable privacy and not collect the domain name, app details and network information as part of the alert report for corresponding threats.
- In Microsoft Intune admin center, go to Apps > App configuration policies > Add > Managed apps.
- Give the policy a name.
- Under the Select Public Apps, choose Microsoft Defender for Endpoint as the target app.
- On the Settings page, under General Configuration Settings, add DefenderExcludeURLInReport and DefenderExcludeAppInReport as the keys and value as 1.
- Add DefenderMAMConfigs key and set the value as 1.
- Assign this policy to users. By default, this value is set to 0.
- In Settings page, under the General Configuration Settings add DefenderExcludeURLInReport, DefenderExcludeAppInReport as the keys and value as true.
- Add DefenderMAMConfigs key and set the value as 1.
- Assign this policy to users. By default, this value is set to false.
- Review and create the policy.
Optional permissions
Microsoft Defender for Endpoint on Android enables Optional Permissions in the onboarding flow. Currently the permissions required by MDE are mandatory in the onboarding flow. With this feature, admin can deploy MDE on Android devices with MAM policies without enforcing the mandatory VPN and Accessibility Permissions during onboarding. End Users can onboard the app without the mandatory permissions and can later review these permissions.
Configure optional permission
Use the following steps to enable Optional permissions for devices.
In Microsoft Intune admin center, go to Apps > App configuration policies > Add > Managed apps.
Give the policy a name.
Select Microsoft Defender for Endpoint in public apps.
On the Settings page, select Use configuration designer and DefenderOptionalVPN or DefenderOptionalAccessibility or both as the key.
Add DefenderMAMConfigs key and set the value as 1.
To enable Optional permissions, enter the value as 1 and assign this policy to users. By default, this value is set to 0.
For users with key set as 1, they will be able to onboard the app without giving these permissions.
In Settings page, select Use configuration designer and DefenderOptionalVPN or DefenderOptionalAccessibility or both as the key and value type as Boolean.
Add DefenderMAMConfigs key and set the value as 1.
To enable Optional permissions, enter value as true and assign this policy to users. By default, this value is set to false.
For users with key set as true, the users are able to onboard the app without giving these permissions.
Select Next and assign this profile to targeted devices/users.
User flow
Users can install and open the app to start the onboarding process.
If an admin has setup Optional permissions, then users can choose to skip the VPN or accessibility permission or both and complete onboarding.
Even if the user has skipped these permissions, the device is able to onboard, and a heartbeat will be sent.
Since permissions are disabled, Web protection won't be active. It will be partially active if one of the permissions is given.
Later, users can enable Web protection from within the app. This will install the VPN configuration on the device.
Note
The Optional permissions setting is different from the Disable Web protection setting. Optional permissions only help to skip the permissions during onboarding but it's available for the end user to later review and enable while Disable Web protection allows users to onboard the Microsoft Defender for Endpoint app without the Web Protection. It cannot be enabled later.
Disable sign out
Defender for Endpoint allows you to deploy the app and disabling the sign out button. By hiding the sign out button, users are prevented from signing out of the Defender app. This action helps prevent tampering with the device when Defender for Endpoint isn't running.
Use the following steps to configure the Disable sign out:
In the Microsoft Intune admin center, go to Apps > App configuration policies > Add > Managed apps.
Provide the policy a name.
Under Select Public Apps, choose Microsoft Defender for Endpoint as the target app.
In the Settings page, under the General Configuration Settings, add DisableSignOut as the key and set the value as 1.
- By default, Disable Sign Out = 0.
- Admin needs to make Disable Sign Out = 1 to disable the sign-out button in the app. Users will not see the sign out button once the policy is pushed to the device.
Select Next and assign this profile to targeted devices and users.
Device Tagging
Defender for Endpoint on Android enables bulk tagging the mobile devices during onboarding by allowing the admins to set up tags via Intune. Admin can configure the device tags through Intune via configuration policies and push them to user's devices. Once the User installs and activates Defender, the client app passes the device tags to the Security Portal. The Device tags appear against the devices in the Device Inventory.
Use the following steps to configure the Device tags:
In the Microsoft Intune admin center, go to Apps > App configuration policies > Add > Managed apps.
Provide the policy a name.
Under Select Public Apps, choose Microsoft Defender for Endpoint as the target app.
In Settings page, select Use configuration designer and add DefenderDeviceTag as the key and value type as String.
- Admin can assign a new tag by adding the key DefenderDeviceTag and setting a value for device tag.
- Admin can edit an existing tag by modifying the value of the key DefenderDeviceTag.
- Admin can delete an existing tag by removing the key DefenderDeviceTag.
Click Next and assign this policy to targeted devices and users.
Note
The Defender app needs to be opened for tags to be synced with Intune and passed to Security Portal. It may take up to 18 hours for tags to reflect in the portal.
Related topics
Tip
Do you want to learn more? Engage with the Microsoft Security community in our Tech Community: Microsoft Defender for Endpoint Tech Community.
