Configure Workday for automatic user provisioning
The objective of this tutorial is to show the steps you need to perform to provision worker profiles from Workday into on-premises Active Directory (AD).
Note
Use this tutorial, if the users you want to provision from Workday need an on-premises AD account and a Microsoft Entra account.
- If the users from Workday only need Microsoft Entra account (cloud-only users), then please refer to the tutorial on configure Workday to Microsoft Entra ID user provisioning.
- To configure writeback of attributes such as email address, username and phone number from Microsoft Entra ID to Workday, please refer to the tutorial on configure Workday writeback.
The following video provides a quick overview of the steps involved when planning your provisioning integration with Workday.
Overview
The Microsoft Entra user provisioning service integrates with the Workday Human Resources API in order to provision user accounts. The Workday user provisioning workflows supported by the Microsoft Entra user provisioning service enable automation of the following human resources and identity lifecycle management scenarios:
Hiring new employees - When a new employee is added to Workday, a user account is automatically created in Active Directory, Microsoft Entra ID, and optionally Microsoft 365 and other SaaS applications supported by Microsoft Entra ID, with write-back of IT-managed contact information to Workday.
Employee attribute and profile updates - When an employee record is updated in Workday (such as their name, title, or manager), their user account is automatically updated in Active Directory, Microsoft Entra ID, and optionally Microsoft 365 and other SaaS applications supported by Microsoft Entra ID.
Employee terminations - When an employee is terminated in Workday, their user account is automatically disabled in Active Directory, Microsoft Entra ID, and optionally Microsoft 365 and other SaaS applications supported by Microsoft Entra ID.
Employee rehires - When an employee is rehired in Workday, their old account can be automatically reactivated or re-provisioned (depending on your preference) to Active Directory, Microsoft Entra ID, and optionally Microsoft 365 and other SaaS applications supported by Microsoft Entra ID.
What's new
This section captures recent Workday integration enhancements. For a list of comprehensive updates, planned changes and archives, visit What's new in Microsoft Entra ID?
Oct 2020 - Enabled provision on demand for Workday: Using on-demand provisioning you can now test end-to-end provisioning for a specific user profile in Workday to verify your attribute mapping and expression logic.
May 2020 - Ability to writeback phone numbers to Workday: In addition to email and username, you can now writeback work phone number and mobile phone number from Microsoft Entra ID to Workday. For more details, refer to the writeback app tutorial.
April 2020 - Support for the latest version of Workday Web Services (WWS) API: Twice a year in March and September, Workday delivers feature-rich updates that help you meet your business goals and changing workforce demands. To keep up with the new features delivered by Workday, you can directly specify the WWS API version that you would like to use in the connection URL. For details on how to specify the Workday API version, refer to the section on configuring Workday connectivity.
Who is this user provisioning solution best suited for?
This Workday user provisioning solution is ideally suited for:
Organizations that desire a pre-built, cloud-based solution for Workday user provisioning
Organizations that require direct user provisioning from Workday to Active Directory, or Microsoft Entra ID
Organizations that require users to be provisioned using data obtained from the Workday HCM module (see Get_Workers)
Organizations that require joining, moving, and leaving users to sync to one or more Active Directory Forests, Domains, and OUs based only on a change detected in the Workday HCM module (see Get_Workers)
Organizations using Microsoft 365 for email
Solution architecture
This section describes the end-to-end user provisioning solution architecture for common hybrid environments. There are two related flows:
- Authoritative HR data flow – from Workday to on-premises Active Directory: In this flow, worker events such as New Hires, Transfers, Terminations first occur in the cloud Workday HR tenant and then the event data flows into on-premises Active Directory through Microsoft Entra ID and the Provisioning Agent. Depending on the event, it may lead to create/update/enable/disable operations in AD.
- Writeback flow – from on-premises Active Directory to Workday: Once the account creation is complete in Active Directory, it's synced with Microsoft Entra ID through Microsoft Entra Connect and information such as email, username and phone number can be written back to Workday.
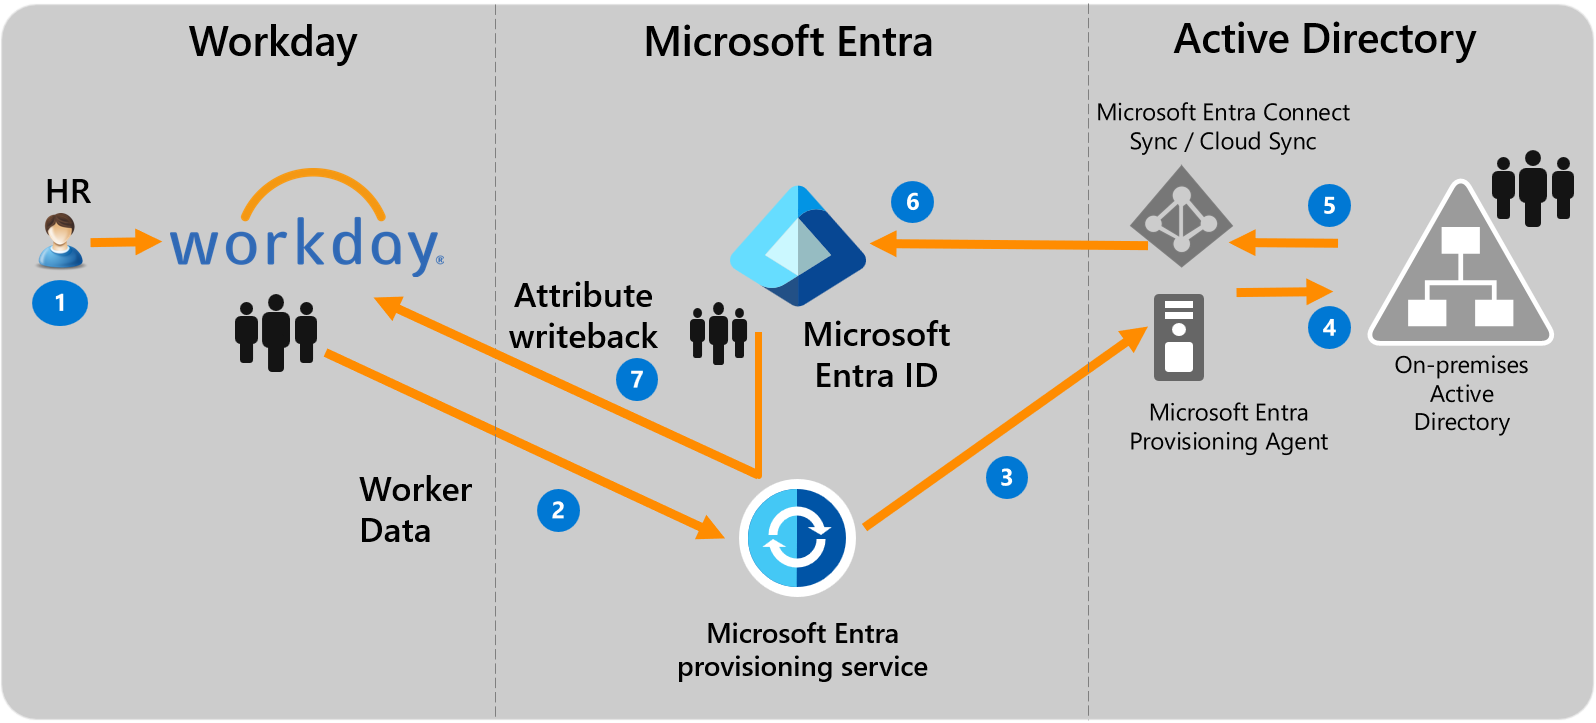
End-to-end user data flow
- The HR team performs worker transactions (Joiners/Movers/Leavers or New Hires/Transfers/Terminations) in Workday HCM
- The Microsoft Entra provisioning service runs scheduled synchronizations of identities from Workday HR and identifies changes that need to be processed for sync with on-premises Active Directory.
- The Microsoft Entra provisioning service invokes the on-premises Microsoft Entra Connect Provisioning Agent with a request payload containing AD account create/update/enable/disable operations.
- The Microsoft Entra Connect Provisioning Agent uses a service account to add/update AD account data.
- The Microsoft Entra Connect / AD Sync engine runs delta sync to pull updates in AD.
- The Active Directory updates are synced with Microsoft Entra ID.
- If the Workday Writeback app is configured, it writes back attributes such as email, username and phone number to Workday.
Planning your deployment
Configuring Workday to Active Directory user provisioning requires considerable planning covering different aspects such as:
- Setup of the Microsoft Entra Connect provisioning agent
- Number of Workday to AD user provisioning apps to deploy
- Selecting the right matching identifier, attribute mapping, transformation and scoping filters
Please refer to the cloud HR deployment plan for comprehensive guidelines and recommended best practices.
Configure integration system user in Workday
A common requirement of all the Workday provisioning connectors is that they require credentials of a Workday integration system user to connect to the Workday Human Resources API. This section describes how to create an integration system user in Workday and has the following sections:
- Creating an integration system user
- Creating an integration security group
- Configuring domain security policy permissions
- Configuring business process security policy permissions
- Activating security policy changes
Note
it's possible to bypass this procedure and instead use a Workday administrator account as the system integration account. This may work fine for demos, but isn't recommended for production deployments.
Creating an integration system user
To create an integration system user:
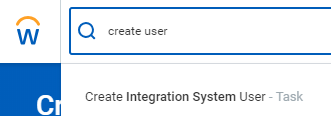
Sign in to your Workday tenant using an administrator account. In the Workday Application, enter create user in the search box, and then click Create Integration System User.
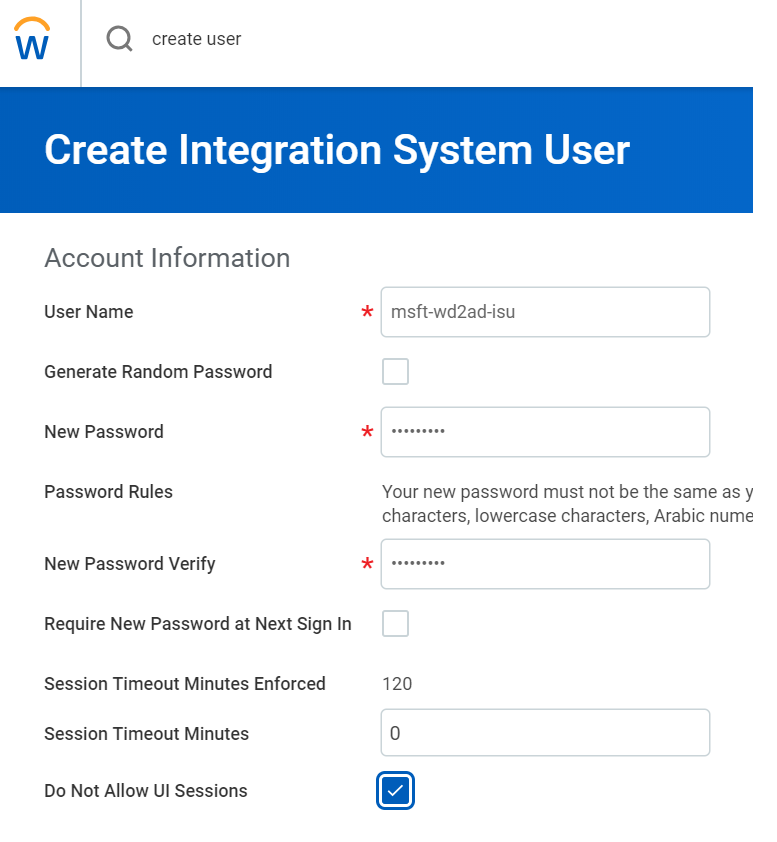
Complete the Create Integration System User task by supplying a user name and password for a new Integration System User.
- Leave the Require New Password at Next Sign In option unchecked, because this user is logging on programmatically.
- Leave the Session Timeout Minutes with its default value of 0, which prevents the user's sessions from timing out prematurely.
- Select the option Do Not Allow UI Sessions as it provides an added layer of security that prevents a user with the password of the integration system from logging into Workday.
Creating an integration security group
In this step, you'll create an unconstrained or constrained integration system security group in Workday and assign the integration system user created in the previous step to this group.
To create a security group:
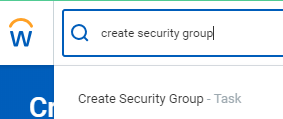
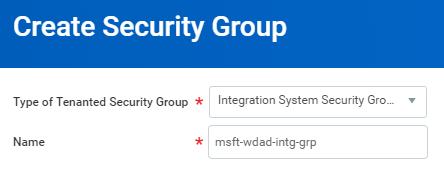
Enter create security group in the search box, and then click Create Security Group.
Complete the Create Security Group task.
There are two types of security groups in Workday:
- Unconstrained: All members of the security group can access all data instances secured by the security group.
- Constrained: All security group members have contextual access to a subset of data instances (rows) that the security group can access.
Please check with your Workday integration partner to select the appropriate security group type for the integration.
Once you know the group type, select Integration System Security Group (Unconstrained) or Integration System Security Group (Constrained) from the Type of Tenanted Security Group dropdown.
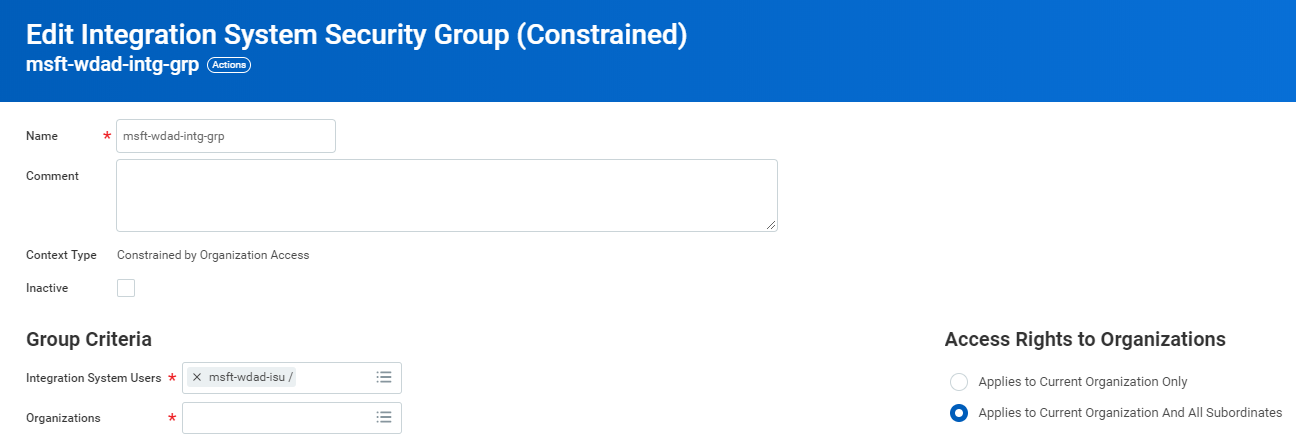
After the Security Group creation is successful, you'll see a page where you can assign members to the Security Group. Add the new integration system user created in the previous step to this security group. If you're using constrained security group, you'll need to select the appropriate organization scope.
Configuring domain security policy permissions
In this step, you'll grant domain security policy permissions for the worker data to the security group.
To configure domain security policy permissions:
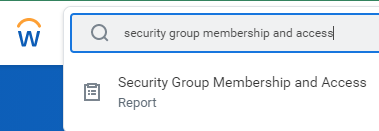
Enter Security Group Membership and Access in the search box and click on the report link.
Search and select the security group created in the previous step.

Click on the ellipsis (
...) next to the group name and from the menu, select Security Group > Maintain Domain Permissions for Security Group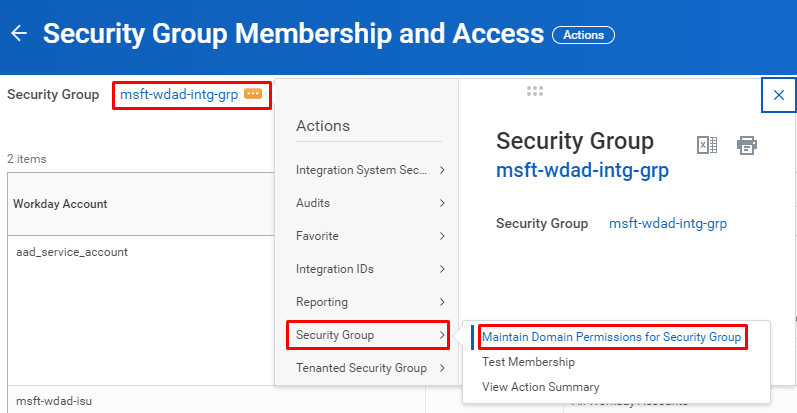
Under Integration Permissions, add the following domains to the list Domain Security Policies permitting Put access
- External Account Provisioning
- Worker Data: Public Worker Reports
- Person Data: Work Contact Information (required if you plan to writeback contact data from Microsoft Entra ID to Workday)
- Workday Accounts (required if you plan to writeback username/UPN from Microsoft Entra ID to Workday)
Under Integration Permissions, add the following domains to the list Domain Security Policies permitting Get access
- Worker Data: Workers
- Worker Data: All Positions
- Worker Data: Current Staffing Information
- Worker Data: Business Title on Worker Profile
- Worker Data: Qualified Workers (Optional - add this to retrieve worker qualification data for provisioning)
- Worker Data: Skills and Experience (Optional - add this to retrieve worker skills data for provisioning)
After completing the above steps, the permissions screen appears as shown below:
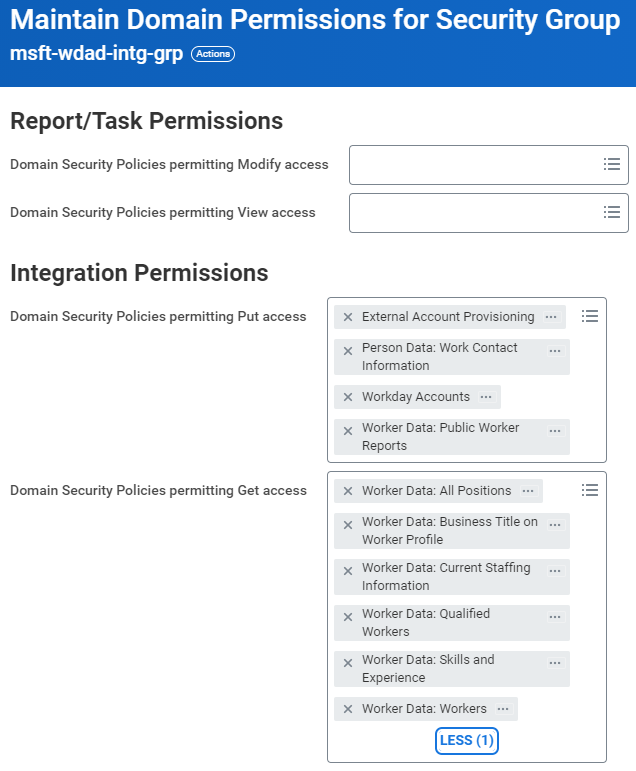
Click OK and Done on the next screen to complete the configuration.
Configuring business process security policy permissions
In this step, you'll grant "business process security" policy permissions for the worker data to the security group.
Note
This step is required only for setting up the Workday Writeback app connector.
To configure business process security policy permissions:
Enter Business Process Policy in the search box, and then click on the link Edit Business Process Security Policy task.
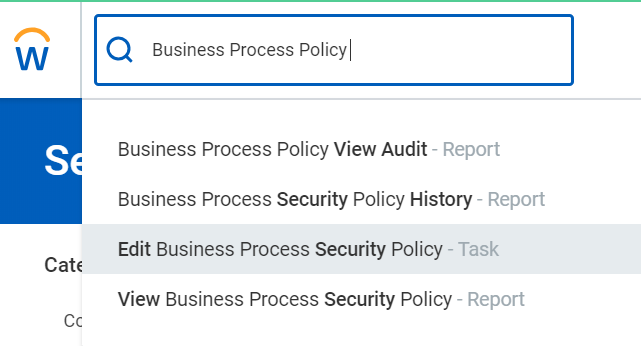
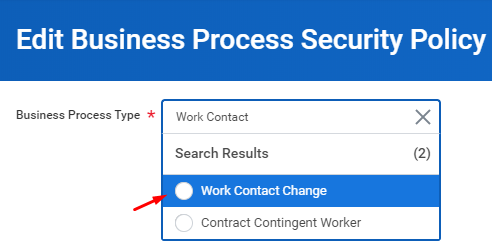
In the Business Process Type textbox, search for Contact and select Work Contact Change business process and click OK.
On the Edit Business Process Security Policy page, scroll to the Change Work Contact Information (Web Service) section.
Select and add the new integration system security group to the list of security groups that can initiate the web services request.
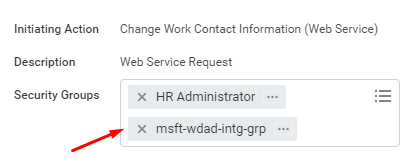
Click on Done.
Activating security policy changes
To activate security policy changes:
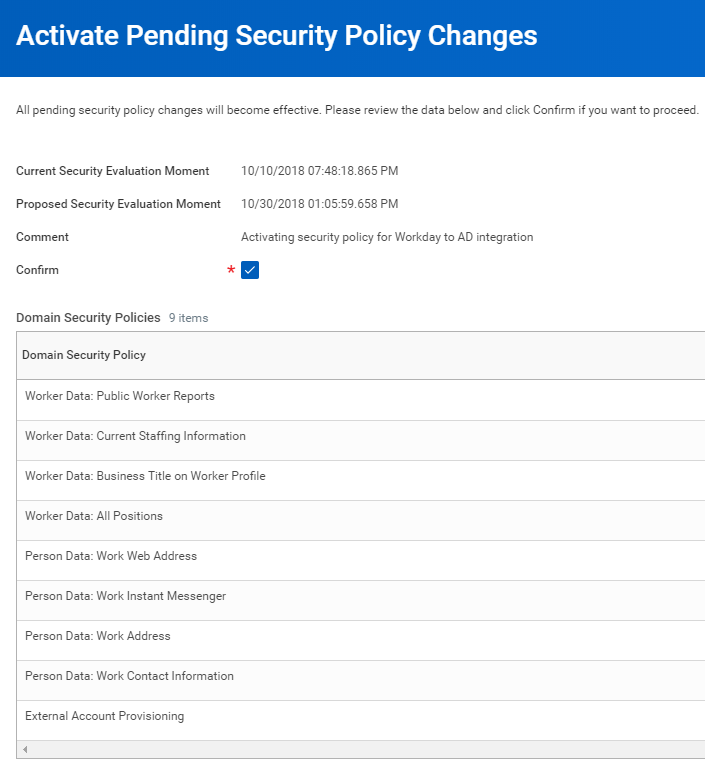
Enter activate in the search box, and then click on the link Activate Pending Security Policy Changes.

Begin the Activate Pending Security Policy Changes task by entering a comment for auditing purposes, and then click OK.
Complete the task on the next screen by checking the checkbox Confirm, and then click OK.
Provisioning Agent installation prerequisites
Review the provisioning agent installation prerequisites before proceeding to the next section.
Configuring user provisioning from Workday to Active Directory
This section provides steps for user account provisioning from Workday to each Active Directory domain within the scope of your integration.
- Add the provisioning connector app and download the Provisioning Agent
- Install and configure on-premises Provisioning Agent(s)
- Configure connectivity to Workday and Active Directory
- Configure attribute mappings
- Enable and launch user provisioning
Part 1: Add the provisioning connector app and download the Provisioning Agent
To configure Workday to Active Directory provisioning:
Sign in to the Microsoft Entra admin center as at least a Cloud Application Administrator.
Browse to Identity > Applications > Enterprise applications > New application.
Search for Workday to Active Directory User Provisioning, and add that app from the gallery.
After the app is added and the app details screen is shown, select Provisioning.
Change the Provisioning Mode to Automatic.
Click on the information banner displayed to download the Provisioning Agent.

Part 2: Install and configure on-premises Provisioning Agent(s)
To provision to Active Directory on-premises, the Provisioning agent must be installed on a domain-joined server that has network access to the desired Active Directory domain(s).
Transfer the downloaded agent installer to the server host and follow the steps listed in the Install agent section to complete the agent configuration.
Part 3: In the provisioning app, configure connectivity to Workday and Active Directory
In this step, we establish connectivity with Workday and Active Directory.
Sign in to the Microsoft Entra admin center as at least a Cloud Application Administrator.
Browse to Identity > Applications > Enterprise applications > Workday to Active Directory User Provisioning App created in Part 1.
Complete the Admin Credentials section as follows:
Workday Username – Enter the username of the Workday integration system account, with the tenant domain name appended. It should look something like: username@tenant_name
Workday password – Enter the password of the Workday integration system account
Workday Web Services API URL – Enter the URL to the Workday web services endpoint for your tenant. The URL determines the version of the Workday Web Services API used by the connector.
URL format WWS API version used XPATH changes required https://####.workday.com/ccx/service/tenantName v21.1 No https://####.workday.com/ccx/service/tenantName/Human_Resources v21.1 No https://####.workday.com/ccx/service/tenantName/Human_Resources/v##.# v##.# Yes Note
If no version information is specified in the URL, the app uses Workday Web Services (WWS) v21.1 and no changes are required to the default XPATH API expressions shipped with the app. To use a specific WWS API version, specify version number in the URL
Example:https://wd3-impl-services1.workday.com/ccx/service/contoso4/Human_Resources/v34.0
If you're using a WWS API v30.0+, before turning on the provisioning job, please update the XPATH API expressions under Attribute Mapping -> Advanced Options -> Edit attribute list for Workday referring to the section Managing your configuration and Workday attribute reference.Active Directory Forest - The "Name" of your Active Directory domain, as registered with the agent. Use the dropdown to select the target domain for provisioning. This value is typically a string like: contoso.com
Active Directory Container - Enter the container DN where the agent should create user accounts by default. Example: OU=Standard Users,OU=Users,DC=contoso,DC=test
Note
This setting only comes into play for user account creations if the parentDistinguishedName attribute isn't configured in the attribute mappings. This setting isn't used for user search or update operations. The entire domain sub tree falls in the scope of the search operation.
Notification Email – Enter your email address, and check the "send email if failure occurs" checkbox.
Note
The Microsoft Entra provisioning service sends email notification if the provisioning job goes into a quarantine state.
Click the Test Connection button. If the connection test succeeds, click the Save button at the top. If it fails, double-check that the Workday credentials and the AD credentials configured on the agent setup are valid.
Once the credentials are saved successfully, the Mappings section displays the default mapping Synchronize Workday Workers to On Premises Active Directory
Part 4: Configure attribute mappings
In this section, you configure how user data flows from Workday to Active Directory.
On the Provisioning tab under Mappings, click Synchronize Workday Workers to On Premises Active Directory.
In the Source Object Scope field, you can select which sets of users in Workday should be in scope for provisioning to AD, by defining a set of attribute-based filters. The default scope is "all users in Workday". Example filters:
Example: Scope to users with Worker IDs between 1000000 and 2000000 (excluding 2000000)
Attribute: WorkerID
Operator: REGEX Match
Value: (1[0-9][0-9][0-9][0-9][0-9][0-9])
Example: Only employees and not contingent workers
Attribute: EmployeeID
Operator: isn't NULL
Tip
When you're configuring the provisioning app for the first time, you need to test and verify your attribute mappings and expressions to make sure that it's giving you the desired result. Microsoft recommends using scoping filters under Source Object Scope and on-demand provisioning to test your mappings with a few test users from Workday. Once you have verified that the mappings work, then you can either remove the filter or gradually expand it to include more users.
Caution
The default behavior of the provisioning engine is to disable/delete users that go out of scope. This may not be desirable in your Workday to AD integration. To override this default behavior refer to the article Skip deletion of user accounts that go out of scope
In the Target Object Actions field, you can globally filter what actions are performed on Active Directory. Create and Update are most common.
In the Attribute mappings section, you can define how individual Workday attributes map to Active Directory attributes.
Click on an existing attribute mapping to update it, or click Add new mapping at the bottom of the screen to add new mappings. An individual attribute mapping supports these properties:
Mapping Type
Direct – Writes the value of the Workday attribute to the AD attribute, with no changes
Constant - Write a static, constant string value to the AD attribute
Expression – Allows you to write a custom value to the AD attribute, based on one or more Workday attributes. For more info, see this article on expressions.
Source attribute - The user attribute from Workday. If the attribute you're looking for isn't present, see Customizing the list of Workday user attributes.
Default value – Optional. If the source attribute has an empty value, the mapping writes this value instead. Most common configuration is to leave this blank.
Target attribute – The user attribute in Active Directory.
Match objects using this attribute – Whether or not this mapping should be used to uniquely identify users between Workday and Active Directory. This value is typically set on the Worker ID field for Workday, which is typically mapped to one of the Employee ID attributes in Active Directory.
Matching precedence – Multiple matching attributes can be set. When there are multiple, they're evaluated in the order defined by this field. As soon as a match is found, no further matching attributes are evaluated.
Apply this mapping
Always – Apply this mapping on both user creation and update actions
Only during creation - Apply this mapping only on user creation actions
To save your mappings, click Save at the top of the Attribute-Mapping section.
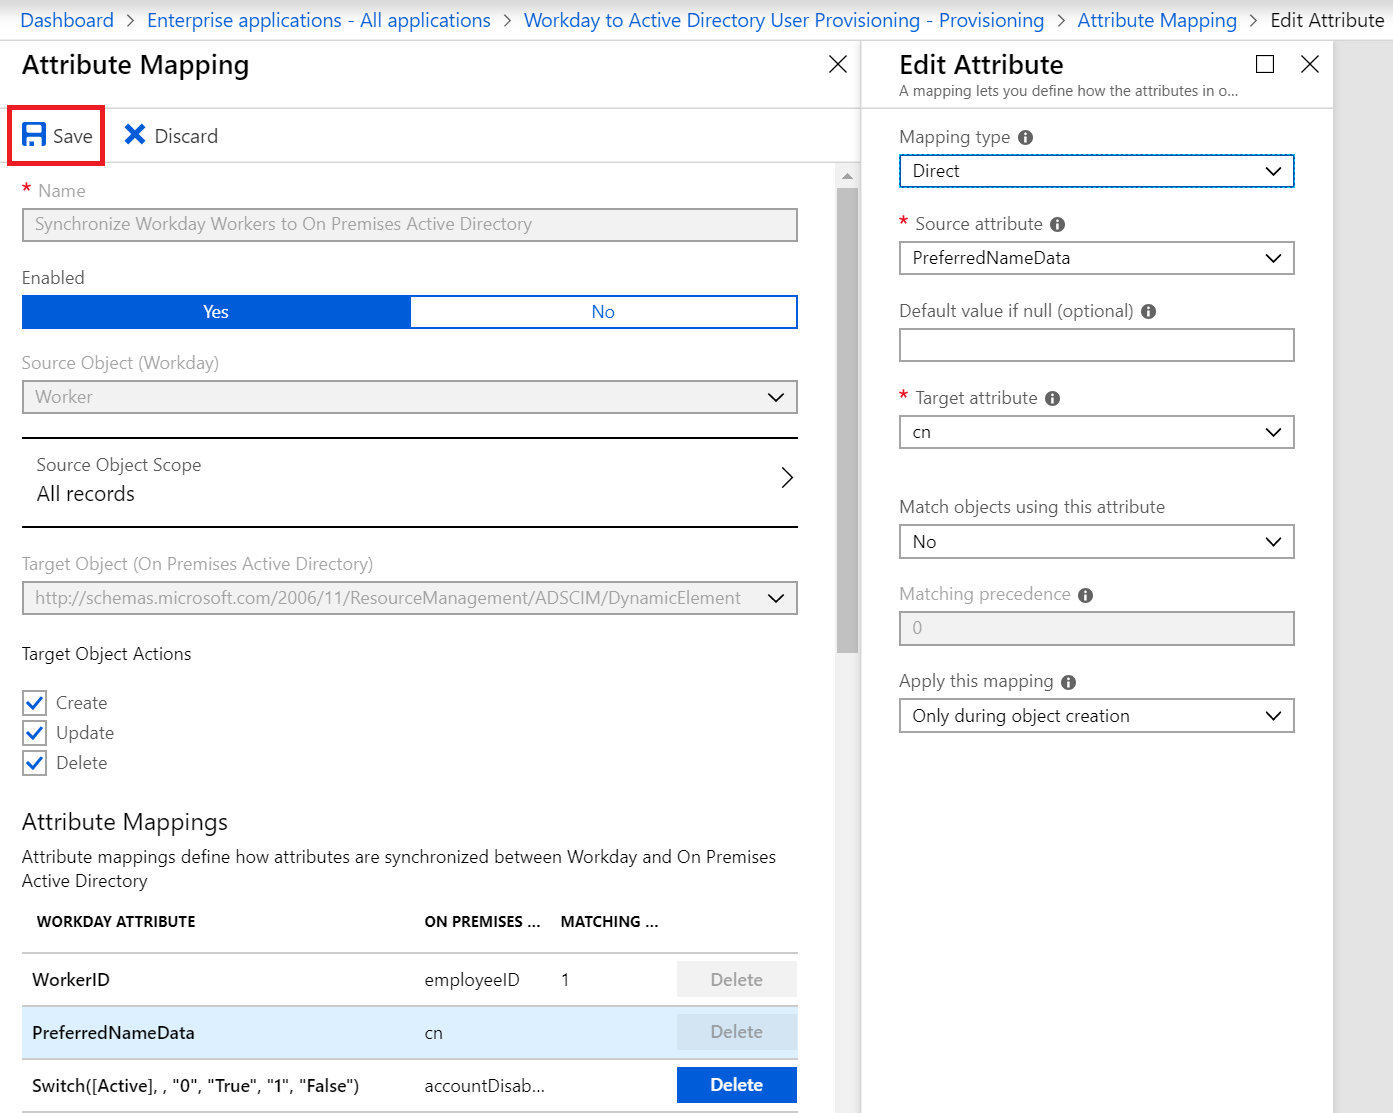
Below are some example attribute mappings between Workday and Active Directory, with some common expressions
The expression that maps to the parentDistinguishedName attribute is used to provision a user to different OUs based on one or more Workday source attributes. This example here places users in different OUs based on what city they're in.
The userPrincipalName attribute in Active Directory is generated using the de-duplication function SelectUniqueValue that checks for existence of a generated value in the target AD domain and only sets it if it's unique.
there's documentation on writing expressions here. This section includes examples on how to remove special characters.
| WORKDAY ATTRIBUTE | ACTIVE DIRECTORY ATTRIBUTE | MATCHING ID? | CREATE / UPDATE |
|---|---|---|---|
| WorkerID | EmployeeID | Yes | Written on create only |
| PreferredNameData | cn | Written on create only | |
| SelectUniqueValue( Join("@", Join(".", [FirstName], [LastName]), "contoso.com"), Join("@", Join(".", Mid([FirstName], 1, 1), [LastName]), "contoso.com"), Join("@", Join(".", Mid([FirstName], 1, 2), [LastName]), "contoso.com")) | userPrincipalName | Written on create only | |
Replace(Mid(Replace([UserID], , "([\\/\\\\\\[\\]\\:\\;\\|\\=\\,\\+\\*\\?\\<\\>])", , "", , ), 1, 20), , "(\\.)*$", , "", , ) |
sAMAccountName | Written on create only | |
| Switch([Active], , "0", "True", "1", "False") | accountDisabled | Create + update | |
| FirstName | givenName | Create + update | |
| LastName | sn | Create + update | |
| PreferredNameData | displayName | Create + update | |
| Company | company | Create + update | |
| SupervisoryOrganization | department | Create + update | |
| ManagerReference | manager | Create + update | |
| BusinessTitle | title | Create + update | |
| AddressLineData | streetAddress | Create + update | |
| Municipality | l | Create + update | |
| CountryReferenceTwoLetter | co | Create + update | |
| CountryReferenceTwoLetter | c | Create + update | |
| CountryRegionReference | st | Create + update | |
| WorkSpaceReference | physicalDeliveryOfficeName | Create + update | |
| PostalCode | postalCode | Create + update | |
| PrimaryWorkTelephone | telephoneNumber | Create + update | |
| Fax | facsimileTelephoneNumber | Create + update | |
| Mobile | mobile | Create + update | |
| LocalReference | preferredLanguage | Create + update | |
| Switch([Municipality], "OU=Default Users,DC=contoso,DC=com", "Dallas", "OU=Dallas,OU=Users,DC=contoso,DC=com", "Austin", "OU=Austin,OU=Users,DC=contoso,DC=com", "Seattle", "OU=Seattle,OU=Users,DC=contoso,DC=com", "London", "OU=London,OU=Users,DC=contoso,DC=com") | parentDistinguishedName | Create + update |
Once your attribute mapping configuration is complete, you can test provisioning for a single user using on-demand provisioning and then enable and launch the user provisioning service.
Enable and launch user provisioning
Once the Workday provisioning app configurations have been completed and you have verified provisioning for a single user with on-demand provisioning, you can turn on the provisioning service.
Tip
By default when you turn on the provisioning service, it initiates provisioning operations for all users in scope. If there are errors in the mapping or Workday data issues, then the provisioning job might fail and go into the quarantine state. To avoid this, as a best practice, we recommend configuring Source Object Scope filter and testing your attribute mappings with a few test users using on-demand provisioning before launching the full sync for all users. Once you have verified that the mappings work and are giving you the desired results, then you can either remove the filter or gradually expand it to include more users.
Go to the Provisioning blade and click on Start provisioning.
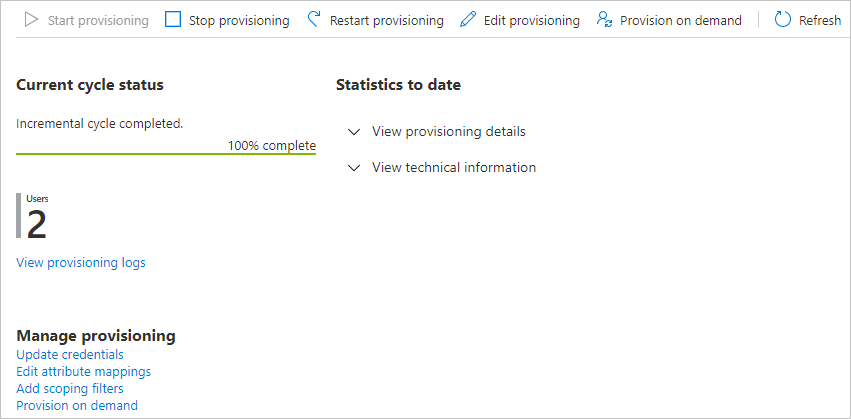
This operation starts the initial sync, which can take a variable number of hours depending on how many users are in the Workday tenant. You can check the progress bar to the track the progress of the sync cycle.
At any time, check the Provisioning tab in the Microsoft Entra admin center to see what actions the provisioning service has performed. The provisioning logs lists all individual sync events performed by the provisioning service, such as which users are being read out of Workday and then subsequently added or updated to Active Directory. Refer to the Troubleshooting section for instructions on how to review the provisioning logs and fix provisioning errors.
Once the initial sync is completed, it writes an audit summary report in the Provisioning tab, as shown below.
Frequently Asked Questions (FAQ)
Solution capability questions
- When processing a new hire from Workday, how does the solution set the password for the new user account in Active Directory?
- Does the solution support sending email notifications after provisioning operations complete?
- Does the solution cache Workday user profiles in the Microsoft Entra cloud or at the provisioning agent layer?
- Does the solution support assigning on-premises AD groups to the user?
- Which Workday APIs does the solution use to query and update Workday worker profiles?
- Can I configure my Workday HCM tenant with two Microsoft Entra tenants?
- How do I suggest improvements or request new features related to Workday and Microsoft Entra integration?
Provisioning Agent questions
- What is the GA version of the Provisioning Agent?
- How do I know the version of my Provisioning Agent?
- Does Microsoft automatically push Provisioning Agent updates?
- Can I install the Provisioning Agent on the same server running Microsoft Entra Connect?
- How do I configure the Provisioning Agent to use a proxy server for outbound HTTP communication?
- How do I ensure that the Provisioning Agent is able to communicate with the Microsoft Entra tenant and no firewalls are blocking ports required by the agent?
- How do I de-register the domain associated with my Provisioning Agent?
- How do I uninstall the Provisioning Agent?
Workday to AD attribute mapping and configuration questions
- How do I back up or export a working copy of my Workday Provisioning Attribute Mapping and Schema?
- I have custom attributes in Workday and Active Directory. How do I configure the solution to work with my custom attributes?
- Can I provision user's photo from Workday to Active Directory?
- How do I sync mobile numbers from Workday based on user consent for public usage?
- How do I format display names in AD based on the user's department/country/city attributes and handle regional variances?
- How can I use SelectUniqueValue to generate unique values for samAccountName attribute?
- How do I remove characters with diacritics and convert them into normal English alphabets?
Solution capability questions
When processing a new hire from Workday, how does the solution set the password for the new user account in Active Directory?
When the on-premises provisioning agent gets a request to create a new AD account, it automatically generates a complex random password designed to meet the password complexity requirements defined by the AD server and sets this on the user object. This password isn't logged anywhere.
Does the solution support sending email notifications after provisioning operations complete?
No, sending email notifications after completing provisioning operations isn't supported in the current release.
Does the solution cache Workday user profiles in the Microsoft Entra cloud or at the provisioning agent layer?
No, the solution doesn't maintain a cache of user profiles. The Microsoft Entra provisioning service simply acts as a data processor, reading data from Workday and writing to the target Active Directory or Microsoft Entra ID. See the section Managing personal data for details related to user privacy and data retention.
Does the solution support assigning on-premises AD groups to the user?
This functionality isn't supported currently. Recommended workaround is to deploy a PowerShell script that queries the Microsoft Graph API endpoint for provisioning log data and use that to trigger scenarios such as group assignment. This PowerShell script can be attached to a task scheduler and deployed on the same box running the provisioning agent.
Which Workday APIs does the solution use to query and update Workday worker profiles?
The solution currently uses the following Workday APIs:
The Workday Web Services API URL format used in the Admin Credentials section, determines the API version used for Get_Workers
- If the URL format is: https://####.workday.com/ccx/service/tenantName , then API v21.1 is used.
- If the URL format is: https://####.workday.com/ccx/service/tenantName/Human_Resources , then API v21.1 is used
- If the URL format is: https://####.workday.com/ccx/service/tenantName/Human_Resources/v##.# , then the specified API version is used. (Example: if v34.0 is specified, then it's used.)
Workday Email Writeback feature uses Change_Work_Contact_Information (v30.0)
Workday Username Writeback feature uses Update_Workday_Account (v31.2)
Can I configure my Workday HCM tenant with two Microsoft Entra tenants?
Yes, this configuration is supported. Here are the high level steps to configure this scenario:
- Deploy provisioning agent #1 and register it with Microsoft Entra tenant #1.
- Deploy provisioning agent #2 and register it with Microsoft Entra tenant #2.
- Based on the "Child Domains" that each Provisioning Agent manages, configure each agent with the domain(s). One agent can handle multiple domains.
- In Microsoft Entra admin center, set up the Workday to AD User Provisioning App in each tenant and configure it with the respective domains.
How do I suggest improvements or request new features related to Workday and Microsoft Entra integration?
Your feedback is highly valued as it helps us set the direction for the future releases and enhancements. We welcome all feedback and encourage you to submit your idea or improvement suggestion in the feedback forum of Microsoft Entra ID. For specific feedback related to the Workday integration, select the category SaaS Applications and search using the keywords Workday to find existing feedback related to the Workday.

When suggesting a new idea, please check to see if someone else has already suggested a similar feature. In that case, you can up vote the feature or enhancement request. You can also leave a comment regarding your specific use case to show your support for the idea and demonstrate how the feature is valuable for you too.
Provisioning Agent questions
What is the GA version of the Provisioning Agent?
Refer to Microsoft Entra Connect Provisioning Agent: Version release history for the latest GA version of the Provisioning Agent.
How do I know the version of my Provisioning Agent?
- Sign in to the Windows server where the Provisioning Agent is installed.
- Go to Control Panel -> Uninstall or Change a Program menu.
- Look for the version corresponding to the entry Microsoft Entra Connect Provisioning Agent.
Does Microsoft automatically push Provisioning Agent updates?
Yes, Microsoft automatically updates the provisioning agent if the Windows service Microsoft Entra Connect Agent Updater is up and running.
Can I install the Provisioning Agent on the same server running Microsoft Entra Connect?
Yes, you can install the Provisioning Agent on the same server that runs Microsoft Entra Connect.
At the time of configuration the Provisioning Agent prompts for Microsoft Entra admin credentials. Does the Agent store the credentials locally on the server?
During configuration, the Provisioning Agent prompts for Microsoft Entra admin credentials only to connect to your Microsoft Entra tenant. It doesn't store the credentials locally on the server. However it does retain the credentials used to connect to the on-premises Active Directory domain in a local Windows password vault.
How do I configure the Provisioning Agent to use a proxy server for outbound HTTP communication?
The Provisioning Agent supports use of outbound proxy. You can configure it by editing the agent config file C:\Program Files\Microsoft Azure AD Connect Provisioning Agent\AADConnectProvisioningAgent.exe.config.
Add the following lines into it, towards the end of the file just before the closing </configuration> tag.
Replace the variables [proxy-server] and [proxy-port] with your proxy server name and port values.
    <system.net>
          <defaultProxy enabled="true" useDefaultCredentials="true">
             <proxy
                usesystemdefault="true"
                proxyaddress="http://[proxy-server]:[proxy-port]"
                bypassonlocal="true"
             />
         </defaultProxy>
    </system.net>
How do I ensure that the Provisioning Agent is able to communicate with the Microsoft Entra tenant and no firewalls are blocking ports required by the agent?
You can also check whether all of the required ports are open.
Can one Provisioning Agent be configured to provision multiple AD domains?
Yes, one Provisioning Agent can be configured to handle multiple AD domains as long as the agent has line of sight to the respective domain controllers. Microsoft recommends setting up a group of 3 provisioning agents serving the same set of AD domains to ensure high availability and provide failover support.
How do I de-register the domain associated with my Provisioning Agent?
*, get the tenant ID of your Microsoft Entra tenant.
Sign in to the Windows server running the Provisioning Agent.
Open PowerShell as Windows Administrator.
Change to the directory containing the registration scripts and run the following commands replacing the [tenant ID] parameter with the value of your tenant ID.
cd "C:\Program Files\Microsoft Azure AD Connect Provisioning Agent\RegistrationPowershell\Modules\PSModulesFolder"
Import-Module "C:\Program Files\Microsoft Azure AD Connect Provisioning Agent\RegistrationPowershell\Modules\PSModulesFolder\MicrosoftEntraPrivateNetworkConnectorPSModule.psd1"
Get-PublishedResources -TenantId "[tenant ID]"
From the list of agents that appear – copy the value of the
idfield from that resource whose resourceName equals to your AD domain name.Paste the ID value into this command and execute the command in PowerShell.
Remove-PublishedResource -ResourceId "[resource ID]" -TenantId "[tenant ID]"Rerun the Agent configuration wizard.
Any other agents, that were previously assigned to this domain needs to be reconfigured.
How do I uninstall the Provisioning Agent?
- Sign in to the Windows server where the Provisioning Agent is installed.
- Go to Control Panel -> Uninstall or Change a Program menu
- Uninstall the following programs:
- Microsoft Entra Connect Provisioning Agent
- Microsoft Entra Connect Agent Updater
- Microsoft Entra Connect Provisioning Agent Package
Workday to AD attribute mapping and configuration questions
How do I back up or export a working copy of my Workday Provisioning Attribute Mapping and Schema?
You can use Microsoft Graph API to export your Workday User Provisioning configuration. Refer to the steps in the section Exporting and Importing your Workday User Provisioning Attribute Mapping configuration for details.
I have custom attributes in Workday and Active Directory. How do I configure the solution to work with my custom attributes?
The solution supports custom Workday and Active Directory attributes. To add your custom attributes to the mapping schema, open the Attribute Mapping blade and scroll down to expand the section Show advanced options.
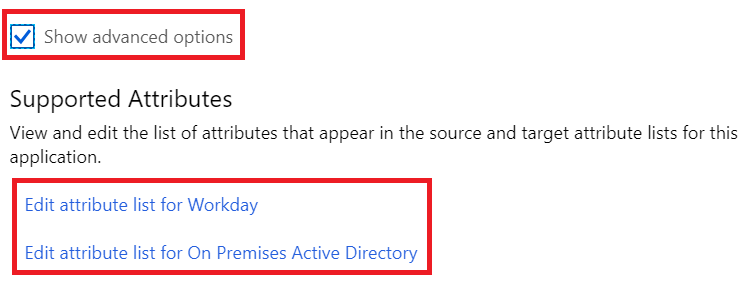
To add your custom Workday attributes, select the option Edit attribute list for Workday and to add your custom AD attributes, select the option Edit attribute list for On Premises Active Directory.
See also:
How do I configure the solution to only update attributes in AD based on Workday changes and not create any new AD accounts?
This configuration can be achieved by setting the Target Object Actions in the Attribute Mappings blade as shown below:
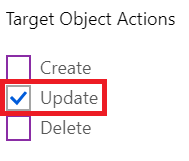
Select the checkbox "Update" for only update operations to flow from Workday to AD.
Can I provision user's photo from Workday to Active Directory?
The solution currently doesn't support setting binary attributes such as thumbnailPhoto and jpegPhoto in Active Directory.
How do I sync mobile numbers from Workday based on user consent for public usage?
Go the "Provisioning" blade of your Workday Provisioning App.
Click on the Attribute Mappings
Under Mappings, select Synchronize Workday Workers to On Premises Active Directory (or Synchronize Workday Workers to Microsoft Entra ID).
On the Attribute Mappings page, scroll down and check the box "Show Advanced Options". Click on Edit attribute list for Workday
In the blade that opens up, locate the "Mobile" attribute and click on the row so you can edit the API Expression

Replace the API Expression with the following new expression, which retrieves the work mobile number only if the "Public Usage Flag" is set to "True" in Workday.
wd:Worker/wd:Worker_Data/wd:Personal_Data/wd:Contact_Data/wd:Phone_Data[translate(string(wd:Phone_Device_Type_Reference/@wd:Descriptor),'abcdefghijklmnopqrstuvwxyz','ABCDEFGHIJKLMNOPQRSTUVWXYZ')='MOBILE' and translate(string(wd:Usage_Data/wd:Type_Data/wd:Type_Reference/@wd:Descriptor),'abcdefghijklmnopqrstuvwxyz','ABCDEFGHIJKLMNOPQRSTUVWXYZ')='WORK' and string(wd:Usage_Data/@wd:Public)='1']/@wd:Formatted_PhoneSave the Attribute List.
Save the Attribute Mapping.
Clear current state and restart the full sync.
How do I format display names in AD based on the user's department/country/city attributes and handle regional variances?
it's a common requirement to configure the displayName attribute in AD so that it also provides information about the user's department and country/region. For example, if John Smith works in the Marketing Department in US, you might want his displayName to show up as Smith, John (Marketing-US).
Here's how you can handle such requirements for constructing CN or displayName to include attributes such as company, business unit, city, or country/region.
Each Workday attribute is retrieved using an underlying XPATH API expression, which is configurable in Attribute Mapping -> Advanced Section -> Edit attribute list for Workday. Here's the default XPATH API expression for Workday PreferredFirstName, PreferredLastName, Company and SupervisoryOrganization attributes.
Workday Attribute API XPATH Expression PreferredFirstName wd:Worker/wd:Worker_Data/wd:Personal_Data/wd:Name_Data/wd:Preferred_Name_Data/wd:Name_Detail_Data/wd:First_Name/text() PreferredLastName wd:Worker/wd:Worker_Data/wd:Personal_Data/wd:Name_Data/wd:Preferred_Name_Data/wd:Name_Detail_Data/wd:Last_Name/text() Company wd:Worker/wd:Worker_Data/wd:Organization_Data/wd:Worker_Organization_Data[wd:Organization_Data/wd:Organization_Type_Reference/wd:ID[@wd:type='Organization_Type_ID']='Company']/wd:Organization_Reference/@wd:Descriptor SupervisoryOrganization wd:Worker/wd:Worker_Data/wd:Organization_Data/wd:Worker_Organization_Data/wd:Organization_Data[wd:Organization_Type_Reference/wd:ID[@wd:type='Organization_Type_ID']='Supervisory']/wd:Organization_Name/text() Confirm with your Workday team that the API expression above is valid for your Workday tenant configuration. If necessary, you can edit them as described in the section Customizing the list of Workday user attributes.
Similarly the country/region information present in Workday is retrieved using the following XPATH: wd:Worker/wd:Worker_Data/wd:Employment_Data/wd:Position_Data/wd:Business_Site_Summary_Data/wd:Address_Data/wd:Country_Reference
There are 5 country/region-related attributes that are available in the Workday attribute list section.
Workday Attribute API XPATH Expression CountryReference wd:Worker/wd:Worker_Data/wd:Employment_Data/wd:Position_Data/wd:Business_Site_Summary_Data/wd:Address_Data/wd:Country_Reference/wd:ID[@wd:type='ISO_3166-1_Alpha-3_Code']/text() CountryReferenceFriendly wd:Worker/wd:Worker_Data/wd:Employment_Data/wd:Position_Data/wd:Business_Site_Summary_Data/wd:Address_Data/wd:Country_Reference/@wd:Descriptor CountryReferenceNumeric wd:Worker/wd:Worker_Data/wd:Employment_Data/wd:Position_Data/wd:Business_Site_Summary_Data/wd:Address_Data/wd:Country_Reference/wd:ID[@wd:type='ISO_3166-1_Numeric-3_Code']/text() CountryReferenceTwoLetter wd:Worker/wd:Worker_Data/wd:Employment_Data/wd:Position_Data/wd:Business_Site_Summary_Data/wd:Address_Data/wd:Country_Reference/wd:ID[@wd:type='ISO_3166-1_Alpha-2_Code']/text() CountryRegionReference wd:Worker/wd:Worker_Data/wd:Employment_Data/wd:Position_Data/wd:Business_Site_Summary_Data/wd:Address_Data/wd:Country_Region_Reference/@wd:Descriptor Confirm with your Workday team that the API expressions above are valid for your Workday tenant configuration. If necessary, you can edit them as described in the section Customizing the list of Workday user attributes.
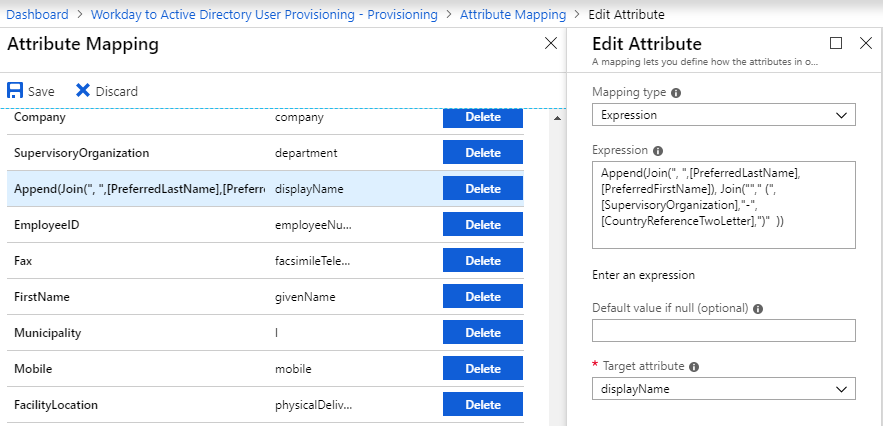
To build the right attribute mapping expression, identify which Workday attribute "authoritatively" represents the user's first name, last name, country/region and department. Let's say the attributes are PreferredFirstName, PreferredLastName, CountryReferenceTwoLetter and SupervisoryOrganization respectively. You can use this to build an expression for the AD displayName attribute as follows to get a display name like Smith, John (Marketing-US).
Append(Join(", ",[PreferredLastName],[PreferredFirstName]), Join(""," (",[SupervisoryOrganization],"-",[CountryReferenceTwoLetter],")"))Once you have the right expression, edit the Attribute Mappings table and modify the displayName attribute mapping as shown below:
Extending the above example, let's say you would like to convert city names coming from Workday into shorthand values and then use it to build display names such as Smith, John (CHI) or Doe, Jane (NYC), then this result can be achieved using a Switch expression with the Workday Municipality attribute as the determinant variable.
Switch
(
  [Municipality],
  Join(", ", [PreferredLastName], [PreferredFirstName]),
       "Chicago", Append(Join(", ",[PreferredLastName], [PreferredFirstName]), "(CHI)"),
       "New York", Append(Join(", ",[PreferredLastName], [PreferredFirstName]), "(NYC)"),
       "Phoenix", Append(Join(", ",[PreferredLastName], [PreferredFirstName]), "(PHX)")
)
See also:
How can I use SelectUniqueValue to generate unique values for samAccountName attribute?
Let's say you want to generate unique values for samAccountName attribute using a combination of FirstName and LastName attributes from Workday. Given below is an expression that you can start with:
SelectUniqueValue(
    Replace(Mid(Replace(NormalizeDiacritics(StripSpaces(Join("",  Mid([FirstName],1,1), [LastName]))), , "([\\/\\\\\\[\\]\\:\\;\\|\\=\\,\\+\\*\\?\\<\\>])", , "", , ), 1, 20), , "(\\.)*$", , "", , ),
    Replace(Mid(Replace(NormalizeDiacritics(StripSpaces(Join("",  Mid([FirstName],1,2), [LastName]))), , "([\\/\\\\\\[\\]\\:\\;\\|\\=\\,\\+\\*\\?\\<\\>])", , "", , ), 1, 20), , "(\\.)*$", , "", , ),
    Replace(Mid(Replace(NormalizeDiacritics(StripSpaces(Join("",  Mid([FirstName],1,3), [LastName]))), , "([\\/\\\\\\[\\]\\:\\;\\|\\=\\,\\+\\*\\?\\<\\>])", , "", , ), 1, 20), , "(\\.)*$", , "", , )
)
How the above expression works: If the user is John Smith, it first tries to generate JSmith, if JSmith already exists, then it generates JoSmith, if that exists, it generates JohSmith. The expression also ensures that the value generated meets the length restriction and special characters restriction associated with samAccountName.
See also:
How do I remove characters with diacritics and convert them into normal English alphabets?
Use the function NormalizeDiacritics to remove special characters in first name and last name of the user, while constructing the email address or CN value for the user.
Troubleshooting tips
This section provides specific guidance on how to troubleshoot provisioning issues with your Workday integration using the Microsoft Entra provisioning logs and Windows Server Event Viewer logs. It builds on top of the generic troubleshooting steps and concepts captured in the Tutorial: Reporting on automatic user account provisioning
This section covers the following aspects of troubleshooting:
- Configure provisioning agent to emit Event Viewer logs
- Setting up Windows Event Viewer for agent troubleshooting
- Setting up Microsoft Entra admin center Provisioning Logs for service troubleshooting
- Understanding logs for AD User Account create operations
- Understanding logs for Manager update operations
- Resolving commonly encountered errors
Configure provisioning agent to emit Event Viewer logs
Sign in to the Windows Server machine where the provisioning agent is deployed
Stop the service Microsoft Entra Connect Provisioning Agent.
Create a copy of the original config file: C:\Program Files\Microsoft Azure AD Connect Provisioning Agent\AADConnectProvisioningAgent.exe.config.
Replace the existing
<system.diagnostics>section with the following.- The listener config etw emits messages to the EventViewer logs
- The listener config textWriterListener sends trace messages to the file ProvAgentTrace.log. Uncomment the lines related to textWriterListener only for advanced troubleshooting.
  <system.diagnostics>
      <sources>
      <source name="AAD Connect Provisioning Agent">
          <listeners>
          <add name="console"/>
          <add name="etw"/>
          <!-- <add name="textWriterListener"/> -->
          </listeners>
      </source>
      </sources>
      <sharedListeners>
      <add name="console" type="System.Diagnostics.ConsoleTraceListener" initializeData="false"/>
      <add name="etw" type="System.Diagnostics.EventLogTraceListener" initializeData="Azure AD Connect Provisioning Agent">
          <filter type="System.Diagnostics.EventTypeFilter" initializeData="All"/>
      </add>
      <!-- <add name="textWriterListener" type="System.Diagnostics.TextWriterTraceListener" initializeData="C:/ProgramData/Microsoft/Azure AD Connect Provisioning Agent/Trace/ProvAgentTrace.log"/> -->
      </sharedListeners>
  </system.diagnostics>
Start the service Microsoft Entra Connect Provisioning Agent.
Setting up Windows Event Viewer for agent troubleshooting
Sign in to the Windows Server machine where the Provisioning Agent is deployed
Open Windows Server Event Viewer desktop app.
Select Windows Logs > Application.
Use the Filter Current Log… option to view all events logged under the source Microsoft Entra Connect Provisioning Agent and exclude events with Event ID "5", by specifying the filter "-5" as shown below.
Note
Event ID 5 captures agent bootstrap messages to the Microsoft Entra cloud service and hence we filter it while analyzing the log files.
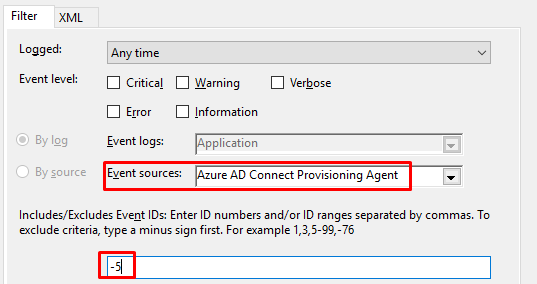
Click OK and sort the result view by Date and Time column.
Setting up Microsoft Entra admin center Provisioning Logs for service troubleshooting
Launch the Microsoft Entra admin center, and navigate to the Provisioning section of your Workday provisioning application.
Use the Columns button on the Provisioning Logs page to display only the following columns in the view (Date, Activity, Status, Status Reason). This configuration ensures that you focus only on data that is relevant for troubleshooting.
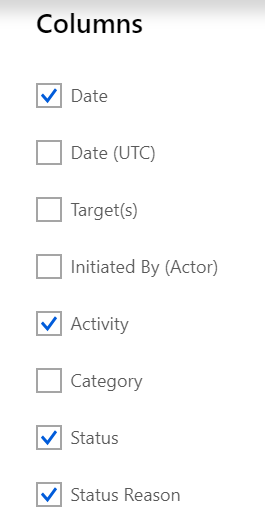
Use the Target and Date Range query parameters to filter the view.
- Set the Target query parameter to the "Worker ID" or "Employee ID" of the Workday worker object.
- Set the Date Range to an appropriate time period over which you want to investigate for errors or issues with the provisioning.

Understanding logs for AD User Account create operations
When a new hire in Workday is detected (let's say with Employee ID 21023), the Microsoft Entra provisioning service attempts to create a new AD user account for the worker and in the process creates 4 provisioning log records as described below:
When you click on any of the provisioning log records, the Activity Details page opens up. Here's what the Activity Details page displays for each log record type.
Workday Import record: This log record displays the worker information fetched from Workday. Use information in the Additional Details section of the log record to troubleshoot issues with fetching data from Workday. An example record is shown below along with pointers on how to interpret each field.
ErrorCode : None  // Use the error code captured here to troubleshoot Workday issues
EventName : EntryImportAdd // For full sync, value is "EntryImportAdd" and for delta sync, value is "EntryImport"
JoiningProperty : 21023 // Value of the Workday attribute that serves as the Matching ID (usually the Worker ID or Employee ID field)
SourceAnchor : a071861412de4c2486eb10e5ae0834c3 // set to the WorkdayID (WID) associated with the record
AD Import record: This log record displays information of the account fetched from AD. As during initial user creation there's no AD account, the Activity Status Reason indicates that no account with the Matching ID attribute value was found in Active Directory. Use information in the Additional Details section of the log record to troubleshoot issues with fetching data from Workday. An example record is shown below along with pointers on how to interpret each field.
ErrorCode : None // Use the error code captured here to troubleshoot Workday issues
EventName : EntryImportObjectNotFound // Implies that object wasn't found in AD
JoiningProperty : 21023 // Value of the Workday attribute that serves as the Matching ID
To find Provisioning Agent log records corresponding to this AD import operation, open the Windows Event Viewer logs and use the Find… menu option to find log entries containing the Matching ID/Joining Property attribute value (in this case 21023).

Look for the entry with Event ID = 9, which provides you with the LDAP search filter used by the agent to retrieve the AD account. You can verify if this is the right search filter to retrieve unique user entries.
The record that immediately follows it with Event ID = 2 captures the result of the search operation and if it returned any results.
Synchronization rule action record: This log record displays the results of the attribute mapping rules and configured scoping filters along with the provisioning action that is taken to process the incoming Workday event. Use information in the Additional Details section of the log record to troubleshoot issues with the synchronization action. An example record is shown below along with pointers on how to interpret each field.
ErrorCode : None // Use the error code captured here to troubleshoot sync issues
EventName : EntrySynchronizationAdd // Implies that the object is added
JoiningProperty : 21023 // Value of the Workday attribute that serves as the Matching ID
SourceAnchor : a071861412de4c2486eb10e5ae0834c3 // set to the WorkdayID (WID) associated with the profile in Workday
If there are issues with your attribute mapping expressions or the incoming Workday data has issues (for example: empty or null value for required attributes), then you'll observe a failure at this stage with the ErrorCode providing details of the failure.
AD Export record: This log record displays the result of AD account creation operation along with the attribute values that were set in the process. Use information in the Additional Details section of the log record to troubleshoot issues with the account create operation. An example record is shown below along with pointers on how to interpret each field. In the "Additional Details" section, the "EventName" is set to "EntryExportAdd", the "JoiningProperty" is set to the value of the Matching ID attribute, the "SourceAnchor" is set to the WorkdayID (WID) associated with the record and the "TargetAnchor" is set to the value of the AD "ObjectGuid" attribute of the newly created user.
ErrorCode : None // Use the error code captured here to troubleshoot AD account creation issues
EventName : EntryExportAdd // Implies that object is created
JoiningProperty : 21023 // Value of the Workday attribute that serves as the Matching ID
SourceAnchor : a071861412de4c2486eb10e5ae0834c3 // set to the WorkdayID (WID) associated with the profile in Workday
TargetAnchor : aaaaaaaa-0000-1111-2222-bbbbbbbbbbbb // set to the value of the AD "objectGuid" attribute of the new user
To find Provisioning Agent log records corresponding to this AD export operation, open the Windows Event Viewer logs and use the Find… menu option to find log entries containing the Matching ID/Joining Property attribute value (in this case 21023).
Look for an HTTP POST record corresponding to the timestamp of the export operation with Event ID = 2. This record contains the attribute values sent by the provisioning service to the provisioning agent.
Immediately following the above event, there should be another event that captures the response of the create AD account operation. This event returns the new objectGuid created in AD and it's set as the TargetAnchor attribute in the provisioning service.
Understanding logs for manager update operations
The manager attribute is a reference attribute in AD. The provisioning service doesn't set the manager attribute as part of the user creation operation. Rather the manager attribute is set as part of an update operation after AD account is created for the user. Expanding the example above, let's say a new hire with Employee ID "21451" is activated in Workday and the new hire's manager (21023) already has an AD account. In this scenario, searching the Provisioning logs for user 21451 shows up 5 entries.
The first 4 records are like the ones we explored as part of the user create operation. The 5th record is the export associated with manager attribute update. The log record displays the result of AD account manager update operation, which is performed using the manager's objectGuid attribute.
// Modified Properties
Name : manager
New Value : "aaaaaaaa-0000-1111-2222-bbbbbbbbbbbb" // objectGuid of the user 21023

// Additional Details
ErrorCode : None // Use the error code captured here to troubleshoot AD account creation issues
EventName : EntryExportUpdate // Implies that object is created
JoiningProperty : 21451 // Value of the Workday attribute that serves as the Matching ID
SourceAnchor : 9603bf594b9901693f307815bf21870a // WorkdayID of the user
TargetAnchor : 43b668e7-1d73-401c-a00a-fed14d31a1a8 // objectGuid of the user 21451
Resolving commonly encountered errors
This section covers commonly seen errors with Workday user provisioning and how to resolve it. The errors are grouped as follows:
- Provisioning agent errors
- Connectivity errors
- AD user account creation errors
- AD user account update errors
Provisioning agent errors
| # | Error Scenario | Probable Causes | Recommended Resolution |
|---|---|---|---|
| 1. | Error installing the provisioning agent with error message: Service 'Microsoft Entra Connect Provisioning Agent' (AADConnectProvisioningAgent) failed to start. Verify that you have sufficient privileges to start the system. | This error usually shows up if you're trying to install the provisioning agent on a domain controller and group policy prevents the service from starting. it's also seen if you have a previous version of the agent running and you haven't uninstalled it before starting a new installation. | Install the provisioning agent on a non-DC server. Ensure that previous versions of the agent are uninstalled before installing the new agent. |
| 2. | The Windows Service 'Microsoft Entra Connect Provisioning Agent' is in Starting state and doesn't switch to Running state. | As part of the installation, the agent wizard creates a local account (NT Service\AADConnectProvisioningAgent) on the server and this is the logon account used for starting the service. If a security policy on your Windows server prevents local accounts from running the services, you'll encounter this error. | Open the Services console. Right click on the Windows Service 'Microsoft Entra Connect Provisioning Agent' and in the logon tab specify the account of a domain administrator to run the service. Restart the service. |
| 3. | When configuring the provisioning agent with your AD domain in the step Connect Active Directory, the wizard takes a long time trying to load the AD schema and eventually times out. | This error usually shows up if the wizard is unable to contact the AD domain controller server due to firewall issues. | On the Connect Active Directory wizard screen, while providing the credentials for your AD domain, there's an option called Select domain controller priority. Use this option to select a domain controller that is in the same site as the agent server and ensure that there are no firewall rules blocking the communication. |
Connectivity errors
If the provisioning service is unable to connect to Workday or Active Directory, it could cause the provisioning to go into a quarantined state. Use the table below to troubleshoot connectivity issues.
| # | Error Scenario | Probable Causes | Recommended Resolution |
|---|---|---|---|
| 1. | When you click on Test Connection, you get the error message: There was an error connecting to Active Directory. Please ensure that the on-premises Provisioning Agent is running and it's configured with the correct Active Directory domain. | This error usually shows up if the provisioning agent isn't running or there's a firewall blocking communication between Microsoft Entra ID and the provisioning agent. You may also see this error, if the domain isn't configured in the Agent Wizard. | Open the Services console on the Windows server to confirm that the agent is running. Open the provisioning agent wizard and confirm that the right domain is registered with the agent. |
| 2. | The provisioning job goes into quarantine state over the weekends (Fri-Sat) and we get an email notification that there's an error with the synchronization. | One of the common causes for this error is the planned Workday downtime. If you're using a Workday implementation tenant, please note that Workday has scheduled down time for its implementation tenants over weekends (usually from Friday evening to Saturday morning) and during that period the Workday provisioning apps may go into quarantine state as it's not able to connect to Workday. It gets back to normal state once the Workday implementation tenant is back online. In rare cases, you may also see this error, if the password of the Integration System User changed due to tenant refresh or if the account is in locked or expired state. | Check with your Workday administrator or integration partner to see when Workday schedules downtime to ignore alert messages during the downtime period and confirm availability once Workday instance is back online. |
AD user account creation errors
| # | Error Scenario | Probable Causes | Recommended Resolution |
|---|---|---|---|
| 1. | Export operation failures in the provisioning log with the message Error: OperationsError-SvcErr: An operation error occurred. No superior reference has been configured for the directory service. The directory service is therefore unable to issue referrals to objects outside this forest. | This error usually shows up if the Active Directory Container OU isn't set correctly or if there are issues with the Expression Mapping used for parentDistinguishedName. | Check the Active Directory Container OU parameter for typos. If you're using parentDistinguishedName in the attribute mapping ensure that it always evaluates to a known container within the AD domain. Check the Export event in the provisioning logs to see the generated value. |
| 2. | Export operation failures in the provisioning log with error code: SystemForCrossDomainIdentityManagementBadResponse and message Error: ConstraintViolation-AtrErr: A value in the request is invalid. A value for the attribute wasn't in the acceptable range of values. \nError Details: CONSTRAINT_ATT_TYPE - company. | While this error is specific to the company attribute, you may see this error for other attributes like CN as well. This error appears due to AD enforced schema constraint. By default, the attributes like company and CN in AD have an upper limit of 64 characters. If the value coming from Workday is more than 64 characters, then you see this error message. | Check the Export event in the provisioning logs to see the value for the attribute reported in the error message. Consider truncating the value coming from Workday using the Mid function or changing the mappings to an AD attribute that doesn't have similar length constraints. |
AD user account update errors
During the AD user account update process, the provisioning service reads information from both Workday and AD, runs the attribute mapping rules and determines if any change needs to take effect. Accordingly an update event is triggered. If any of these steps encounters a failure, it's logged in the provisioning logs. Use the table below to troubleshoot common update errors.
| # | Error Scenario | Probable Causes | Recommended Resolution |
|---|---|---|---|
| 1. | Synchronization rule action failures in the provisioning log with the message EventName = EntrySynchronizationError and ErrorCode = EndpointUnavailable. | This error shows up if the provisioning service is unable to retrieve user profile data from Active Directory due to a processing error encountered by the on-premises provisioning agent. | Check the Provisioning Agent Event Viewer logs for error events that indicate issues with the read operation (Filter by Event ID #2). |
| 2. | The manager attribute in AD doesn't get updated for certain users in AD. | The most likely cause of this error is if you're using scoping rules and the user's manager isn't part of the scope. You may also run into this issue if the manager's matching ID attribute (such as EmployeeID) isn't found in the target AD domain or not set to the correct value. | Review the scoping filter and add the manager user in scope. Check the manager's profile in AD to make sure that there's a value for the matching ID attribute. |
Managing your configuration
This section describes how you can further extend, customize and manage your Workday-driven user provisioning configuration. It covers the following topics:
Customizing the list of Workday user attributes
The Workday provisioning apps for Active Directory and Microsoft Entra ID both include a default list of Workday user attributes you can select from. However, these lists aren't comprehensive. Workday supports many hundreds of possible user attributes, which can either be standard or unique to your Workday tenant.
The Microsoft Entra provisioning service supports the ability to customize your list or Workday attribute to include any attributes exposed in the Get_Workers operation of the Human Resources API.
To do this change, you must use Workday Studio to extract the XPath expressions that represent the attributes you wish to use, and then add them to your provisioning configuration using the advanced attribute editor.
To retrieve an XPath expression for a Workday user attribute:
Download and install Workday Studio. You need a Workday community account to access the installer.
Download the Workday Human_Resources WSDL file specific to the WWS API version you plan to use from the Workday Web Services Directory
Launch Workday Studio.
From the command bar, select the Workday > Test Web Service in Tester option.
Select External, and select the Human_Resources WSDL file you downloaded in step 2.
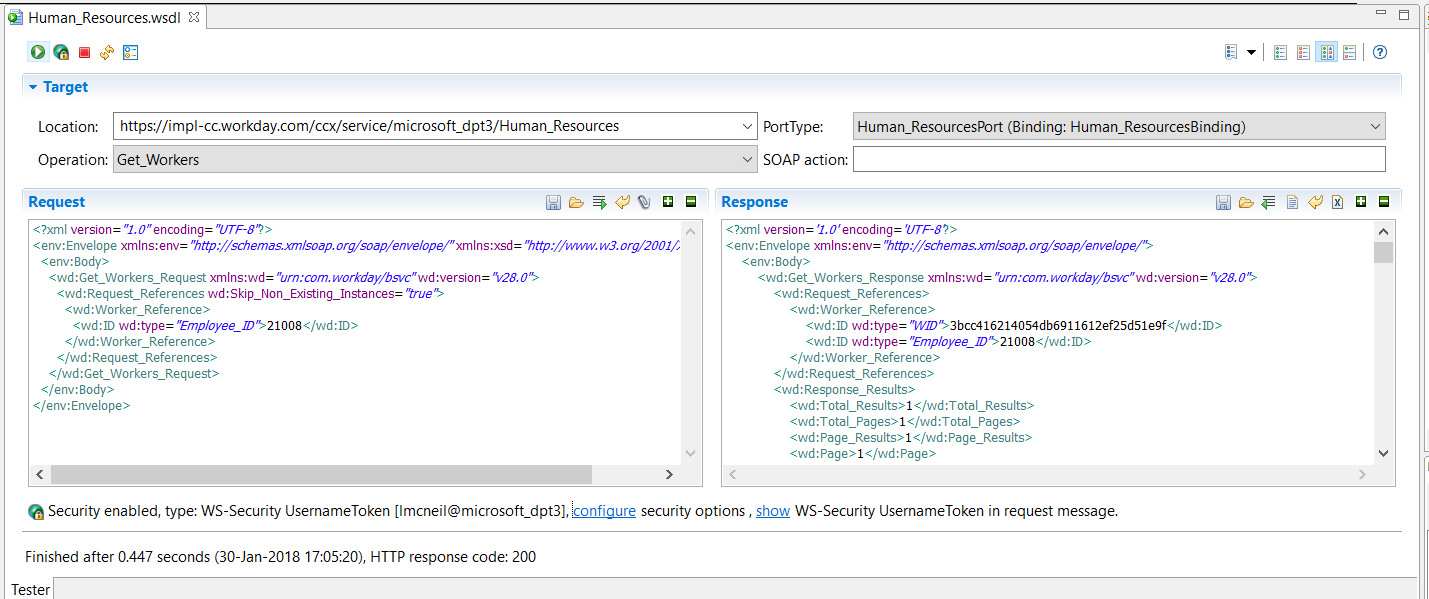
Set the Location field to
https://IMPL-CC.workday.com/ccx/service/TENANT/Human_Resources, but replacing "IMPL-CC" with your actual instance type, and "TENANT" with your real tenant name.Set Operation to Get_Workers
Click the small configure link below the Request/Response panes to set your Workday credentials. Check Authentication, and then enter the user name and password for your Workday integration system account. Be sure to format the user name as name@tenant, and leave the WS-Security UsernameToken option selected.
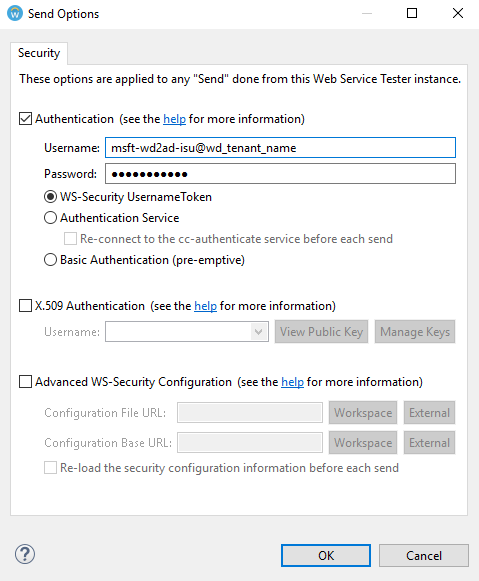
Select OK.
In the Request pane, paste in the XML below. Set Employee_ID to the employee ID of a real user in your Workday tenant. Set wd:version to the version of WWS that you plan to use. Select a user that has the attribute populated that you wish to extract.
<?xml version="1.0" encoding="UTF-8"?>
<env:Envelope xmlns:env="http://schemas.xmlsoap.org/soap/envelope/" xmlns:xsd="https://www.w3.org/2001/XMLSchema">
  <env:Body>
    <wd:Get_Workers_Request xmlns:wd="urn:com.workday/bsvc" wd:version="v21.1">
      <wd:Request_References wd:Skip_Non_Existing_Instances="true">
        <wd:Worker_Reference>
          <wd:ID wd:type="Employee_ID">21008</wd:ID>
        </wd:Worker_Reference>
      </wd:Request_References>
      <wd:Response_Group>
        <wd:Include_Reference>true</wd:Include_Reference>
        <wd:Include_Personal_Information>true</wd:Include_Personal_Information>
        <wd:Include_Employment_Information>true</wd:Include_Employment_Information>
        <wd:Include_Management_Chain_Data>true</wd:Include_Management_Chain_Data>
        <wd:Include_Organizations>true</wd:Include_Organizations>
        <wd:Include_Reference>true</wd:Include_Reference>
        <wd:Include_Transaction_Log_Data>true</wd:Include_Transaction_Log_Data>
        <wd:Include_Photo>true</wd:Include_Photo>
        <wd:Include_User_Account>true</wd:Include_User_Account>
      <wd:Include_Roles>true</wd:Include_Roles>
      </wd:Response_Group>
    </wd:Get_Workers_Request>
  </env:Body>
</env:Envelope>
Click the Send Request (green arrow) to execute the command. If successful, the response should appear in the Response pane. Check the response to ensure it has the data of the user ID you entered, and not an error.
If successful, copy the XML from the Response pane and save it as an XML file.
In the command bar of Workday Studio, select File > Open File... and open the XML file you saved. This action opens the file in the Workday Studio XML editor.
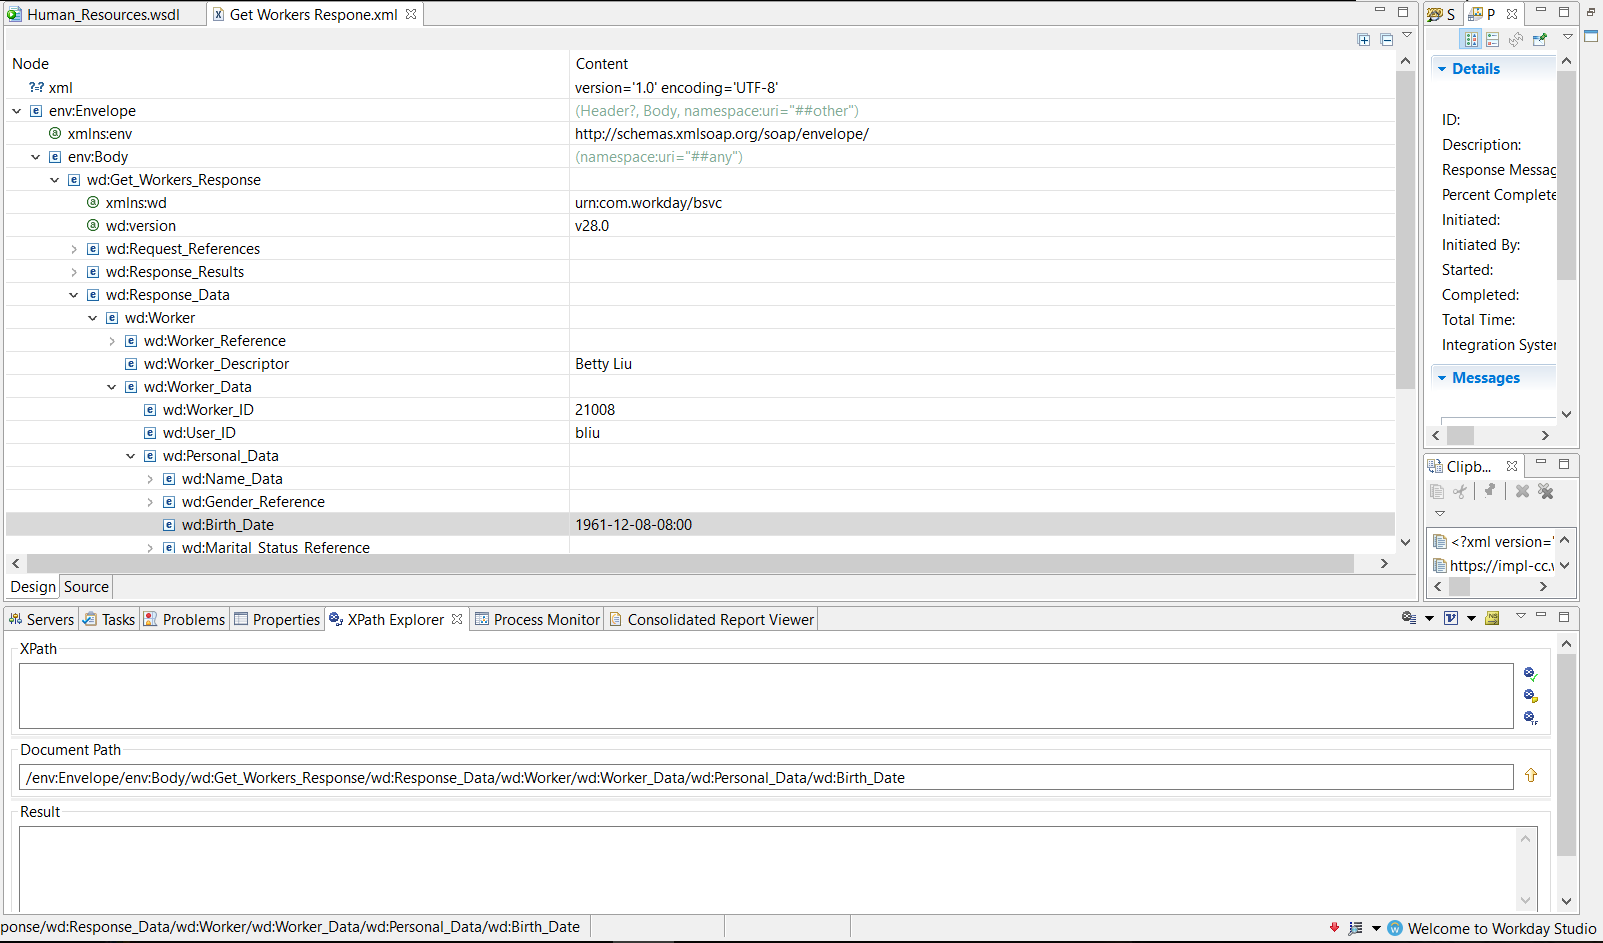
In the file tree, navigate through /env: Envelope > env: Body > wd:Get_Workers_Response > wd:Response_Data > wd: Worker to find your user's data.
Under wd: Worker, find the attribute that you wish to add, and select it.
Copy the XPath expression for your selected attribute out of the Document Path field.
Remove the /env:Envelope/env:Body/wd:Get_Workers_Response/wd:Response_Data/ prefix from the copied expression.
If the last item in the copied expression is a node (example: "/wd: Birth_Date"), then append /text() at the end of the expression. This isn't necessary if the last item is an attribute (example: "/@wd: type").
The result should be something like
wd:Worker/wd:Worker_Data/wd:Personal_Data/wd:Birth_Date/text(). This value is what you copy and enter into the Microsoft Entra admin center.
To add your custom Workday user attribute to your provisioning configuration:
Launch the Microsoft Entra admin center, and navigate to the Provisioning section of your Workday provisioning application, as described earlier in this tutorial.
Set Provisioning Status to Off, and select Save. This step helps ensure your changes take effect only when you're ready.
Under Mappings, select Synchronize Workday Workers to On Premises Active Directory (or Synchronize Workday Workers to Microsoft Entra ID).
Scroll to the bottom of the next screen, and select Show advanced options.
Select Edit attribute list for Workday.
Scroll to the bottom of the attribute list to where the input fields are.
For Name, enter a display name for your attribute.
For Type, select type that appropriately corresponds to your attribute (String is most common).
For API Expression, enter the XPath expression you copied from Workday Studio. Example:
wd:Worker/wd:Worker_Data/wd:Personal_Data/wd:Birth_Date/text()Select Add Attribute.
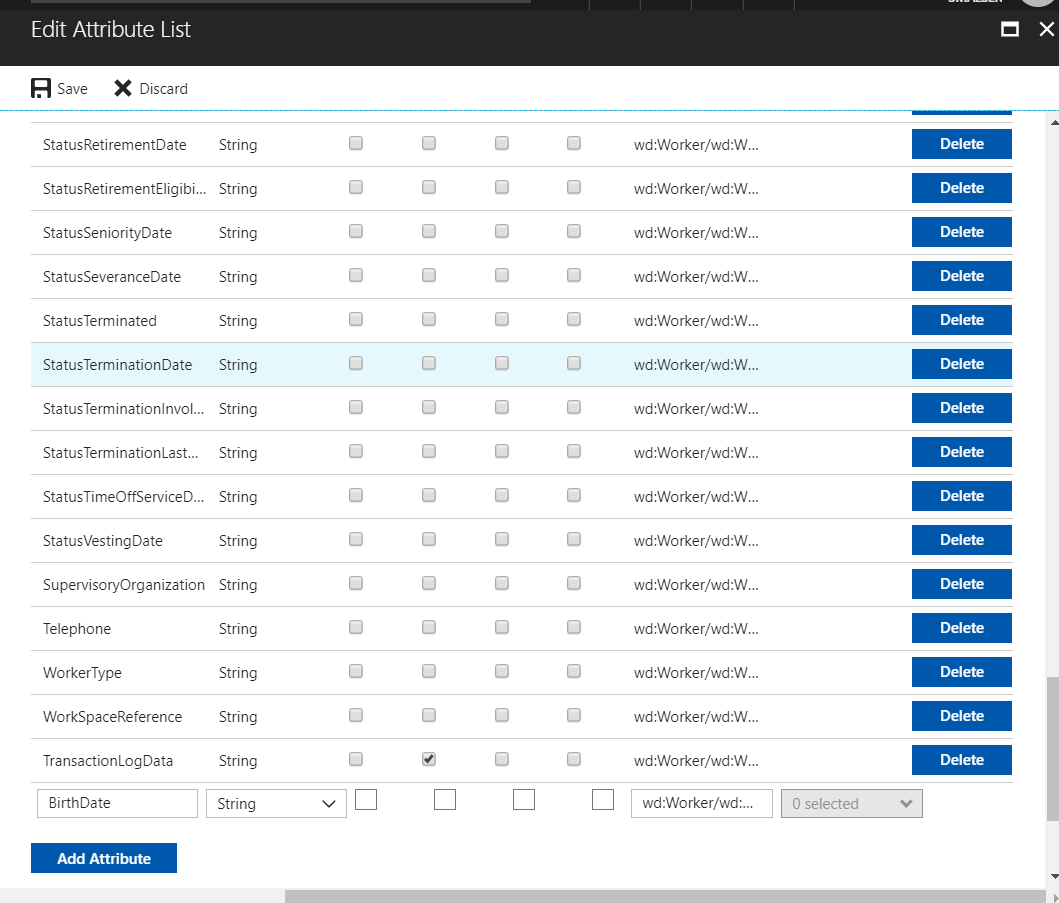
Select Save above, and then Yes to the dialog. Close the Attribute-Mapping screen if it's still open.
Back on the main Provisioning tab, select Synchronize Workday Workers to On Premises Active Directory (or Synchronize Workers to Microsoft Entra ID) again.
Select Add new mapping.
Your new attribute should now appear in the Source attribute list.
Add a mapping for your new attribute as desired.
When finished, remember to set Provisioning Status back to On and save.
Exporting and importing your configuration
Refer to the article Exporting and importing provisioning configuration
Managing personal data
The Workday provisioning solution for Active Directory requires a provisioning agent to be installed on an on-premises Windows server, and this agent creates logs in the Windows Event log which may contain personal data depending on your Workday to AD attribute mappings. To comply with user privacy obligations, you can ensure that no data is retained in the Event logs beyond 48 hours by setting up a Windows scheduled task to clear the event log.
The Microsoft Entra provisioning service falls into the data processor category of GDPR classification. As a data processor pipeline, the service provides data processing services to key partners and end consumers. Microsoft Entra provisioning service doesn't generate user data and has no independent control over what personal data is collected and how it's used. Data retrieval, aggregation, analysis, and reporting in Microsoft Entra provisioning service are based on existing enterprise data.
Note
For information about viewing or deleting personal data, please review Microsoft's guidance on the Windows data subject requests for the GDPR site. For general information about GDPR, see the GDPR section of the Microsoft Trust Center and the GDPR section of the Service Trust portal.
With respect to data retention, the Microsoft Entra provisioning service doesn't generate reports, perform analytics, or provide insights beyond 30 days. Therefore, Microsoft Entra provisioning service doesn't store, process, or retain any data beyond 30 days. This design is compliant with the GDPR regulations, Microsoft privacy compliance regulations, and Microsoft Entra data retention policies.
Related content
- Learn more about Microsoft Entra ID and Workday integration scenarios and web service calls
- Learn how to review logs and get reports on provisioning activity
- Learn how to configure single sign-on between Workday and Microsoft Entra ID
- Learn how to configure Workday Writeback
- Learn how to use Microsoft Graph APIs to manage provisioning configurations


