ईवेंट्स
17 मार्च, 9 pm - 21 मार्च, 10 am
साथी डेवलपर्स और विशेषज्ञों के साथ वास्तविक दुनिया के उपयोग के मामलों के आधार पर स्केलेबल एआई समाधान बनाने के लिए मीटअप श्रृंखला में शामिल हों।
अभी पंजीकरण करेंयह ब्राउज़र अब समर्थित नहीं है.
नवीनतम सुविधाओं, सुरक्षा अपडेट और तकनीकी सहायता का लाभ लेने के लिए Microsoft Edge में अपग्रेड करें.
In this article, you use Visual Studio Code to create a TypeScript function that responds to HTTP requests. After testing the code locally, you deploy it to the serverless environment of Azure Functions.
महत्वपूर्ण
The content of this article changes based on your choice of the Node.js programming model in the selector at the top of the page. The v4 model is generally available and is designed to have a more flexible and intuitive experience for JavaScript and TypeScript developers. Learn more about the differences between v3 and v4 in the migration guide.
Completion of this quickstart incurs a small cost of a few USD cents or less in your Azure account.
There's also a CLI-based version of this article.
Before you get started, make sure you have the following requirements in place:
node --version command to check your version.Node.js 18.x or above. Use the node --version command to check your version.
TypeScript 4.x. Use the tsc -v command to check your version.
Visual Studio Code on one of the supported platforms.
The Azure Functions extension v1.10.4 or above for Visual Studio Code.
In this section, you use Visual Studio Code to create a local Azure Functions project in TypeScript. Later in this article, you publish your function code to Azure.
In Visual Studio Code, press F1 to open the command palette and search for and run the command Azure Functions: Create New Project....
Choose the directory location for your project workspace and choose Select. You should either create a new folder or choose an empty folder for the project workspace. Don't choose a project folder that is already part of a workspace.
Provide the following information at the prompts:
| Prompt | Selection |
|---|---|
| Select a language for your function project | Choose TypeScript. |
| Select a TypeScript programming model | Choose Model V3 |
| Select a template for your project's first function | Choose HTTP trigger. |
| Provide a function name | Type HttpExample. |
| Authorization level | Choose Anonymous, which enables anyone to call your function endpoint. For more information, see Authorization level. |
| Select how you would like to open your project | Choose Open in current window. |
Using this information, Visual Studio Code generates an Azure Functions project with an HTTP trigger. You can view the local project files in the Explorer. To learn more about files that are created, see Generated project files.
Provide the following information at the prompts:
| Prompt | Selection |
|---|---|
| Select a language for your function project | Choose TypeScript. |
| Select a TypeScript programming model | Choose Model V4 |
| Select a template for your project's first function | Choose HTTP trigger. |
| Provide a function name | Type HttpExample. |
| Select how you would like to open your project | Choose Open in current window |
Using this information, Visual Studio Code generates an Azure Functions project with an HTTP trigger. You can view the local project files in the Explorer. To learn more about files that are created, see Azure Functions TypeScript developer guide.
Visual Studio Code integrates with Azure Functions Core tools to let you run this project on your local development computer before you publish to Azure.
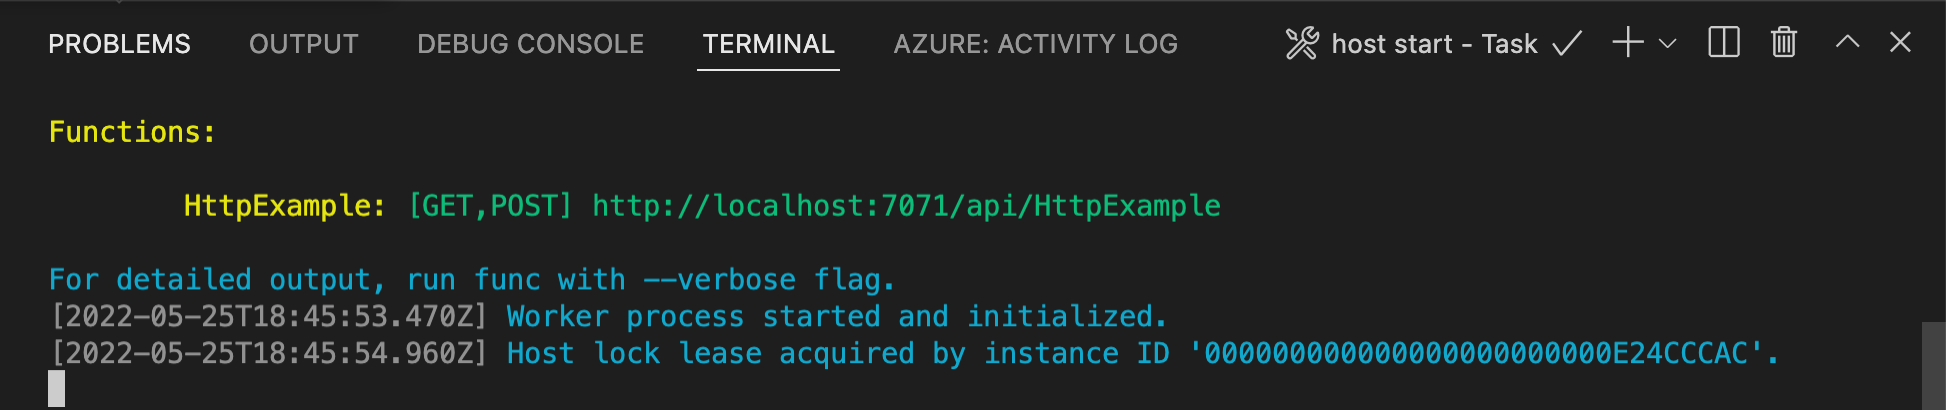
To start the function locally, press F5 or the Run and Debug icon in the left-hand side Activity bar. The Terminal panel displays the Output from Core Tools. Your app starts in the Terminal panel. You can see the URL endpoint of your HTTP-triggered function running locally.
If you have trouble running on Windows, make sure that the default terminal for Visual Studio Code isn't set to WSL Bash.
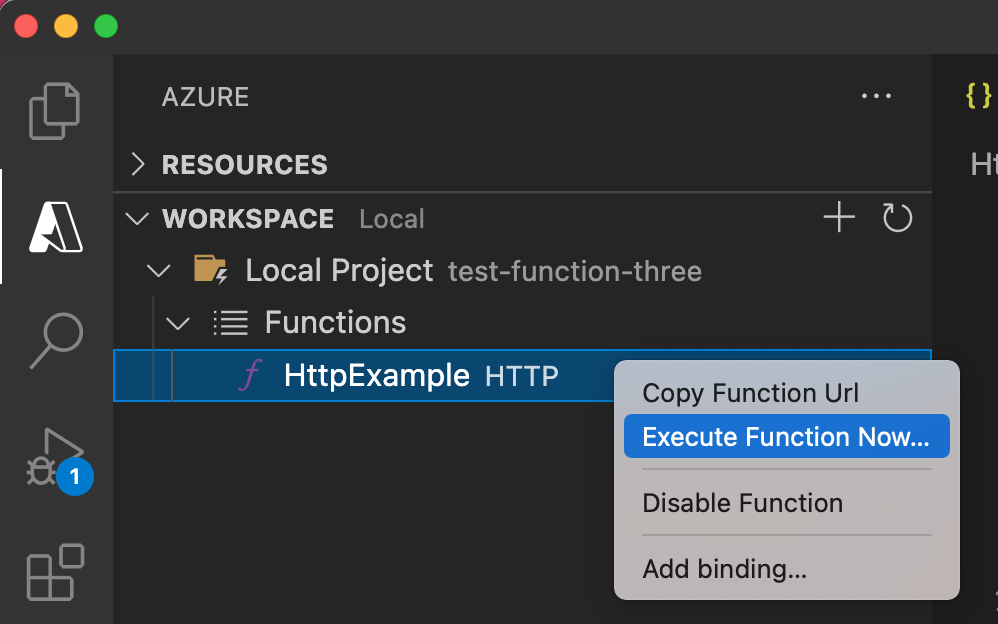
With Core Tools still running in Terminal, choose the Azure icon in the activity bar. In the Workspace area, expand Local Project > Functions. Right-click (Windows) or Ctrl - click (macOS) the new function and choose Execute Function Now....
In Enter request body you see the request message body value of { "name": "Azure" }. Press Enter to send this request message to your function.
When the function executes locally and returns a response, a notification is raised in Visual Studio Code. Information about the function execution is shown in Terminal panel.
With the Terminal panel focused, press Ctrl + C to stop Core Tools and disconnect the debugger.
After you've verified that the function runs correctly on your local computer, it's time to use Visual Studio Code to publish the project directly to Azure.
Before you can create Azure resources or publish your app, you must sign in to Azure.
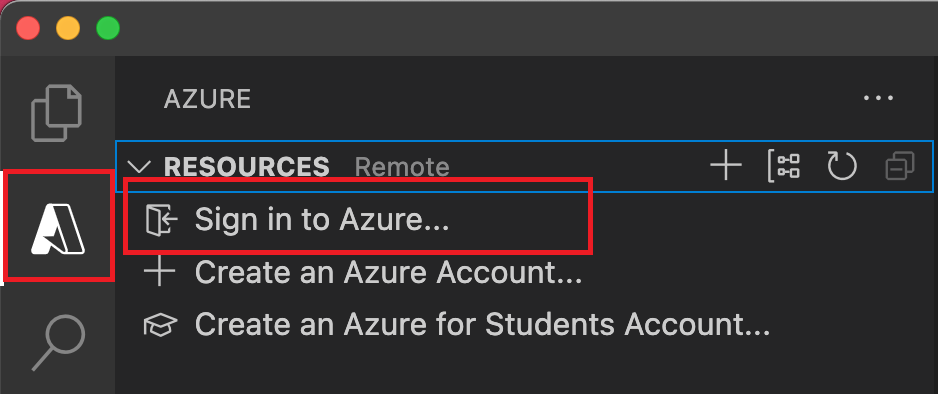
If you aren't already signed in, in the Activity bar, select the Azure icon. Then under Resources, select Sign in to Azure.
If you're already signed in and can see your existing subscriptions, go to the next section. If you don't yet have an Azure account, select Create an Azure Account. Students can select Create an Azure for Students Account.
When you are prompted in the browser, select your Azure account and sign in by using your Azure account credentials. If you create a new account, you can sign in after your account is created.
After you successfully sign in, you can close the new browser window. The subscriptions that belong to your Azure account are displayed in the side bar.
In this section, you create a function app and related resources in your Azure subscription. Many of the resource creation decisions are made for you based on default behaviors. For more control over the created resources, you must instead create your function app with advanced options.
In Visual Studio Code, select F1 to open the command palette. At the prompt (>), enter and then select Azure Functions: Create Function App in Azure.
At the prompts, provide the following information:
| Prompt | Action |
|---|---|
| Select subscription | Select the Azure subscription to use. The prompt doesn't appear when you have only one subscription visible under Resources. |
| Enter a globally unique name for the function app | Enter a name that is valid in a URL path. The name you enter is validated to make sure that it's unique in Azure Functions. |
| Select a runtime stack | Select the language version you currently run locally. |
| Select a location for new resources | Select an Azure region. For better performance, select a region near you. |
In the Azure: Activity Log panel, the Azure extension shows the status of individual resources as they're created in Azure.

When the function app is created, the following related resources are created in your Azure subscription. The resources are named based on the name you entered for your function app.
A notification is displayed after your function app is created and the deployment package is applied.
युक्ति
By default, the Azure resources required by your function app are created based on the name you enter for your function app. By default, the resources are created with the function app in the same, new resource group. If you want to customize the names of the associated resources or reuse existing resources, publish the project with advanced create options.
महत्वपूर्ण
Deploying to an existing function app always overwrites the contents of that app in Azure.
In the command palette, enter and then select Azure Functions: Deploy to Function App.
Select the function app you just created. When prompted about overwriting previous deployments, select Deploy to deploy your function code to the new function app resource.
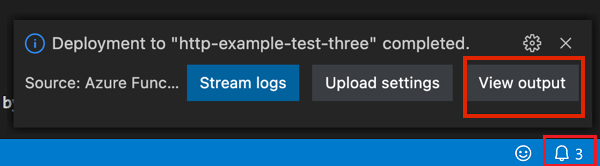
When deployment is completed, select View Output to view the creation and deployment results, including the Azure resources that you created. If you miss the notification, select the bell icon in the lower-right corner to see it again.
Press F1 to display the command palette, then search for and run the command Azure Functions:Execute Function Now.... If prompted, select your subscription.
Select your new function app resource and HttpExample as your function.
In Enter request body type { "name": "Azure" }, then press Enter to send this request message to your function.
When the function executes in Azure, the response is displayed in the notification area. Expand the notification to review the full response.
When you continue to the next step and add an Azure Storage queue binding to your function, you'll need to keep all your resources in place to build on what you've already done.
Otherwise, you can use the following steps to delete the function app and its related resources to avoid incurring any further costs.
In Visual Studio Code, press F1 to open the command palette. In the command palette, search for and select Azure: Open in portal.
Choose your function app and press Enter. The function app page opens in the Azure portal.
In the Overview tab, select the named link next to Resource group.

On the Resource group page, review the list of included resources, and verify that they're the ones you want to delete.
Select Delete resource group, and follow the instructions.
Deletion may take a couple of minutes. When it's done, a notification appears for a few seconds. You can also select the bell icon at the top of the page to view the notification.
For more information about Functions costs, see Estimating Consumption plan costs.
You have used Visual Studio Code to create a function app with a simple HTTP-triggered function. In the next article, you expand that function by connecting to Azure Storage. To learn more about connecting to other Azure services, see Add bindings to an existing function in Azure Functions.
ईवेंट्स
17 मार्च, 9 pm - 21 मार्च, 10 am
साथी डेवलपर्स और विशेषज्ञों के साथ वास्तविक दुनिया के उपयोग के मामलों के आधार पर स्केलेबल एआई समाधान बनाने के लिए मीटअप श्रृंखला में शामिल हों।
अभी पंजीकरण करेंप्रशिक्षण
मॉड्यूल
Azure Static Web Apps में API प्रकाशित करें - Training
Azure Static Web Apps और Azure Functions के साथ Angular, React, Svelte, या Vue JavaScript ऐप और API प्रकाशित करें। पूर्वावलोकन URL का उपयोग करके अपने कोड को GitHub से स्टेजिंग साइट पर परिनियोजित करें।
Certification
Microsoft प्रमाणित: Azure डेवलपर सहयोगी - Certifications
Azure फ़ंक्शन बनाने, वेब ऐप्स को लागू करने और प्रबंधित करने, Azure संग्रहण का उपयोग करके समाधान विकसित करने, और बहुत कुछ करने के लिए Microsoft Azure में एंड-टू-एंड समाधान बनाएँ।
दस्तावेज़ीकरण
Create a TypeScript function from the command line - Azure Functions
Learn how to create a TypeScript function from the command line, then publish the local project to serverless hosting in Azure Functions.
Node.js developer reference for Azure Functions
Understand how to develop functions by using Node.js.
Introduction to Developing Serverless Node.js Apps with Azure Functions - JavaScript on Azure
Learn how to develop serverless Node.js applications using Azure Functions. This guide introduces Azure's serverless technologies, enabling you to create scalable, on-demand HTTP endpoints with JavaScript and TypeScript.