Deploy Start/Stop VMs v2 to an Azure subscription
Perform the steps in this article in sequence to install the Start/Stop VMs v2 feature. After completing the setup process, configure the schedules to customize it to your requirements.
Permissions and Policy considerations
Keep the following considerations in mind before and during deployment:
The solution allows users with appropriate role-based access control (RBAC) permissions on the Start/Stop v2 deployment to add, remove, and manage schedules for virtual machines under the scope of the Start/Stop VMs v2 instance. This behavior is by design. In practice, this means a user who doesn't have explicit permissions on a virtual machine could still create start, stop, and autostop operations on that virtual machine when they have the permission to modify the Start/Stop v2 solution managing the virtual machine.
Any users with access to the Start/Stop v2 solution could uncover cost, savings, operation history, and other data that is stored in the Application Insights instance used by the Start/Stop v2 application.
When managing a Start/Stop v2 solution, you should consider the permissions of users to the Start/Stop v2 solution, particularly when whey don't have permission to directly modify the target virtual machines.
When you deploy the Start/Stop v2 solution to a new or existing resource group, a tag named SolutionName with a value of StartStopV2 is added to resource group and to its resources that are deployed by Start/Stop v2. Any other tags on these resources are removed. If you have an Azure policy that denies management operations based on resource tags, you must allow management operations for resources that contain only this tag.
Deploy feature
The deployment is initiated from the Start/Stop VMs v2 GitHub organization. While this feature is intended to manage all of your VMs in your subscription across all resource groups from a single deployment within the subscription, you can install another instance of it based on the operations model or requirements of your organization. It also can be configured to centrally manage VMs across multiple subscriptions.
To simplify management and removal, we recommend you deploy Start/Stop VMs v2 to a dedicated resource group.
Note
Currently this solution does not support specifying an existing Storage account or Application Insights resource.
Note
The naming format for the function app and storage account has changed. To guarantee global uniqueness, a random and unique string is now appended to the names of these resource.
Open your browser and navigate to the Start/Stop VMs v2 GitHub organization.
Select the deployment option based on the Azure cloud environment your Azure VMs are created in.
If prompted, sign in to the Azure portal.
Choose the appropriate Plan from the drop-down box. When choosing a Zone Redundant plan (Start/StopV2-AZ), you must create your deployment in one of the following regions:
- Australia East
- Brazil South
- Canada Central
- Central US
- East US
- East US 2
- France Central
- Germany West Central
- Japan East
- North Europe
- Southeast Asia
- UK South
- West Europe
- West US 2
- West US 3
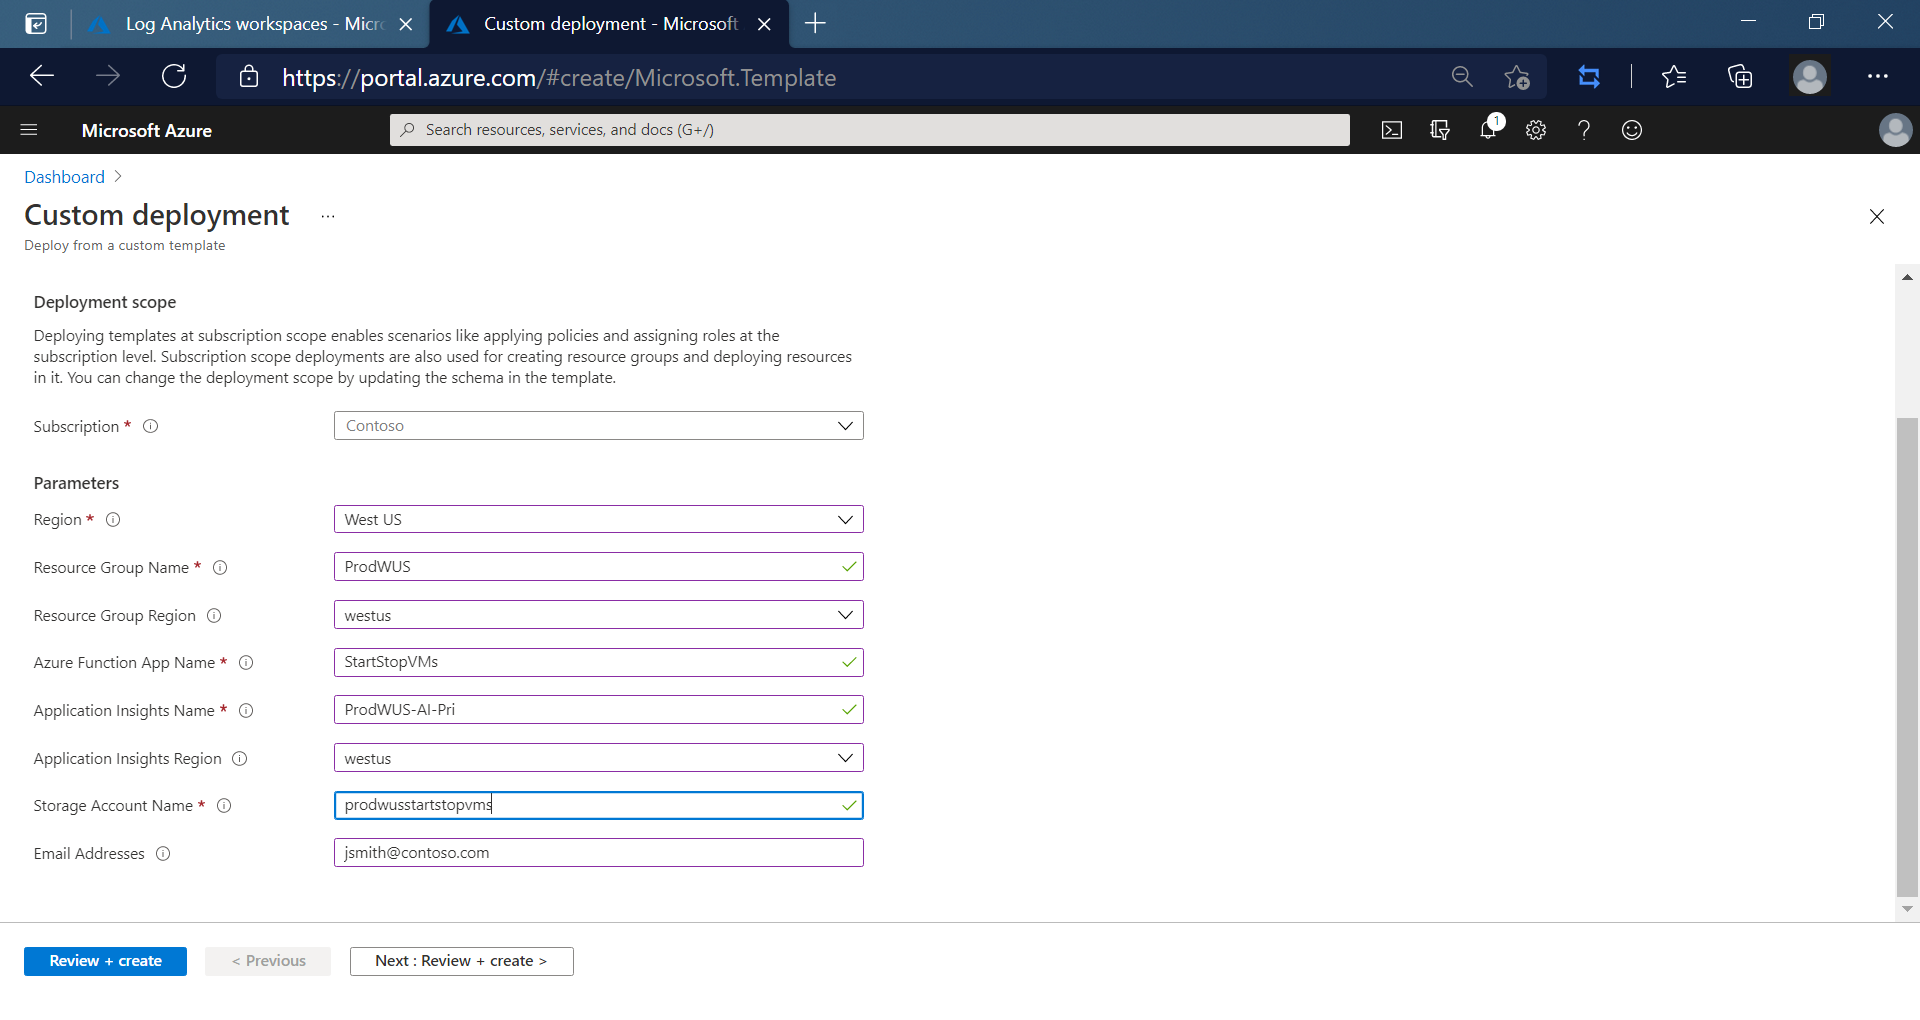
Select Create, which opens the custom Azure Resource Manager deployment page in the Azure portal.
Enter the following values:
Name Value Region Select a region near you for new resources. Resource Group Name Specify the resource group name that will contain the individual resources for Start/Stop VMs. Resource Group Region Specify the region for the resource group. For example, Central US. Azure Function App Name Type a name that is valid in a URL path. The name you type is validated to make sure that it's unique in Azure Functions. Application Insights Name Specify the name of your Application Insights instance that will hold the analytics for Start/Stop VMs. Application Insights Region Specify the region for the Application Insights instance. Storage Account Name Specify the name of the Azure Storage account to store Start/Stop VMs execution telemetry. Email Address Specify one or more email addresses to receive status notifications, separated by a comma (,). 
Select Review + create on the bottom of the page.
Select Create to start the deployment.
Select the bell icon (notifications) from the top of the screen to see the deployment status. You shall see Deployment in progress. Wait until the deployment is completed.
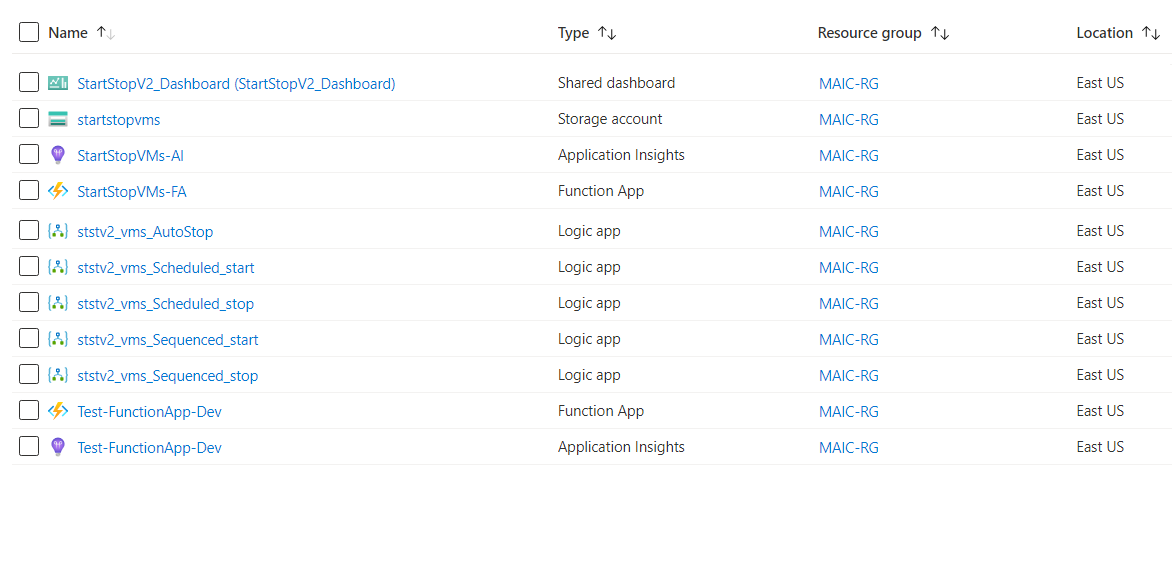
Select Go to resource group from the notification pane. You shall see a screen similar to:

Note
We are collecting operation and heartbeat telemetry to better assist you if you reach the support team for any troubleshooting. We are also collecting virtual machine event history to verify when the service acted on a virtual machine and how long a virtual machine was snoozed in order to determine the efficacy of the service.
Enable multiple subscriptions
After the Start/Stop deployment completes, perform the following steps to enable Start/Stop VMs v2 to take action across multiple subscriptions.
Copy the value for the Azure Function App name that you specified during the deployment.
In the Azure portal, navigate to your secondary subscription.
Select Access control (IAM).
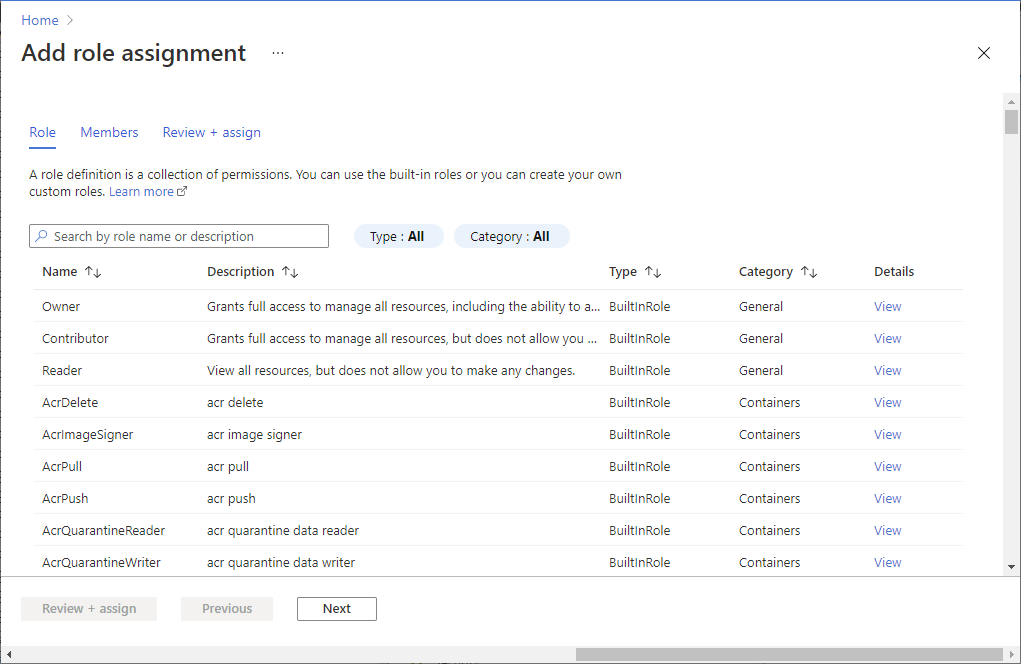
Select Add > Add role assignment to open the Add role assignment page.
Assign the following role. For detailed steps, see Assign Azure roles using the Azure portal.
Setting Value Role Contributor Assign access to User, group, or service principal Members <Your Azure Function App name> 
Configure schedules overview
To manage the automation method to control the start and stop of your VMs, you configure one or more of the included logic apps based on your requirements.
Scheduled - Start and stop actions are based on a schedule you specify against Azure Resource Manager and classic VMs. ststv2_vms_Scheduled_start and ststv2_vms_Scheduled_stop configure the scheduled start and stop.
Sequenced - Start and stop actions are based on a schedule targeting VMs with pre-defined sequencing tags. Only two named tags are supported - sequencestart and sequencestop. ststv2_vms_Sequenced_start and ststv2_vms_Sequenced_stop configure the sequenced start and stop.
Note
This scenario only supports Azure Resource Manager VMs.
AutoStop - This functionality is only used for performing a stop action against both Azure Resource Manager and classic VMs based on its CPU utilization. It can also be a scheduled-based take action, which creates alerts on VMs and based on the condition, the alert is triggered to perform the stop action.ststv2_vms_AutoStop configures the auto-stop functionality.
If you need additional schedules, you can duplicate one of the Logic Apps provided using the Clone option in the Azure portal.
Scheduled start and stop scenario
Perform the following steps to configure the scheduled start and stop action for Azure Resource Manager and classic VMs. For example, you can configure the ststv2_vms_Scheduled_start schedule to start them in the morning when you are in the office, and stop all VMs across a subscription when you leave work in the evening based on the ststv2_vms_Scheduled_stop schedule.
Configuring the logic app to just start the VMs is supported.
For each scenario, you can target the action against one or more subscriptions, single or multiple resource groups, and specify one or more VMs in an inclusion or exclusion list. You cannot specify them together in the same logic app.
Sign in to the Azure portal and then navigate to Logic apps.
From the list of Logic apps, to configure scheduled start, select ststv2_vms_Scheduled_start. To configure scheduled stop, select ststv2_vms_Scheduled_stop.
Select Logic app designer from the left-hand pane.
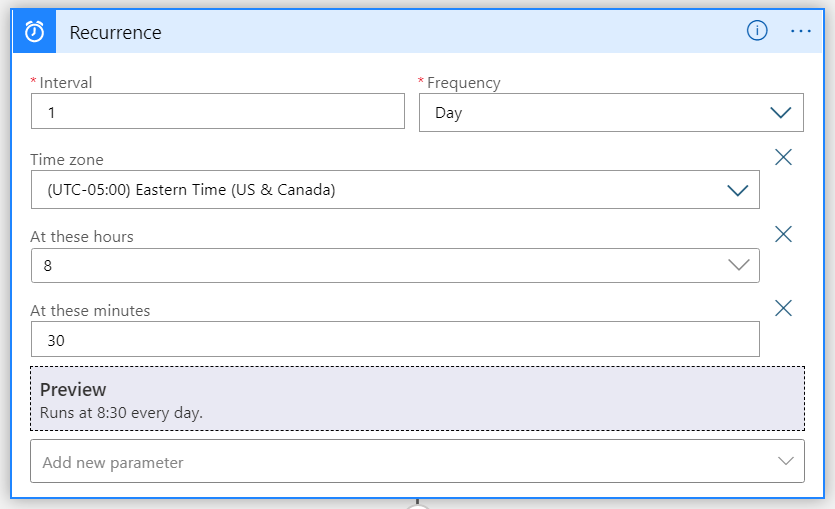
After Logic App Designer appears, in the designer pane, select Recurrence to configure the logic app schedule. To learn about the specific recurrence options, see Schedule recurring task.

Note
If you do not provide a start date and time for the first recurrence, a recurrence will immediately run when you save the logic app, which might cause the VMs to start or stop before the scheduled run.
In the designer pane, select Function-Try to configure the target settings. In the request body, if you want to manage VMs across all resource groups in the subscription, modify the request body as shown in the following example.
{
  "Action": "start",
  "EnableClassic": false,
  "RequestScopes": {
    "ExcludedVMLists": [],
    "Subscriptions": [
      "/subscriptions/12345678-1234-5678-1234-123456781234/"
    ]
 }
}
Specify multiple subscriptions in the
subscriptionsarray with each value separated by a comma as in the following example."Subscriptions": [ "/subscriptions/12345678-1234-5678-1234-123456781234/", "/subscriptions/11111111-0000-1111-2222-444444444444/" ]In the request body, if you want to manage VMs for specific resource groups, modify the request body as shown in the following example. Each resource path specified must be separated by a comma. You can specify one resource group or more if required.
This example also demonstrates excluding a virtual machine. You can exclude the VM by specifying the VMs resource path or by wildcard.
{
  "Action": "start",
  "EnableClassic": false,
  "RequestScopes": {
    "Subscriptions": [
      "/subscriptions/12345678-1234-5678-1234-123456781234/",
      "/subscriptions/11111111-0000-1111-2222-444444444444/"
     ],
    "ResourceGroups": [
      "/subscriptions/12345678-1234-5678-1234-123456781234/resourceGroups/rg1/",
      "/subscriptions/11111111-0000-1111-2222-444444444444/resourceGroups/rg2/"
    ],
    "ExcludedVMLists": [
     "/subscriptions/12345678-1234-5678-1234-123456781234/resourceGroups/vmrg1/providers/Microsoft.Compute/virtualMachines/vm1"
    ]
  }
}
Here the action will be performed on all the VMs except on the VM name starts with Az and Bz in both subscriptions.
{
  "Action": "start",
  "EnableClassic": false,
  "RequestScopes": {
    "ExcludedVMLists": [“Az*”,“Bz*”],
   "Subscriptions": [
      "/subscriptions/12345678-1234-5678-1234-123456781234/",
      "/subscriptions/11111111-0000-1111-2222-444444444444/"

    ]
  }
}
In the request body, if you want to manage a specific set of VMs within the subscription, modify the request body as shown in the following example. Each resource path specified must be separated by a comma. You can specify one VM if required.
{
  "Action": "start",
  "EnableClassic": false,
  "RequestScopes": {
    "ExcludedVMLists": [],
    "VMLists": [
      "/subscriptions/12345678-1234-5678-1234-123456781234/resourceGroups/rg1/providers/Microsoft.Compute/virtualMachines/vm1",
      "/subscriptions/12345678-1234-5678-1234-123456781234/resourceGroups/rg3/providers/Microsoft.Compute/virtualMachines/vm2",
      "/subscriptions/11111111-0000-1111-2222-444444444444/resourceGroups/rg2/providers/Microsoft.ClassicCompute/virtualMachines/vm30"

    ]
  }
}
In the overview pane for the logic app, select Enable.
Sequenced start and stop scenario
In an environment that includes two or more components on multiple Azure Resource Manager VMs in a distributed application architecture, supporting the sequence in which components are started and stopped in order is important. Make sure you have applied the sequencestart and sequencestop tags to the target VMs as described on the Overview page before configuring this scenario.
From the list of Logic apps, to configure sequenced start, select ststv2_vms_Sequenced_start. To configure sequenced stop, select ststv2_vms_Sequenced_stop.
Select Logic app designer from the left-hand pane.
After Logic App Designer appears, in the designer pane, select Recurrence to configure the logic app schedule. To learn about the specific recurrence options, see Schedule recurring task.

Note
If you do not provide a start date and time for the first recurrence, a recurrence will immediately run when you save the logic app, which might cause the VMs to start or stop before the scheduled run.
In the designer pane, select Function-Try to configure the target settings and then select the </> Code view button in the top menu to edit the code for the Function-Try element. In the request body, if you want to manage VMs across all resource groups in the subscription, modify the request body as shown in the following example.
{
  "Action": "start",
  "EnableClassic": false,
  "RequestScopes": {
    "ExcludedVMLists": [],
    "Subscriptions": [
      "/subscriptions/12345678-1234-5678-1234-123456781234/"
    ]
 },
   "Sequenced": true
}
Specify multiple subscriptions in the
subscriptionsarray with each value separated by a comma as in the following example."Subscriptions": [ "/subscriptions/12345678-1234-5678-1234-123456781234/", "/subscriptions/11111111-0000-1111-2222-444444444444/" ]In the request body, if you want to manage VMs for specific resource groups, modify the request body as shown in the following example. Each resource path specified must be separated by a comma. You can specify one resource group if required.
This example also demonstrates excluding a virtual machine by its resource path compared to the example for scheduled start/stop, which used wildcards.
{
  "Action": "start",
  "EnableClassic": false,
  "RequestScopes": {
    "Subscriptions":[
      "/subscriptions/12345678-1234-5678-1234-123456781234/",
      "/subscriptions/11111111-0000-1111-2222-444444444444/"
    ],
    "ResourceGroups": [
      "/subscriptions/12345678-1234-5678-1234-123456781234/resourceGroups/rg1/",
      "/subscriptions/11111111-0000-1111-2222-444444444444/resourceGroups/rg2/"
    ],
    "ExcludedVMLists": [
     "/subscriptions/12345678-1234-5678-1234-123456781234/resourceGroups/vmrg1/providers/Microsoft.Compute/virtualMachines/vm1"
    ]
  },
   "Sequenced": true
}
In the request body, if you want to manage a specific set of VMs within a subscription, modify the request body as shown in the following example. Each resource path specified must be separated by a comma. You can specify one VM if required.
{
  "Action": "start",
  "EnableClassic": false,
  "RequestScopes": {
    "ExcludedVMLists": [],
    "VMLists": [
      "/subscriptions/12345678-1234-5678-1234-123456781234/resourceGroups/rg1/providers/Microsoft.Compute/virtualMachines/vm1",
      "/subscriptions/12345678-1234-5678-1234-123456781234/resourceGroups/rg2/providers/Microsoft.ClassicCompute/virtualMachines/vm2",
      "/subscriptions/11111111-0000-1111-2222-444444444444/resourceGroups/rg2/providers/Microsoft.ClassicCompute/virtualMachines/vm30"
    ]
  },
   "Sequenced": true
}
Auto stop scenario
Start/Stop VMs v2 can help manage the cost of running Azure Resource Manager and classic VMs in your subscription by evaluating machines that aren't used during non-peak periods, such as after hours, and automatically shutting them down if processor utilization is less than a specified percentage.
The following metric alert properties in the request body support customization:
- AutoStop_MetricName
- AutoStop_Condition
- AutoStop_Threshold
- AutoStop_Description
- AutoStop_Frequency
- AutoStop_Severity
- AutoStop_Threshold
- AutoStop_TimeAggregationOperator
- AutoStop_TimeWindow
To learn more about how Azure Monitor metric alerts work and how to configure them see Metric alerts in Azure Monitor.
From the list of Logic apps, to configure auto stop, select ststv2_vms_AutoStop.
Select Logic app designer from the left-hand pane.
After Logic App Designer appears, in the designer pane, select Recurrence to configure the logic app schedule. To learn about the specific recurrence options, see Schedule recurring task.

In the designer pane, select Function-Try to configure the target settings. In the request body, if you want to manage VMs across all resource groups in the subscription, modify the request body as shown in the following example.
{
  "Action": "stop",
  "EnableClassic": false,
  "AutoStop_MetricName": "Percentage CPU",
  "AutoStop_Condition": "LessThan",
  "AutoStop_Description": "Alert to stop the VM if the CPU % falls below the threshold",
  "AutoStop_Frequency": "00:05:00",
  "AutoStop_Severity": "2",
  "AutoStop_Threshold": "5",
  "AutoStop_TimeAggregationOperator": "Average",
  "AutoStop_TimeWindow": "06:00:00",
  "RequestScopes":{
    "Subscriptions":[
        "/subscriptions/12345678-1111-2222-3333-1234567891234/",
        "/subscriptions/12345678-2222-4444-5555-1234567891234/"
    ],
    "ExcludedVMLists":[]
  }
}
In the request body, if you want to manage VMs for specific resource groups, modify the request body as shown in the following example. Each resource path specified must be separated by a comma. You can specify one resource group if required.
{
  "Action": "stop",
  "AutoStop_Condition": "LessThan",
  "AutoStop_Description": "Alert to stop the VM if the CPU % falls below the threshold",
  "AutoStop_Frequency": "00:05:00",
  "AutoStop_MetricName": "Percentage CPU",
  "AutoStop_Severity": "2",
  "AutoStop_Threshold": "5",
  "AutoStop_TimeAggregationOperator": "Average",
  "AutoStop_TimeWindow": "06:00:00",
  "EnableClassic": false,
  "RequestScopes": {
    "ExcludedVMLists": [],
    "ResourceGroups": [
      "/subscriptions/12345678-1111-2222-3333-1234567891234/resourceGroups/vmrg1/",
      "/subscriptions/12345678-1111-2222-3333-1234567891234/resourceGroupsvmrg2/",
      "/subscriptions/12345678-2222-4444-5555-1234567891234/resourceGroups/VMHostingRG/"
      ]
  }
}
In the request body, if you want to manage a specific set of VMs within the subscription, modify the request body as shown in the following example. Each resource path specified must be separated by a comma. You can specify one VM if required.
{
  "Action": "stop",
  "AutoStop_Condition": "LessThan",
  "AutoStop_Description": "Alert to stop the VM if the CPU % falls below the threshold",
  "AutoStop_Frequency": "00:05:00",
  "AutoStop_MetricName": "Percentage CPU",
  "AutoStop_Severity": "2",
  "AutoStop_Threshold": "5",
  "AutoStop_TimeAggregationOperator": "Average",
  "AutoStop_TimeWindow": "06:00:00",
  "EnableClassic": false,
  "RequestScopes": {
    "ExcludedVMLists": [],
    "VMLists": [
      "/subscriptions/12345678-1111-2222-3333-1234567891234/resourceGroups/rg3/providers/Microsoft.ClassicCompute/virtualMachines/Clasyvm11",
      "/subscriptions/12345678-1111-2222-3333-1234567891234/resourceGroups/vmrg1/providers/Microsoft.Compute/virtualMachines/vm1"
    ]
  }
}
VM Tags
You can also include or exclude specific VMs from start and stop actions by settings tags on the VMs themselves. To add a tag, navigate to the specific VM, select Tags from the left menu, and add a tag named ssv2excludevm. To exclude this VM from the start or stop action, set the value of this new tag to true. To include the VM in the action, set the value to false. This gives you a way to exclude specific VMs without having to update ExcludedVMLists in the payload configuration.
Next steps
To learn how to monitor status of your Azure VMs managed by the Start/Stop VMs v2 feature and perform other management tasks, see the Manage Start/Stop VMs article.