Troubleshooting in Azure Communication Services
This document helps you troubleshoot issues that you might experience within your Communication Services solution. If you're troubleshooting SMS, you can enable delivery reporting with Event Grid to capture SMS delivery details.
Getting help
We encourage developers to submit questions, suggest features, and report problems as issues. For more information, see the dedicated support and help options page.
To help you troubleshoot certain issues, you might need one or more of the following pieces of information:
- MS-CV ID: Troubleshoot calls and messages.
- Call ID: Identify Communication Services calls.
- SMS message ID: Identify SMS messages.
- Short Code Program Brief ID: Identify a short code program brief application.
- Toll-free verification campaign brief ID: Identify a toll-free verification campaign brief application.
- Email message ID: Identify Send Email requests.
- Correlation ID: Identify requests made using Call Automation.
- Call logs: Contain detailed information can be used to troubleshoot calling and network issues.
For more information about throttling and limitations, see Service limits.
Access your MS-CV ID
You can access the MS-CV ID by configuring diagnostics in the clientOptions object instance when initializing your SDKs. You can configure diagnostics for any Azure SDK including Chat, Identity, and VoIP calling.
Client options example
The following code snippets demonstrate diagnostics configuration. When you enable diagnostics for SDKs, diagnostics details can be emitted to the configured event listener:
// 1. Import Azure.Core.Diagnostics
using Azure.Core.Diagnostics;

// 2. Initialize an event source listener instance
using var listener = AzureEventSourceListener.CreateConsoleLogger();
Uri endpoint = new Uri("https://<RESOURCE-NAME>.communication.azure.net");
var (token, communicationUser) = await GetCommunicationUserAndToken();
CommunicationUserCredential communicationUserCredential = new CommunicationUserCredential(token);

// 3. Setup diagnostic settings
var clientOptions = new ChatClientOptions()
{
    Diagnostics =
    {
        LoggedHeaderNames = { "*" },
        LoggedQueryParameters = { "*" },
        IsLoggingContentEnabled = true,
    }
};

// 4. Initialize the ChatClient instance with the clientOptions
ChatClient chatClient = new ChatClient(endpoint, communicationUserCredential, clientOptions);
ChatThreadClient chatThreadClient = await chatClient.CreateChatThreadAsync("Thread Topic", new[] { new ChatThreadMember(communicationUser) });
Access IDs required for Call Automation
When troubleshooting issues with the Call Automation SDK, such as call management or recording problems, you need to collect the IDs that help identify the failing call or operation. You can provide either of the following two IDs.
From the header of API response, locate the field
X-Ms-Skype-Chain-Id.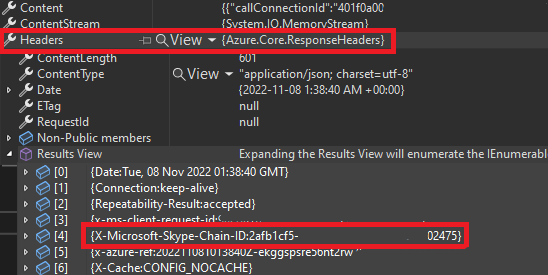
From the callback events, your application receives after executing an action. For example
CallConnectedorPlayFailed, locate the correlationID.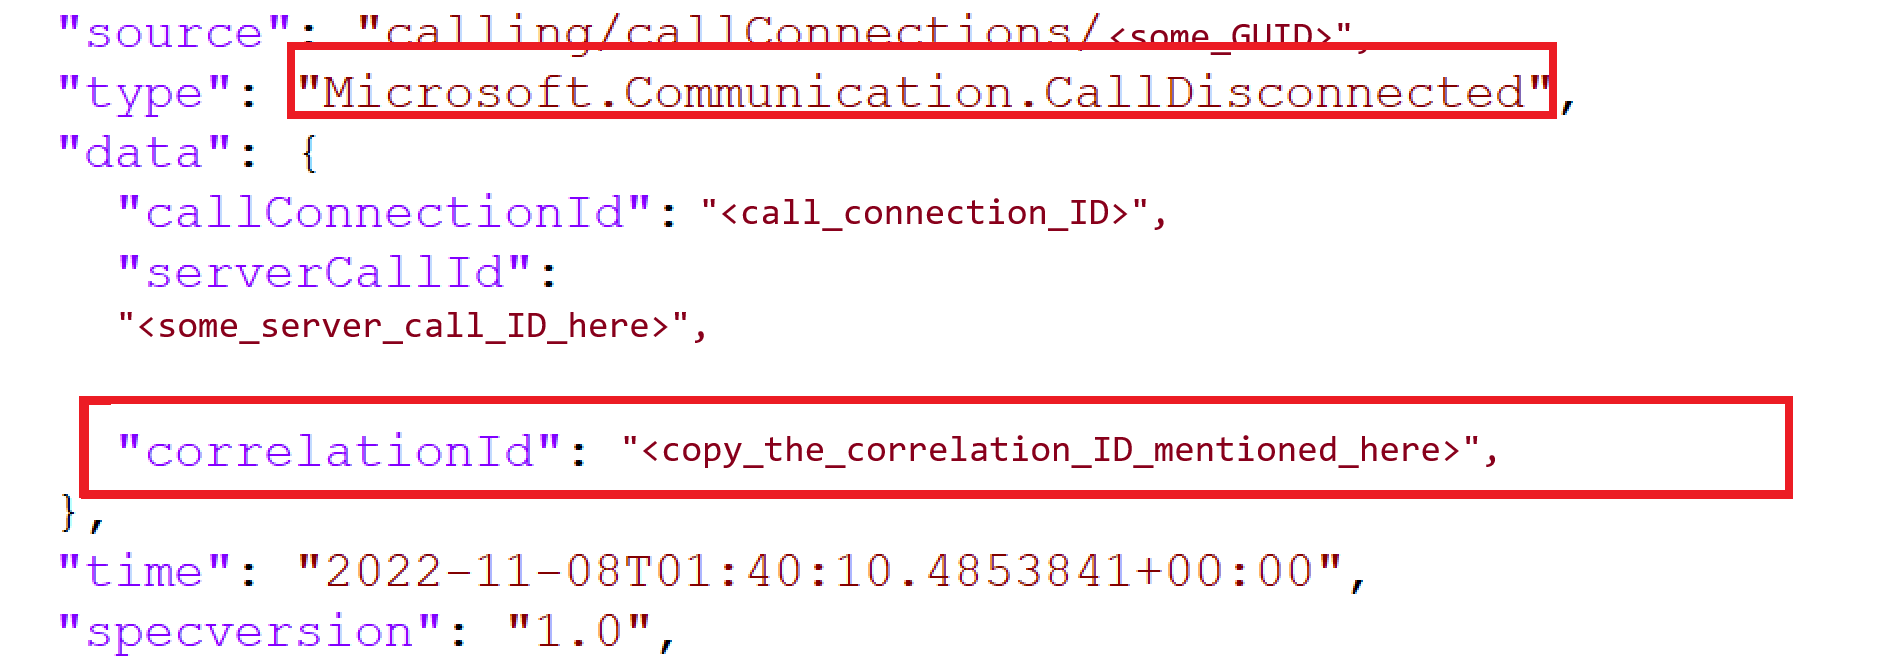
In addition to one of these IDs, you need to provide details about the failing use case and the timestamp when the failure occurred.
Access your client call ID
When troubleshooting voice or video calls, you might need to provide a call ID. Access this value via the id property of the call object:
// `call` is an instance of a call created by `callAgent.startCall` or `callAgent.join` methods
console.log(call.id)
Access your SMS message ID
For SMS issues, you can collect the message ID from the response object.
// Instantiate the SMS client
const smsClient = new SmsClient(connectionString);
async function main() {
  const result = await smsClient.send({
    from: "+18445792722",
    to: ["+1972xxxxxxx"],
    message: "Hello World 👋🏻 via Sms"
  }, {
    enableDeliveryReport: true // Optional parameter
  });
console.log(result); // your message ID is in the result
}
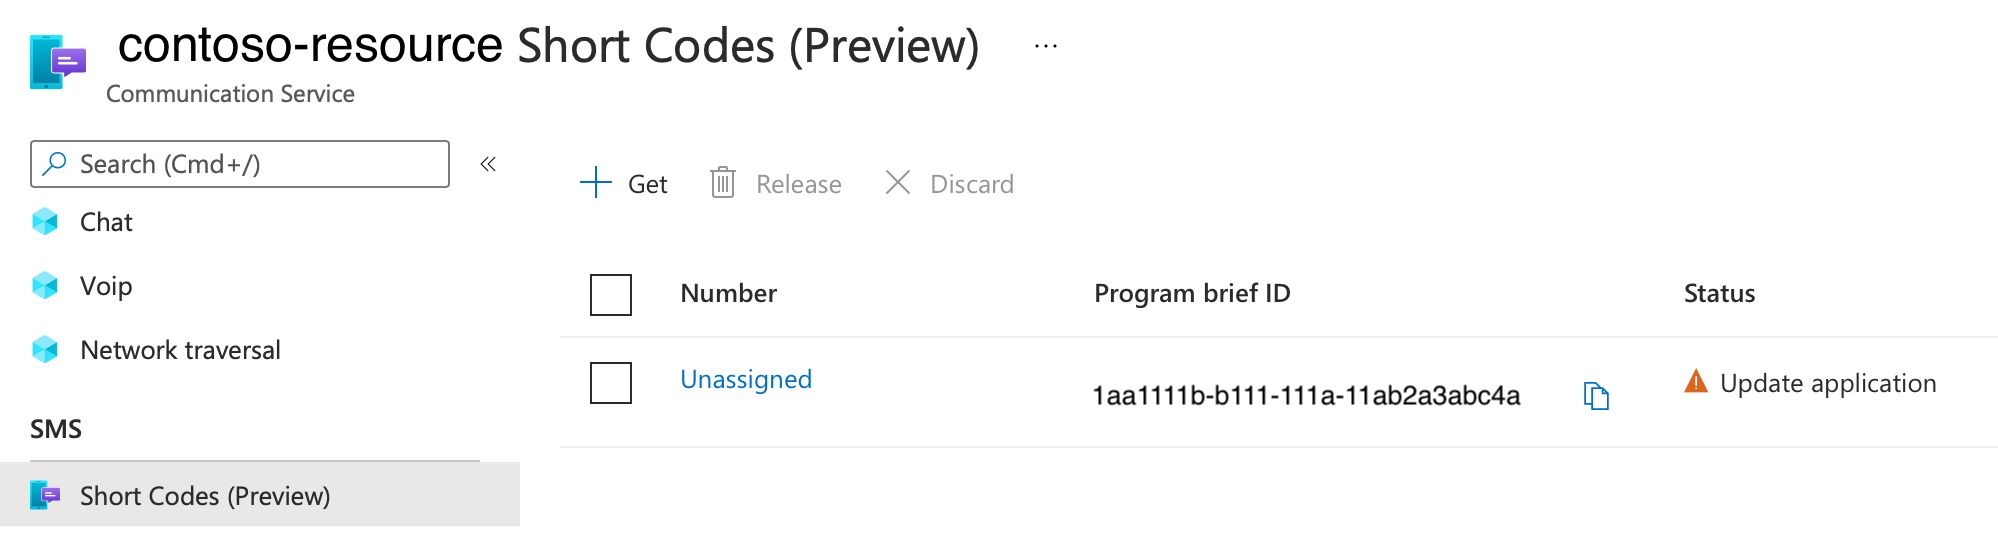
Access your short code program brief ID
Find the program brief ID on the Azure portal in the Short Codes section.
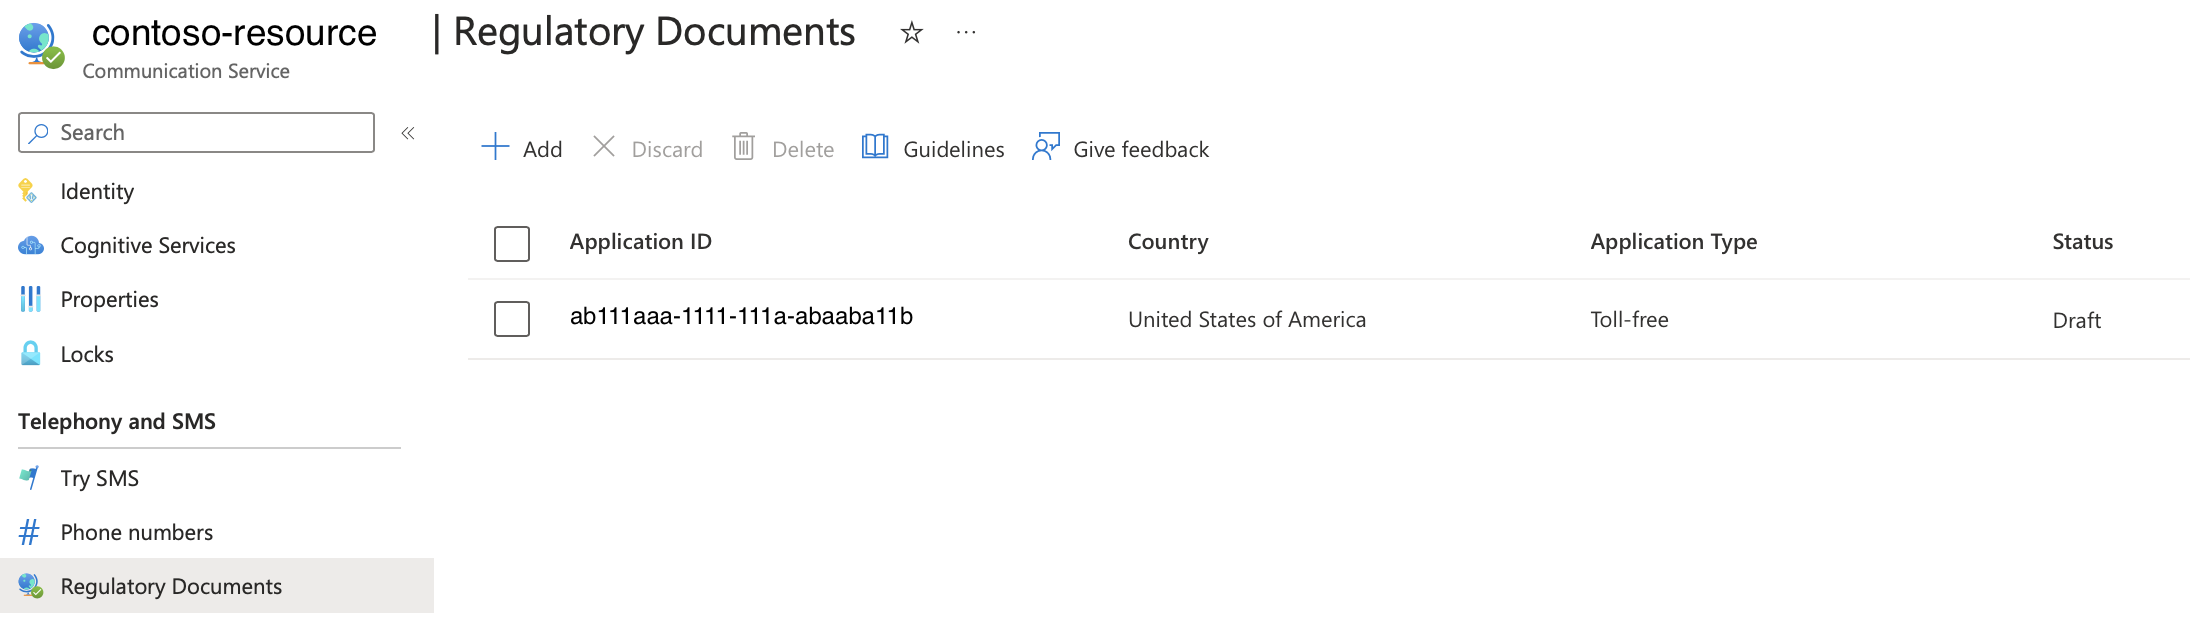
Access your toll-free verification campaign brief ID
Find the program brief ID on the Azure portal in the Regulatory Documents section.
Access your email operation ID
When troubleshooting send email or email message status requests, you might need to provide an operation ID. You can access this value in the response:
var emailSendOperation = await emailClient.SendAsync(
    wait: WaitUntil.Completed,
    senderAddress: sender,
    recipientAddress: recipient,
    subject: subject,
    htmlContent: htmlContent);

/// Get the OperationId so that it can be used for tracking the message for troubleshooting
Console.WriteLine($"Email operation id = {emailSendOperation.Id}");
Accessing Support Files in the Calling SDK
Calling SDK provides convenient methods to access to the Log Files. These files can serve valuable to Microsoft support specialists and engineers. We recommend that you collect these logs when you detect an issue.
Enable and Access Call Logs
[JavaScript]
The Azure Communication Services Calling SDK relies internally on @azure/logger library to control logging.
Use the setLogLevel method from the @azure/logger package to configure the log output level. Create a logger and pass it into the CallClient constructor as follows:
import { setLogLevel, createClientLogger, AzureLogger } from '@azure/logger';
setLogLevel('verbose');
let logger = createClientLogger('ACS');
const callClient = new CallClient({ logger });
You can use AzureLogger to redirect the logging output from Azure SDKs by overriding the AzureLogger.log method:
You can log to the browser console, a file, buffer, send to our own service, and so on. If you're going to send logs over the network to your own service, don't send a request per log line because this adversely affects browser performance. Instead, accumulate logs lines and send them in batches.
// Redirect log output
AzureLogger.log = (...args) => {
    // To console, file, buffer, REST API, etc...
    console.log(...args);
};
Native SDK (Android/iOS)
For Android, iOS, and Windows, the Azure Communication Services Calling SDK offers access to log files.
For Calling Native SDKs, see the Log file access tutorials
UI Libraries (Android, iOS)
If you're using the Azure Communication Services UI Libraries for Android or iOS, you can solicit user feedback through the built-in support form.
For more information about the support functions of the Calling UI Support form, see the Support Form integration tutorial. This document guides you through adding the necessary event handler, and creating a basic client/server implementation for centralized storage of support information. This guide describes the path for integrating with the support services used by your organization.
Building end to end Support Flows in your ACS Integrations
Whether you're using Calling SDK or Calling UI SDK, providing support to your customers is a key component of any robust integration. The following document highlights the key considerations at each point of the Support feedback loop, and provides jumping off points to learn more.
Finding Microsoft Entra information
- Getting Directory ID
- Getting Application ID
- Getting User ID
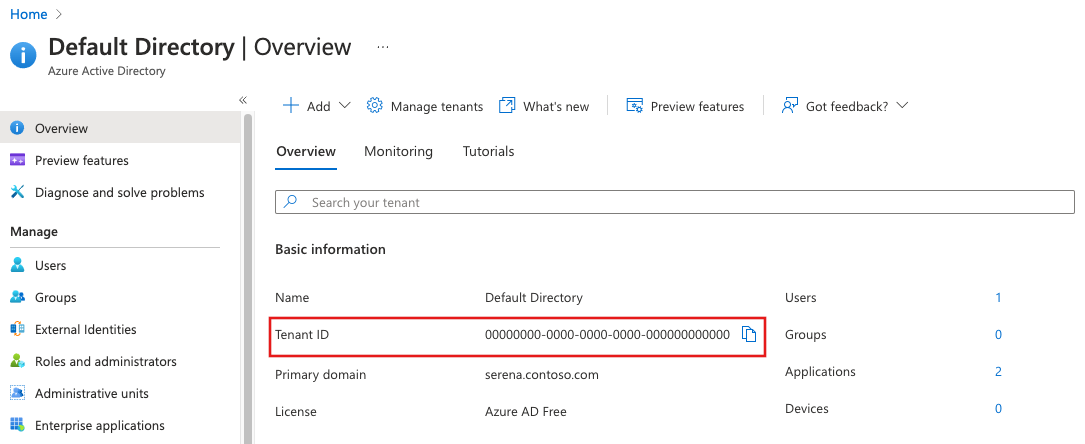
Getting Directory ID
To find your Directory (tenant) ID, follow these steps:
Navigate to Azure portal and sign in to the Azure portal using the credentials.
From the left-pane, select Microsoft Entra ID.
From Overview page in Microsoft Entra ID, copy the Directory (tenant) ID and store it in your application code.
Getting Application ID
To find your Application ID, follow these steps:
Navigate to Azure portal and sign in to the Azure portal using the credentials.
From the left-pane, select Microsoft Entra ID.
From App registrations in Microsoft Entra ID, select your application.
Copy the Application ID and store it in your application code.

The directory (tenant) ID can also be found in the application overview page.
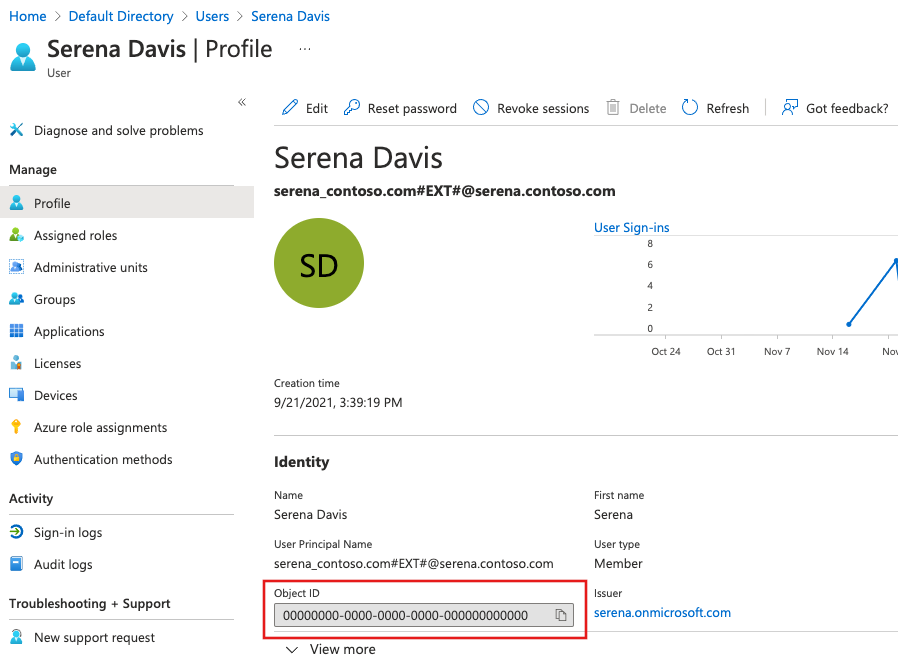
Getting User ID
To find your User ID, follow these steps:
Navigate to Azure portal and sign in to the Azure portal using the credentials.
From the left-pane, select Microsoft Entra ID.
From Users in Microsoft Entra ID, select your user.
From Profile page in Microsoft Entra users, copy the Object ID and store it in your application code.
Getting immutable resource ID
Sometimes you also need to provide immutable resource ID of your Communication Service resource. To find it, follow these steps:
- Navigate to Azure portal and sign in to the Azure portal using the credentials.
- Open your Communication Service resource.
- From the left-pane, select Overview, and switch to a JSON view
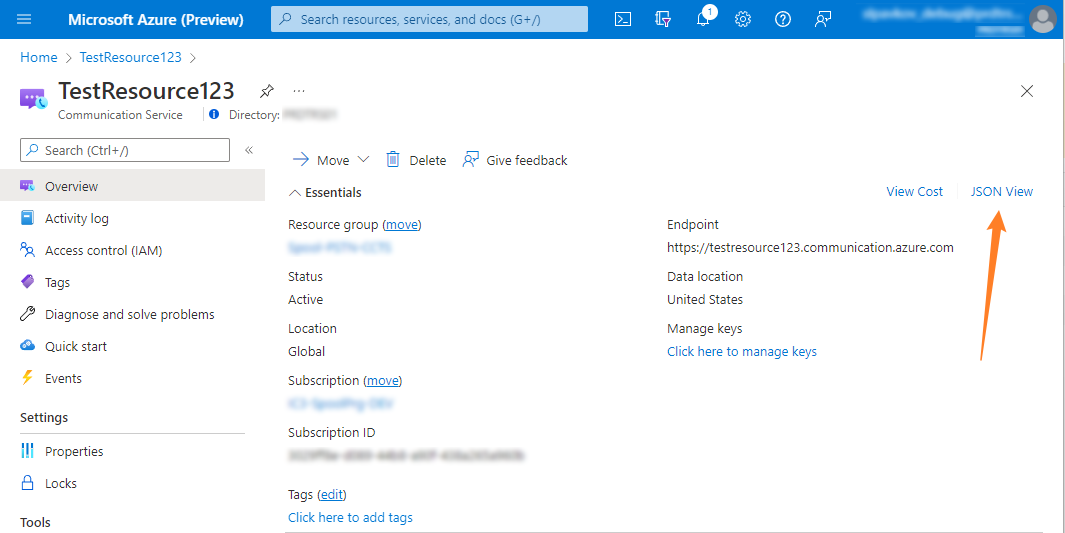
- From Resource JSON page, copy the
immutableResourceIdvalue, and provide it to your support team.
Verification of Teams license eligibility to use Azure Communication Services support for Teams users
There are two ways to verify your Teams License eligibility to use Azure Communication Services support for Teams users:
- Verification via Teams web client
- Checking your current Teams license via Microsoft Graph API
Verification via Teams web client
To verify your Teams License eligibility via Teams web client, follow these steps:
- Open your browser and navigate to Teams web client.
- Sign in with credentials that have a valid Teams license.
- If the authentication is successful and you remain in the https://teams.microsoft.com/ domain, then your Teams License is eligible. If authentication fails or you're redirected to the https://teams.live.com/v2/ domain, then your Teams License isn't eligible to use Azure Communication Services support for Teams users.
Checking your current Teams license via Microsoft Graph API
You can find your current Teams license using licenseDetails Microsoft Graph API that returns the licenses assigned to a user. Follow these steps to use the Graph Explorer tool to view licenses assigned to a user:
Open your browser and navigate to Graph Explorer
Sign in to Graph Explorer using the credentials.

In the query box, enter the following API and click Run Query :
https://graph.microsoft.com/v1.0/me/licenseDetails
Or you can query for a particular user by providing the user ID using the following API:
https://graph.microsoft.com/v1.0/users/{id}/licenseDetailsThe Response preview pane displays output as follows:
The response object shown here might be shortened for readability.
{
    "@odata.context": "https://graph.microsoft.com/v1.0/$metadata#users('071cc716-8147-4397-a5ba-b2105951cc0b')/assignedLicenses",
    "value": [
        {
            "skuId": "b05e124f-c7cc-45a0-a6aa-8cf78c946968",
            "servicePlans":[
                {
                    "servicePlanId":"57ff2da0-773e-42df-b2af-ffb7a2317929",
                    "servicePlanName":"TEAMS1",
                    "provisioningStatus":"Success",
                    "appliesTo":"User"
                }
            ]
        }
    ]
}
Find license detail where property
servicePlanNamehas one of the values in the Eligible Teams Licenses table
Related articles
- Troubleshooting Azure Communication Services PSTN call failures.
- Troubleshooting call end response codes for Calling SDK, Call Automation SDK, PSTN, Chat SDK, and SMS SDK(./troubleshooting-codes.md).
- Access logs for voice and video, chat, email, network traversal, recording, SMS and call automation.
- Metrics.
- Service limits.