Quickstart: Send events to and receive events from Azure Event Hubs using .NET
आलेख
In this quickstart, you learn how to send events to an event hub and then receive those events from the event hub using the Azure.Messaging.EventHubs .NET library.
नोट
Quickstarts are for you to quickly ramp up on the service. If you are already familiar with the service, you might want to see .NET samples for Event Hubs in our .NET SDK repository on GitHub: Event Hubs samples on GitHub, Event processor samples on GitHub.
Prerequisites
If you're new to Azure Event Hubs, see Event Hubs overview before you go through this quickstart.
To complete this quickstart, you need the following prerequisites:
Microsoft Azure subscription. To use Azure services, including Azure Event Hubs, you need a subscription. If you don't have an existing Azure account, you can sign up for a free trial or use your MSDN subscriber benefits when you create an account.
Microsoft Visual Studio 2022. The Azure Event Hubs client library makes use of new features that were introduced in C# 8.0. You can still use the library with previous C# language versions, but the new syntax isn't available. To make use of the full syntax, we recommend that you compile with the .NET Core SDK 3.0 or higher and language version set to latest. If you're using Visual Studio, versions before Visual Studio 2022 aren't compatible with the tools needed to build C# 8.0 projects. Visual Studio 2022, including the free Community edition, can be downloaded here.
Create an Event Hubs namespace and an event hub. The first step is to use the Azure portal to create an Event Hubs namespace and an event hub in the namespace. Then, obtain the management credentials that your application needs to communicate with the event hub. To create a namespace and an event hub, see Quickstart: Create an event hub using Azure portal.
Authenticate the app to Azure
This quick start shows you two ways of connecting to Azure Event Hubs:
Passwordless (Microsoft Entra authentication)
Connection string
The first option shows you how to use your security principal in Azure Active Directory and role-based access control (RBAC) to connect to an Event Hubs namespace. You don't need to worry about having hard-coded connection strings in your code or in a configuration file or in a secure storage like Azure Key Vault.
The second option shows you how to use a connection string to connect to an Event Hubs namespace. If you're new to Azure, you may find the connection string option easier to follow. We recommend using the passwordless option in real-world applications and production environments. For more information, see Authentication and authorization. You can also read more about passwordless authentication on the overview page.
When developing locally, make sure that the user account that connects to Azure Event Hubs has the correct permissions. You'll need the Azure Event Hubs Data Owner role in order to send and receive messages. To assign yourself this role, you'll need the User Access Administrator role, or another role that includes the Microsoft.Authorization/roleAssignments/write action. You can assign Azure RBAC roles to a user using the Azure portal, Azure CLI, or Azure PowerShell. Learn more about the available scopes for role assignments on the scope overview page.
The following example assigns the Azure Event Hubs Data Owner role to your user account, which provides full access to Azure Event Hubs resources. In a real scenario, follow the Principle of Least Privilege to give users only the minimum permissions needed for a more secure production environment.
Azure built-in roles for Azure Event Hubs
For Azure Event Hubs, the management of namespaces and all related resources through the Azure portal and the Azure resource management API is already protected using the Azure RBAC model. Azure provides the below Azure built-in roles for authorizing access to an Event Hubs namespace:
Azure Event Hubs Data Owner: Enables data access to Event Hubs namespace and its entities (queues, topics, subscriptions, and filters)
In most cases, it will take a minute or two for the role assignment to propagate in Azure. In rare cases, it may take up to eight minutes. If you receive authentication errors when you first run your code, wait a few moments and try again.
In the Azure portal, locate your Event Hubs namespace using the main search bar or left navigation.
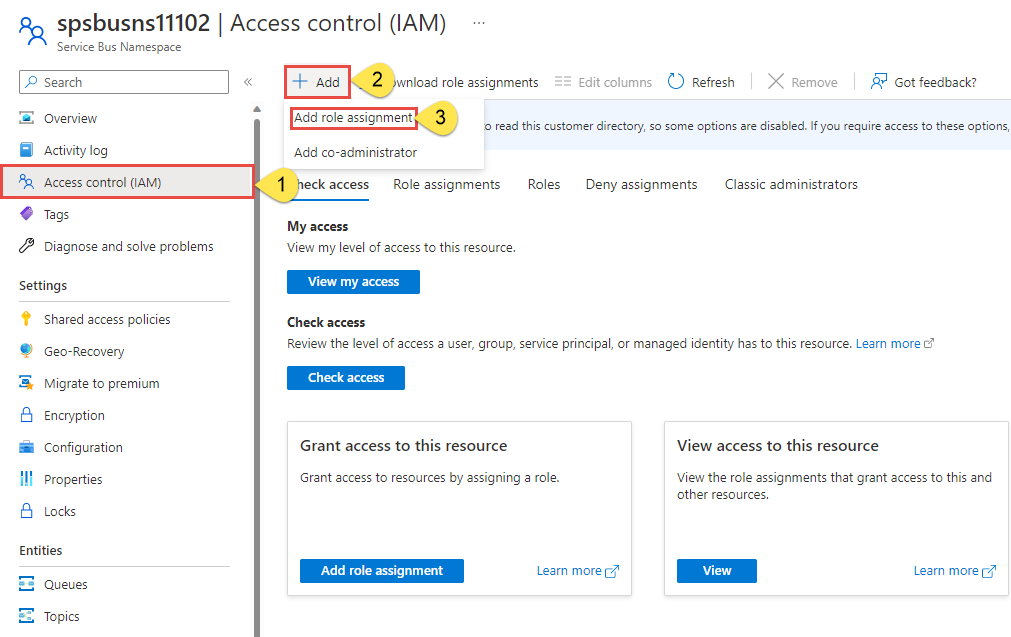
On the overview page, select Access control (IAM) from the left-hand menu.
On the Access control (IAM) page, select the Role assignments tab.
Select + Add from the top menu and then Add role assignment from the resulting drop-down menu.
Use the search box to filter the results to the desired role. For this example, search for Azure Event Hubs Data Owner and select the matching result. Then choose Next.
Under Assign access to, select User, group, or service principal, and then choose + Select members.
In the dialog, search for your Microsoft Entra username (usually your user@domain email address) and then choose Select at the bottom of the dialog.
Select Review + assign to go to the final page, and then Review + assign again to complete the process.
To assign a role at the resource level using the Azure CLI, you first must retrieve the resource ID using the az eventhubs namespace show command. You can filter the output properties using the --query parameter.
Azure CLI
az eventhubs namespace show -g'<your-event-hub-resource-group>'-n'<your-event-hub-name> --query id
Copy the output Id from the preceding command. You can then assign roles using the az role command of the Azure CLI.
Azure CLI
az role assignment create --assignee"<user@domain>" \
--role"Azure Event Hubs Data Owner" \
--scope"<your-resource-id>"
To assign a role at the resource level using Azure PowerShell, you first must retrieve the resource ID using the Get-AzResource command.
You can authorize access to the service bus namespace using the following steps:
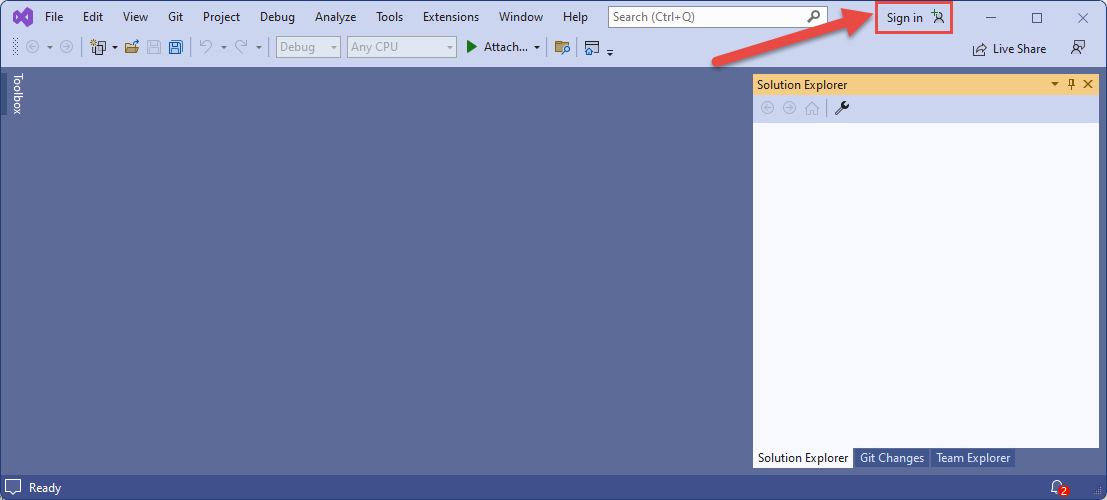
Launch Visual Studio. If you see the Get started window, select the Continue without code link in the right pane.
Select the Sign in button in the top right of Visual Studio.
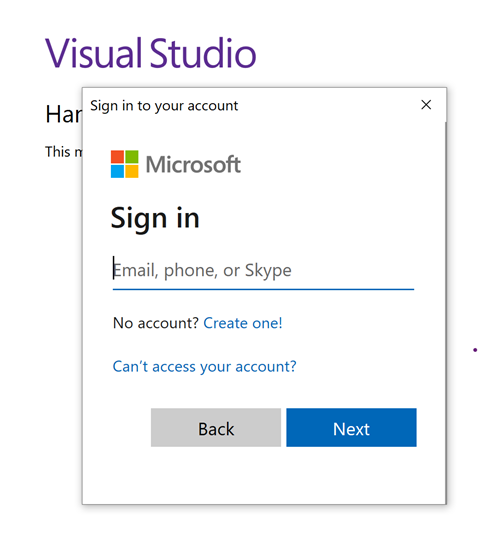
Sign-in using the Microsoft Entra account you assigned a role to previously.
Get the connection string
Creating a new namespace automatically generates an initial Shared Access Signature (SAS) policy with primary and secondary keys and connection strings that each grant full control over all aspects of the namespace. See Event Hubs authentication and authorization for information about how to create rules with more constrained rights for regular senders and receivers.
A client can use the connection string to connect to the Event Hubs namespace. To copy the primary connection string for your namespace, follow these steps:
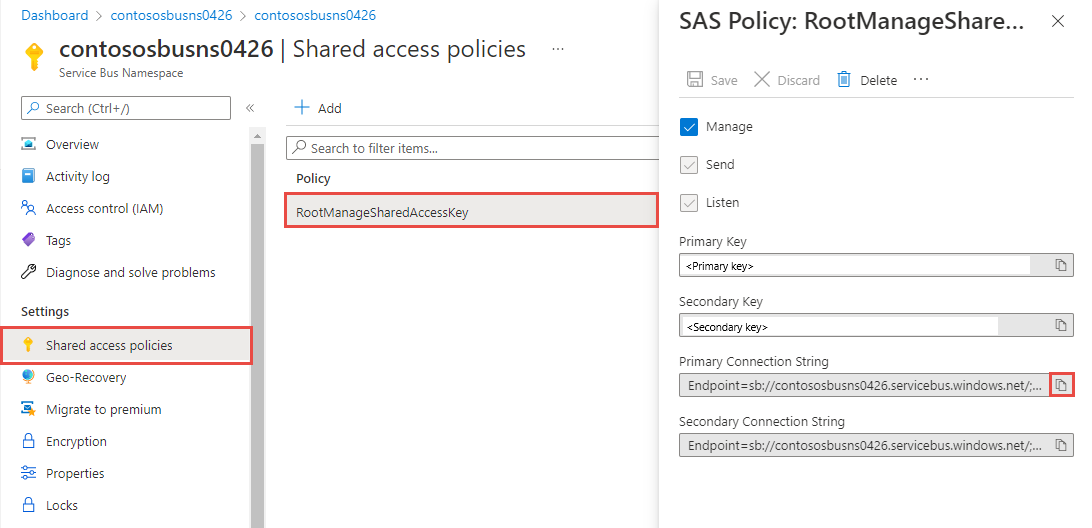
On the Event Hub Namespace page, select Shared access policies on the left menu.
On the Shared access policies page, select RootManageSharedAccessKey.
In the Policy: RootManageSharedAccessKey window, select the copy button next to Primary Connection String, to copy the connection string to your clipboard for later use. Paste this value into Notepad or some other temporary location.
You can use this page to copy primary key, secondary key, primary connection string, and secondary connection string.
Send events to the event hub
This section shows you how to create a .NET Core console application to send events to the event hub you created.
Create a console application
If you have Visual Studio 2022 open already, select File on the menu, select New, and then select Project. Otherwise, launch Visual Studio 2022 and select Create a new project if you see a popup window.
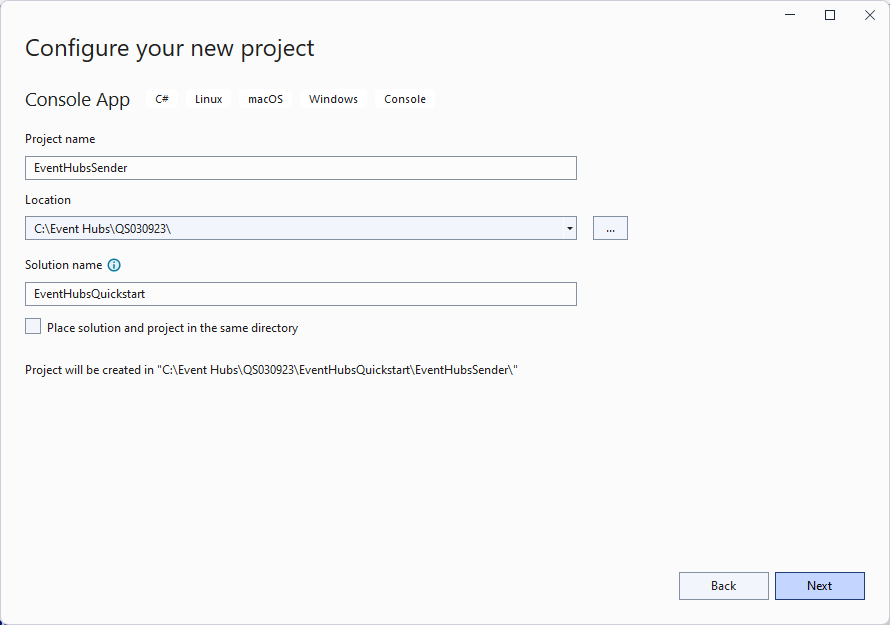
On the Create a new project dialog box, do the following steps: If you don't see this dialog box, select File on the menu, select New, and then select Project.
Select C# for the programming language.
Select Console for the type of the application.
Select Console Application from the results list.
Then, select Next.
Enter EventHubsSender for the project name, EventHubsQuickStart for the solution name, and then select Next.
On the Additional information page, select Create.
Replace the existing code in the Program.cs file with the following sample code. Then, replace <EVENT_HUB_NAMESPACE> and <HUB_NAME> placeholder values for the EventHubProducerClient parameters with the names of your Event Hubs namespace and the event hub. For example: "spehubns0309.servicebus.windows.net" and "spehub".
using Azure.Identity;
using Azure.Messaging.EventHubs;
using Azure.Messaging.EventHubs.Producer;
using System.Text;
// number of events to be sent to the event hubint numOfEvents = 3;
// The Event Hubs client types are safe to cache and use as a singleton for the lifetime// of the application, which is best practice when events are being published or read regularly.// TODO: Replace the <EVENT_HUB_NAMESPACE> and <HUB_NAME> placeholder values
EventHubProducerClient producerClient = new EventHubProducerClient(
"<EVENT_HUB_NAMESPACE>.servicebus.windows.net",
"<HUB_NAME>",
new DefaultAzureCredential());
// Create a batch of events using EventDataBatch eventBatch = await producerClient.CreateBatchAsync();
for (int i = 1; i <= numOfEvents; i++)
{
if (!eventBatch.TryAdd(new EventData(Encoding.UTF8.GetBytes($"Event {i}"))))
{
// if it is too large for the batchthrownew Exception($"Event {i} is too large for the batch and cannot be sent.");
}
}
try
{
// Use the producer client to send the batch of events to the event hubawait producerClient.SendAsync(eventBatch);
Console.WriteLine($"A batch of {numOfEvents} events has been published.");
Console.ReadLine();
}
finally
{
await producerClient.DisposeAsync();
}
Replace the existing code in the Program.cs file with the following sample code. Then, replace the <CONNECTION_STRING> and <HUB_NAME> placeholder values for the EventHubProducerClient parameters.
Here are the important steps from the code:
Creates a EventHubProducerClient object using the primary connection string to the namespace and the event hub name.
using Azure.Messaging.EventHubs;
using Azure.Messaging.EventHubs.Producer;
using System.Text;
// number of events to be sent to the event hubint numOfEvents = 3;
// The Event Hubs client types are safe to cache and use as a singleton for the lifetime// of the application, which is best practice when events are being published or read regularly.// TODO: Replace the <CONNECTION_STRING> and <HUB_NAME> placeholder values
EventHubProducerClient producerClient = new EventHubProducerClient(
"<CONNECTION_STRING>",
"<HUB_NAME>");
// Create a batch of events using EventDataBatch eventBatch = await producerClient.CreateBatchAsync();
for (int i = 1; i <= numOfEvents; i++)
{
if (!eventBatch.TryAdd(new EventData(Encoding.UTF8.GetBytes($"Event {i}"))))
{
// if it is too large for the batchthrownew Exception($"Event {i} is too large for the batch and cannot be sent.");
}
}
try
{
// Use the producer client to send the batch of events to the event hubawait producerClient.SendAsync(eventBatch);
Console.WriteLine($"A batch of {numOfEvents} events has been published.");
Console.ReadLine();
}
finally
{
await producerClient.DisposeAsync();
}
Build the project, and ensure that there are no errors.
Run the program and wait for the confirmation message.
C#
A batch of 3 events has been published.
नोट
If you get an error "InvalidIssuer: Token issuer is invalid" when using Microsoft Entra authentication, it may be because the wrong Entra Tenant Id is being used. In you code replace'new DefaultAzureCredential()' with 'new DefaultAzureCredential(new DefaultAzureCredentialOptions {TenantId = "xxxxxxxx-xxxx-xxxx-xxxx-xxxxxxxxxxxx"})' to explicitly specify Entra Tenant Id.
महत्वपूर्ण
If you are using the Passwordless (Azure Active Directory's Role-based Access Control) authentication, select Tools, then select Options. In the Options window, expand Azure Service Authentication, and select Account Selection. Confirm that you are using the account that was added to the Azure Event Hubs Data Owner role on the Event Hubs namespace.
On the Event Hubs Namespace page in the Azure portal, you see three incoming messages in the Messages chart. Refresh the page to update the chart if needed. It might take a few seconds for it to show that the messages have been received.
This section shows how to write a .NET Core console application that receives events from an event hub using an event processor. The event processor simplifies receiving events from event hubs.
Create an Azure Storage Account and a blob container
In this quickstart, you use Azure Storage as the checkpoint store. Follow these steps to create an Azure Storage account.
Authenticate to the blob container using either Microsoft Entra ID (passwordless) authentication or a connection string to the namespace.
Follow these recommendations when using Azure Blob Storage as a checkpoint store:
Use a separate container for each consumer group. You can use the same storage account, but use one container per each group.
Don't use the container for anything else, and don't use the storage account for anything else.
Storage account should be in the same region as the deployed application is located in. If the application is on-premises, try to choose the closest region possible.
On the Storage account page in the Azure portal, in the Blob service section, ensure that the following settings are disabled.
When developing locally, make sure that the user account that is accessing blob data has the correct permissions. You'll need Storage Blob Data Contributor to read and write blob data. To assign yourself this role, you'll need to be assigned the User Access Administrator role, or another role that includes the Microsoft.Authorization/roleAssignments/write action. You can assign Azure RBAC roles to a user using the Azure portal, Azure CLI, or Azure PowerShell. You can learn more about the available scopes for role assignments on the scope overview page.
In this scenario, you'll assign permissions to your user account, scoped to the storage account, to follow the Principle of Least Privilege. This practice gives users only the minimum permissions needed and creates more secure production environments.
The following example will assign the Storage Blob Data Contributor role to your user account, which provides both read and write access to blob data in your storage account.
महत्वपूर्ण
In most cases it will take a minute or two for the role assignment to propagate in Azure, but in rare cases it may take up to eight minutes. If you receive authentication errors when you first run your code, wait a few moments and try again.
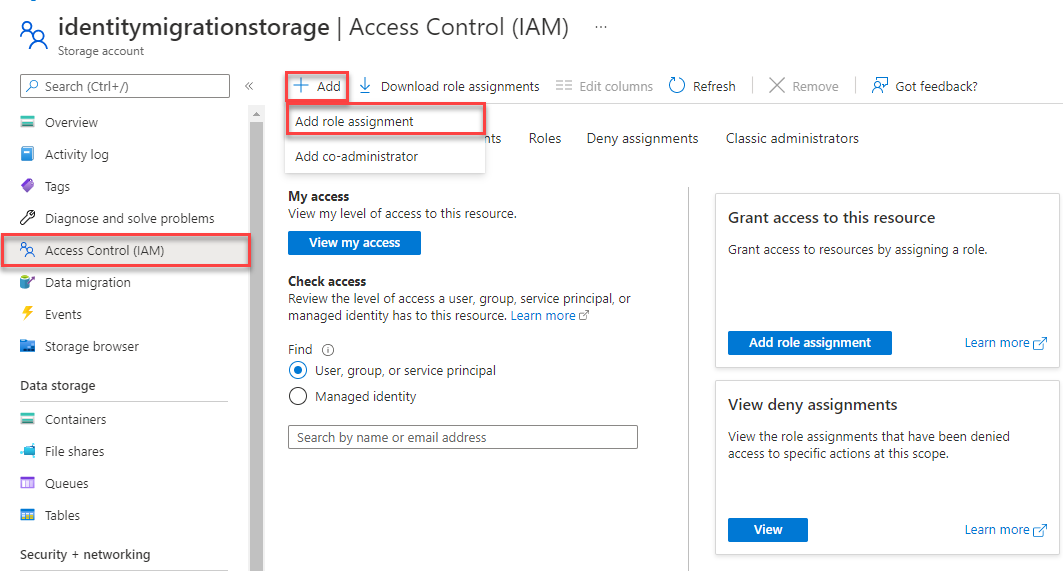
In the Azure portal, locate your storage account using the main search bar or left navigation.
On the storage account overview page, select Access control (IAM) from the left-hand menu.
On the Access control (IAM) page, select the Role assignments tab.
Select + Add from the top menu and then Add role assignment from the resulting drop-down menu.
Use the search box to filter the results to the desired role. For this example, search for Storage Blob Data Contributor and select the matching result and then choose Next.
Under Assign access to, select User, group, or service principal, and then choose + Select members.
In the dialog, search for your Microsoft Entra username (usually your user@domain email address) and then choose Select at the bottom of the dialog.
Select Review + assign to go to the final page, and then Review + assign again to complete the process.
To assign a role at the resource level using the Azure CLI, you first must retrieve the resource ID using the az storage account show command. You can filter the output properties using the --query parameter.
Azure CLI
az storage account show --resource-group'<your-resource-group-name>'--name'<your-storage-account-name>'--query id
Copy the output Id from the preceding command. You can then assign roles using the az role command of the Azure CLI.
Azure CLI
az role assignment create --assignee"<user@domain>" \
--role"Storage Blob Data Contributor" \
--scope"<your-resource-id>"
To assign a role at the resource level using Azure PowerShell, you first must retrieve the resource ID using the Get-AzResource command.
Select Tools > NuGet Package Manager > Package Manager Console from the menu.
In the Package Manager Console window, confirm that EventHubsReceiver is selected for the Default project. If not, use the drop-down list to select EventHubsReceiver.
Run the following command to install the Azure.Messaging.EventHubs and the Azure.Identity NuGet packages. Press ENTER to run the last command.
Select Tools > NuGet Package Manager > Package Manager Console from the menu.
In the Package Manager Console window, confirm that EventHubsReceiver is selected for the Default project. If not, use the drop-down list to select EventHubsReceiver.
Run the following command to install the Azure.Messaging.EventHubs NuGet package:
Replace the existing code in the Program.cs file with the following sample code. Then, replace the <STORAGE_ACCOUNT_NAME> and <BLOB_CONTAINER_NAME> placeholder values for the BlobContainerClient URI. Replace the <EVENT_HUB_NAMESPACE> and <HUB_NAME> placeholder values for the EventProcessorClient as well.
Here are the important steps from the code:
Creates an EventProcessorClient object using the Event Hubs namespace and the event hub name. You need to build BlobContainerClient object for the container in the Azure storage you created earlier.
using Azure.Identity;
using Azure.Messaging.EventHubs;
using Azure.Messaging.EventHubs.Consumer;
using Azure.Messaging.EventHubs.Processor;
using Azure.Storage.Blobs;
using System.Text;
// Create a blob container client that the event processor will use// TODO: Replace <STORAGE_ACCOUNT_NAME> and <BLOB_CONTAINER_NAME> with actual names
BlobContainerClient storageClient = new BlobContainerClient(
new Uri("https://<STORAGE_ACCOUNT_NAME>.blob.core.windows.net/<BLOB_CONTAINER_NAME>"),
new DefaultAzureCredential());
// Create an event processor client to process events in the event hub// TODO: Replace the <EVENT_HUBS_NAMESPACE> and <HUB_NAME> placeholder valuesvar processor = new EventProcessorClient(
storageClient,
EventHubConsumerClient.DefaultConsumerGroupName,
"<EVENT_HUB_NAMESPACE>.servicebus.windows.net",
"<HUB_NAME>",
new DefaultAzureCredential());
// Register handlers for processing events and handling errors
processor.ProcessEventAsync += ProcessEventHandler;
processor.ProcessErrorAsync += ProcessErrorHandler;
// Start the processingawait processor.StartProcessingAsync();
// Wait for 30 seconds for the events to be processedawait Task.Delay(TimeSpan.FromSeconds(30));
// Stop the processingawait processor.StopProcessingAsync();
Task ProcessEventHandler(ProcessEventArgs eventArgs)
{
// Write the body of the event to the console window
Console.WriteLine("\tReceived event: {0}", Encoding.UTF8.GetString(eventArgs.Data.Body.ToArray()));
Console.ReadLine();
return Task.CompletedTask;
}
Task ProcessErrorHandler(ProcessErrorEventArgs eventArgs)
{
// Write details about the error to the console window
Console.WriteLine($"\tPartition '{eventArgs.PartitionId}': an unhandled exception was encountered. This was not expected to happen.");
Console.WriteLine(eventArgs.Exception.Message);
Console.ReadLine();
return Task.CompletedTask;
}
Replace the existing code in the Program.cs file with the following sample code. Then, replace the <AZURE_STORAGE_CONNECTION_STRING> and <BLOB_CONTAINER_NAME> placeholder values for the BlobContainerClient URI. Replace the <EVENT_HUB_NAMESPACE_CONNECTION_STRING> and <HUB_NAME> placeholder values for the EventProcessorClient as well.
Here are the important steps from the code:
Creates an EventProcessorClient object using the primary connection string to the namespace and the event hub. You need to build BlobContainerClient object for the container in the Azure storage you created earlier.
using Azure.Messaging.EventHubs;
using Azure.Messaging.EventHubs.Consumer;
using Azure.Messaging.EventHubs.Processor;
using Azure.Storage.Blobs;
using System.Text;
// Create a blob container client that the event processor will use
BlobContainerClient storageClient = new BlobContainerClient(
"<AZURE_STORAGE_CONNECTION_STRING>", "<BLOB_CONTAINER_NAME>");
// Create an event processor client to process events in the event hubvar processor = new EventProcessorClient(
storageClient,
EventHubConsumerClient.DefaultConsumerGroupName,
"<EVENT_HUBS_NAMESPACE_CONNECTION_STRING>",
"<HUB_NAME>");
// Register handlers for processing events and handling errors
processor.ProcessEventAsync += ProcessEventHandler;
processor.ProcessErrorAsync += ProcessErrorHandler;
// Start the processingawait processor.StartProcessingAsync();
// Wait for 30 seconds for the events to be processedawait Task.Delay(TimeSpan.FromSeconds(30));
// Stop the processingawait processor.StopProcessingAsync();
Task ProcessEventHandler(ProcessEventArgs eventArgs)
{
// Write the body of the event to the console window
Console.WriteLine("\tReceived event: {0}", Encoding.UTF8.GetString(eventArgs.Data.Body.ToArray()));
return Task.CompletedTask;
}
Task ProcessErrorHandler(ProcessErrorEventArgs eventArgs)
{
// Write details about the error to the console window
Console.WriteLine($"\tPartition '{eventArgs.PartitionId}': an unhandled exception was encountered. This was not expected to happen.");
Console.WriteLine(eventArgs.Exception.Message);
return Task.CompletedTask;
}
Build the project, and ensure that there are no errors.
You should see a message that the events have been received. Press ENTER after you see a received event message.
Bash
Received event: Event 1
Received event: Event 2
Received event: Event 3
These events are the three events you sent to the event hub earlier by running the sender program.
In the Azure portal, you can verify that there are three outgoing messages, which Event Hubs sent to the receiving application. Refresh the page to update the chart. It might take a few seconds for it to show that the messages have been received.
Schema validation for Event Hubs SDK based applications
You can use Azure Schema Registry to perform schema validation when you stream data with your Event Hubs SDK-based applications.
Azure Schema Registry of Event Hubs provides a centralized repository for managing schemas and you can seamlessly connect your new or existing applications with Schema Registry.
This quick start provides step-by-step instructions to implement a scenario of sending a batch of events to an event hub and then receiving them. For more samples, select the following links.