Autoscale automatically runs the right amount of resources to handle the load on your application. Online endpoints supports autoscaling through integration with the Azure Monitor autoscale feature.
Azure Monitor autoscaling supports a rich set of rules. You can configure metrics-based scaling (for instance, CPU utilization >70%), schedule-based scaling (for example, scaling rules for peak business hours), or a combination. For more information, see Overview of autoscale in Microsoft Azure.
Today, you can manage autoscaling using either the Azure CLI, REST, ARM, or the browser-based Azure portal. Other Azure Machine Learning SDKs, such as the Python SDK, will add support over time.
To use autoscale, the role microsoft.insights/autoscalesettings/write must be assigned to the identity that manages autoscale. You can use any built-in or custom roles that allow this action. For general guidance on managing roles for Azure Machine Learning, see Manage users and roles. For more on autoscale settings from Azure Monitor, see Microsoft.Insights autoscalesettings.
Define an autoscale profile
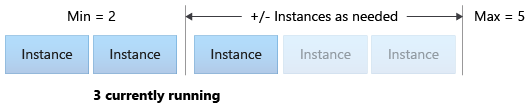
To enable autoscale for an endpoint, you first define an autoscale profile. This profile defines the default, minimum, and maximum scale set capacity. The following example sets the default and minimum capacity as two VM instances, and the maximum capacity as five:
The following snippet sets the endpoint and deployment names:
# set your existing endpoint name
ENDPOINT_NAME=your-endpoint-name
DEPLOYMENT_NAME=blue
Next, get the Azure Resource Manager ID of the deployment and endpoint:
# ARM id of the deployment
DEPLOYMENT_RESOURCE_ID=$(az ml online-deployment show -e $ENDPOINT_NAME -n $DEPLOYMENT_NAME -o tsv --query "id")
# ARM id of the deployment. todo: change to --query "id"
ENDPOINT_RESOURCE_ID=$(az ml online-endpoint show -n $ENDPOINT_NAME -o tsv --query "properties.\"azureml.onlineendpointid\"")
# set a unique name for autoscale settings for this deployment. The below will append a random number to make the name unique.
AUTOSCALE_SETTINGS_NAME=autoscale-$ENDPOINT_NAME-$DEPLOYMENT_NAME-`echo $RANDOM`
The following snippet creates the autoscale profile:
from azure.ai.ml import MLClient
from azure.identity import DefaultAzureCredential
from azure.mgmt.monitor import MonitorManagementClient
from azure.mgmt.monitor.models import AutoscaleProfile, ScaleRule, MetricTrigger, ScaleAction, Recurrence, RecurrentSchedule
import random
import datetime
Define variables for the workspace, endpoint, and deployment:
# Set a unique name for autoscale settings for this deployment. The below will append a random number to make the name unique.
autoscale_settings_name = f"autoscale-{endpoint_name}-{deployment_name}-{random.randint(0,1000)}"

mon_client.autoscale_settings.create_or_update(
    resource_group,
    autoscale_settings_name,
    parameters = {
        "location" : endpoint.location,
        "target_resource_uri" : deployment.id,
        "profiles" : [
            AutoscaleProfile(
                name="my-scale-settings",
                capacity={
                    "minimum" : 2,
                    "maximum" : 5,
                    "default" : 2
                },
                rules = []
            )
        ]
    }
)
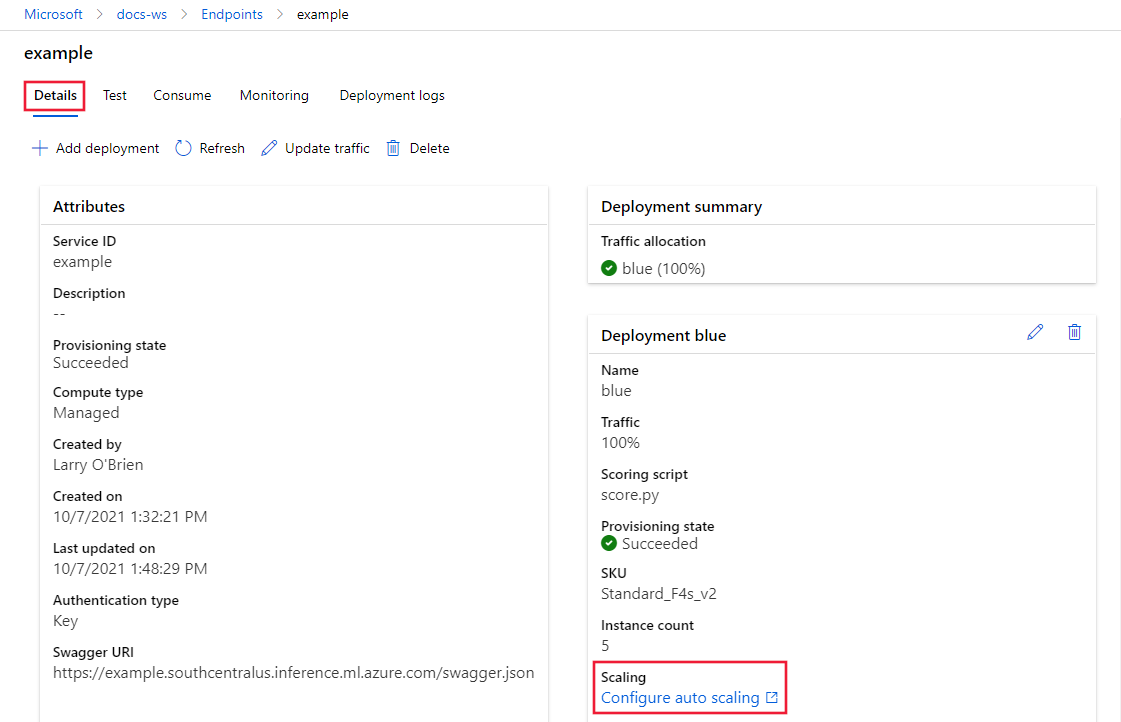
In Azure Machine Learning studio, select your workspace and then select Endpoints from the left side of the page. Once the endpoints are listed, select the one you want to configure.
From the Details tab for the endpoint, select Configure auto scaling.
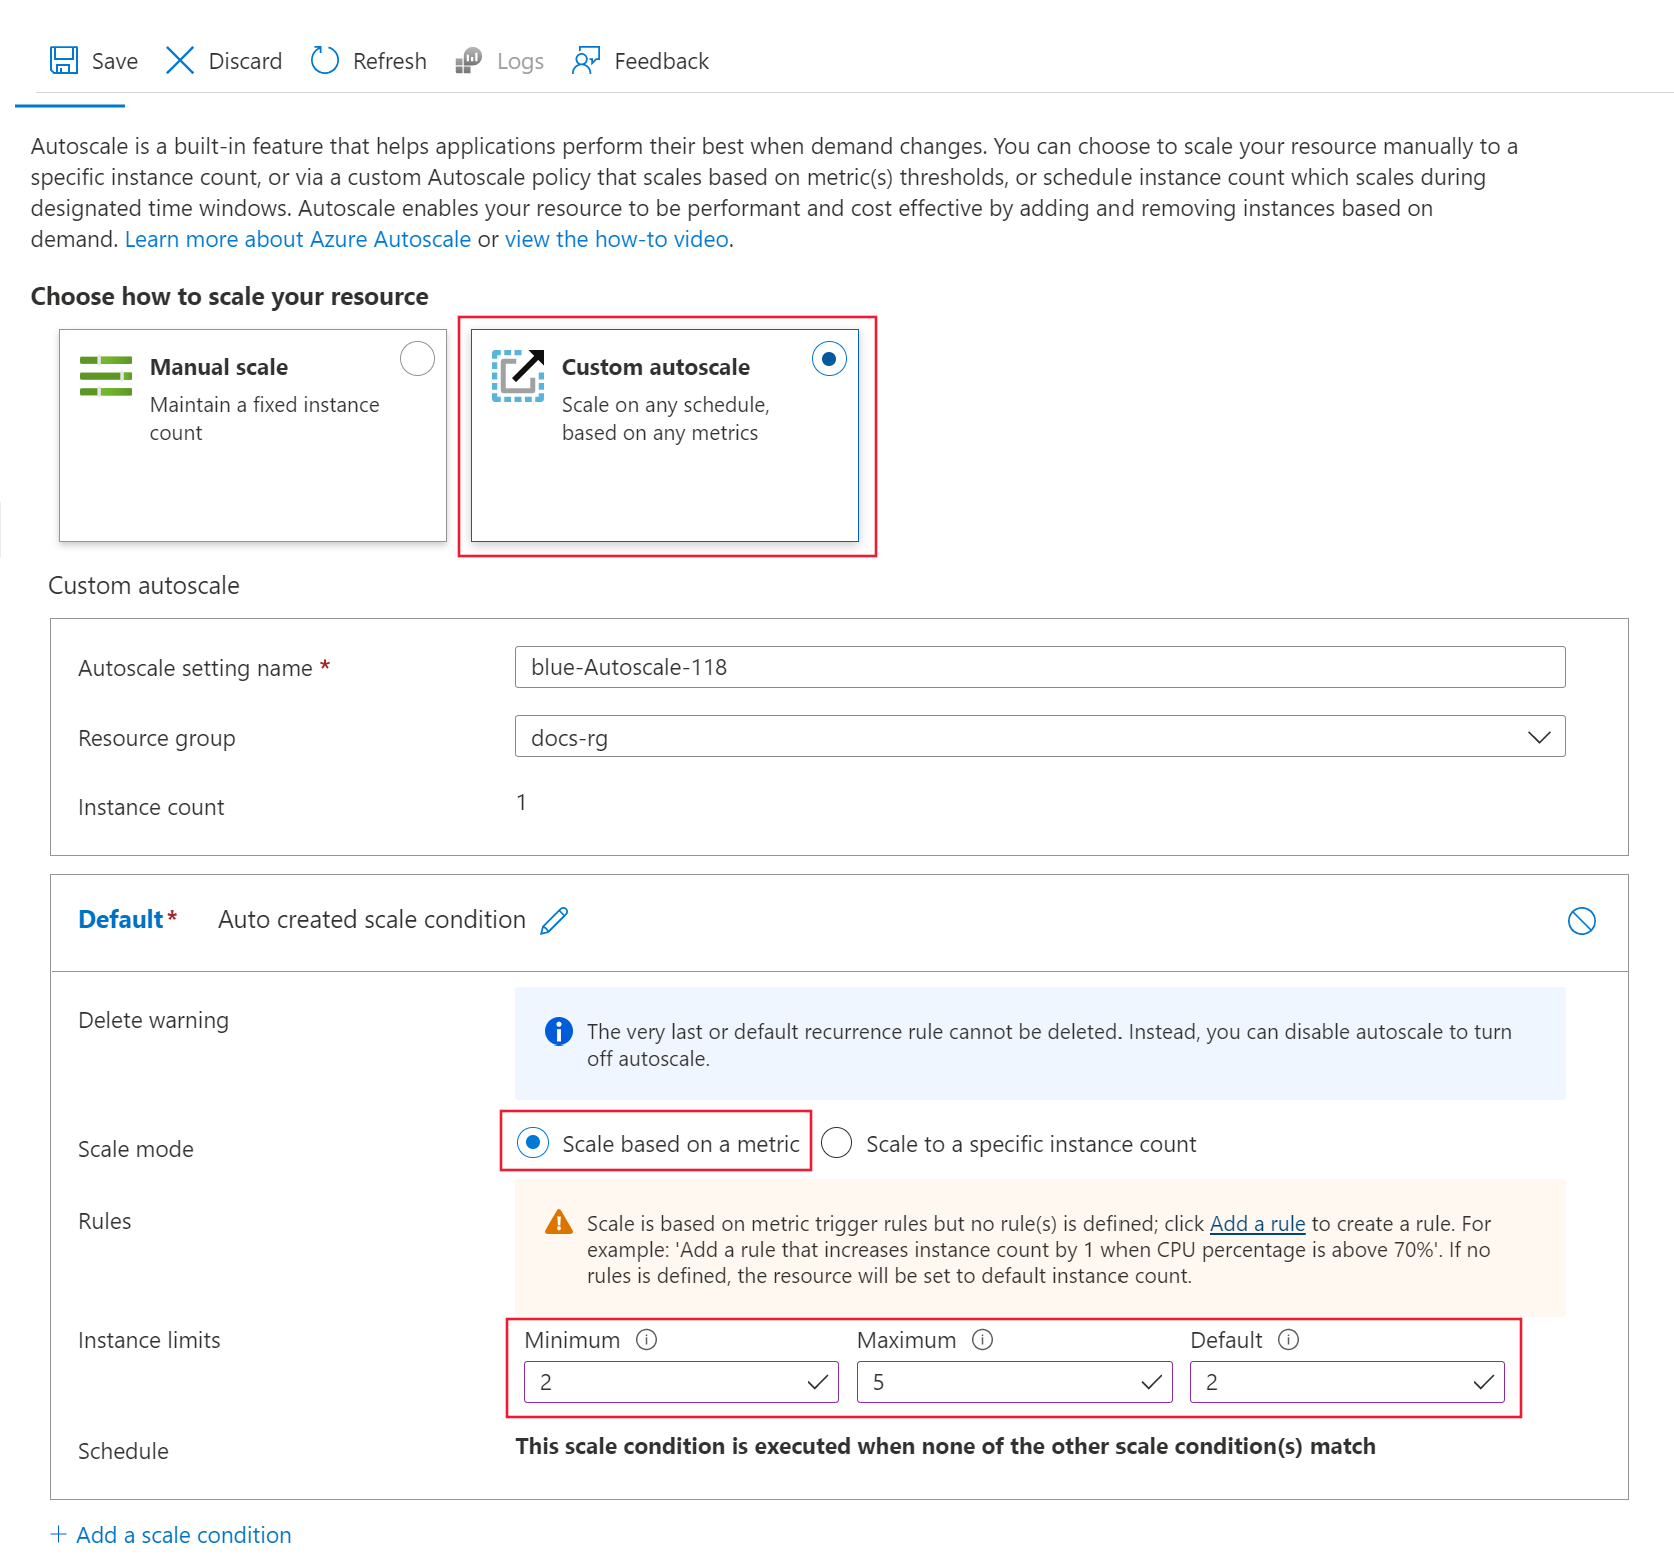
Under Choose how to scale your resources, select Custom autoscale to begin the configuration. For the default scale condition, use the following values:
Set Scale mode to Scale based on a metric.
Set Minimum to 2.
Set Maximum to 5.
Set Default to 2.
Create a rule to scale out using deployment metrics
A common scaling out rule is one that increases the number of VM instances when the average CPU load is high. The following example will allocate two more nodes (up to the maximum) if the CPU average a load of greater than 70% for five minutes::
az monitor autoscale rule create \
  --autoscale-name $AUTOSCALE_SETTINGS_NAME \
  --condition "CpuUtilizationPercentage > 70 avg 5m" \
  --scale out 2
The rule is part of the my-scale-settings profile (autoscale-name matches the name of the profile). The value of its condition argument says the rule should trigger when "The average CPU consumption among the VM instances exceeds 70% for five minutes." When that condition is satisfied, two more VM instances are allocated.
This rule is refers to the last 5 minute average of CPUUtilizationpercentage from the arguments metric_name, time_window and time_aggregation. When value of the metric is greater than the threshold of 70, two more VM instances are allocated.
Update the my-scale-settings profile to include this rule:
In the Rules section, select Add a rule. The Scale rule page is displayed. Use the following information to populate the fields on this page:
Set Metric name to CPU Utilization Percentage.
Set Operator to Greater than and set the Metric threshold to 70.
Set Duration (minutes) to 5. Leave the Time grain statistic as Average.
Set Operation to Increase count by and set Instance count to 2.
Finally, select the Add button to create the rule.
Create a rule to scale in using deployment metrics
When load is light, a scaling in rule can reduce the number of VM instances. The following example will release a single node, down to a minimum of 2, if the CPU load is less than 30% for 5 minutes:
In the Rules section, select Add a rule. The Scale rule page is displayed. Use the following information to populate the fields on this page:
Set Metric name to CPU Utilization Percentage.
Set Operator to Less than and the Metric threshold to 30.
Set Duration (minutes) to 5.
Set Operation to Decrease count by and set Instance count to 1.
Finally, select the Add button to create the rule.
If you have both scale out and scale in rules, your rules will look similar to the following screenshot. You've specified that if average CPU load exceeds 70% for 5 minutes, 2 more nodes should be allocated, up to the limit of 5. If CPU load is less than 30% for 5 minutes, a single node should be released, down to the minimum of 2.
Create a scaling rule based on endpoint metrics
The previous rules applied to the deployment. Now, add a rule that applies to the endpoint. In this example, if the request latency is greater than an average of 70 milliseconds for 5 minutes, allocate another node.
From the bottom of the page, select + Add a scale condition.
Select Scale based on metric, and then select Add a rule. The Scale rule page is displayed. Use the following information to populate the fields on this page:
Set Metric source to Other resource.
Set Resource type to Machine Learning online endpoints.
Set Resource to your endpoint.
Set Metric name to Request latency.
Set Operator to Greater than and set Metric threshold to 70.
Set Duration (minutes) to 5.
Set Operation to Increase count by and set Instance count to 1
Find supported Metrics IDs
If you want to use other metrics in code (either CLI or SDK) to set up autoscale rules, see the table in Available metrics.
Create scaling rules based on a schedule
You can also create rules that apply only on certain days or at certain times. In this example, the node count is set to 2 on the weekend.
To disable the autoscale profile, simply choose "Manual scale" and Save.
To enable the autoscale profile, simply choose "Custom autoscale". If you have added the autoscale profile before, you'll see them below. You can now click Save to enable it.
Delete resources
If you are not going to use your deployments, delete them:
# delete the autoscaling profile
az monitor autoscale delete -n "$AUTOSCALE_SETTINGS_NAME"

# delete the endpoint
az ml online-endpoint delete --name $ENDPOINT_NAME --yes --no-wait
जल्द आ रहा है: 2024 के दौरान हम सामग्री के लिए फीडबैक तंत्र के रूप में GitHub मुद्दों को चरणबद्ध तरीके से समाप्त कर देंगे और इसे एक नई फीडबैक प्रणाली से बदल देंगे. अधिक जानकारी के लिए, देखें: https://aka.ms/ContentUserFeedback.
 Azure CLI ml extension v2 (current)