Enter skills
Applies to these Dynamics 365 apps:
Human Resources
You can enter target skills or actual skills for workers, applicants, or contacts in Dynamics 365 Human Resources. A target skill is a skill that a person plans to achieve. An actual skill is a skill that a person currently has.
Create a workflow to auto-approve skills
To enter skills without requiring approval, you must create a workflow to auto-approve skills.
Note
Skills entered by workers always require manager approval. This workflow only auto-approves skills entered by managers on behalf of their workers.
In the Personnel management workspace, select Links.
Under Setup, select Human resources workflows.
Select New.
In the Create workflow pane, select Worker skills.

In the Open this file? dialogue, select Open. When prompted, enter your credentials.
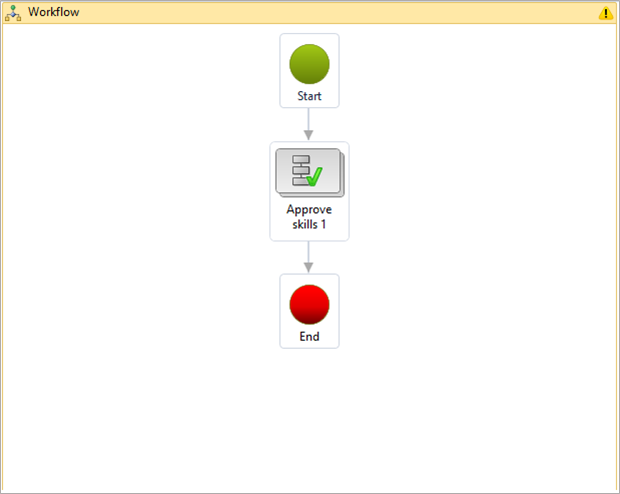
In the workflow editor, select the Approve skills workflow element and drag it onto the canvas.

Connect the Start element to the Approve skills 1 element, and then connect the Approve skills 1 element to the End element. You might need to scroll down to see the End element. You can drag it closer to the other elements.
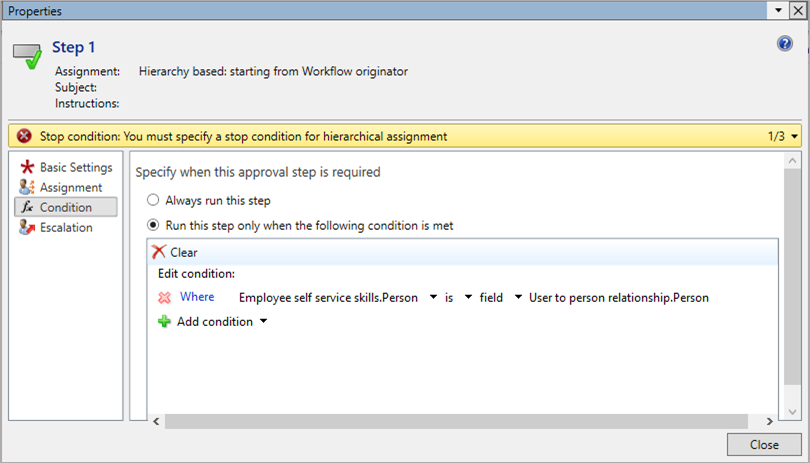
Double-click the Approve skills 1 workflow element, and then right-click the Step 1 element. Right-click the Step 1 element, and then select Properties.
In the Properties window, select Condition on the left-hand nav bar.
Select Run this step only when the following condition is met.
Select Add condition. After Where, select Employee self service skills, and then select Employee self service skills.Person. After is, select field, and then select User to person relationship.Person.
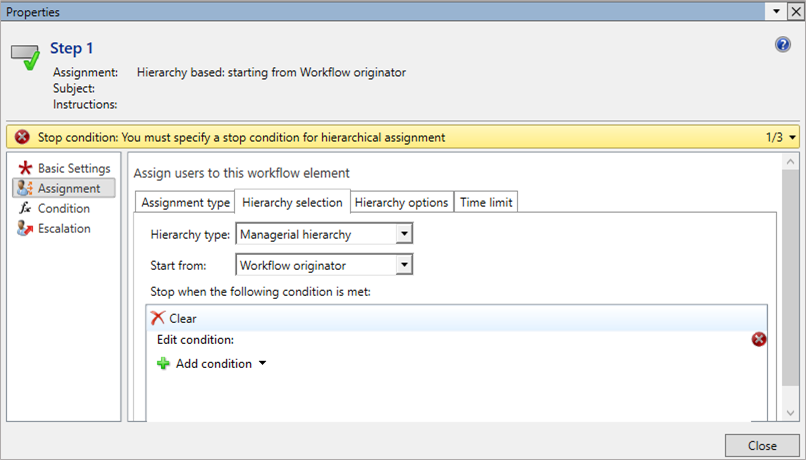
Select Assignment on the left-hand nav bar.
On the Assignment type tab, select Hierarchy.
On the Hierarchy selection tab, in the Hierarchy type: field, select Managerial hierarchy.
Select Close, select Workflow in the canvas breadcrumb, and then select Save and close. For more information about creating workflows, see Workflow system overview.
Enter skills for a worker
Select a worker.
In the action bar of the Worker page, select Person, and then select Skills.
On the Skills page, complete the following fields for each skill:
- Skill: Select a skill.
- Level type: Select Actual for a skill the worker already has, or select Target for a skill the worker is working toward.
- Level: Select a level for the worker's skill.
- Level date: Select a date in the calendar tool.
- Examiner: If appropriate, select an examiner from the list. You can filter your search.
- Years of experience: Enter years of experience.
- Verified: If the skill is verified, check the box.
- Verified by: Enter the name of the verifier.
When you're done entering skills, select Save.
See also
प्रतिक्रिया
जल्द आ रहा है: 2024 के दौरान हम सामग्री के लिए फीडबैक तंत्र के रूप में GitHub मुद्दों को चरणबद्ध तरीके से समाप्त कर देंगे और इसे एक नई फीडबैक प्रणाली से बदल देंगे. अधिक जानकारी के लिए, देखें: https://aka.ms/ContentUserFeedback.
के लिए प्रतिक्रिया सबमिट करें और देखें