Configure failover cluster instance - iSCSI - SQL Server on Linux
Applies to: ![]() SQL Server - Linux
SQL Server - Linux
This article explains how to configure iSCSI storage for a failover cluster instance (FCI) on Linux.
Configure iSCSI
iSCSI uses networking to present disks from a server known as a target to servers. The servers connecting to the iSCSI target require that an iSCSI initiator is configured. The disks on the target are given explicit permissions so that only the initiators that should be able to access them can do so. The target itself should be highly available and reliable.
Important iSCSI target information
While this section doesn't cover how to configure an iSCSI target since it's specific to the type of source you use, ensure that the security for the disks that will be used by the cluster nodes is configured.
The target should never be configured on any of the FCI nodes if using a Linux-based iSCSI target. For performance and availability, iSCSI networks should be separate from networks used by regular network traffic on both the source and the client servers. Networks used for iSCSI should be fast. Remember that network does consume some processor bandwidth, so plan accordingly if using a regular server.
The most important thing to ensure is completed on the target is that the disks that are created are assigned the proper permissions so that only those servers participating in the FCI have access to them. An example is shown here from the Microsoft iSCSI target where linuxnodes1 is the name created, and in this case, the IP addresses of the nodes are assigned so that NewFCIDisk1.vhdx appears to them.

Instructions
This section covers how to configure an iSCSI initiator on the servers that serve as nodes for the FCI. The instructions should work as is on Red Hat Enterprise Linux (RHEL) and Ubuntu.
For more information on iSCSI initiator for the supported distributions, see the following links:
Choose one of the servers that will participate in the FCI configuration. It doesn't matter which one. iSCSI should be on a dedicated network, so configure iSCSI to recognize and use that network. Run
sudo iscsiadm -m iface -I <iSCSIIfaceName> -o newwhere<iSCSIIfaceName>is the unique or friendly name for the network. The following example usesiSCSINIC:sudo iscsiadm -m iface -I iSCSINIC -o new
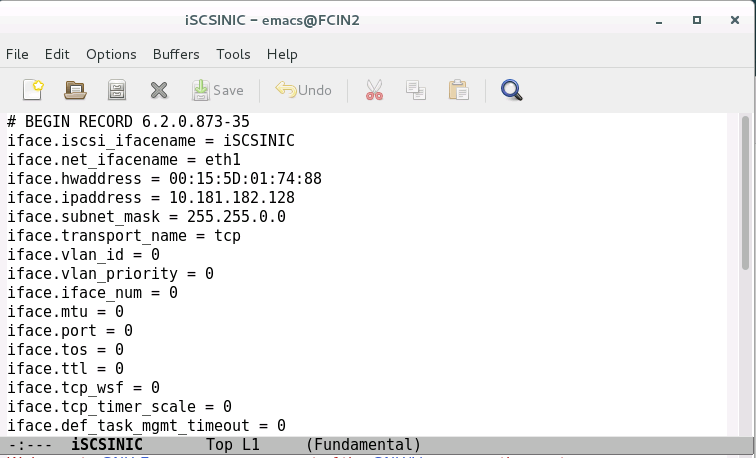
Edit
/var/lib/iscsi/ifaces/iSCSIIfaceName. Make sure it has the following values completely filled out:iface.net_ifacenameis the name of the network card as seen in the OS.iface.hwaddressis the MAC address of the unique name that will be created for the following interface.iface.ipaddressiface.subnet_Mask
See the following example:
Find the iSCSI target.
sudo iscsiadm -m discovery -t sendtargets -I <iSCSINetName> -p <TargetIPAddress>:<TargetPort><iSCSINetName>is the unique/friendly name for the network,<TargetIPAddress>is the IP address of the iSCSI target, and<TargetPort>is the port of the iSCSI target.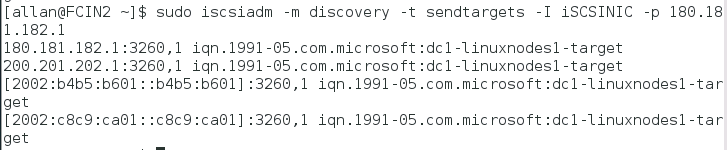
Sign in to the target.
sudo iscsiadm -m node -I <iSCSIIfaceName> -p TargetIPAddress -l<iSCSIIfaceName>is the unique/friendly name for the network and<TargetIPAddress>is the IP address of the iSCSI target.
Check to see that there's a connection to the iSCSI target.
sudo iscsiadm -m session
Check iSCSI attached disks.
sudo grep "Attached SCSI" /var/log/messages
Create a physical volume on the iSCSI disk.
sudo pvcreate /dev/<devicename><devicename>is the name of the device from the previous step.Create a volume group on the iSCSI disk. Disks assigned to a single volume group are seen as a pool or collection.
sudo vgcreate <VolumeGroupName> /dev/devicename<VolumeGroupName>is the name of the volume group and<devicename>is the name of the device from Step 6.Create and verify the logical volume for the disk.
sudo lvcreate -Lsize -n <LogicalVolumeName> <VolumeGroupName><size>is the size of the volume to create, and can be specified with G (gigabytes), T (terabytes), etc.,<LogicalVolumeName>is the name of the logical volume, and<VolumeGroupName>is the name of the volume group from the previous step.The following example creates a 25-GB volume.

Execute
sudo lvsto see the LVM that was created.Format the logical volume with a supported filesystem. For EXT4, use the following example:
sudo mkfs.ext4 /dev/<VolumeGroupName>/<LogicalVolumeName><VolumeGroupName>is the name of the volume group from the previous step.<LogicalVolumeName>is the name of the logical volume from the previous step.For system databases or anything stored in the default data location, follow these steps. Otherwise, skip to Step 13.
Ensure that SQL Server is stopped on the server that you're working on.
sudo systemctl stop mssql-server
sudo systemctl status mssql-server
Switch fully to be the superuser. You don't receive any acknowledgment if successful.
sudo -iSwitch to be the
mssqluser. You don't receive any acknowledgment if successful.su mssqlCreate a temporary directory to store the SQL Server data and log files. You don't receive any acknowledgment if successful.
mkdir <TempDir><TempDir>is the name of the folder. The following example creates a folder named /var/opt/mssql/TempDir.mkdir /var/opt/mssql/TempDirCopy the SQL Server data and log files to the temporary directory. You don't receive any acknowledgment if successful.
cp /var/opt/mssql/data/* <TempDir><TempDir>is the name of the folder from the previous step.Verify that the files are in the directory.
ls <TempDir><TempDir>is the name of the folder from previous steps.Delete the files from the existing SQL Server data directory. You don't receive any acknowledgment if successful.
rm - f /var/opt/mssql/data/*Verify that the files have been deleted. The following image shows an example of the entire sequence from c through h.
ls /var/opt/mssql/data
Type
exitto switch back to therootuser.Mount the iSCSI logical volume in the SQL Server data folder. You don't receive any acknowledgment if successful.
mount /dev/<VolumeGroupName>/<LogicalVolumeName> /var/opt/mssql/data<VolumeGroupName>is the name of the volume group and<LogicalVolumeName>is the name of the logical volume that was created. The following example syntax matches the volume group and logical volume from the previous command.mount /dev/FCIDataVG1/FCIDataLV1 /var/opt/mssql/dataChange the owner of the mount to
mssql. You don't receive any acknowledgment if successful.chown mssql /var/opt/mssql/dataChange ownership of the group of the mount to
mssql. You don't receive any acknowledgment if successful.chgrp mssql /var/opt/mssql/dataSwitch to the
mssqluser. You don't receive any acknowledgment if successful.su mssqlCopy the files from the temporary directory
/var/opt/mssql/data. You don't receive any acknowledgment if successful.cp /var/opt/mssql/TempDir/* /var/opt/mssql/dataVerify the files are there.
ls /var/opt/mssql/dataEnter
exitto not bemssql.Enter
exitto not beroot.Start SQL Server. If everything was copied correctly and security applied correctly, SQL Server should show as started.
sudo systemctl start mssql-server
sudo systemctl status mssql-server
Stop SQL Server and verify that it has shut down.
sudo systemctl stop mssql-server
sudo systemctl status mssql-server
For things other than system databases, such as user databases or backups, follow these steps. If only using the default location, skip to Step 14.
Switch to be the superuser. You don't receive any acknowledgment if successful.
sudo -iCreate a folder to be used by SQL Server.
mkdir <FolderName><FolderName>is the name of the folder. The folder's full path needs to be specified if not in the right location. The following example creates a folder named /var/opt/mssql/userdata.mkdir /var/opt/mssql/userdataMount the iSCSI logical volume in the folder that was created in the previous step. You don't receive any acknowledgment if successful.
mount /dev/<VolumeGroupName>/<LogicalVolumeName> <FolderName><VolumeGroupName>is the name of the volume group,<LogicalVolumeName>is the name of the logical volume that was created, and<FolderName>is the name of the folder. Example syntax is shown here.mount /dev/FCIDataVG2/FCIDataLV2 /var/opt/mssql/userdataChange ownership of the folder created to
mssql. You don't receive any acknowledgment if successful.chown mssql <FolderName><FolderName>is the name of the folder that was created. An example is shown here.chown mssql /var/opt/mssql/userdataChange the group of the folder created to
mssql. You don't receive any acknowledgment if successful.chown mssql <FolderName><FolderName>is the name of the folder that was created. An example is shown here.chown mssql /var/opt/mssql/userdataType
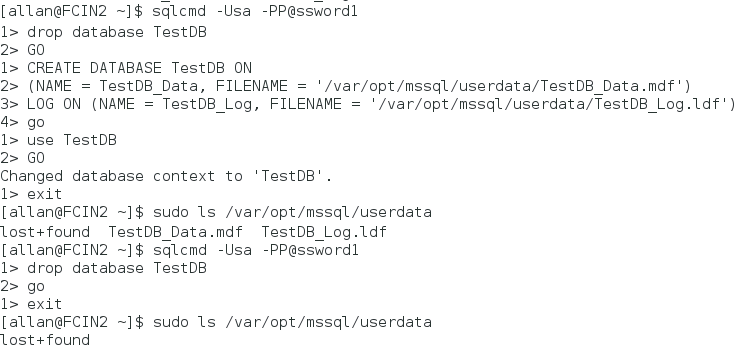
exitto no longer be the superuser.To test, create a database in that folder. The following example uses sqlcmd to create a database, switch context to it, verify the files exist at the OS level, and then deletes the temporary location. You can use SSMS.
Unmount the share
sudo umount /dev/<VolumeGroupName>/<LogicalVolumeName> <FolderName><VolumeGroupName>is the name of the volume group,<LogicalVolumeName>is the name of the logical volume that was created, and<FolderName>is the name of the folder. Example syntax is shown here.sudo umount /dev/FCIDataVG2/FCIDataLV2 /var/opt/mssql/userdata
Configure the server so that only Pacemaker can activate the volume group.
sudo lvmconf --enable-halvm --services -startstopservicesGenerate a list of the volume groups on the server. Anything listed that isn't the iSCSI disk is used by the system, such as for the OS disk.
sudo vgsModify the activation configuration section of the file /etc/lvm/lvm.conf. Configure the following line:
volume_list = [ <ListOfVGsNotUsedByPacemaker> ]<ListOfVGsNotUsedByPacemaker>is the list of volume groups from the output of Step 20 that aren't used by the FCI. Put each one in quotes and separate by a comma. An example is shown here.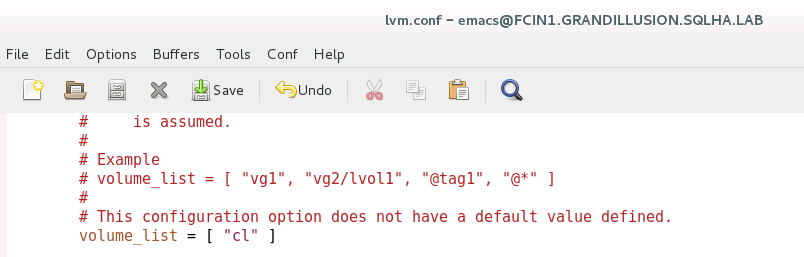
When Linux starts, it mounts the file system. To ensure that only Pacemaker can mount the iSCSI disk, rebuild the root filesystem image.
Run the following command, which might take a few moments to complete. You get no message back if successful.
sudo dracut -H -f /boot/initramfs-$(uname -r).img $(uname -r)Restart the server.
On another server that will participate in the FCI, perform Steps 1 - 6. This presents the iSCSI target to the SQL Server.
Generate a list of the volume groups on the server. It should show the volume group created earlier.
sudo vgsStart SQL Server and verify it can be started on this server.
sudo systemctl start mssql-server
sudo systemctl status mssql-server
Stop SQL Server and verify that it has shut down.
sudo systemctl stop mssql-server
sudo systemctl status mssql-server
Repeat Steps 1 - 6 on any other servers that will participate in the FCI.


You're now ready to configure the FCI.
Related content
प्रतिक्रिया
जल्द आ रहा है: 2024 के दौरान हम सामग्री के लिए फीडबैक तंत्र के रूप में GitHub मुद्दों को चरणबद्ध तरीके से समाप्त कर देंगे और इसे एक नई फीडबैक प्रणाली से बदल देंगे. अधिक जानकारी के लिए, देखें: https://aka.ms/ContentUserFeedback.
के लिए प्रतिक्रिया सबमिट करें और देखें