Esercitazione: Accedere agli utenti e chiamare l'API Microsoft Graph in un'app desktop Electron
In questa esercitazione si crea un'applicazione desktop Electron che accede agli utenti e chiama Microsoft Graph usando il flusso del codice di autorizzazione con PKCE. L'app desktop compilata usa Microsoft Authentication Library (MSAL) per Node.js.
Seguire la procedura descritta in questa esercitazione per:
- Registrare l'applicazione nel portale di Azure
- Creare un progetto di app desktop Electron
- Aggiungere la logica di autenticazione all'app
- Aggiungere un metodo per chiamare un'API Web
- Aggiungere i dettagli di registrazione dell'app
- Testare l'app
Prerequisiti
- Node.JS
- Elettrone
- Visual Studio Code o un altro editor di codice
Registrare l'applicazione
Prima di tutto, completare i passaggi descritti in Registrare un'applicazione con Microsoft Identity Platform per registrare l'app.
Usare le impostazioni seguenti per la registrazione dell'app:
- Nome:
ElectronDesktopApp(suggerito) - Tipi di account supportati: account solo nella directory dell'organizzazione (tenant singolo)
- Tipo di piattaforma: applicazioni per dispositivi mobili e desktop
- URI di reindirizzamento:
http://localhost
Creare il progetto
Creare una cartella per ospitare l'applicazione, ad esempio ElectronDesktopApp.
Per prima cosa, passare alla cartella del progetto nel terminale e quindi eseguire i comandi
npmseguenti:npm init -y npm install --save @azure/msal-node @microsoft/microsoft-graph-client isomorphic-fetch bootstrap jquery popper.js npm install --save-dev electron@20.0.0Creare quindi una cartella denominata App. All'interno di questa cartella creare un file denominato index.html che fungerà da interfaccia utente. Aggiungere il codice seguente:
<!DOCTYPE html>
<html lang="en">

<head>
    <meta charset="UTF-8">
    <meta name="viewport" content="width=device-width, initial-scale=1.0, shrink-to-fit=no">
    <meta http-equiv="Content-Security-Policy" content="script-src 'self'" />
    <title>MSAL Node Electron Sample App</title>

    <!-- adding Bootstrap 4 for UI components  -->
    <link rel="stylesheet" href="../node_modules/bootstrap/dist/css/bootstrap.min.css">
</head>

<body>
    <nav class="navbar navbar-expand-lg navbar-dark bg-primary">
        <a class="navbar-brand">Microsoft identity platform</a>
        <div class="btn-group ml-auto dropleft">
            <button type="button" id="signIn" class="btn btn-secondary" aria-expanded="false">
                Sign in
            </button>
            <button type="button" id="signOut" class="btn btn-success" hidden aria-expanded="false">
                Sign out
            </button>
        </div>
    </nav>
    <br>
    <h5 class="card-header text-center">Electron sample app calling MS Graph API using MSAL Node</h5>
    <br>
    <div class="row" style="margin:auto">
        <div id="cardDiv" class="col-md-6" style="display:none; margin:auto">
            <div class="card text-center">
                <div class="card-body">
                    <h5 class="card-title" id="WelcomeMessage">Please sign-in to see your profile and read your mails
                    </h5>
                    <div id="profileDiv"></div>
                    <br>
                    <br>
                    <button class="btn btn-primary" id="seeProfile">See Profile</button>
                </div>
            </div>
        </div>
    </div>

    <!-- importing bootstrap.js and supporting js libraries -->
    <script src="../node_modules/jquery/dist/jquery.js"></script>
    <script src="../node_modules/popper.js/dist/umd/popper.js"></script>
    <script src="../node_modules/bootstrap/dist/js/bootstrap.js"></script>

    <!-- importing app scripts | load order is important -->
    <script src="./renderer.js"></script>

</body>

</html>
Creare quindi il file denominato main.js e aggiungere il codice seguente:
/*
 * Copyright (c) Microsoft Corporation. All rights reserved.
 * Licensed under the MIT License.
 */

const path = require("path");
const { app, ipcMain, BrowserWindow } = require("electron");

const AuthProvider = require("./AuthProvider");
const { IPC_MESSAGES } = require("./constants");
const { protectedResources, msalConfig } = require("./authConfig");
const getGraphClient = require("./graph");

let authProvider;
let mainWindow;

function createWindow() {
    mainWindow = new BrowserWindow({
        width: 800,
        height: 600,
        webPreferences: { preload: path.join(__dirname, "preload.js") },
    });

    authProvider = new AuthProvider(msalConfig);
}

app.on("ready", () => {
    createWindow();
    mainWindow.loadFile(path.join(__dirname, "./index.html"));
});

app.on("window-all-closed", () => {
    app.quit();
});

app.on('activate', () => {
    // On OS X it's common to re-create a window in the app when the
    // dock icon is clicked and there are no other windows open.
    if (BrowserWindow.getAllWindows().length === 0) {
        createWindow();
    }
});


// Event handlers
ipcMain.on(IPC_MESSAGES.LOGIN, async () => {
    const account = await authProvider.login();

    await mainWindow.loadFile(path.join(__dirname, "./index.html"));

    mainWindow.webContents.send(IPC_MESSAGES.SHOW_WELCOME_MESSAGE, account);
});

ipcMain.on(IPC_MESSAGES.LOGOUT, async () => {
    await authProvider.logout();

    await mainWindow.loadFile(path.join(__dirname, "./index.html"));
});

ipcMain.on(IPC_MESSAGES.GET_PROFILE, async () => {
    const tokenRequest = {
        scopes: protectedResources.graphMe.scopes
    };

    const tokenResponse = await authProvider.getToken(tokenRequest);
    const account = authProvider.account;

    await mainWindow.loadFile(path.join(__dirname, "./index.html"));

    const graphResponse = await getGraphClient(tokenResponse.accessToken)
        .api(protectedResources.graphMe.endpoint).get();

    mainWindow.webContents.send(IPC_MESSAGES.SHOW_WELCOME_MESSAGE, account);
    mainWindow.webContents.send(IPC_MESSAGES.SET_PROFILE, graphResponse);
});
Nel frammento di codice precedente, inizializziamo un oggetto finestra principale Electron e creiamo alcuni gestori eventi per le interazioni con la finestra Electron. Si importano anche parametri di configurazione, si crea un'istanza della classe authProvider per gestire l'accesso, l'accesso e l'acquisizione di token e chiamare l'API Microsoft Graph.
Nella stessa cartella (App) creare un altro file denominato renderer.js e aggiungere il codice seguente:
// Copyright (c) Microsoft Corporation. All rights reserved.
// Licensed under the MIT License

/**
 * The renderer API is exposed by the preload script found in the preload.ts
 * file in order to give the renderer access to the Node API in a secure and
 * controlled way
 */
const welcomeDiv = document.getElementById('WelcomeMessage');
const signInButton = document.getElementById('signIn');
const signOutButton = document.getElementById('signOut');
const seeProfileButton = document.getElementById('seeProfile');
const cardDiv = document.getElementById('cardDiv');
const profileDiv = document.getElementById('profileDiv');

window.renderer.showWelcomeMessage((event, account) => {
    if (!account) return;

    cardDiv.style.display = 'initial';
    welcomeDiv.innerHTML = `Welcome ${account.name}`;
    signInButton.hidden = true;
    signOutButton.hidden = false;
});

window.renderer.handleProfileData((event, graphResponse) => {
    if (!graphResponse) return;

    console.log(`Graph API responded at: ${new Date().toString()}`);
    setProfile(graphResponse);
});

// UI event handlers
signInButton.addEventListener('click', () => {
    window.renderer.sendLoginMessage();
});

signOutButton.addEventListener('click', () => {
    window.renderer.sendSignoutMessage();
});

seeProfileButton.addEventListener('click', () => {
    window.renderer.sendSeeProfileMessage();
});

const setProfile = (data) => {
    if (!data) return;

    profileDiv.innerHTML = '';

    const title = document.createElement('p');
    const email = document.createElement('p');
    const phone = document.createElement('p');
    const address = document.createElement('p');

    title.innerHTML = '<strong>Title: </strong>' + data.jobTitle;
    email.innerHTML = '<strong>Mail: </strong>' + data.mail;
    phone.innerHTML = '<strong>Phone: </strong>' + data.businessPhones[0];
    address.innerHTML = '<strong>Location: </strong>' + data.officeLocation;

    profileDiv.appendChild(title);
    profileDiv.appendChild(email);
    profileDiv.appendChild(phone);
    profileDiv.appendChild(address);
}
I metodi del renderer vengono esposti dallo script di precaricamento trovato nel file preload.js per concedere al renderer l'accesso Node API a in modo sicuro e controllato
Creare quindi un nuovo file preload.js e aggiungere il codice seguente:
// Copyright (c) Microsoft Corporation. All rights reserved.
// Licensed under the MIT License

const { contextBridge, ipcRenderer } = require('electron');

/**
 * This preload script exposes a "renderer" API to give
 * the Renderer process controlled access to some Node APIs
 * by leveraging IPC channels that have been configured for
 * communication between the Main and Renderer processes.
 */
contextBridge.exposeInMainWorld('renderer', {
    sendLoginMessage: () => {
        ipcRenderer.send('LOGIN');
    },
    sendSignoutMessage: () => {
        ipcRenderer.send('LOGOUT');
    },
    sendSeeProfileMessage: () => {
        ipcRenderer.send('GET_PROFILE');
    },
    handleProfileData: (func) => {
        ipcRenderer.on('SET_PROFILE', (event, ...args) => func(event, ...args));
    },
    showWelcomeMessage: (func) => {
        ipcRenderer.on('SHOW_WELCOME_MESSAGE', (event, ...args) => func(event, ...args));
    },
});
Questo script di precaricamento espone un'API renderer per concedere al processo renderer l'accesso controllato ad alcuni Node APIs applicando canali IPC configurati per la comunicazione tra i processi main e renderer.
Creare infine un file denominato constants.js che archivierà le costanti delle stringhe per descrivere gli eventi dell'applicazione:
/*
 * Copyright (c) Microsoft Corporation. All rights reserved.
 * Licensed under the MIT License.
 */

const IPC_MESSAGES = {
    SHOW_WELCOME_MESSAGE: 'SHOW_WELCOME_MESSAGE',
    LOGIN: 'LOGIN',
    LOGOUT: 'LOGOUT',
    GET_PROFILE: 'GET_PROFILE',
    SET_PROFILE: 'SET_PROFILE',
}

module.exports = {
    IPC_MESSAGES: IPC_MESSAGES,
}
Ora hai un'interfaccia utente grafica semplice e interazioni per la tua app Electron. Dopo aver completato il resto dell'esercitazione, la struttura di file e cartelle del progetto sarà simile alla seguente:
ElectronDesktopApp/
├── App
│   ├── AuthProvider.js
│   ├── constants.js
│   ├── graph.js
│   ├── index.html
|   ├── main.js
|   ├── preload.js
|   ├── renderer.js
│   ├── authConfig.js
├── package.json
Aggiungere la logica di autenticazione all'app
Nella cartella App creare un file denominato AuthProvider.js. Il file AuthProvider.js conterrà una classe del provider di autenticazione che gestirà l'accesso, la disconnessione, l'acquisizione di token, la selezione dell'account e le attività di autenticazione correlate usando il nodo MSAL. Aggiungere il codice seguente:
/*
 * Copyright (c) Microsoft Corporation. All rights reserved.
 * Licensed under the MIT License.
 */

const { PublicClientApplication, InteractionRequiredAuthError } = require('@azure/msal-node');
const { shell } = require('electron');

class AuthProvider {
    msalConfig
    clientApplication;
    account;
    cache;

    constructor(msalConfig) {
        /**
         * Initialize a public client application. For more information, visit:
         * https://github.com/AzureAD/microsoft-authentication-library-for-js/blob/dev/lib/msal-node/docs/initialize-public-client-application.md
         */
        this.msalConfig = msalConfig;
        this.clientApplication = new PublicClientApplication(this.msalConfig);
        this.cache = this.clientApplication.getTokenCache();
        this.account = null;
    }

    async login() {
        const authResponse = await this.getToken({
            // If there are scopes that you would like users to consent up front, add them below
            // by default, MSAL will add the OIDC scopes to every token request, so we omit those here
            scopes: [],
        });

        return this.handleResponse(authResponse);
    }

    async logout() {
        if (!this.account) return;

        try {
            /**
             * If you would like to end the session with AAD, use the logout endpoint. You'll need to enable
             * the optional token claim 'login_hint' for this to work as expected. For more information, visit:
             * https://learn.microsoft.com/azure/active-directory/develop/v2-protocols-oidc#send-a-sign-out-request
             */
            if (this.account.idTokenClaims.hasOwnProperty('login_hint')) {
                await shell.openExternal(`${this.msalConfig.auth.authority}/oauth2/v2.0/logout?logout_hint=${encodeURIComponent(this.account.idTokenClaims.login_hint)}`);
            }

            await this.cache.removeAccount(this.account);
            this.account = null;
        } catch (error) {
            console.log(error);
        }
    }

    async getToken(tokenRequest) {
        let authResponse;
        const account = this.account || (await this.getAccount());

        if (account) {
            tokenRequest.account = account;
            authResponse = await this.getTokenSilent(tokenRequest);
        } else {
            authResponse = await this.getTokenInteractive(tokenRequest);
        }

        return authResponse || null;
    }

    async getTokenSilent(tokenRequest) {
        try {
            return await this.clientApplication.acquireTokenSilent(tokenRequest);
        } catch (error) {
            if (error instanceof InteractionRequiredAuthError) {
                console.log('Silent token acquisition failed, acquiring token interactive');
                return await this.getTokenInteractive(tokenRequest);
            }

            console.log(error);
        }
    }

    async getTokenInteractive(tokenRequest) {
        try {
            const openBrowser = async (url) => {
                await shell.openExternal(url);
            };

            const authResponse = await this.clientApplication.acquireTokenInteractive({
                ...tokenRequest,
                openBrowser,
                successTemplate: '<h1>Successfully signed in!</h1> <p>You can close this window now.</p>',
                errorTemplate: '<h1>Oops! Something went wrong</h1> <p>Check the console for more information.</p>',
            });

            return authResponse;
        } catch (error) {
            throw error;
        }
    }

    /**
     * Handles the response from a popup or redirect. If response is null, will check if we have any accounts and attempt to sign in.
     * @param response
     */
    async handleResponse(response) {
        if (response !== null) {
            this.account = response.account;
        } else {
            this.account = await this.getAccount();
        }

        return this.account;
    }

    /**
     * Calls getAllAccounts and determines the correct account to sign into, currently defaults to first account found in cache.
     * https://github.com/AzureAD/microsoft-authentication-library-for-js/blob/dev/lib/msal-common/docs/Accounts.md
     */
    async getAccount() {
        const currentAccounts = await this.cache.getAllAccounts();

        if (!currentAccounts) {
            console.log('No accounts detected');
            return null;
        }

        if (currentAccounts.length > 1) {
            // Add choose account code here
            console.log('Multiple accounts detected, need to add choose account code.');
            return currentAccounts[0];
        } else if (currentAccounts.length === 1) {
            return currentAccounts[0];
        } else {
            return null;
        }
    }
}

module.exports = AuthProvider;
Nel frammento di codice precedente è stato inizializzato il nodo PublicClientApplication MSAL passando un oggetto di configurazione (msalConfig). Sono stati quindi esposti logini metodi e logoutgetToken da chiamare dal modulo main (main.js). In login e getTokenvengono acquisiti i token di accesso e ID usando l'API pubblica del nodo acquireTokenInteractive MSAL.
Aggiungere Microsoft Graph SDK
Creare un file denominato graph.js. Il file graph.js conterrà un'istanza del client Microsoft Graph SDK per facilitare l'accesso ai dati nell'API Microsoft Graph, usando il token di accesso ottenuto dal nodo MSAL:
const { Client } = require('@microsoft/microsoft-graph-client');
require('isomorphic-fetch');

/**
 * Creating a Graph client instance via options method. For more information, visit:
 * https://github.com/microsoftgraph/msgraph-sdk-javascript/blob/dev/docs/CreatingClientInstance.md#2-create-with-options
 * @param {String} accessToken
 * @returns
 */
const getGraphClient = (accessToken) => {
    // Initialize Graph client
    const graphClient = Client.init({
        // Use the provided access token to authenticate requests
        authProvider: (done) => {
            done(null, accessToken);
        },
    });

    return graphClient;
};

module.exports = getGraphClient;
Aggiungere i dettagli di registrazione dell'app
Creare un file di ambiente per archiviare i dettagli di registrazione dell'app che verranno usati durante l'acquisizione dei token. A tale scopo, creare un file denominato authConfig.js all'interno della cartella radice dell'esempio (ElectronDesktopApp) e aggiungere il codice seguente:
/*
 * Copyright (c) Microsoft Corporation. All rights reserved.
 * Licensed under the MIT License.
 */

const { LogLevel } = require("@azure/msal-node");

/**
 * Configuration object to be passed to MSAL instance on creation.
 * For a full list of MSAL.js configuration parameters, visit:
 * https://github.com/AzureAD/microsoft-authentication-library-for-js/blob/dev/lib/msal-node/docs/configuration.md
 */
const AAD_ENDPOINT_HOST = "Enter_the_Cloud_Instance_Id_Here"; // include the trailing slash

const msalConfig = {
    auth: {
        clientId: "Enter_the_Application_Id_Here",
        authority: `${AAD_ENDPOINT_HOST}Enter_the_Tenant_Info_Here`,
    },
    system: {
        loggerOptions: {
            loggerCallback(loglevel, message, containsPii) {
                console.log(message);
            },
            piiLoggingEnabled: false,
            logLevel: LogLevel.Verbose,
        },
    },
};

/**
 * Add here the endpoints and scopes when obtaining an access token for protected web APIs. For more information, see:
 * https://github.com/AzureAD/microsoft-authentication-library-for-js/blob/dev/lib/msal-browser/docs/resources-and-scopes.md
 */
const GRAPH_ENDPOINT_HOST = "Enter_the_Graph_Endpoint_Here"; // include the trailing slash

const protectedResources = {
    graphMe: {
        endpoint: `${GRAPH_ENDPOINT_HOST}v1.0/me`,
        scopes: ["User.Read"],
    }
};


module.exports = {
    msalConfig: msalConfig,
    protectedResources: protectedResources,
};
Compilare questi dettagli con i valori ottenuti dal portale di registrazione delle app di Azure:
Enter_the_Tenant_Id_heredeve essere uno dei seguenti:- Se l'applicazione supporta account in questa directory organizzativa, sostituire questo valore con l'ID tenant o il nome del tenant. Ad esempio,
contoso.microsoft.com. - Se l'applicazione supporta account in qualsiasi directory organizzativa, sostituire questo valore con
organizations. - Se l'applicazione supporta account in qualsiasi directory organizzativa e account Microsoft personali, sostituire questo valore con
common. - Per limitare il supporto ai soli account Microsoft personali, sostituire questo valore con
consumers.
- Se l'applicazione supporta account in questa directory organizzativa, sostituire questo valore con l'ID tenant o il nome del tenant. Ad esempio,
Enter_the_Application_Id_Here: ID applicazione (client) dell'applicazione registrata.Enter_the_Cloud_Instance_Id_Here: l'istanza cloud di Azure in cui è registrata l'applicazione.- Per il cloud principale (o globale) di Azure, immettere
https://login.microsoftonline.com/. - Peri cloud nazionali, ad esempio Cina, è possibile trovare i valori appropriati nella pagina Cloud nazionali.
- Per il cloud principale (o globale) di Azure, immettere
Enter_the_Graph_Endpoint_Hereè l'istanza dell'API Microsoft Graph con cui l'applicazione dovrà comunicare.- Per l'endpoint API Microsoft Graph globale, sostituire entrambe le istanze di questa stringa con
https://graph.microsoft.com/. - Per gli endpoint delle distribuzioni di cloud nazionali, vedere Distribuzioni di cloud nazionali nella documentazione di Microsoft Graph.
- Per l'endpoint API Microsoft Graph globale, sostituire entrambe le istanze di questa stringa con
Testare l'app
La creazione dell'applicazione è stata completata ed è ora possibile avviare l'app desktop Electron e testare le funzionalità dell'app.
- Avviare l'app eseguendo il comando seguente dalla radice della cartella del progetto:
electron App/main.js
- Nella finestra principale dell'applicazione dovrebbero essere visualizzati il contenuto del file index.html e il pulsante Accedi .
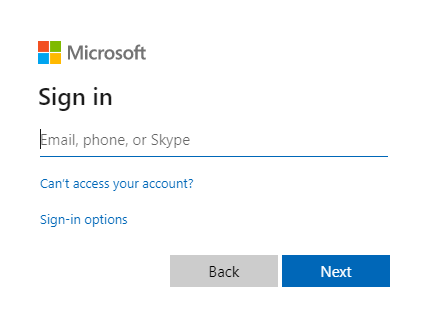
Testare l'accesso e disconnettersi
Dopo il caricamento del file index.html , selezionare Accedi. Viene richiesto di accedere con Microsoft Identity Platform:
Se si acconsente alle autorizzazioni richieste, nelle applicazioni Web viene visualizzato il nome utente, a indicare che l'accesso è riuscito:
Testare la chiamata api Web
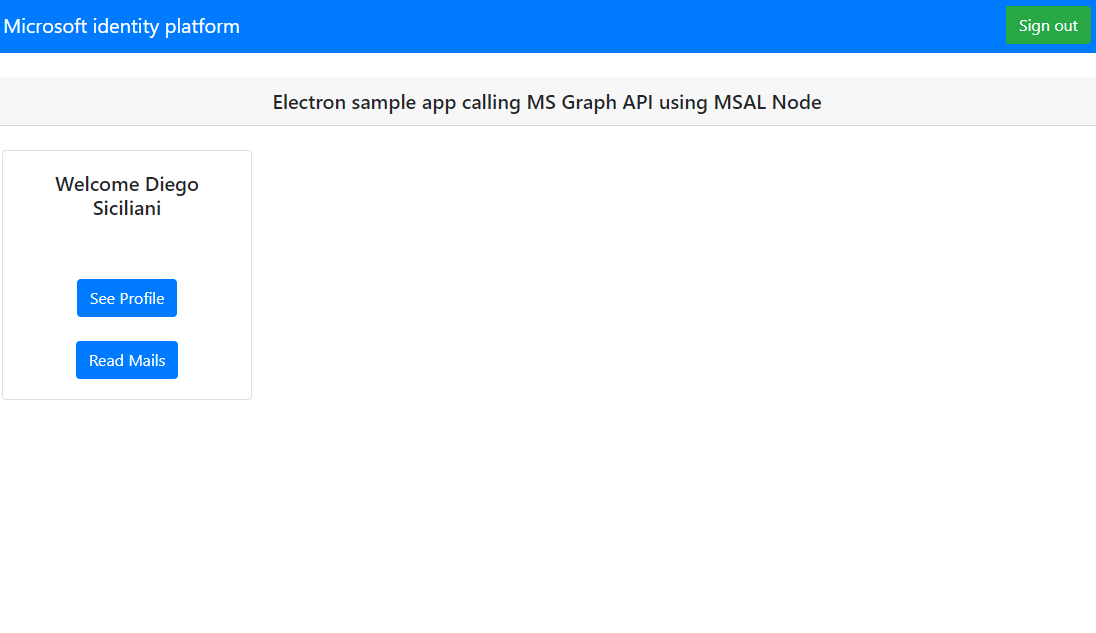
Dopo l'accesso, selezionare Visualizza profilo per visualizzare le informazioni sul profilo utente restituite nella risposta dalla chiamata all'API Microsoft Graph. Dopo il consenso, verranno visualizzate le informazioni sul profilo restituite nella risposta:

Funzionamento dell'applicazione
Quando un utente seleziona il pulsante Accedi per la prima volta, il acquireTokenInteractive metodo del nodo MSAL. Questo metodo reindirizza l'utente all'accesso con l'endpoint di Microsoft Identity Platform e convalida le credenziali dell'utente, ottiene un codice di autorizzazione e quindi scambia tale codice per un token ID, un token di accesso e un token di aggiornamento. Il nodo MSAL memorizza nella cache anche questi token per un uso futuro.
Il token ID contiene informazioni di base sull'utente, ad esempio il nome visualizzato. Il token di accesso ha una durata limitata e scade dopo 24 ore. Se si prevede di usare questi token per accedere alla risorsa protetta, il server back-end deve convalidarlo per garantire che il token sia stato rilasciato a un utente valido per l'applicazione.
L'app desktop creata in questa esercitazione effettua una chiamata REST all'API Microsoft Graph usando un token di accesso come token di connessione nell'intestazione della richiesta (RFC 6750).
L'API Microsoft Graph richiede l'ambito user.read per leggere il profilo dell'utente. Per impostazione predefinita, questo ambito viene aggiunto automaticamente in ogni applicazione registrata nel portale di Azure. Altre API per Microsoft Graph e API personalizzate per il server back-end potrebbero richiedere ambiti aggiuntivi. Ad esempio, l'API Microsoft Graph richiede l'ambito Mail.Read per visualizzare la posta elettronica dell'utente.
Quando si aggiungono ambiti, agli utenti potrebbe essere richiesto di fornire un altro consenso per gli ambiti aggiunti.
Assistenza e supporto
Se è necessaria assistenza, si vuole segnalare un problema o si vogliono ottenere informazioni sulle opzioni di supporto, vedere Assistenza e supporto per gli sviluppatori.
Passaggi successivi
Per approfondire lo sviluppo di applicazioni desktop Node.js e Electron in Microsoft Identity Platform, vedere la serie di scenari in più parti: