Usare GitHub Actions per automatizzare il flusso di lavoro e distribuirlo nel servizio app di Azure da GitHub.
Prerequisiti
Configurare la distribuzione di GitHub Actions durante la creazione di un'app
GitHub Actions distribuzione è integrata nel processo di creazione di app Web predefinito. Impostare Distribuzione continua su Abilita nella scheda Distribuzione e configurare l'organizzazione, il repository e il ramo scelti.
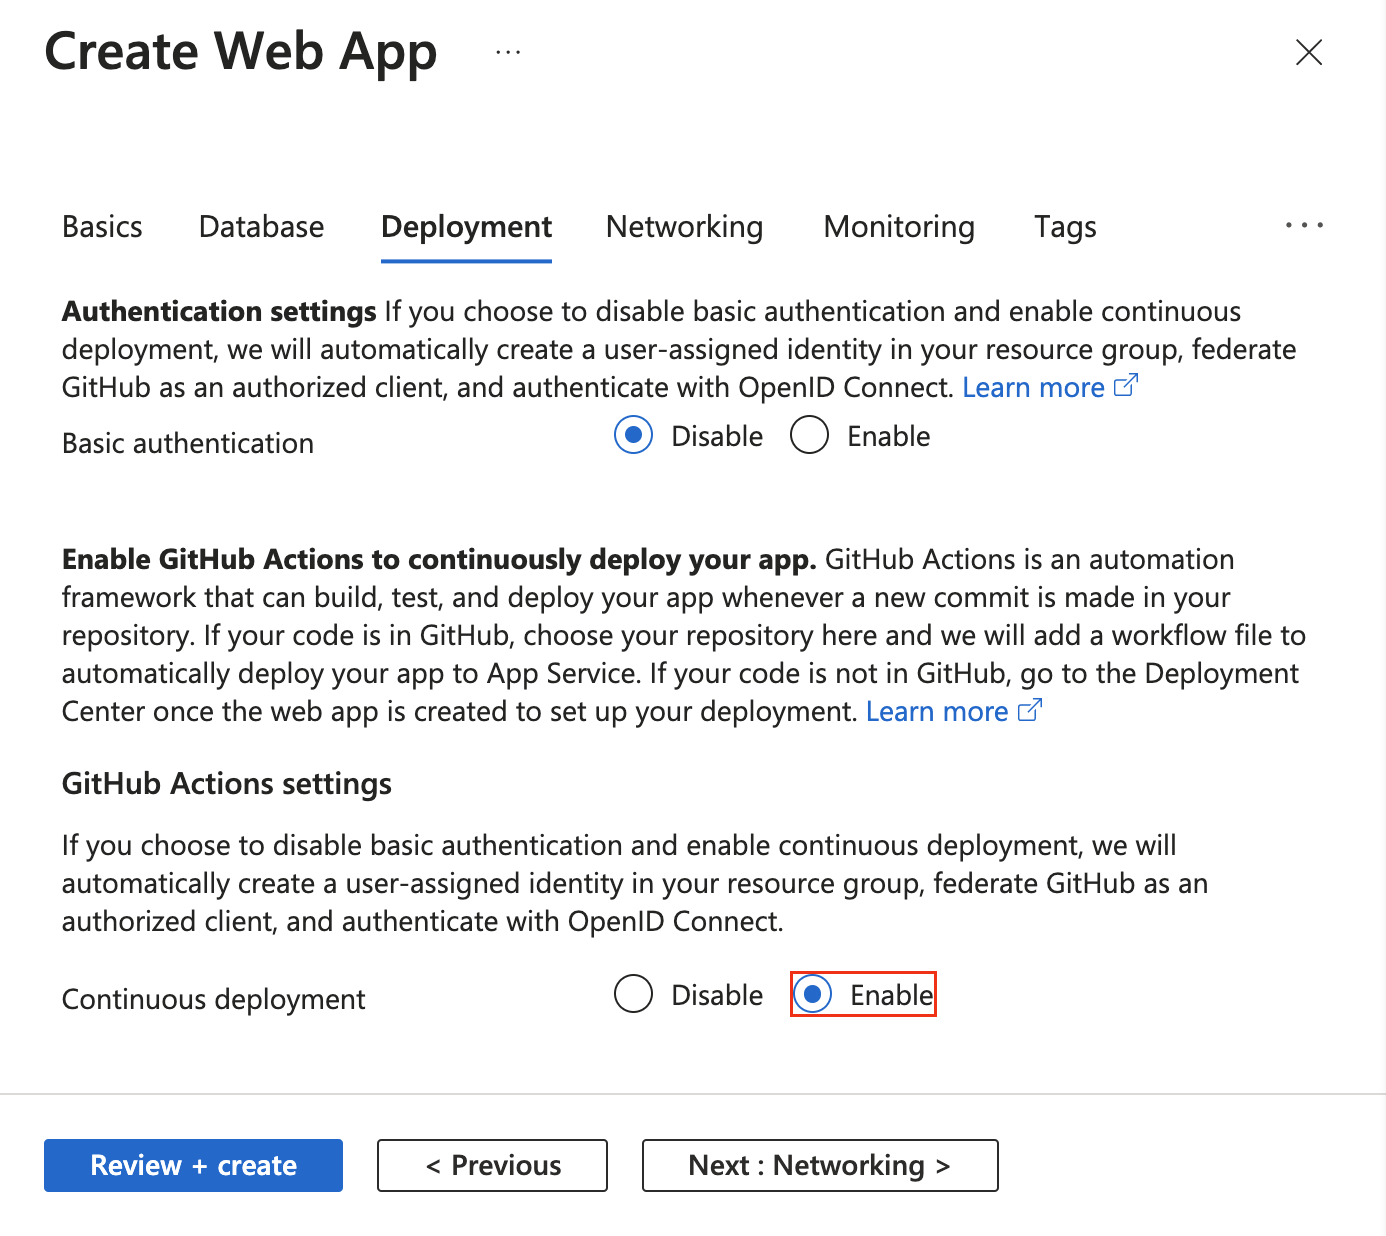
Quando si abilita la distribuzione continua, il processo Crea app Web seleziona automaticamente il metodo di autenticazione in base alla selezione di autenticazione di base e configura l'app e il repository GitHub di conseguenza:
Configurare la distribuzione di GitHub Actions dal Centro distribuzione
Per un'app esistente, è possibile iniziare rapidamente a usare GitHub Actions usando il Centro distribuzione nel servizio app. Questo metodo chiavi in mano genera un file del flusso di lavoro di GitHub Actions basato sullo stack di applicazioni ed esegue il commit nel repository GitHub.
Usando il Centro distribuzione, è anche possibile configurare facilmente l'autenticazione OpenID Connect più sicura con un'identità assegnata dall'utente. Per altre informazioni, vedere l'opzione relativa all'identità assegnata dall'utente.
Se l'account Azure ha le autorizzazioni necessarie, è possibile creare un'identità assegnata dall'utente. In caso contrario, è possibile selezionare un'identità gestita assegnata dall'utente esistente nel menu a discesa Identità. È possibile collaborare con l'amministratore di Azure per creare un'identità gestita assegnata dall'utente con il ruolo Collaboratore sito Web.
Per altre informazioni, vedere Distribuzione continua in servizio app di Azure.
Configurare manualmente un flusso di lavoro di GitHub Actions
È possibile distribuire un flusso di lavoro senza usare il Centro distribuzione. Eseguire questi tre passaggi:
-
Generare le credenziali di distribuzione.
-
Configurare il secret GitHub.
-
Aggiungere il file del flusso di lavoro al repository GitHub.
Generare le credenziali per la distribuzione
È consigliabile usare OpenID Connect per eseguire l'autenticazione con il servizio app di Azure per GitHub Actions. Questo metodo di autenticazione usa token di breve durata. La configurazione di OpenID Connect con GitHub Actions è più complessa, ma offre sicurezza avanzata.
È anche possibile eseguire l'autenticazione con un'identità gestita assegnata dall'utente, un principal di servizio o un profilo di pubblicazione.
La procedura seguente descrive i passaggi per creare un'applicazione Microsoft Entra, un'entità servizio e credenziali federate usando le istruzioni dell'interfaccia della riga di comando di Azure. Per informazioni su come creare un'applicazione, un'entità servizio e le credenziali federate di Microsoft Entra nel portale di Azure, vedere Connettere GitHub e Azure.
Se non si dispone di un'applicazione esistente, registrare una nuova applicazione Microsoft Entra e un'entità servizio in grado di accedere alle risorse. Creare l'applicazione Microsoft Entra.
az ad app create --display-name myApp
Questo comando restituisce un output JSON con un oggetto appId, che è il tuo client-id. Salvare il valore da usare come AZURE_CLIENT_ID segreto GitHub in un secondo momento.
Il valore objectId viene utilizzato quando si creano credenziali federate con l'API Graph e viene fatto riferimento come APPLICATION-OBJECT-ID.
Creare un'entità servizio. Sostituire il $appID con il appId dall'output JSON.
Questo comando genera un output JSON con un'altra objectId da usare nel passaggio successivo. Il nuovo objectId è assignee-object-id.
Copia appOwnerTenantId per utilizzarlo successivamente come segreto GitHub per AZURE_TENANT_ID.
az ad sp create --id $appId
Creare una nuova assegnazione di ruolo per sottoscrizione e oggetto. Per impostazione predefinita, l'assegnazione del ruolo viene associata alla sottoscrizione predefinita. Sostituire $subscriptionId con l'ID sottoscrizione, $resourceGroupName con il nome del gruppo di risorse, $webappName con il nome dell'app Web e $assigneeObjectId con l'elemento generato id. Imparare a gestire le sottoscrizioni di Azure con l'interfaccia della riga di comando di Azure.
az role assignment create --role "Website Contributor" --subscription $subscriptionId --assignee-object-id $assigneeObjectId --scope /subscriptions/$subscriptionId/resourceGroups/$resourceGroupName/providers/Microsoft.Web/sites/$webappName --assignee-principal-type ServicePrincipal
Eseguire il comando seguente per creare una nuova credenziale di identità federata per l'app Microsoft Entra.
Sostituire APPLICATION-OBJECT-ID con l'oggetto appId generato durante la creazione dell'app per l'applicazione Active Directory.
Impostare un valore per CREDENTIAL-NAME per farvi riferimento in un secondo momento.
Impostare subject. GitHub ne definisce il valore a seconda del flusso di lavoro:
- Per i processi nell'ambiente GitHub Actions, utilizzare:
repo:< Organization/Repository >:environment:< Name >
- Per i processi non associati a un ambiente, includere il percorso di riferimento per branch/tag in base al percorso di riferimento usato per attivare il flusso di lavoro:
repo:< Organization/Repository >:ref:< ref path>. Ad esempio, repo:n-username/ node_express:ref:refs/heads/my-branch o repo:n-username/ node_express:ref:refs/tags/my-tag.
- Per i flussi di lavoro attivati da un evento di richiesta pull, usare :
repo:< Organization/Repository >:pull_request.
az ad app federated-credential create --id <APPLICATION-OBJECT-ID> --parameters credential.json
("credential.json" contains the following content)
{
    "name": "<CREDENTIAL-NAME>",
    "issuer": "https://token.actions.githubusercontent.com",
    "subject": "repo:organization/repository:ref:refs/heads/main",
    "description": "Testing",
    "audiences": [
        "api://AzureADTokenExchange"
    ]
}
Un profilo di pubblicazione è una credenziale a livello di app. Configurare il profilo di pubblicazione come segreto GitHub.
Passare a Servizio app nel portale di Azure.
Nella pagina Panoramica, selezionare Scarica profilo di pubblicazione.
Salvare il file scaricato. Usare il contenuto del file per creare un segreto GitHub.
Note
A partire da ottobre 2020, le app Web Linux richiedono che l'impostazione WEBSITE_WEBDEPLOY_USE_SCM dell'app sia impostata su trueprima di scaricare il profilo di pubblicazione.
È possibile creare un'entità servizio con il comando az ad sp create-for-rbac nell'interfaccia della riga di comando di Azure. Eseguire questo comando usando Azure Cloud Shell nel portale di Azure o selezionando Apri Cloud Shell.
az ad sp create-for-rbac --name "myApp" --role "Website Contributor" \
                            --scopes /subscriptions/<subscription-id>/resourceGroups/<group-name>/providers/Microsoft.Web/sites/<app-name> \
                            --json-auth
Nell'esempio precedente sostituire i segnaposto con l'ID sottoscrizione, il nome del gruppo di risorse e il nome dell'app. L'output è un oggetto JSON con le credenziali di assegnazione del ruolo che forniscono l'accesso alla tua app di App Service. L'output dovrebbe essere simile al frammento JSON seguente. Copiare l'oggetto JSON per un uso successivo.
  {
    "clientId": "<GUID>",
    "clientSecret": "<GUID>",
    "subscriptionId": "<GUID>",
    "tenantId": "<GUID>",
    (...)
  }
Importante
È consigliabile concedere l'accesso minimo. Nell'esempio precedente l'ambito è limitato all'app del Servizio app specifica, e non include l'intero gruppo di risorse.
È necessario specificare l'ID client, l'ID tenant e l'ID sottoscrizione dell'applicazione all'azione Azure/login . Questi valori possono essere forniti direttamente nel flusso di lavoro oppure possono essere archiviati nei segreti gitHub e riportati nel flusso di lavoro. Il salvataggio dei valori come segreti GitHub è l'opzione più sicura.
Aprire il repository GitHub e passare a Impostazioni>Sicurezza>Segreti e variabili>Azioni>Nuovo segreto della repository.
Creare segreti per AZURE_CLIENT_ID, AZURE_TENANT_IDe AZURE_SUBSCRIPTION_ID. Usare questi valori dell'applicazione Active Directory per i segreti di GitHub:
| Segreto GitHub |
Applicazione Active Directory |
AZURE_CLIENT_ID |
ID applicazione (client) |
AZURE_TENANT_ID |
ID della directory (tenant) |
AZURE_SUBSCRIPTION_ID |
ID sottoscrizione |
Selezionare Aggiungi segreto per salvare ogni segreto.
In GitHub passare al repository. Selezionare Impostazioni>Sicurezza>Segreti e variabili>Azioni>Nuovo segreto della repository.
Per usare le credenziali a livello di app create nella sezione precedente, incollare il contenuto del file del profilo di pubblicazione scaricato nel campo valore del segreto. Assegnare al segreto il nome AZURE_WEBAPP_PUBLISH_PROFILE.
Quando si configura successivamente il file del flusso di lavoro GitHub, utilizzare AZURE_WEBAPP_PUBLISH_PROFILE nell'azione Deploy Azure Web App (Distribuisci app Web di Azure). Ad esempio:
- uses: azure/webapps-deploy@v2
  with:
    publish-profile: ${{ secrets.AZURE_WEBAPP_PUBLISH_PROFILE }}
In GitHub passare al repository. Selezionare Impostazioni>Sicurezza>Segreti e variabili>Azioni>Nuovo segreto della repository.
Per usare le credenziali a livello di utente create nella sezione precedente, incollare l'intero output JSON dal comando del CLI di Azure nel campo del valore del segreto. Assegnare al segreto il nome AZURE_CREDENTIALS.
Quando si configura il file del flusso di lavoro GitHub in un secondo momento, usare il segreto per l'input creds di Azure/login. Ad esempio:
- uses: azure/login@v2
  with:
    creds: ${{ secrets.AZURE_CREDENTIALS }}
Aggiungere il file del flusso di lavoro al repository GitHub
Un file YAML (.yml) nel percorso /.github/workflows/ nel repository GitHub definisce un flusso di lavoro. Questa definizione contiene i vari passaggi e i parametri che costituiscono il flusso di lavoro.
Come minimo, il file del flusso di lavoro prevede i passaggi distinti seguenti:
- Autenticarsi con App Service utilizzando il segreto GitHub che hai creato.
- Compilare l'app Web.
- Distribuire l'app Web.
Per distribuire il codice in un'app di App Service, usa l'azione azure/webapps-deploy@v3. L'azione richiede il nome dell'app Web in app-name e, a seconda dello stack linguistico, il percorso di una *.zip, *.war, *.jar o di una cartella da distribuire in package. Per un elenco completo dei possibili input per l'azione azure/webapps-deploy@v3, vedere action.yml.
Gli esempi seguenti illustrano la parte del flusso di lavoro che compila l'app Web, in diverse lingue supportate.
Per eseguire la distribuzione con OpenID Connect usando l'identità gestita configurata, usare l'azione azure/login@v2 con le chiavi client-id, tenant-id e subscription-id. Fare riferimento ai segreti di GitHub creati in precedenza.
name: .NET Core

on: [push]

permissions:
      id-token: write
      contents: read

env:
  AZURE_WEBAPP_NAME: my-app    # Set this to your application's name
  AZURE_WEBAPP_PACKAGE_PATH: '.'      # Set this to the path to your web app project, defaults to the repository root
  DOTNET_VERSION: '6.0.x'           # Set this to the dot net version to use

jobs:
  build:
    runs-on: ubuntu-latest

    steps:
      # Check out the repo
      - uses: actions/checkout@main
      - uses: azure/login@v2
        with:
          client-id: ${{ secrets.AZURE_CLIENT_ID }}
          tenant-id: ${{ secrets.AZURE_TENANT_ID }}
          subscription-id: ${{ secrets.AZURE_SUBSCRIPTION_ID }}


      # Setup .NET Core SDK
      - name: Setup .NET Core
        uses: actions/setup-dotnet@v3
        with:
          dotnet-version: ${{ env.DOTNET_VERSION }}

      # Run dotnet build and publish
      - name: dotnet build and publish
        run: |
          dotnet restore
          dotnet build --configuration Release
          dotnet publish -c Release --property:PublishDir='${{ env.AZURE_WEBAPP_PACKAGE_PATH }}/myapp'

      # Deploy to Azure Web apps
      - name: 'Run Azure webapp deploy action using publish profile credentials'
        uses: azure/webapps-deploy@v3
        with:
          app-name: ${{ env.AZURE_WEBAPP_NAME }} # Replace with your app name
          package: '${{ env.AZURE_WEBAPP_PACKAGE_PATH }}/myapp'

      - name: logout
        run: |
          az logout
Compilare e distribuire un'app ASP.NET model-view-controller (MVC) in Azure usando un'entità servizio di Azure. Nell'esempio vengono usati i segreti di GitHub per i valori client-id, tenant-id e subscription-id. È anche possibile passare questi valori direttamente nell'azione di accesso.
name: Deploy ASP.NET MVC App deploy to Azure Web App

on: [push]

permissions:
      id-token: write
      contents: read

env:
  AZURE_WEBAPP_NAME: my-app    # Set this to your application's name
  AZURE_WEBAPP_PACKAGE_PATH: '.'      # Set this to the path to your web app project, defaults to the repository root
  NUGET_VERSION: '5.3.x'           # Set this to the dot net version to use

jobs:
  build-and-deploy:
    runs-on: windows-latest
    steps:

    # Check out the repo
    - uses: actions/checkout@main

    - uses: azure/login@v2
      with:
        client-id: ${{ secrets.AZURE_CLIENT_ID }}
        tenant-id: ${{ secrets.AZURE_TENANT_ID }}
        subscription-id: ${{ secrets.AZURE_SUBSCRIPTION_ID }}

    - name: Install Nuget
      uses: nuget/setup-nuget@v1
      with:
        nuget-version: ${{ env.NUGET_VERSION}}
    - name: NuGet to restore dependencies as well as project-specific tools that are specified in the project file
      run: nuget restore

    - name: Add msbuild to PATH
      uses: microsoft/setup-msbuild@v1.0.2

    - name: Run MSBuild
      run: msbuild .\SampleWebApplication.sln

    - name: 'Run Azure webapp deploy action using publish profile credentials'
      uses: azure/webapps-deploy@v3
      with:
        app-name: ${{ env.AZURE_WEBAPP_NAME }} # Replace with your app name
        package: '${{ env.AZURE_WEBAPP_PACKAGE_PATH }}/SampleWebApplication/'

    # Azure logout
    - name: logout
      run: |
        az logout
Compilare e implementare un'app Java Spring Boot in Azure usando un principale servizio di Azure. Nell'esempio vengono usati i segreti di GitHub per i valori client-id, tenant-id e subscription-id. È anche possibile passare questi valori direttamente nell'azione di accesso.
name: Java CI with Maven

on: [push]

permissions:
      id-token: write
      contents: read

jobs:
  build:

    runs-on: ubuntu-latest

    steps:
    - uses: actions/checkout@v4
    - uses: azure/login@v2
      with:
        client-id: ${{ secrets.AZURE_CLIENT_ID }}
        tenant-id: ${{ secrets.AZURE_TENANT_ID }}
        subscription-id: ${{ secrets.AZURE_SUBSCRIPTION_ID }}
    - name: Set up JDK 1.8
      uses: actions/setup-java@v3
      with:
        java-version: 1.8
    - name: Build with Maven
      run: mvn -B package --file pom.xml
      working-directory: complete
    - name: Azure WebApp
      uses: Azure/webapps-deploy@v3
      with:
        app-name: my-app-name
        package: my/target/*.jar

    # Azure logout
    - name: logout
      run: |
        az logout
name: Build and deploy WAR app to Azure Web App using OpenID Connect

env:
  JAVA_VERSION: '11'                  # Set this to the Java version to use
  DISTRIBUTION: microsoft             # Set this to the Java distribution
  AZURE_WEBAPP_NAME: sampleapp        # Set this to the name of your web app

on: [push]

permissions:
  id-token: write
  contents: read

jobs:
  build:
    runs-on: ubuntu-latest

    steps:
      - uses: actions/checkout@v4

      - name: Set up Java version
        uses: actions/setup-java@v3.0.0
        with:
          java-version: ${{ env.JAVA_VERSION }}
          distribution: ${{ env.DISTRIBUTION }}
          cache: 'maven'

      - name: Build with Maven
        run: mvn clean install

      - name: Login to Azure
        uses: azure/login@v2
        with:
          client-id: ${{ secrets.AZURE_CLIENT_ID }}
          tenant-id: ${{ secrets.AZURE_TENANT_ID }}
          subscription-id: ${{ secrets.AZURE_SUBSCRIPTION_ID }}

      - name: Deploy to Azure Web App
        id: deploy-to-webapp
        uses: azure/webapps-deploy@v3
        with:
          app-name: ${{ env.AZURE_WEBAPP_NAME }}
          package: '*.war'
Ecco un esempio completo che usa più processi per la compilazione e la distribuzione.
Importante
Se si distribuisce un'app Node.js con TypeScript o altri linguaggi compilati usando azure/webapps-deploy@v3, compilare prima l'app in GitHub Actions e quindi distribuire la cartella di output compilata (ad esempio dist/ o build/). Se invece si vuole usare l'automazione della compilazione del Servizio app, impostare l'impostazione app SCM_DO_BUILD_DURING_DEPLOYMENT su true.
name: JavaScript CI

on: [push]

permissions:
      id-token: write
      contents: read

name: Node.js

env:
  AZURE_WEBAPP_NAME: my-app   # Set this to your application's name
  AZURE_WEBAPP_PACKAGE_PATH: 'my-app-path'      # Set this to the path to your web app project, defaults to the repository root
  NODE_VERSION: '24.x'                # Set this to the node version to use

jobs:
  build-and-deploy:
    runs-on: ubuntu-latest
    steps:
    # Check out the repo
    - name: 'Checkout GitHub Action'
      uses: actions/checkout@main

    - uses: azure/login@v2
      with:
        client-id: ${{ secrets.AZURE_CLIENT_ID }}
        tenant-id: ${{ secrets.AZURE_TENANT_ID }}
        subscription-id: ${{ secrets.AZURE_SUBSCRIPTION_ID }}

    - name: Setup Node ${{ env.NODE_VERSION }}
      uses: actions/setup-node@v4
      with:
        node-version: ${{ env.NODE_VERSION }}

    - name: 'npm install, build, and test'
      run: |
        npm install
        npm run build --if-present
        npm run test --if-present
      working-directory:  my-app-path

    # Deploy web app by using Azure credentials
    - uses: azure/webapps-deploy@v3
      with:
        app-name: ${{ env.AZURE_WEBAPP_NAME }}
        package: ${{ env.AZURE_WEBAPP_PACKAGE_PATH }}

    # Azure logout
    - name: logout
      run: |
        az logout
name: Python application

on:
  [push]

permissions:
      id-token: write
      contents: read

env:
  AZURE_WEBAPP_NAME: my-app # Set this to your application's name
  AZURE_WEBAPP_PACKAGE_PATH: '.' # Set this to the path to your web app project, defaults to the repository root

jobs:
  build:
    runs-on: ubuntu-latest
    steps:
    - uses: actions/checkout@v4

    - uses: azure/login@v2
      with:
        client-id: ${{ secrets.AZURE_CLIENT_ID }}
        tenant-id: ${{ secrets.AZURE_TENANT_ID }}
        subscription-id: ${{ secrets.AZURE_SUBSCRIPTION_ID }}

    - name: Set up Python 3.x
      uses: actions/setup-python@v4
      with:
        python-version: 3.x
    - name: Install dependencies
      run: |
        python -m pip install --upgrade pip
        pip install -r requirements.txt
    - name: Deploy web App using GH Action azure/webapps-deploy
      uses: azure/webapps-deploy@v3
      with:
        app-name: ${{ env.AZURE_WEBAPP_NAME }}
        package: ${{ env.AZURE_WEBAPP_PACKAGE_PATH }}
    - name: logout
      run: |
        az logout
L'input publish-profile deve fare riferimento al segreto GitHub AZURE_WEBAPP_PUBLISH_PROFILE creato in precedenza.
name: .NET Core CI

on: [push]

env:
  AZURE_WEBAPP_NAME: my-app-name    # Set this to your application's name
  AZURE_WEBAPP_PACKAGE_PATH: '.'      # Set this to the path to your web app project, defaults to the repository root
  DOTNET_VERSION: '6.0.x'           # Set this to the dot net version to use

jobs:
  build:
    runs-on: ubuntu-latest

    steps:
      # Check out the repo
      - uses: actions/checkout@main

      # Setup .NET Core SDK
      - name: Setup .NET Core
        uses: actions/setup-dotnet@v3
        with:
          dotnet-version: ${{ env.DOTNET_VERSION }}

      # Run dotnet build and publish
      - name: dotnet build and publish
        run: |
          dotnet restore
          dotnet build --configuration Release
          dotnet publish -c Release --property:PublishDir='${{ env.AZURE_WEBAPP_PACKAGE_PATH }}/myapp'

      # Deploy to Azure Web apps
      - name: 'Run Azure webapp deploy action using publish profile credentials'
        uses: azure/webapps-deploy@v3
        with:
          app-name: ${{ env.AZURE_WEBAPP_NAME }} # Replace with your app name
          publish-profile: ${{ secrets.AZURE_WEBAPP_PUBLISH_PROFILE  }} # Define secret variable in repository settings as per action documentation
          package: '${{ env.AZURE_WEBAPP_PACKAGE_PATH }}/myapp'
Compilare e distribuire un'app ASP.NET model-view-controller (MVC) che usa NuGet e publish-profile per l'autenticazione.
name: Deploy ASP.NET MVC App deploy to Azure Web App

on: [push]

env:
  AZURE_WEBAPP_NAME: my-app    # Set this to your application's name
  AZURE_WEBAPP_PACKAGE_PATH: '.'      # Set this to the path to your web app project, defaults to the repository root
  NUGET_VERSION: '5.3.x'           # Set this to the dot net version to use

jobs:
  build-and-deploy:
    runs-on: windows-latest
    steps:

    - uses: actions/checkout@main

    - name: Install Nuget
      uses: nuget/setup-nuget@v1
      with:
        nuget-version: ${{ env.NUGET_VERSION}}
    - name: NuGet to restore dependencies as well as project-specific tools that are specified in the project file
      run: nuget restore

    - name: Add msbuild to PATH
      uses: microsoft/setup-msbuild@v1.0.2

    - name: Run MSBuild
      run: msbuild .\SampleWebApplication.sln

    - name: 'Run Azure webapp deploy action using publish profile credentials'
      uses: azure/webapps-deploy@v3
      with:
        app-name: ${{ env.AZURE_WEBAPP_NAME }} # Replace with your app name
        publish-profile: ${{ secrets.AZURE_WEBAPP_PUBLISH_PROFILE  }} # Define secret variable in repository settings as per action documentation
        package: '${{ env.AZURE_WEBAPP_PACKAGE_PATH }}/SampleWebApplication/'
Compilare e distribuire un'app Java Spring Boot in Azure usando un profilo di pubblicazione di Azure. L'input publish-profile fa riferimento al segreto AZURE_WEBAPP_PUBLISH_PROFILE creato in precedenza.
name: Java CI with Maven

on: [push]

jobs:
  build:

    runs-on: ubuntu-latest

    steps:
    - uses: actions/checkout@v4
    - name: Set up JDK 1.8
      uses: actions/setup-java@v3
      with:
        java-version: 1.8
    - name: Build with Maven
      run: mvn -B package --file pom.xml
      working-directory: my-app-path
    - name: Azure WebApp
      uses: Azure/webapps-deploy@v3
      with:
        app-name: my-app-name
        publish-profile: ${{ secrets.AZURE_WEBAPP_PUBLISH_PROFILE }}
        package: my/target/*.jar
Per distribuire un oggetto war anziché un oggetto jar, modificare il valore package.
    - name: Azure WebApp
      uses: Azure/webapps-deploy@v3
      with:
        app-name: my-app-name
        publish-profile: ${{ secrets.AZURE_WEBAPP_PUBLISH_PROFILE }}
        package: my/target/*.war
Compilare e distribuire un'app Tomcat in Azure usando un profilo di pubblicazione di Azure. L'input publish-profile fa riferimento al segreto AZURE_WEBAPP_PUBLISH_PROFILE creato in precedenza.
name: Build and deploy WAR app to Azure Web App using publish profile

env:
  JAVA_VERSION: '11'                  # Set this to the Java version to use
  DISTRIBUTION: microsoft             # Set this to the Java distribution
  AZURE_WEBAPP_NAME: sampleapp        # Set this to the name of your web app

on: [push]

permissions:
  id-token: write
  contents: read

jobs:
  build:
    runs-on: ubuntu-latest

    steps:
      - uses: actions/checkout@v4

      - name: Set up Java version
        uses: actions/setup-java@v3.0.0
        with:
          java-version: ${{ env.JAVA_VERSION }}
          distribution: ${{ env.DISTRIBUTION }}
          cache: 'maven'

      - name: Build with Maven
        run: mvn clean install

      - name: Deploy to Azure Web App
        id: deploy-to-webapp
        uses: azure/webapps-deploy@v3
        with:
          app-name: ${{ env.AZURE_WEBAPP_NAME }}
          publish-profile: ${{ secrets.AZURE_WEBAPP_PUBLISH_PROFILE }}
          package: '*.war'
Ecco un esempio completo che usa più processi per la compilazione e la distribuzione.
Importante
Se si distribuisce un'app Node.js con TypeScript o altri linguaggi compilati usando azure/webapps-deploy@v3, compilare prima l'app in GitHub Actions e quindi distribuire la cartella di output compilata (ad esempio dist/ o build/). Se invece si vuole usare l'automazione della compilazione del Servizio app, impostare l'impostazione app SCM_DO_BUILD_DURING_DEPLOYMENT su true.
Compilare e distribuire un'app Node.js in Azure usando il profilo di pubblicazione dell'app. L'input publish-profile fa riferimento al segreto AZURE_WEBAPP_PUBLISH_PROFILE creato in precedenza.
# File: .github/workflows/workflow.yml
name: JavaScript CI

on: [push]

env:
  AZURE_WEBAPP_NAME: my-app-name   # Set this to your application's name
  AZURE_WEBAPP_PACKAGE_PATH: 'my-app-path'      # Set this to the path to your web app project, defaults to the repository root
  NODE_VERSION: '24.x'                # Set this to the node version to use

jobs:
  build-and-deploy:
    name: Build and Deploy
    runs-on: ubuntu-latest
    steps:
    - uses: actions/checkout@main
    - name: Use Node.js ${{ env.NODE_VERSION }}
      uses: actions/setup-node@v4
      with:
        node-version: ${{ env.NODE_VERSION }}
    - name: npm install, build, and test
      run: |
        # Build and test the project, then
        # deploy to Azure Web App.
        npm install
        npm run build --if-present
        npm run test --if-present
      working-directory: my-app-path
    - name: 'Deploy to Azure WebApp'
      uses: azure/webapps-deploy@v3
      with:
        app-name: ${{ env.AZURE_WEBAPP_NAME }}
        publish-profile: ${{ secrets.AZURE_WEBAPP_PUBLISH_PROFILE }}
        package: ${{ env.AZURE_WEBAPP_PACKAGE_PATH }}
Compilare e distribuire un'app Python in Azure usando il profilo di pubblicazione dell'app. Si noti che l'input publish-profile fa riferimento al segreto AZURE_WEBAPP_PUBLISH_PROFILE creato in precedenza.
name: Python CI

on:
  [push]

env:
  AZURE_WEBAPP_NAME: my-web-app # Set this to your application's name
  AZURE_WEBAPP_PACKAGE_PATH: '.' # Set this to the path to your web app project, defaults to the repository root

jobs:
  build:
    runs-on: ubuntu-latest
    steps:
    - uses: actions/checkout@v4
    - name: Set up Python 3.x
      uses: actions/setup-python@v4
      with:
        python-version: 3.x
    - name: Install dependencies
      run: |
        python -m pip install --upgrade pip
        pip install -r requirements.txt
    - name: Building web app
      uses: azure/appservice-build@v2
    - name: Deploy web App using GH Action azure/webapps-deploy
      uses: azure/webapps-deploy@v3
      with:
        app-name: ${{ env.AZURE_WEBAPP_NAME }}
        publish-profile: ${{ secrets.AZURE_WEBAPP_PUBLISH_PROFILE }}
        package: ${{ env.AZURE_WEBAPP_PACKAGE_PATH }}
Per eseguire la distribuzione con l'entità servizio configurata, usare l'azione azure/login@v2 con la chiave creds e fare riferimento al segreto AZURE_CREDENTIALS creato in precedenza.
name: .NET Core

on: [push]

env:
  AZURE_WEBAPP_NAME: my-app    # Set this to your application's name
  AZURE_WEBAPP_PACKAGE_PATH: '.'      # Set this to the path to your web app project, defaults to the repository root
  DOTNET_VERSION: '6.0.x'           # Set this to the dot net version to use

jobs:
  build:
    runs-on: ubuntu-latest

    steps:
      # Check out the repo
      - uses: actions/checkout@main
      - uses: azure/login@v2
        with:
          creds: ${{ secrets.AZURE_CREDENTIALS }}


      # Set up .NET Core SDK
      - name: Setup .NET Core
        uses: actions/setup-dotnet@v3
        with:
          dotnet-version: ${{ env.DOTNET_VERSION }}

      # Run dotnet build and publish
      - name: dotnet build and publish
        run: |
          dotnet restore
          dotnet build --configuration Release
          dotnet publish -c Release --property:PublishDir='${{ env.AZURE_WEBAPP_PACKAGE_PATH }}/myapp'

      # Deploy to Azure Web apps
      - name: 'Run Azure webapp deploy action using Azure Credentials'
        uses: azure/webapps-deploy@v3
        with:
          app-name: ${{ env.AZURE_WEBAPP_NAME }} # Replace with your app name
          package: '${{ env.AZURE_WEBAPP_PACKAGE_PATH }}/myapp'

      - name: logout
        run: |
          az logout
Compilare e distribuire un'app ASP.NET model-view-controller (MVC) in Azure usando un'entità servizio di Azure. L'input creds fa riferimento al segreto AZURE_CREDENTIALS creato in precedenza.
name: Deploy ASP.NET MVC App deploy to Azure Web App

on: [push]

env:
  AZURE_WEBAPP_NAME: my-app    # Set this to your application's name
  AZURE_WEBAPP_PACKAGE_PATH: '.'      # Set this to the path to your web app project, defaults to the repository root
  NUGET_VERSION: '5.3.x'           # Set this to the dot net version to use

jobs:
  build-and-deploy:
    runs-on: windows-latest
    steps:

    # Check out the repo
    - uses: actions/checkout@main

    - uses: azure/login@v2
      with:
        creds: ${{ secrets.AZURE_CREDENTIALS }}

    - name: Install Nuget
      uses: nuget/setup-nuget@v1
      with:
        nuget-version: ${{ env.NUGET_VERSION}}
    - name: NuGet to restore dependencies as well as project-specific tools that are specified in the project file
      run: nuget restore

    - name: Add msbuild to PATH
      uses: microsoft/setup-msbuild@v1.0.2

    - name: Run MSBuild
      run: msbuild .\SampleWebApplication.sln

    - name: 'Run Azure webapp deploy action using Azure Credentials'
      uses: azure/webapps-deploy@v3
      with:
        app-name: ${{ env.AZURE_WEBAPP_NAME }} # Replace with your app name
        package: '${{ env.AZURE_WEBAPP_PACKAGE_PATH }}/SampleWebApplication/'

    # Azure logout
    - name: logout
      run: |
        az logout
Compilare e implementare un'app Java Spring Boot in Azure usando un principale servizio di Azure. L'input creds fa riferimento al segreto AZURE_CREDENTIALS creato in precedenza.
name: Java CI with Maven

on: [push]

jobs:
  build:

    runs-on: ubuntu-latest

    steps:
    - uses: actions/checkout@v4
    - uses: azure/login@v2
      with:
        creds: ${{ secrets.AZURE_CREDENTIALS }}
    - name: Set up JDK 1.8
      uses: actions/setup-java@v3
      with:
        java-version: 1.8
    - name: Build with Maven
      run: mvn -B package --file pom.xml
      working-directory: complete
    - name: Azure WebApp
      uses: Azure/webapps-deploy@v3
      with:
        app-name: my-app-name
        package: my/target/*.jar

    # Azure logout
    - name: logout
      run: |
        az logout
Creare e distribuire un'app Tomcat in Azure usando un'entità servizio di Azure. L'input creds fa riferimento al segreto AZURE_CREDENTIALS creato in precedenza.
name: Build and deploy WAR app to Azure Web App using Service Principal Connect

env:
  JAVA_VERSION: '11'                  # Set this to the Java version to use
  DISTRIBUTION: microsoft             # Set this to the Java distribution
  AZURE_WEBAPP_NAME: sampleapp        # Set this to the name of your web app

on: [push]

permissions:
  contents: read

jobs:
  build:
    runs-on: ubuntu-latest

    steps:
      - uses: actions/checkout@v4

      - name: Set up Java version
        uses: actions/setup-java@v3.0.0
        with:
          java-version: ${{ env.JAVA_VERSION }}
          distribution: ${{ env.DISTRIBUTION }}
          cache: 'maven'

      - name: Build with Maven
        run: mvn clean install

      - name: Login to Azure
        uses: azure/login@v2
        with:
          creds: ${{ secrets.AZURE_CREDENTIALS }}

      - name: Deploy to Azure Web App
        id: deploy-to-webapp
        uses: azure/webapps-deploy@v3
        with:
          app-name: ${{ env.AZURE_WEBAPP_NAME }}
          package: '*.war'
Ecco un esempio completo che usa più processi per la compilazione e la distribuzione.
Importante
Se si distribuisce un'app Node.js con TypeScript o altri linguaggi compilati usando azure/webapps-deploy@v3, compilare prima l'app in GitHub Actions e quindi distribuire la cartella di output compilata (ad esempio dist/ o build/). Se invece si vuole usare l'automazione della compilazione del Servizio app, impostare l'impostazione app SCM_DO_BUILD_DURING_DEPLOYMENT su true.
Sviluppare e distribuire un'app Node.js in Azure usando un principal del servizio di Azure. L'input creds fa riferimento al segreto AZURE_CREDENTIALS creato in precedenza.
name: JavaScript CI

on: [push]

name: Node.js

env:
  AZURE_WEBAPP_NAME: my-app   # Set this to your application's name
  AZURE_WEBAPP_PACKAGE_PATH: 'my-app-path'      # Set this to the path to your web app project, defaults to the repository root
  NODE_VERSION: '24.x'                # Set this to the node version to use

jobs:
  build-and-deploy:
    runs-on: ubuntu-latest
    steps:
    # Check out the repo
    - name: 'Checkout GitHub Action'
      uses: actions/checkout@main

    - uses: azure/login@v2
      with:
        creds: ${{ secrets.AZURE_CREDENTIALS }}

    - name: Setup Node ${{ env.NODE_VERSION }}
      uses: actions/setup-node@v4
      with:
        node-version: ${{ env.NODE_VERSION }}

    - name: 'npm install, build, and test'
      run: |
        npm install
        npm run build --if-present
        npm run test --if-present
      working-directory:  my-app-path

    # Deploy web app using Azure credentials
    - uses: azure/webapps-deploy@v3
      with:
        app-name: ${{ env.AZURE_WEBAPP_NAME }}
        package: ${{ env.AZURE_WEBAPP_PACKAGE_PATH }}

    # Azure logout
    - name: logout
      run: |
        az logout
Creare e distribuire un'app Python in Azure usando un principale del servizio di Azure. L'input creds fa riferimento al segreto AZURE_CREDENTIALS creato in precedenza.
name: Python application

on:
  [push]

env:
  AZURE_WEBAPP_NAME: my-app # Set this to your application's name
  AZURE_WEBAPP_PACKAGE_PATH: '.' # Set this to the path to your web app project, defaults to the repository root

jobs:
  build:
    runs-on: ubuntu-latest
    steps:
    - uses: actions/checkout@v4

    - uses: azure/login@v2
      with:
        creds: ${{ secrets.AZURE_CREDENTIALS }}

    - name: Set up Python 3.x
      uses: actions/setup-python@v4
      with:
        python-version: 3.x
    - name: Install dependencies
      run: |
        python -m pip install --upgrade pip
        pip install -r requirements.txt
    - name: Deploy web App using GH Action azure/webapps-deploy
      uses: azure/webapps-deploy@v3
      with:
        app-name: ${{ env.AZURE_WEBAPP_NAME }}
        package: ${{ env.AZURE_WEBAPP_PACKAGE_PATH }}
    - name: logout
      run: |
        az logout
Domande frequenti
Come si distribuisce un file WAR tramite il plug-in Maven?
Se il progetto Java Tomcat è stato configurato con il plug-in Maven, è anche possibile eseguire la distribuzione nel servizio app di Azure tramite questo plug-in. Se si usa l'azione GitHub dell'interfaccia della riga di comando di Azure, vengono usate le credenziali di Azure.
    - name: Azure CLI script file
      uses: azure/cli@v2
      with:
        inlineScript: |
          mvn package azure-webapp:deploy
Per altre informazioni su come usare e configurare il plug-in Maven, vedere Wiki del plug-in Maven per Servizio app di Azure.
Come si distribuisce un file WAR tramite l'interfaccia della riga di comando di Azure?
Se si preferisce usare l'interfaccia della riga di comando di Azure per la distribuzione nel servizio app, è possibile usare GitHub Action per l'interfaccia della riga di comando di Azure.
- name: Azure CLI script
  uses: azure/cli@v2
  with:
    inlineScript: |
      az webapp deploy --src-path '${{ github.workspace }}/target/yourpackage.war' --name ${{ env.AZURE_WEBAPP_NAME }} --resource-group ${{ env.RESOURCE_GROUP }}  --async true --type war
Per altre informazioni su come usare e configurare l'azione GitHub per l'interfaccia della riga di comando di Azure, vedere l'azione GitHub dell'interfaccia della riga di comando di Azure.
Per altre informazioni sul az webapp deploy comando, tra cui come usarlo e i dettagli del parametro, vedere laaz webapp deploy documentazione.
Come distribuire un file di avvio?
Usare GitHub Action per l'interfaccia della riga di comando di Azure. Ad esempio:
- name: Deploy startup script
  uses: azure/cli@v2
  with:
    inlineScript: |
      az webapp deploy --src-path ${{ github.workspace }}/src/main/azure/createPasswordlessDataSource.sh --name ${{ env.AZURE_WEBAPP_NAME }} --resource-group ${{ env.RESOURCE_GROUP }} --type startup --track-status false
Come distribuire in un contenitore?
Con l'azione Distribuzione Web di Azure , è possibile automatizzare il flusso di lavoro per distribuire contenitori personalizzati nel servizio app usando GitHub Actions. Per altre informazioni, vedere Distribuire in un contenitore.
Come si esegue la distribuzione in uno slot di distribuzione?
È possibile eseguire la distribuzione in uno slot di distribuzione anziché nello slot di produzione usando il slot-name parametro nell'azione azure/webapps-deploy@v3 . Per eseguire la distribuzione in uno slot, aggiungere il slot-name parametro al passaggio di distribuzione nel flusso di lavoro:
- name: Deploy to Azure Web App
  uses: azure/webapps-deploy@v3
  with:
    app-name: 'my-app-name'
    slot-name: 'staging'  # Deploy to the 'staging' slot instead of production
    package: './output'
Note
Quando si usa OpenID Connect o l'autenticazione dell'entità servizio, assicurarsi che l'identità disponga del ruolo Collaboratore sito Web sia per l'app sia per lo slot di distribuzione. Per l'autenticazione del profilo di pubblicazione, scaricare il profilo di pubblicazione per lo slot di distribuzione specifico dal portale di Azure (slot di distribuzione> selezionare slot >Scarica profilo di pubblicazione).
Come aggiornare la configurazione di Tomcat dopo la distribuzione?
Se si vuole aggiornare una delle impostazioni delle app Web dopo la distribuzione, è possibile usare l'azione impostazioni del servizio app.
    - uses: azure/appservice-settings@v1
      with:
        app-name: 'my-app'
        slot-name: 'staging'  # Optional and needed only if the settings have to be configured on the specific deployment slot
        app-settings-json: '[{ "name": "CATALINA_OPTS", "value": "-Dfoo=bar" }]'
        connection-strings-json: '${{ secrets.CONNECTION_STRINGS }}'
        general-settings-json: '{"alwaysOn": "false", "webSocketsEnabled": "true"}' #'General configuration settings as Key Value pairs'
      id: settings
Per ulteriori informazioni su come usare e configurare questa azione, vedere il repository delle impostazioni di App Service.
Contenuti correlati
Vedere i riferimenti seguenti in Azure GitHub Actions e nei flussi di lavoro: