Esercitazione: Istruzioni dettagliate per creare una nuova app Unity HoloLens con Ancoraggi nello spazio di Azure
Questa esercitazione illustra come creare una nuova app HoloLens Unity con Ancoraggi nello spazio di Azure.
Prerequisiti
Per completare questa esercitazione, accertarsi di avere:
- PC - UN PC che esegue Windows
- Visual Studio Visual Studio - 2019 installato con il carico di lavoro di sviluppo piattaforma UWP (Universal Windows Platform) e il componente Windows 10 SDK (10.0.18362.0 o versione successiva). C++/WinRT Visual Studio Extension (VSIX) per Visual Studio installato da Visual Studio Marketplace.
- HoloLens : dispositivo HoloLens con la modalità sviluppatore abilitata. Questo articolo richiede un dispositivo HoloLens con l'aggiornamento di maggio 2020 di Windows 10. Per aggiornare alla versione più recente per HoloLens, aprire l'app Impostazioni, scegliere Aggiornamento e sicurezza, quindi selezionare il pulsante Verifica disponibilità aggiornamento.
- Unity - 2020.3.25 con moduli piattaforma UWP (Universal Windows Platform) supporto per la compilazione e il supporto per la compilazione di Windows (IL2CPP)
Creazione e configurazione di un progetto Unity
Create New Project (Funzioni di Azure: Crea nuovo progetto)
- In Unity Hub selezionare Nuovo progetto
- Selezionare 3D
- Immettere il nome del progetto e immettere un percorso di salvataggio
- Selezionare Crea progetto e attendere che Unity crei il progetto
Modificare la piattaforma di compilazione
- Nell'editor unity selezionare Impostazioni di compilazione file>
- Selezionare piattaforma UWP (Universal Windows Platform) quindi Cambia piattaforma. Attendere che Unity abbia completato l'elaborazione di tutti i file.
Importare ASA e OpenXR
- Avviare Realtà mista Strumento funzionalità
- Selezionare il percorso del progetto, ovvero la cartella che contiene cartelle come Asset, Pacchetti, ProjectSettings e così via, quindi selezionare Individua funzionalità
- In Servizi Realtà mista di Azure selezionare entrambi
- Azure Spatial Anchors SDK Core
- Azure Spatial Anchors SDK per Windows
- In Supporto della piattaforma selezionare
- Realtà mista plug-in OpenXR
Nota
Assicurarsi di aver aggiornato il catalogo e che la versione più recente sia selezionata per ogni
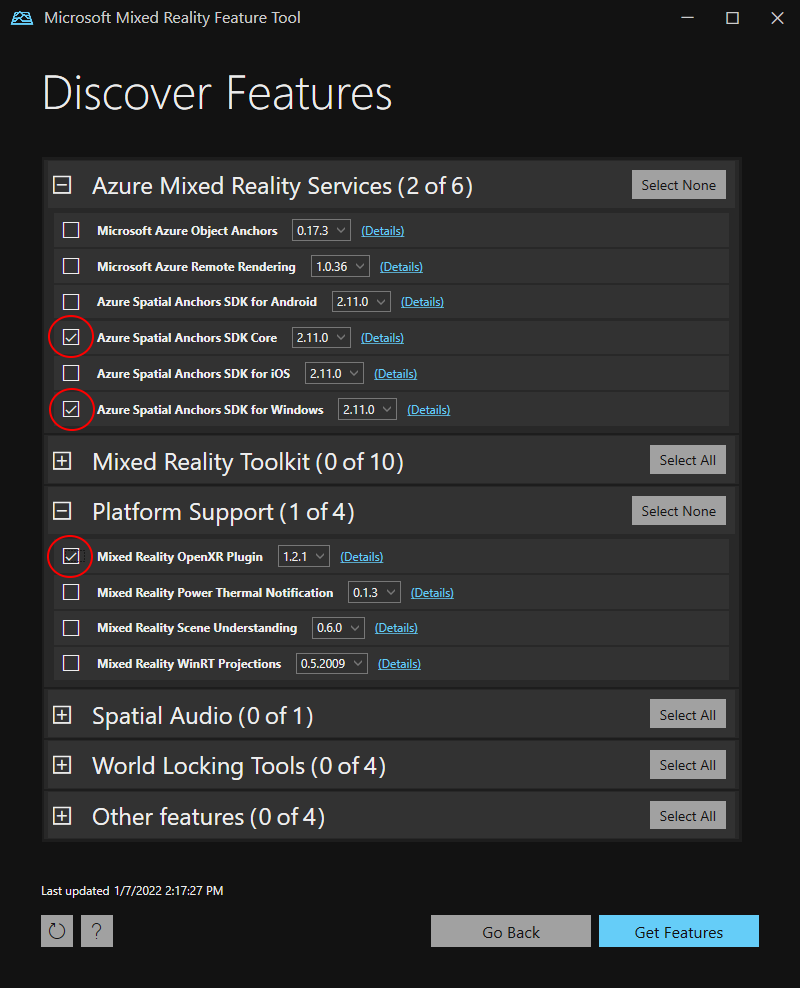
- Premere Get Features -->Import -->Approve -->Exit
- Quando si aggiorna la finestra di Unity, Unity inizierà a importare i moduli
- Se viene visualizzato un messaggio sull'uso del nuovo sistema di input, selezionare Sì per riavviare Unity e abilitare i back-end.
Configurare le Impostazioni del progetto
Ora si imposteranno alcune impostazioni del progetto Unity che aiutano a usare l'SDK Windows Holographic come destinazione per lo sviluppo.
Modificare le impostazioni di OpenXR
- Selezionare Impostazioni di compilazione file>(potrebbe essere ancora aperto dal passaggio precedente)
- Selezionare Impostazioni lettore ...
- Selezionare Gestione plug-in XR
- Assicurarsi che la scheda Impostazioni piattaforma UWP (Universal Windows Platform) sia selezionata e selezionare la casella accanto a OpenXR e accanto al gruppo di funzionalità di Microsoft HoloLens
- Selezionare il segno di avviso giallo accanto a OpenXR per visualizzare tutti i problemi di OpenXR.
- Selezionare Correggi tutto
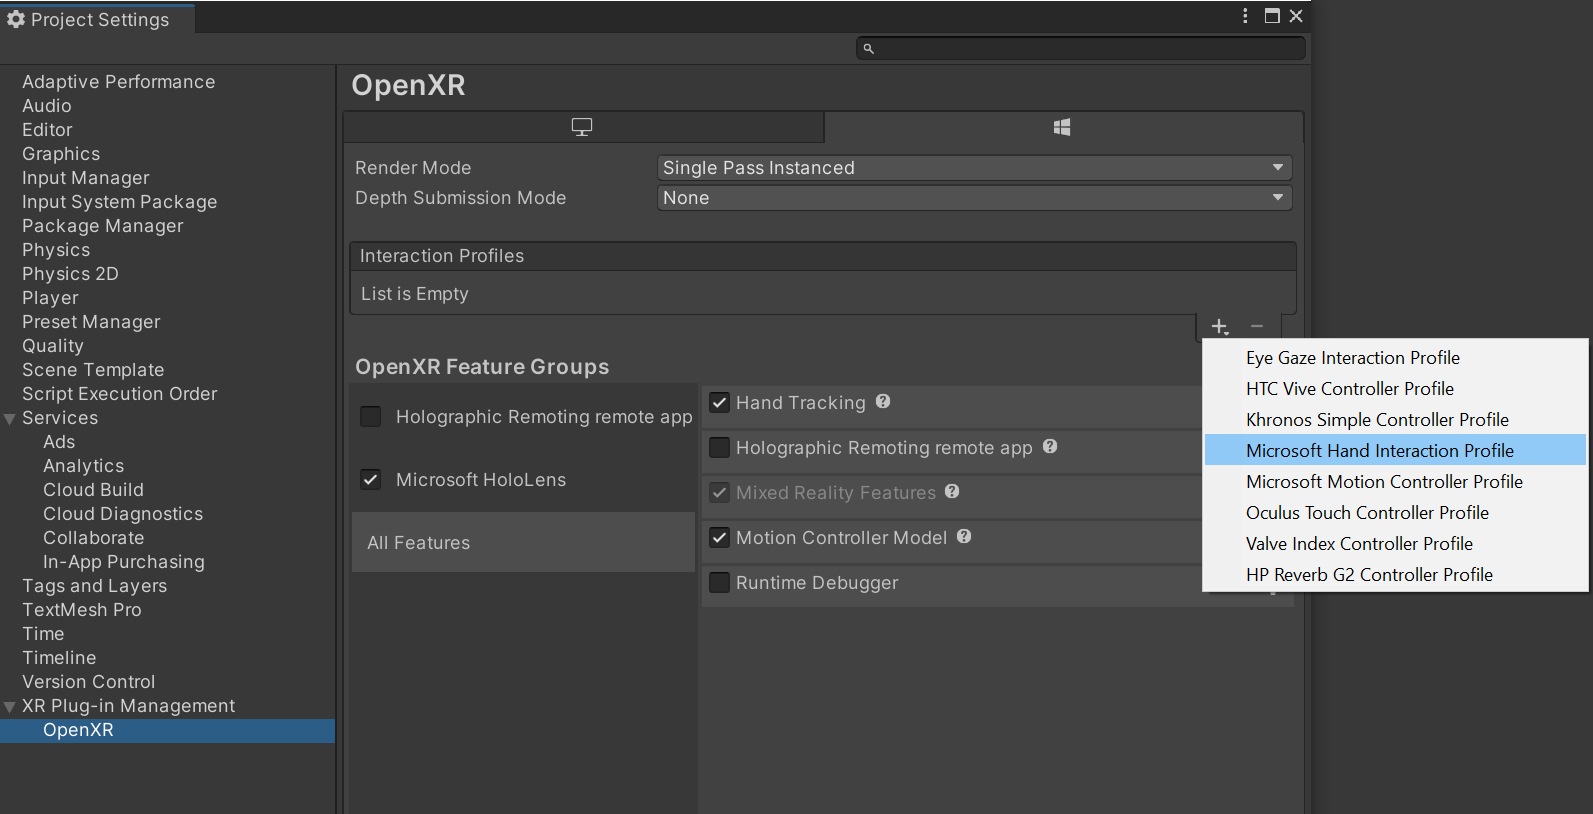
- Per risolvere il problema "È necessario aggiungere almeno un profilo di interazione", selezionare Modifica per aprire le impostazioni del progetto OpenXR. Quindi, in Profili di interazione selezionare il + simbolo e selezionare Profilo di interazione microsoft hand
Modificare le impostazioni di qualità
- Selezionare Modifica>Impostazioni progetto>Qualità
- Nella colonna sotto il logo piattaforma UWP (Universal Windows Platform) selezionare la freccia nella riga Predefinita e selezionare Molto bassa. Si saprà che l'impostazione viene applicata correttamente quando la casella nella colonna piattaforma UWP (Universal Windows Platform) e la riga Molto bassa è verde.
Impostare funzionalità
- Passare a Modifica>lettore impostazioni> progetto (potrebbe essere ancora aperto dal passaggio precedente).
- Assicurarsi che sia selezionata la scheda Impostazioni piattaforma UWP (Universal Windows Platform)
- Nella sezione Configurazione delle impostazioni di pubblicazione abilitare quanto segue
- InternetClient
- InternetClientServer
- PrivateNetworkClientServer
- SpatialPerception (potrebbe essere già abilitato)
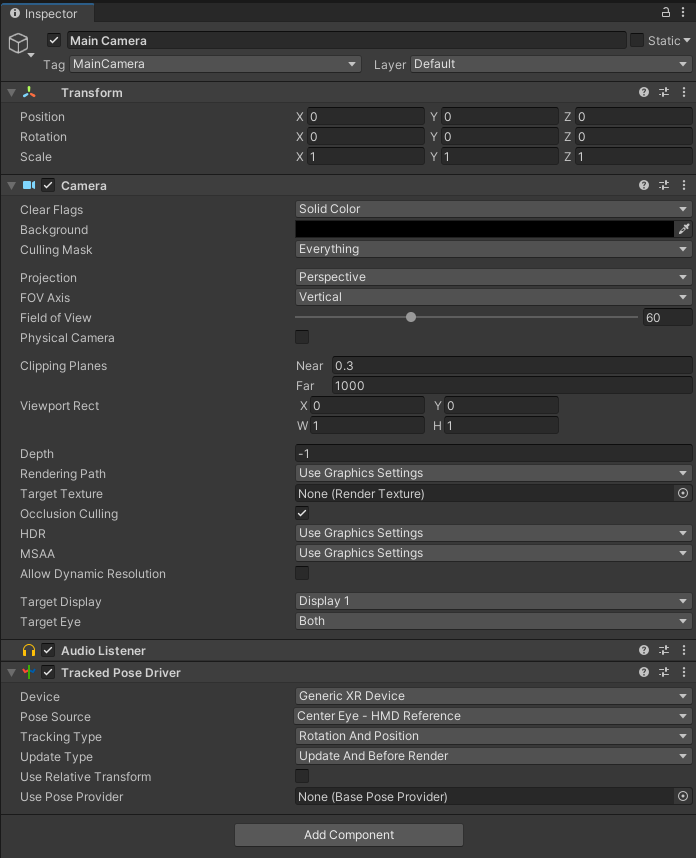
Configurare la fotocamera principale
- Nel Pannello di gerarchia, selezionare Fotocamera principale.
- Nell'Inspector, impostare la posizione di trasformazione su 0,0,0.
- Trovare la proprietà Cancella flag e modificare l'elenco a discesa da Skybox a Tinta unita.
- Selezionare il campo Sfondo per aprire una selezione colori.
- Impostare R, G, B e A su 0.
- Selezionare Add Component (Aggiungi componente ) nella parte inferiore e aggiungere tracked Pose Driver Component (Componente driver pose tracciato) alla fotocamera
Provare #1
Dovrebbe ora essere disponibile una scena vuota pronta per essere distribuita nel dispositivo HoloLens. Per verificare che tutto funzioni, compilare l'app in Unity e distribuirla da Visual Studio. Seguire Uso di Visual Studio per distribuire ed eseguire il debug a tale scopo. Dovrebbe essere visibile la schermata di avvio di Unity e quindi una schermata chiara.
Creare una risorsa di Ancoraggi nello spazio
Vai al portale di Azure.
Nel riquadro sinistro selezionare Crea una risorsa.
Digitare Ancoraggi nello spazio nella casella di ricerca.
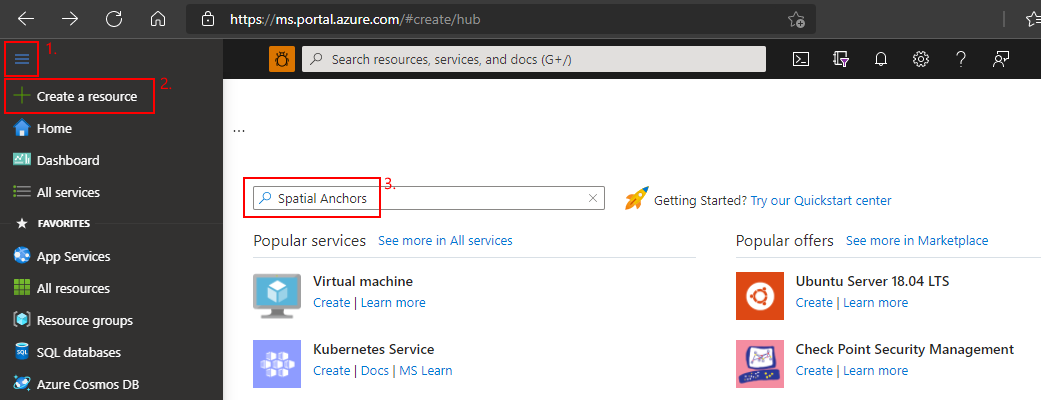
Selezionare Ancoraggi nello spazio, quindi selezionare Crea.
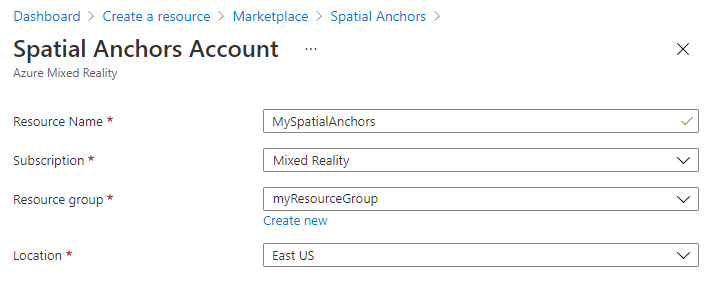
Nel riquadro Account ancoraggi nello spazio procedere come segue:
Immettere un nome di risorsa univoco usando i normali caratteri alfanumerici.
Selezionare la sottoscrizione a cui collegare la risorsa.
Creare un gruppo di risorse selezionando Crea nuovo. Assegnare al gruppo il nome myResourceGroup e quindi selezionare OK.
Un gruppo di risorse è un contenitore logico in cui vengono distribuite e gestite risorse di Azure come app Web, database e account di archiviazione. Ad esempio, si può scegliere in un secondo momento di eliminare l'intero gruppo di risorse in un unico semplice passaggio.
Selezionare un'area in cui inserire la risorsa.
Selezionare Crea per iniziare a creare la risorsa.
Dopo aver creato la risorsa, il portale di Azure indica che la distribuzione è stata completata.

Selezionare Vai alla risorsa. È ora possibile visualizzare le proprietà della risorsa.
Copiare il valore di ID account della risorsa in un editor di testo per un uso successivo.
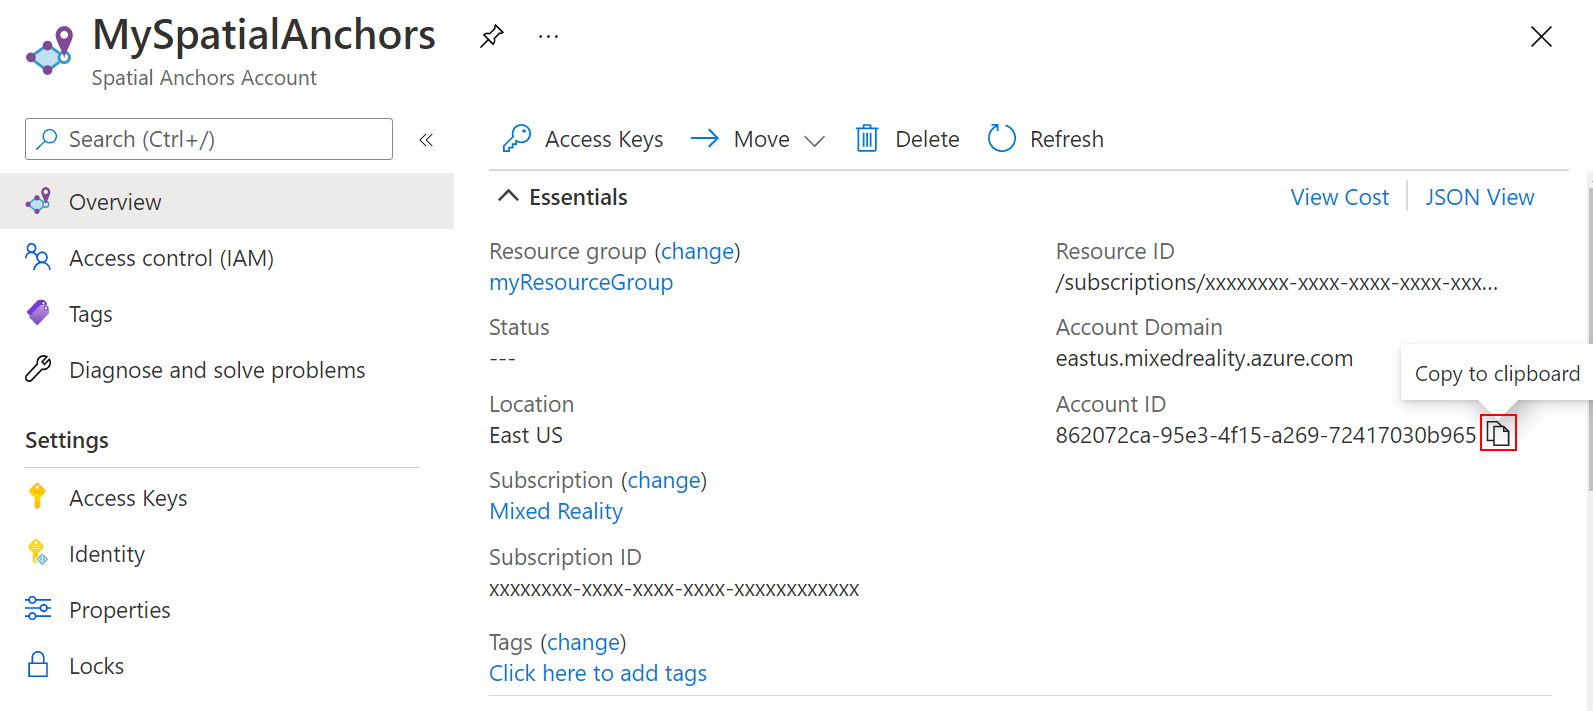
Copiare anche il valore di Dominio account della risorsa in un editor di testo per un uso successivo.

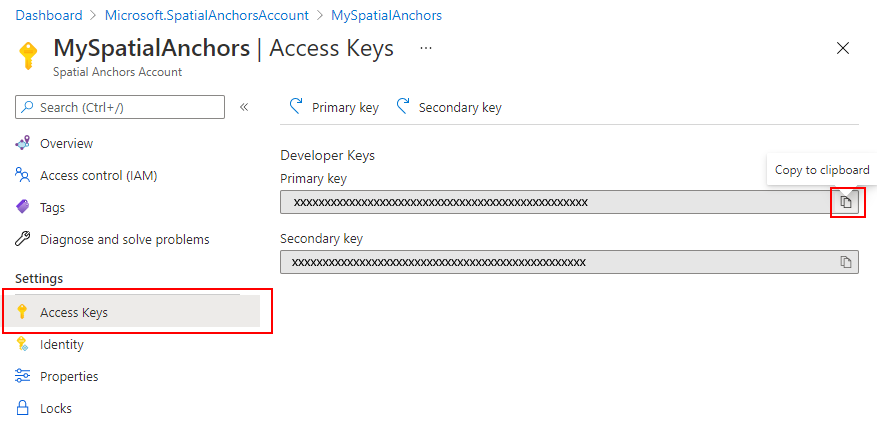
In Impostazioni selezionare Chiave di accesso. Copiare i valori di Chiave primaria e Chiave dell'account in un editor di testo per un uso successivo.

Creazione e aggiunta di script
- Nel riquadro Progetto di Unity creare una nuova cartella denominata Scripts nella cartella Assets.
- Nella cartella fare clic con il pulsante destro del mouse su -Crea ->>C# Script. Titolo AzureSpatialAnchorsScript
- Passare a GameObject -> Crea vuoto.
- Selezionarlo e nel controllo rinominarlo da GameObject in AzureSpatialAnchors.
- Ancora sul
GameObject- Imposta la sua posizione su 0,0,0
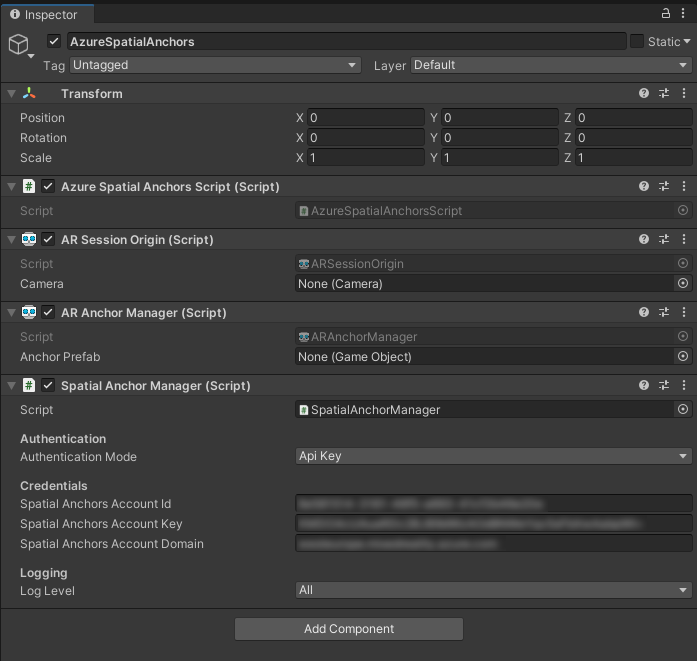
- Selezionare Aggiungi componente e cercare e aggiungere AzureSpatialAnchorsScript
- Selezionare di nuovo Aggiungi componente e cercare e aggiungere AR Anchor Manager. Verrà aggiunta automaticamente anche l'origine sessione AR.
- Selezionare di nuovo Aggiungi componente e cercare e aggiungere lo script SpatialAnchorManager
- Nel componente SpatialAnchorManager aggiunto compilare l'ID account, la chiave dell'account e il dominio account copiati nel passaggio precedente dalla risorsa ancoraggi nello spazio nel portale di Azure.
Panoramica dell'app
L'app supporterà le interazioni seguenti:
| Gesto | Azione |
|---|---|
| Toccare ovunque | Start/Continue Session + Create anchor at Hand Position |
| Toccando su un ancoraggio | Elimina + Elimina GameObject ancoraggio nel servizio cloud ASA |
| Toccare + Tenere premuto per 2 sec (+ sessione in esecuzione) | Arrestare la sessione e rimuovere tutto GameObjects. Mantenere gli ancoraggi nel servizio cloud ASA |
| Toccare + Tenere premuto per 2 sec (+ sessione non è in esecuzione) | Avviare la sessione e cercare tutti gli ancoraggi. |
Aggiungi riconoscimento tocco
Aggiungere un codice allo script per essere in grado di riconoscere il movimento di tocco di un utente.
- Aprire
AzureSpatialAnchorsScript.csin Visual Studio facendo doppio clic sullo script nel riquadro Progetto Unity. - Aggiungere la matrice seguente alla classe
public class AzureSpatialAnchorsScript : MonoBehaviour
{
    /// <summary>
    /// Used to distinguish short taps and long taps
    /// </summary>
    private float[] _tappingTimer = { 0, 0 };
- Aggiungere i due metodi seguenti sotto il metodo Update(). Si aggiungerà l'implementazione in una fase successiva
// Update is called once per frame
void Update()
{
}

/// <summary>
/// Called when a user is air tapping for a short time
/// </summary>
/// <param name="handPosition">Location where tap was registered</param>
private async void ShortTap(Vector3 handPosition)
{
}

/// <summary>
/// Called when a user is air tapping for a long time (>=2 sec)
/// </summary>
private async void LongTap()
{
}
- Aggiungere l'importazione seguente
using UnityEngine.XR;
- Aggiungere il codice seguente all'inizio del
Update()metodo . Ciò consentirà all'app di riconoscere movimenti brevi e lunghi (2 sec) di tocco manuale
// Update is called once per frame
void Update()
{

    //Check for any air taps from either hand
    for (int i = 0; i < 2; i++)
    {
        InputDevice device = InputDevices.GetDeviceAtXRNode((i == 0) ? XRNode.RightHand : XRNode.LeftHand);
        if (device.TryGetFeatureValue(CommonUsages.primaryButton, out bool isTapping))
        {
            if (!isTapping)
            {
                //Stopped Tapping or wasn't tapping
                if (0f < _tappingTimer[i] && _tappingTimer[i] < 1f)
                {
                    //User has been tapping for less than 1 sec. Get hand position and call ShortTap
                    if (device.TryGetFeatureValue(CommonUsages.devicePosition, out Vector3 handPosition))
                    {
                        ShortTap(handPosition);
                    }
                }
                _tappingTimer[i] = 0;
            }
            else
            {
                _tappingTimer[i] += Time.deltaTime;
                if (_tappingTimer[i] >= 2f)
                {
                    //User has been air tapping for at least 2sec. Get hand position and call LongTap
                    if (device.TryGetFeatureValue(CommonUsages.devicePosition, out Vector3 handPosition))
                    {
                        LongTap();
                    }
                    _tappingTimer[i] = -float.MaxValue; // reset the timer, to avoid retriggering if user is still holding tap
                }
            }
        }

    }
}
Aggiungi e configura SpatialAnchorManager
ASA SDK offre una semplice interfaccia chiamata SpatialAnchorManager per effettuare chiamate al servizio ASA. Aggiungiamolo come variabile al nostro AzureSpatialAnchorsScript.cs
Aggiungere prima di tutto l'importazione
using Microsoft.Azure.SpatialAnchors.Unity;
Dichiarare quindi la variabile
public class AzureSpatialAnchorsScript : MonoBehaviour
{
    /// <summary>
    /// Used to distinguish short taps and long taps
    /// </summary>
    private float[] _tappingTimer = { 0, 0 };

    /// <summary>
    /// Main interface to anything Spatial Anchors related
    /// </summary>
    private SpatialAnchorManager _spatialAnchorManager = null;
Start() Nel metodo assegnare la variabile al componente aggiunto in un passaggio precedente
// Start is called before the first frame update
void Start()
{
    _spatialAnchorManager = GetComponent<SpatialAnchorManager>();
}
Per ricevere i log di debug e di errore, è necessario sottoscrivere i diversi callback
// Start is called before the first frame update
void Start()
{
    _spatialAnchorManager = GetComponent<SpatialAnchorManager>();
    _spatialAnchorManager.LogDebug += (sender, args) => Debug.Log($"ASA - Debug: {args.Message}");
    _spatialAnchorManager.Error += (sender, args) => Debug.LogError($"ASA - Error: {args.ErrorMessage}");
}
Nota
Per visualizzare i log assicurarsi di aver compilato il progetto da Unity e di aprire la soluzione .slndi Visual Studio, selezionare Debug -> Esegui con debug e lasciare HoloLens connesso al computer mentre l'app è in esecuzione.
Avvia sessione
Per creare e trovare ancoraggi, è prima necessario avviare una sessione. Quando si chiama StartSessionAsync(), SpatialAnchorManager crea una sessione, se necessario e quindi la avvia. Aggiungiamo questo metodo al ShortTap() metodo .
/// <summary>
/// Called when a user is air tapping for a short time
/// </summary>
/// <param name="handPosition">Location where tap was registered</param>
private async void ShortTap(Vector3 handPosition)
{
    await _spatialAnchorManager.StartSessionAsync();
}
Creare l'ancoraggio
Ora che è in esecuzione una sessione, è possibile creare ancoraggi. In questa applicazione si vuole tenere traccia dell'ancoraggio GameObjects creato e degli identificatori di ancoraggio creati (ID di ancoraggio). Aggiungere due elenchi al codice.
using Microsoft.Azure.SpatialAnchors.Unity;
using System;
using System.Collections.Generic;
using UnityEngine;
using UnityEngine.XR;
    /// <summary>
    /// Main interface to anything Spatial Anchors related
    /// </summary>
    private SpatialAnchorManager _spatialAnchorManager = null;

    /// <summary>
    /// Used to keep track of all GameObjects that represent a found or created anchor
    /// </summary>
    private List<GameObject> _foundOrCreatedAnchorGameObjects = new List<GameObject>();

    /// <summary>
    /// Used to keep track of all the created Anchor IDs
    /// </summary>
    private List<String> _createdAnchorIDs = new List<String>();
Si creerà ora un metodo CreateAnchor che crea un ancoraggio in una posizione definita dal relativo parametro.
using System.Threading.Tasks;
/// <summary>
/// Creates an Azure Spatial Anchor at the given position rotated towards the user
/// </summary>
/// <param name="position">Position where Azure Spatial Anchor will be created</param>
/// <returns>Async Task</returns>
private async Task CreateAnchor(Vector3 position)
{
    //Create Anchor GameObject. We will use ASA to save the position and the rotation of this GameObject.
}
Poiché gli ancoraggi nello spazio non solo hanno una posizione , ma anche una rotazione, impostiamo la rotazione per orientarsi sempre verso HoloLens alla creazione.
/// <summary>
/// Creates an Azure Spatial Anchor at the given position rotated towards the user
/// </summary>
/// <param name="position">Position where Azure Spatial Anchor will be created</param>
/// <returns>Async Task</returns>
private async Task CreateAnchor(Vector3 position)
{
    //Create Anchor GameObject. We will use ASA to save the position and the rotation of this GameObject.
    if (!InputDevices.GetDeviceAtXRNode(XRNode.Head).TryGetFeatureValue(CommonUsages.devicePosition, out Vector3 headPosition))
    {
        headPosition = Vector3.zero;
    }

    Quaternion orientationTowardsHead = Quaternion.LookRotation(position - headPosition, Vector3.up);

}
Ora che abbiamo la posizione e la rotazione dell'ancoraggio desiderato, creiamo un oggetto visibileGameObject. Si noti che gli ancoraggi nello spazio non richiedono che l'ancoraggio GameObject sia visibile all'utente finale perché lo scopo principale degli ancoraggi nello spazio è fornire un frame di riferimento comune e permanente. Ai fini di questa esercitazione, verranno visualizzati gli ancoraggi come cubi. Ogni ancoraggio verrà inizializzato come cubo bianco , che verrà trasformato in un cubo verde al termine del processo di creazione.
/// <summary>
/// Creates an Azure Spatial Anchor at the given position rotated towards the user
/// </summary>
/// <param name="position">Position where Azure Spatial Anchor will be created</param>
/// <returns>Async Task</returns>
private async Task CreateAnchor(Vector3 position)
{
    //Create Anchor GameObject. We will use ASA to save the position and the rotation of this GameObject.
    if (!InputDevices.GetDeviceAtXRNode(XRNode.Head).TryGetFeatureValue(CommonUsages.devicePosition, out Vector3 headPosition))
    {
        headPosition = Vector3.zero;
    }

    Quaternion orientationTowardsHead = Quaternion.LookRotation(position - headPosition, Vector3.up);

    GameObject anchorGameObject = GameObject.CreatePrimitive(PrimitiveType.Cube);
    anchorGameObject.GetComponent<MeshRenderer>().material.shader = Shader.Find("Legacy Shaders/Diffuse");
    anchorGameObject.transform.position = position;
    anchorGameObject.transform.rotation = orientationTowardsHead;
    anchorGameObject.transform.localScale = Vector3.one * 0.1f;

}
Nota
Viene usato uno shader legacy, poiché è incluso in una build predefinita di Unity. Altri shader come il shader predefinito sono inclusi solo se specificati manualmente o sono direttamente parte della scena. Se uno shader non è incluso e l'applicazione sta tentando di eseguirne il rendering, genererà un materiale rosa.
Aggiungere e configurare ora i componenti di Ancoraggio nello spazio. La scadenza dell'ancoraggio viene impostata su 3 giorni dalla creazione dell'ancoraggio. Dopo di che verranno eliminati automaticamente dal cloud. Ricordarsi di aggiungere l'importazione
using Microsoft.Azure.SpatialAnchors;
/// <summary>
/// Creates an Azure Spatial Anchor at the given position rotated towards the user
/// </summary>
/// <param name="position">Position where Azure Spatial Anchor will be created</param>
/// <returns>Async Task</returns>
private async Task CreateAnchor(Vector3 position)
{
    //Create Anchor GameObject. We will use ASA to save the position and the rotation of this GameObject.
    if (!InputDevices.GetDeviceAtXRNode(XRNode.Head).TryGetFeatureValue(CommonUsages.devicePosition, out Vector3 headPosition))
    {
        headPosition = Vector3.zero;
    }

    Quaternion orientationTowardsHead = Quaternion.LookRotation(position - headPosition, Vector3.up);

    GameObject anchorGameObject = GameObject.CreatePrimitive(PrimitiveType.Cube);
    anchorGameObject.GetComponent<MeshRenderer>().material.shader = Shader.Find("Legacy Shaders/Diffuse");
    anchorGameObject.transform.position = position;
    anchorGameObject.transform.rotation = orientationTowardsHead;
    anchorGameObject.transform.localScale = Vector3.one * 0.1f;

    //Add and configure ASA components
    CloudNativeAnchor cloudNativeAnchor = anchorGameObject.AddComponent<CloudNativeAnchor>();
    await cloudNativeAnchor.NativeToCloud();
    CloudSpatialAnchor cloudSpatialAnchor = cloudNativeAnchor.CloudAnchor;
    cloudSpatialAnchor.Expiration = DateTimeOffset.Now.AddDays(3);

}
Per salvare un ancoraggio, l'utente deve raccogliere i dati dell'ambiente.
/// <summary>
/// Creates an Azure Spatial Anchor at the given position rotated towards the user
/// </summary>
/// <param name="position">Position where Azure Spatial Anchor will be created</param>
/// <returns>Async Task</returns>
private async Task CreateAnchor(Vector3 position)
{
    //Create Anchor GameObject. We will use ASA to save the position and the rotation of this GameObject.
    if (!InputDevices.GetDeviceAtXRNode(XRNode.Head).TryGetFeatureValue(CommonUsages.devicePosition, out Vector3 headPosition))
    {
        headPosition = Vector3.zero;
    }

    Quaternion orientationTowardsHead = Quaternion.LookRotation(position - headPosition, Vector3.up);

    GameObject anchorGameObject = GameObject.CreatePrimitive(PrimitiveType.Cube);
    anchorGameObject.GetComponent<MeshRenderer>().material.shader = Shader.Find("Legacy Shaders/Diffuse");
    anchorGameObject.transform.position = position;
    anchorGameObject.transform.rotation = orientationTowardsHead;
    anchorGameObject.transform.localScale = Vector3.one * 0.1f;

    //Add and configure ASA components
    CloudNativeAnchor cloudNativeAnchor = anchorGameObject.AddComponent<CloudNativeAnchor>();
    await cloudNativeAnchor.NativeToCloud();
    CloudSpatialAnchor cloudSpatialAnchor = cloudNativeAnchor.CloudAnchor;
    cloudSpatialAnchor.Expiration = DateTimeOffset.Now.AddDays(3);

    //Collect Environment Data
    while (!_spatialAnchorManager.IsReadyForCreate)
    {
        float createProgress = _spatialAnchorManager.SessionStatus.RecommendedForCreateProgress;
        Debug.Log($"ASA - Move your device to capture more environment data: {createProgress:0%}");
    }

}
Nota
Un dispositivo HoloLens può riutilizzare i dati dell'ambiente già acquisiti che circondano l'ancoraggio, con conseguente IsReadyForCreate true già quando viene chiamato per la prima volta.
Ora che l'ancoraggio nello spazio cloud è stato preparato, è possibile provare il salvataggio effettivo qui.
/// <summary>
/// Creates an Azure Spatial Anchor at the given position rotated towards the user
/// </summary>
/// <param name="position">Position where Azure Spatial Anchor will be created</param>
/// <returns>Async Task</returns>
private async Task CreateAnchor(Vector3 position)
{
    //Create Anchor GameObject. We will use ASA to save the position and the rotation of this GameObject.
    if (!InputDevices.GetDeviceAtXRNode(XRNode.Head).TryGetFeatureValue(CommonUsages.devicePosition, out Vector3 headPosition))
    {
        headPosition = Vector3.zero;
    }

    Quaternion orientationTowardsHead = Quaternion.LookRotation(position - headPosition, Vector3.up);

    GameObject anchorGameObject = GameObject.CreatePrimitive(PrimitiveType.Cube);
    anchorGameObject.GetComponent<MeshRenderer>().material.shader = Shader.Find("Legacy Shaders/Diffuse");
    anchorGameObject.transform.position = position;
    anchorGameObject.transform.rotation = orientationTowardsHead;
    anchorGameObject.transform.localScale = Vector3.one * 0.1f;

    //Add and configure ASA components
    CloudNativeAnchor cloudNativeAnchor = anchorGameObject.AddComponent<CloudNativeAnchor>();
    await cloudNativeAnchor.NativeToCloud();
    CloudSpatialAnchor cloudSpatialAnchor = cloudNativeAnchor.CloudAnchor;
    cloudSpatialAnchor.Expiration = DateTimeOffset.Now.AddDays(3);

    //Collect Environment Data
    while (!_spatialAnchorManager.IsReadyForCreate)
    {
        float createProgress = _spatialAnchorManager.SessionStatus.RecommendedForCreateProgress;
        Debug.Log($"ASA - Move your device to capture more environment data: {createProgress:0%}");
    }

    Debug.Log($"ASA - Saving cloud anchor... ");

    try
    {
        // Now that the cloud spatial anchor has been prepared, we can try the actual save here.
        await _spatialAnchorManager.CreateAnchorAsync(cloudSpatialAnchor);

        bool saveSucceeded = cloudSpatialAnchor != null;
        if (!saveSucceeded)
        {
            Debug.LogError("ASA - Failed to save, but no exception was thrown.");
            return;
        }

        Debug.Log($"ASA - Saved cloud anchor with ID: {cloudSpatialAnchor.Identifier}");
        _foundOrCreatedAnchorGameObjects.Add(anchorGameObject);
        _createdAnchorIDs.Add(cloudSpatialAnchor.Identifier);
        anchorGameObject.GetComponent<MeshRenderer>().material.color = Color.green;
    }
    catch (Exception exception)
    {
        Debug.Log("ASA - Failed to save anchor: " + exception.ToString());
        Debug.LogException(exception);
    }
}
Aggiungere infine la chiamata di funzione al ShortTap metodo
/// <summary>
/// Called when a user is air tapping for a short time
/// </summary>
/// <param name="handPosition">Location where tap was registered</param>
private async void ShortTap(Vector3 handPosition)
{
    await _spatialAnchorManager.StartSessionAsync();
        await CreateAnchor(handPosition);
}
L'app ora può creare più ancoraggi. Tutti i dispositivi possono ora individuare gli ancoraggi creati (se non sono ancora scaduti) purché conoscano gli ID di ancoraggio e abbiano accesso alla stessa risorsa ancoraggi nello spazio in Azure.
Interrompi sessione e distruggi gameObject
Per emulare un secondo dispositivo che trova tutti gli ancoraggi, ora arresteremo la sessione e rimuoveremo tutti gli ancoraggi GameObject (manterranno gli ID di ancoraggio). Dopo aver avviato una nuova sessione ed eseguito una query sugli ancoraggi usando gli ID di ancoraggio archiviati.
SpatialAnchorManager può occuparsi dell'arresto della sessione semplicemente chiamando il relativo DestroySession() metodo. Aggiungiamo questo metodo al metodo LongTap()
/// <summary>
/// Called when a user is air tapping for a long time (>=2 sec)
/// </summary>
private async void LongTap()
{
        _spatialAnchorManager.DestroySession();
}
Creare un metodo per rimuovere tutti gli ancoraggi GameObjects
/// <summary>
/// Destroys all Anchor GameObjects
/// </summary>
private void RemoveAllAnchorGameObjects()
{
    foreach (var anchorGameObject in _foundOrCreatedAnchorGameObjects)
    {
        Destroy(anchorGameObject);
    }
    _foundOrCreatedAnchorGameObjects.Clear();
}
E chiamalo dopo aver distrutto la sessione in LongTap()
/// <summary>
/// Called when a user is air tapping for a long time (>=2 sec)
/// </summary>
private async void LongTap()
{
        // Stop Session and remove all GameObjects. This does not delete the Anchors in the cloud
        _spatialAnchorManager.DestroySession();
        RemoveAllAnchorGameObjects();
        Debug.Log("ASA - Stopped Session and removed all Anchor Objects");
}
Individuare l'ancoraggio
Ora tenteremo di trovare di nuovo gli ancoraggi con la posizione e la rotazione corrette in cui sono stati creati. A tale scopo, è necessario avviare una sessione e creare un oggetto Watcher che cercherà ancoraggi che soddisfano i criteri specificati. Poiché i criteri verranno inseriti negli ID degli ancoraggi creati in precedenza. Si creerà un metodo LocateAnchor() e si userà SpatialAnchorManager per creare un oggetto Watcher. Per individuare strategie diverse dall'uso degli ID di ancoraggio, vedere Strategia di individuazione dell'ancoraggio
/// <summary>
/// Looking for anchors with ID in _createdAnchorIDs
/// </summary>
private void LocateAnchor()
{
    if (_createdAnchorIDs.Count > 0)
    {
        //Create watcher to look for all stored anchor IDs
        Debug.Log($"ASA - Creating watcher to look for {_createdAnchorIDs.Count} spatial anchors");
        AnchorLocateCriteria anchorLocateCriteria = new AnchorLocateCriteria();
        anchorLocateCriteria.Identifiers = _createdAnchorIDs.ToArray();
        _spatialAnchorManager.Session.CreateWatcher(anchorLocateCriteria);
        Debug.Log($"ASA - Watcher created!");
    }
}
Una volta avviato un watcher, viene generato un callback quando viene trovato un ancoraggio che soddisfa i criteri specificati. Creare prima di tutto il metodo di ancoraggio denominato SpatialAnchorManager_AnchorLocated() che verrà configurato per essere chiamato quando il watcher ha individuato un ancoraggio. Questo metodo crea un oggetto visivo GameObject e collega il componente di ancoraggio nativo. Il componente di ancoraggio nativo verifica che sia impostata la posizione e la rotazione corrette di GameObject .
Analogamente al processo di creazione, l'ancoraggio viene collegato a un GameObject. Questo GameObject non deve essere visibile nella scena per il funzionamento degli ancoraggi nello spazio. Ai fini di questa esercitazione, ogni ancoraggio verrà visualizzato come un cubo blu una volta individuato. Se si usa solo l'ancoraggio per stabilire un sistema di coordinate condiviso, non è necessario visualizzare il GameObject creato.
/// <summary>
/// Callback when an anchor is located
/// </summary>
/// <param name="sender">Callback sender</param>
/// <param name="args">Callback AnchorLocatedEventArgs</param>
private void SpatialAnchorManager_AnchorLocated(object sender, AnchorLocatedEventArgs args)
{
    Debug.Log($"ASA - Anchor recognized as a possible anchor {args.Identifier} {args.Status}");

    if (args.Status == LocateAnchorStatus.Located)
    {
        //Creating and adjusting GameObjects have to run on the main thread. We are using the UnityDispatcher to make sure this happens.
        UnityDispatcher.InvokeOnAppThread(() =>
        {
            // Read out Cloud Anchor values
            CloudSpatialAnchor cloudSpatialAnchor = args.Anchor;

            //Create GameObject
            GameObject anchorGameObject = GameObject.CreatePrimitive(PrimitiveType.Cube);
            anchorGameObject.transform.localScale = Vector3.one * 0.1f;
            anchorGameObject.GetComponent<MeshRenderer>().material.shader = Shader.Find("Legacy Shaders/Diffuse");
            anchorGameObject.GetComponent<MeshRenderer>().material.color = Color.blue;

            // Link to Cloud Anchor
            anchorGameObject.AddComponent<CloudNativeAnchor>().CloudToNative(cloudSpatialAnchor);
            _foundOrCreatedAnchorGameObjects.Add(anchorGameObject);
        });
    }
}
A questo punto si sottoscrive il callback AnchorLocated da SpatialAnchorManager per assicurarsi che il SpatialAnchorManager_AnchorLocated() metodo venga chiamato dopo che il watcher trova un ancoraggio.
// Start is called before the first frame update
void Start()
{
    _spatialAnchorManager = GetComponent<SpatialAnchorManager>();
    _spatialAnchorManager.LogDebug += (sender, args) => Debug.Log($"ASA - Debug: {args.Message}");
    _spatialAnchorManager.Error += (sender, args) => Debug.LogError($"ASA - Error: {args.ErrorMessage}");
    _spatialAnchorManager.AnchorLocated += SpatialAnchorManager_AnchorLocated;
}
Espandere infine il LongTap() metodo per includere la ricerca dell'ancoraggio. Useremo il IsSessionStarted valore booleano per decidere se stiamo cercando tutti gli ancoraggi o distruggendo tutti gli ancoraggi come descritto in Panoramica dell'app
/// <summary>
/// Called when a user is air tapping for a long time (>=2 sec)
/// </summary>
private async void LongTap()
{
    if (_spatialAnchorManager.IsSessionStarted)
    {
        // Stop Session and remove all GameObjects. This does not delete the Anchors in the cloud
        _spatialAnchorManager.DestroySession();
        RemoveAllAnchorGameObjects();
        Debug.Log("ASA - Stopped Session and removed all Anchor Objects");
    }
    else
    {
        //Start session and search for all Anchors previously created
        await _spatialAnchorManager.StartSessionAsync();
        LocateAnchor();
    }
}
Provare #2
L'app supporta ora la creazione di ancoraggi e l'individuazione. Compilare l'app in Unity e distribuirla da Visual Studio seguendo l'uso di Visual Studio per distribuire ed eseguire il debug.
Assicurati che HoloLens sia connesso a Internet. Dopo l'avvio dell'app e la creazione con il messaggio Unity scompare, breve tocco nell'ambiente circostante. Dovrebbe essere visualizzato un cubo bianco per mostrare la posizione e la rotazione dell'ancoraggio da creare. Viene chiamato automaticamente il processo di creazione dell'ancoraggio. Mentre si esaminano lentamente i dintorni, si acquisiscono i dati dell'ambiente. Una volta raccolti dati di ambiente sufficienti, l'app tenterà di creare un ancoraggio nella posizione specificata. Una volta completato il processo di creazione dell'ancoraggio, il cubo diventa verde. Controllare i log di debug in Visual Studio per verificare se tutto funziona come previsto.
Tocco lungo per rimuovere tutto GameObjects dalla scena e arrestare la sessione di ancoraggio nello spazio.
Una volta cancellata la scena, è possibile toccare di nuovo a lungo, che avvierà una sessione e cercherà gli ancoraggi creati in precedenza. Una volta trovati, vengono visualizzati da cubi blu nella posizione e nella rotazione ancorata. Questi ancoraggi (purché non siano scaduti) possono essere trovati da qualsiasi dispositivo supportato, purché abbiano gli ID di ancoraggio corretti e abbiano accesso alla risorsa di ancoraggio nello spazio.
Elimina ancoraggio
Al momento l'app può creare e individuare ancoraggi. Mentre elimina GameObjects, non elimina l'ancoraggio nel cloud. Aggiungere la funzionalità per eliminarla anche nel cloud se si tocca un ancoraggio esistente.
Aggiungere ora un metodo DeleteAnchor che riceve un oggetto GameObject. Verrà quindi usato insieme al SpatialAnchorManager componente dell'oggetto CloudNativeAnchor per richiedere l'eliminazione dell'ancoraggio nel cloud.
/// <summary>
/// Deleting Cloud Anchor attached to the given GameObject and deleting the GameObject
/// </summary>
/// <param name="anchorGameObject">Anchor GameObject that is to be deleted</param>
private async void DeleteAnchor(GameObject anchorGameObject)
{
    CloudNativeAnchor cloudNativeAnchor = anchorGameObject.GetComponent<CloudNativeAnchor>();
    CloudSpatialAnchor cloudSpatialAnchor = cloudNativeAnchor.CloudAnchor;

    Debug.Log($"ASA - Deleting cloud anchor: {cloudSpatialAnchor.Identifier}");

    //Request Deletion of Cloud Anchor
    await _spatialAnchorManager.DeleteAnchorAsync(cloudSpatialAnchor);

    //Remove local references
    _createdAnchorIDs.Remove(cloudSpatialAnchor.Identifier);
    _foundOrCreatedAnchorGameObjects.Remove(anchorGameObject);
    Destroy(anchorGameObject);

    Debug.Log($"ASA - Cloud anchor deleted!");
}
Per chiamare questo metodo da ShortTap, è necessario essere in grado di determinare se un tocco è stato vicino a un ancoraggio visibile esistente. Si creerà ora un metodo helper che si occupa di tale metodo
using System.Linq;
/// <summary>
/// Returns true if an Anchor GameObject is within 15cm of the received reference position
/// </summary>
/// <param name="position">Reference position</param>
/// <param name="anchorGameObject">Anchor GameObject within 15cm of received position. Not necessarily the nearest to this position. If no AnchorObject is within 15cm, this value will be null</param>
/// <returns>True if a Anchor GameObject is within 15cm</returns>
private bool IsAnchorNearby(Vector3 position, out GameObject anchorGameObject)
{
    anchorGameObject = null;

    if (_foundOrCreatedAnchorGameObjects.Count <= 0)
    {
        return false;
    }

    //Iterate over existing anchor gameobjects to find the nearest
    var (distance, closestObject) = _foundOrCreatedAnchorGameObjects.Aggregate(
        new Tuple<float, GameObject>(Mathf.Infinity, null),
        (minPair, gameobject) =>
        {
            Vector3 gameObjectPosition = gameobject.transform.position;
            float distance = (position - gameObjectPosition).magnitude;
            return distance < minPair.Item1 ? new Tuple<float, GameObject>(distance, gameobject) : minPair;
        });

    if (distance <= 0.15f)
    {
        //Found an anchor within 15cm
        anchorGameObject = closestObject;
        return true;
    }
    else
    {
        return false;
    }
}
È ora possibile estendere il ShortTap metodo per includere la DeleteAnchor chiamata
/// <summary>
/// Called when a user is air tapping for a short time
/// </summary>
/// <param name="handPosition">Location where tap was registered</param>
private async void ShortTap(Vector3 handPosition)
{
    await _spatialAnchorManager.StartSessionAsync();
    if (!IsAnchorNearby(handPosition, out GameObject anchorGameObject))
    {
        //No Anchor Nearby, start session and create an anchor
        await CreateAnchor(handPosition);
    }
    else
    {
        //Delete nearby Anchor
        DeleteAnchor(anchorGameObject);
    }
}
Provare #3
Compilare l'app in Unity e distribuirla da Visual Studio seguendo l'uso di Visual Studio per distribuire ed eseguire il debug.
Tieni presente che la posizione del movimento di tocco manuale è il centro della mano in questa app e non la punta delle dita.
Quando si tocca un ancoraggio, viene creata (verde) o posizionata (blu) una richiesta viene inviata al servizio di ancoraggio nello spazio per rimuovere l'ancoraggio dall'account. Arrestare la sessione (tocco lungo) e avviare di nuovo la sessione (tocco lungo) per cercare tutti gli ancoraggi. Gli ancoraggi eliminati non verranno più posizionati.
Riunire tutti gli elementi
Ecco come dovrebbe essere il file di classe AzureSpatialAnchorsScript completo dopo aver riunito tutti i diversi elementi. È possibile usarlo come riferimento da confrontare con il proprio file e verificare se sono state lasciate differenze.
Nota
Si noterà che lo script è stato incluso [RequireComponent(typeof(SpatialAnchorManager))] . Con questo, Unity assicurerà che il GameObject a cui ci si collega AzureSpatialAnchorsScript , abbia anche l'elemento SpatialAnchorManager a esso associato.
using Microsoft.Azure.SpatialAnchors;
using Microsoft.Azure.SpatialAnchors.Unity;
using System;
using System.Collections.Generic;
using System.Linq;
using System.Threading.Tasks;
using UnityEngine;
using UnityEngine.XR;


[RequireComponent(typeof(SpatialAnchorManager))]
public class AzureSpatialAnchorsScript : MonoBehaviour
{
    /// <summary>
    /// Used to distinguish short taps and long taps
    /// </summary>
    private float[] _tappingTimer = { 0, 0 };

    /// <summary>
    /// Main interface to anything Spatial Anchors related
    /// </summary>
    private SpatialAnchorManager _spatialAnchorManager = null;

    /// <summary>
    /// Used to keep track of all GameObjects that represent a found or created anchor
    /// </summary>
    private List<GameObject> _foundOrCreatedAnchorGameObjects = new List<GameObject>();

    /// <summary>
    /// Used to keep track of all the created Anchor IDs
    /// </summary>
    private List<String> _createdAnchorIDs = new List<String>();

    // <Start>
    // Start is called before the first frame update
    void Start()
    {
        _spatialAnchorManager = GetComponent<SpatialAnchorManager>();
        _spatialAnchorManager.LogDebug += (sender, args) => Debug.Log($"ASA - Debug: {args.Message}");
        _spatialAnchorManager.Error += (sender, args) => Debug.LogError($"ASA - Error: {args.ErrorMessage}");
        _spatialAnchorManager.AnchorLocated += SpatialAnchorManager_AnchorLocated;
    }
    // </Start>

    // <Update>
    // Update is called once per frame
    void Update()
    {

        //Check for any air taps from either hand
        for (int i = 0; i < 2; i++)
        {
            InputDevice device = InputDevices.GetDeviceAtXRNode((i == 0) ? XRNode.RightHand : XRNode.LeftHand);
            if (device.TryGetFeatureValue(CommonUsages.primaryButton, out bool isTapping))
            {
                if (!isTapping)
                {
                    //Stopped Tapping or wasn't tapping
                    if (0f < _tappingTimer[i] && _tappingTimer[i] < 1f)
                    {
                        //User has been tapping for less than 1 sec. Get hand position and call ShortTap
                        if (device.TryGetFeatureValue(CommonUsages.devicePosition, out Vector3 handPosition))
                        {
                            ShortTap(handPosition);
                        }
                    }
                    _tappingTimer[i] = 0;
                }
                else
                {
                    _tappingTimer[i] += Time.deltaTime;
                    if (_tappingTimer[i] >= 2f)
                    {
                        //User has been air tapping for at least 2sec. Get hand position and call LongTap
                        if (device.TryGetFeatureValue(CommonUsages.devicePosition, out Vector3 handPosition))
                        {
                            LongTap();
                        }
                        _tappingTimer[i] = -float.MaxValue; // reset the timer, to avoid retriggering if user is still holding tap
                    }
                }
            }

        }
    }
    // </Update>


    // <ShortTap>
    /// <summary>
    /// Called when a user is air tapping for a short time
    /// </summary>
    /// <param name="handPosition">Location where tap was registered</param>
    private async void ShortTap(Vector3 handPosition)
    {
        await _spatialAnchorManager.StartSessionAsync();
        if (!IsAnchorNearby(handPosition, out GameObject anchorGameObject))
        {
            //No Anchor Nearby, start session and create an anchor
            await CreateAnchor(handPosition);
        }
        else
        {
            //Delete nearby Anchor
            DeleteAnchor(anchorGameObject);
        }
    }
    // </ShortTap>

    // <LongTap>
    /// <summary>
    /// Called when a user is air tapping for a long time (>=2 sec)
    /// </summary>
    private async void LongTap()
    {
        if (_spatialAnchorManager.IsSessionStarted)
        {
            // Stop Session and remove all GameObjects. This does not delete the Anchors in the cloud
            _spatialAnchorManager.DestroySession();
            RemoveAllAnchorGameObjects();
            Debug.Log("ASA - Stopped Session and removed all Anchor Objects");
        }
        else
        {
            //Start session and search for all Anchors previously created
            await _spatialAnchorManager.StartSessionAsync();
            LocateAnchor();
        }
    }
    // </LongTap>

    // <RemoveAllAnchorGameObjects>
    /// <summary>
    /// Destroys all Anchor GameObjects
    /// </summary>
    private void RemoveAllAnchorGameObjects()
    {
        foreach (var anchorGameObject in _foundOrCreatedAnchorGameObjects)
        {
            Destroy(anchorGameObject);
        }
        _foundOrCreatedAnchorGameObjects.Clear();
    }
    // </RemoveAllAnchorGameObjects>

    // <IsAnchorNearby>
    /// <summary>
    /// Returns true if an Anchor GameObject is within 15cm of the received reference position
    /// </summary>
    /// <param name="position">Reference position</param>
    /// <param name="anchorGameObject">Anchor GameObject within 15cm of received position. Not necessarily the nearest to this position. If no AnchorObject is within 15cm, this value will be null</param>
    /// <returns>True if a Anchor GameObject is within 15cm</returns>
    private bool IsAnchorNearby(Vector3 position, out GameObject anchorGameObject)
    {
        anchorGameObject = null;

        if (_foundOrCreatedAnchorGameObjects.Count <= 0)
        {
            return false;
        }

        //Iterate over existing anchor gameobjects to find the nearest
        var (distance, closestObject) = _foundOrCreatedAnchorGameObjects.Aggregate(
            new Tuple<float, GameObject>(Mathf.Infinity, null),
            (minPair, gameobject) =>
            {
                Vector3 gameObjectPosition = gameobject.transform.position;
                float distance = (position - gameObjectPosition).magnitude;
                return distance < minPair.Item1 ? new Tuple<float, GameObject>(distance, gameobject) : minPair;
            });

        if (distance <= 0.15f)
        {
            //Found an anchor within 15cm
            anchorGameObject = closestObject;
            return true;
        }
        else
        {
            return false;
        }
    }
    // </IsAnchorNearby>

    // <CreateAnchor>
    /// <summary>
    /// Creates an Azure Spatial Anchor at the given position rotated towards the user
    /// </summary>
    /// <param name="position">Position where Azure Spatial Anchor will be created</param>
    /// <returns>Async Task</returns>
    private async Task CreateAnchor(Vector3 position)
    {
        //Create Anchor GameObject. We will use ASA to save the position and the rotation of this GameObject.
        if (!InputDevices.GetDeviceAtXRNode(XRNode.Head).TryGetFeatureValue(CommonUsages.devicePosition, out Vector3 headPosition))
        {
            headPosition = Vector3.zero;
        }

        Quaternion orientationTowardsHead = Quaternion.LookRotation(position - headPosition, Vector3.up);

        GameObject anchorGameObject = GameObject.CreatePrimitive(PrimitiveType.Cube);
        anchorGameObject.GetComponent<MeshRenderer>().material.shader = Shader.Find("Legacy Shaders/Diffuse");
        anchorGameObject.transform.position = position;
        anchorGameObject.transform.rotation = orientationTowardsHead;
        anchorGameObject.transform.localScale = Vector3.one * 0.1f;

        //Add and configure ASA components
        CloudNativeAnchor cloudNativeAnchor = anchorGameObject.AddComponent<CloudNativeAnchor>();
        await cloudNativeAnchor.NativeToCloud();
        CloudSpatialAnchor cloudSpatialAnchor = cloudNativeAnchor.CloudAnchor;
        cloudSpatialAnchor.Expiration = DateTimeOffset.Now.AddDays(3);

        //Collect Environment Data
        while (!_spatialAnchorManager.IsReadyForCreate)
        {
            float createProgress = _spatialAnchorManager.SessionStatus.RecommendedForCreateProgress;
            Debug.Log($"ASA - Move your device to capture more environment data: {createProgress:0%}");
        }

        Debug.Log($"ASA - Saving cloud anchor... ");

        try
        {
            // Now that the cloud spatial anchor has been prepared, we can try the actual save here.
            await _spatialAnchorManager.CreateAnchorAsync(cloudSpatialAnchor);

            bool saveSucceeded = cloudSpatialAnchor != null;
            if (!saveSucceeded)
            {
                Debug.LogError("ASA - Failed to save, but no exception was thrown.");
                return;
            }

            Debug.Log($"ASA - Saved cloud anchor with ID: {cloudSpatialAnchor.Identifier}");
            _foundOrCreatedAnchorGameObjects.Add(anchorGameObject);
            _createdAnchorIDs.Add(cloudSpatialAnchor.Identifier);
            anchorGameObject.GetComponent<MeshRenderer>().material.color = Color.green;
        }
        catch (Exception exception)
        {
            Debug.Log("ASA - Failed to save anchor: " + exception.ToString());
            Debug.LogException(exception);
        }
    }
    // </CreateAnchor>

    // <LocateAnchor>
    /// <summary>
    /// Looking for anchors with ID in _createdAnchorIDs
    /// </summary>
    private void LocateAnchor()
    {
        if (_createdAnchorIDs.Count > 0)
        {
            //Create watcher to look for all stored anchor IDs
            Debug.Log($"ASA - Creating watcher to look for {_createdAnchorIDs.Count} spatial anchors");
            AnchorLocateCriteria anchorLocateCriteria = new AnchorLocateCriteria();
            anchorLocateCriteria.Identifiers = _createdAnchorIDs.ToArray();
            _spatialAnchorManager.Session.CreateWatcher(anchorLocateCriteria);
            Debug.Log($"ASA - Watcher created!");
        }
    }
    // </LocateAnchor>

    // <SpatialAnchorManagerAnchorLocated>
    /// <summary>
    /// Callback when an anchor is located
    /// </summary>
    /// <param name="sender">Callback sender</param>
    /// <param name="args">Callback AnchorLocatedEventArgs</param>
    private void SpatialAnchorManager_AnchorLocated(object sender, AnchorLocatedEventArgs args)
    {
        Debug.Log($"ASA - Anchor recognized as a possible anchor {args.Identifier} {args.Status}");

        if (args.Status == LocateAnchorStatus.Located)
        {
            //Creating and adjusting GameObjects have to run on the main thread. We are using the UnityDispatcher to make sure this happens.
            UnityDispatcher.InvokeOnAppThread(() =>
            {
                // Read out Cloud Anchor values
                CloudSpatialAnchor cloudSpatialAnchor = args.Anchor;

                //Create GameObject
                GameObject anchorGameObject = GameObject.CreatePrimitive(PrimitiveType.Cube);
                anchorGameObject.transform.localScale = Vector3.one * 0.1f;
                anchorGameObject.GetComponent<MeshRenderer>().material.shader = Shader.Find("Legacy Shaders/Diffuse");
                anchorGameObject.GetComponent<MeshRenderer>().material.color = Color.blue;

                // Link to Cloud Anchor
                anchorGameObject.AddComponent<CloudNativeAnchor>().CloudToNative(cloudSpatialAnchor);
                _foundOrCreatedAnchorGameObjects.Add(anchorGameObject);
            });
        }
    }
    // </SpatialAnchorManagerAnchorLocated>

    // <DeleteAnchor>
    /// <summary>
    /// Deleting Cloud Anchor attached to the given GameObject and deleting the GameObject
    /// </summary>
    /// <param name="anchorGameObject">Anchor GameObject that is to be deleted</param>
    private async void DeleteAnchor(GameObject anchorGameObject)
    {
        CloudNativeAnchor cloudNativeAnchor = anchorGameObject.GetComponent<CloudNativeAnchor>();
        CloudSpatialAnchor cloudSpatialAnchor = cloudNativeAnchor.CloudAnchor;

        Debug.Log($"ASA - Deleting cloud anchor: {cloudSpatialAnchor.Identifier}");

        //Request Deletion of Cloud Anchor
        await _spatialAnchorManager.DeleteAnchorAsync(cloudSpatialAnchor);

        //Remove local references
        _createdAnchorIDs.Remove(cloudSpatialAnchor.Identifier);
        _foundOrCreatedAnchorGameObjects.Remove(anchorGameObject);
        Destroy(anchorGameObject);

        Debug.Log($"ASA - Cloud anchor deleted!");
    }
    // </DeleteAnchor>

}
Passaggi successivi
In questa esercitazione si è appreso come implementare un'applicazione di ancoraggi nello spazio di base per HoloLens usando Unity. Per altre informazioni sull'uso degli ancoraggi nello spazio di Azure in una nuova app Android, continuare con l'esercitazione successiva.
Commenti e suggerimenti
Presto disponibile: Nel corso del 2024 verranno gradualmente disattivati i problemi di GitHub come meccanismo di feedback per il contenuto e ciò verrà sostituito con un nuovo sistema di feedback. Per altre informazioni, vedere https://aka.ms/ContentUserFeedback.
Invia e visualizza il feedback per