Nota
L'accesso a questa pagina richiede l'autorizzazione. È possibile provare ad accedere o modificare le directory.
L'accesso a questa pagina richiede l'autorizzazione. È possibile provare a modificare le directory.
Si applica a:
- Microsoft Defender per endpoint per i server
- Microsoft Defender per server Piano 1 o Piano 2
- Antivirus Microsoft Defender
Per eseguire un'analisi di Microsoft Defender Antivirus per Linux, vedere Comandi supportati.
Requisiti di sistema
Vedere i requisiti di sistema seguenti necessari per pianificare Microsoft Defender'analisi antivirus in Microsoft Defender Endpoint in Linux.
- Distribuzioni e versioni di Linux: Red Hat Enterprise Linux 7.2 o versione successiva.
- L'opzione FANOTIFY nel kernel deve essere abilitata.
Vedere anche Prerequisiti per Microsoft Defender per endpoint in Linux.
Pianificazione Microsoft Defender analisi antivirus in Red Hat Linux
È possibile pianificare processi cron per avviare Microsoft Defender analisi antivirus in base a una pianificazione. Questo processo funziona bene se il dispositivo è sempre attivo e in esecuzione.
Ma se i dispositivi Linux vengono arrestati o offline durante la pianificazione cron, le analisi non vengono eseguite. In queste situazioni, è possibile usare anacron per leggere il timestamp e trovare l'ultimo processo eseguito. Se il dispositivo è stato arrestato durante il processo cron pianificato, deve attendere fino all'ora pianificata successiva. Usando anacron, il sistema rileverà l'ultima volta che è stata eseguita l'analisi. Se il dispositivo non ha eseguito il processo cron, lo avvierà automaticamente.
Pianificare le analisi antivirus Microsoft Defender in Red Hat Linux
Per pianificare le analisi, seguire questa procedura:
Connettersi al server RedHat usando PuTTY.
Modificare il file anacron come indicato di seguito:
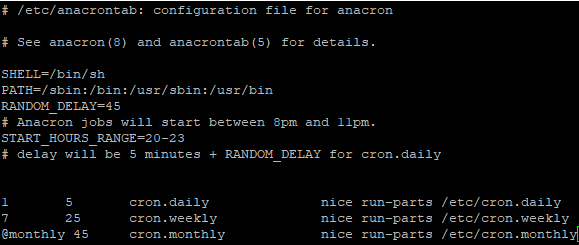
vi /etc/anacronEsaminare e modificare il file Anacron, che contiene le informazioni seguenti:
# /etc/anacrontab: configuration file for anacron
# See anacron (8) and anacrontab (5) for details.
SHELL=/bin/sh
PATH=/sbin:/bin:/usr/sbin:/usr/bin
RANDOM_DELAY=45
# Anacron jobs will start between 8pm and 11pm.
START_HOURS_RANGE=20-23
# delay will be 5 minutes + RANDOM_DELAY for cron.daily
Si notano gli elementi seguenti nel file:
-
La shell è denominata
/bin/she non come/bin/bash. Tenere presente questo aspetto quando si configurano i processi. - RANDOM_DELAY descrive il tempo massimo in minuti per il processo. Questo valore viene usato per compensare i processi in modo che non siano presenti troppi processi in esecuzione contemporaneamente. L'uso di questo ritardo è ideale per le soluzioni VDI.
- START_HOURS_RANGE descrive l'intervallo di tempo per eseguire il processo.
-
cron.daily descrive
1come il periodo di giorni necessario per la frequenza delle esecuzioni dei processi. '5 è il ritardo in minuti che anacron attende dopo il riavvio del dispositivo.
-
La shell è denominata
Esaminare i processi anacron usando il comando seguente:
ls -lh /etc/cron*Dovrebbero essere visualizzate informazioni simili a quelle visualizzate nello screenshot seguente:
L'esempio di codice seguente fornisce una visualizzazione più dettagliata:
[root@redhat7 /] # ls -lh /etc/cron*
- rw - - - - - - -.  1   root    root    0   Nov 30 2021 /etc/cron.deny
- rw - r - - r - -.  1   root    root    451 Dec 27 2013 /etc/crontab

/etc/cron.d:
total 28k
- rw - r - - r - -.  1   root    root    128 Nov 30  2021    0hourly
- rw - r - - r - -.  1   root    root    121 Feb 25  18:11   omilogotate
- rw - r - - r - -.  1   root    root    118 Feb 25  18:14   omsagent
- rw - r - - r - -.  1   root    root    79  Feb 25  18:15   OMSConsistencyInvoker
- rw - r - - r - -.  1   root    root    108 Nov 9   2021    raid-check
- rw - r - - r - -.  1   root    root    135 Jun 1   22:35   scxagent
- rw - - - - - - -.  1   root    root    235 Jan 20  2020    sysstat

/etc/cron.daily:
total 24k
- rwxr - xr - x. 1   root    root    127 Jun 14  16:49    avscandaily
- rwx - - - - - -.   1   root    root    219 Aug 7   2019 logrotate
- rwxr - xr - x. 1   root    root    618 Jul 10  2018     man-db.cron
- rwx - - - - - -.   1   root    root    208 Nov 9   2017    mlocate
- rwx - - - - - -.   1   root    root    558 Apr 18  19:03   rhsmd
- rwxr - xr - x. 1   root    root    114 Apr 8   2021    rhui-update-client

/etc/cron.hourly:
total 8.0k
- rwxr - xr - x. 1   root    root    392 Nov 30  2021    0anacron
- rwxr - xr - x. 1   root    root    131 Jun 14  17:05   update

/etc/cron.monthly:
total 0
- rwxr - xr - x. 1   root    root    0   Jun 14  17:47   mdatpupdate

/etc/cron.weekly:
total 0
Ignorare la
/etc/cron.ddirectory. Esaminare/etc/cron.daily, hourly, monthly, and weeklyinvece .Per pianificare un'analisi antivirus settimanale, è possibile creare un file (processo) nella
/etc/cron.weeklydirectory.cd /etc/cron.weekly vi mdavfullscan Press Insert
#!/bin/sh
set -e
echo $(date) "Time Scan Begins" >>/logs/mdav_avacron_full_scan.log
/usr/bin/mdatp scan full >> /logs/mdav_avacron_full_scan.log
echo $(date) "Time Scan Finished" >>/logs/mdav_avacron_full_scan.log
exit    0
~

Press Esc

Type: wq!
Modificare le autorizzazioni del file per consentire l'esecuzione del file usando questo comando:
Chmod 755 mdavfullscan

ls -la
[root@redhat7 cron.weekly]# ls -la
total    16
drwxr - xr - x.  2   root    root    26  Jun 14  19:19   .
drwxr - xr - x.  85  root    root    8192    Jun 14  19:01   ..
- rw - r - - r - -.  1   root    root    128 Jun 14  19:19   mdavfullscan
[root@redhat7 cron.weekly] # chmod 755 mdavfullscan
[root@redhat7 cron.weekly] # ls -lh
total 4. 0k
- rwxr - xr - x. 1   root    root    128 Jun 14  19:19   mdavfullscan
[root@redhat7 cron.weekly] #
Usare il comando seguente per testare il processo anacron settimanale:
./mdavfullscanUsare il comando seguente per verificare che il processo sia stato eseguito correttamente:
cat /logs/mdav_avacron_full_scan.log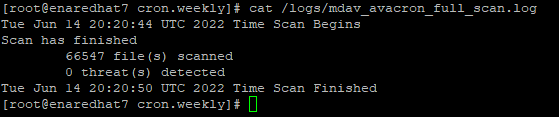
[root@redhat7 cron.weekly] # cat /logs/mdav_avacron_full_scan.log
Tue Jun 14 20:20:44 UTC 2022 Time Scan Begins
Scan has finished
    66547 file(s) scanned
    0 threat(s) detected
Tue Jun 14 20:20:50 UTC 2022 Time Scan Finished
[root@redhat7 cron.weekly] #
Vedere anche
- Microsoft Defender per Endpoint su Linux
- Prerequisiti per Microsoft Defender per endpoint in Linux
- Configurare le impostazioni e i criteri di sicurezza per Microsoft Defender per endpoint in Linux
Consiglio
Per saperne di più, Engage con la community Microsoft Security nella community tech: Microsoft Defender per endpoint Tech Community.