Nota
L'accesso a questa pagina richiede l'autorizzazione. È possibile provare ad accedere o modificare le directory.
L'accesso a questa pagina richiede l'autorizzazione. È possibile provare a modificare le directory.
In questo argomento viene descritto come utilizzare gli oggetti ImageBrush, DrawingBrush e VisualBrush per disegnare un'area con un'immagine, un oggetto Drawing o un oggetto Visual.
Prerequisiti
Per comprendere questo argomento, è necessario avere familiarità con i diversi tipi di pennelli forniti da Windows Presentation Foundation (WPF) e le relative funzionalità di base. Per un'introduzione, vedere Cenni preliminari sui pennelli WPF.
Disegnare un'area con un'immagine
Un ImageBrush oggetto disegna un'area con un oggetto ImageSource. Il tipo più comune di ImageSource da usare con un ImageBrush è un BitmapImage oggetto, che descrive un elemento grafico bitmap. È possibile utilizzare un DrawingImage oggetto per disegnare utilizzando un Drawing oggetto , ma è più semplice usare un DrawingBrush oggetto . Per altre informazioni sugli ImageSource oggetti, vedere Panoramica dell'immagine.
Per dipingere con unImageBrush, creare unBitmapImage e usarlo per caricare il contenuto bitmap. Quindi, utilizza BitmapImage per impostare la proprietà ImageSource dell'oggetto ImageBrush. Infine, applica ImageBrush all'oggetto che vuoi dipingere. In Extensible Application Markup Language (XAML) puoi anche impostare la ImageSource proprietà di ImageBrush con il percorso dell'immagine da caricare.
Come tutti gli Brush oggetti, un ImageBrush oggetto può essere utilizzato per disegnare oggetti come forme, pannelli, controlli e testo. La figura seguente mostra alcuni effetti che possono essere ottenuti con un ImageBrush.

Oggetti dipinti da un ImageBrush
Per impostazione predefinita, un'immagine ImageBrush si estende per riempire completamente l'area da disegnare, distorcendo l'immagine se l'area dipinta ha proporzioni diverse rispetto all'immagine. È possibile modificare questo comportamento modificando la Stretch proprietà dal valore predefinito di Fill a None, Uniformo UniformToFill. Poiché ImageBrush è un tipo di TileBrush, è possibile specificare esattamente come un pennello per immagini riempie l'area di output e persino creare modelli. Per altre informazioni sulle funzionalità avanzate TileBrush , vedere La panoramica di TileBrush.
Esempio: disegnare un oggetto con un'immagine bitmap
Nell'esempio seguente viene utilizzato un ImageBrush per dipingere il Background di un Canvas.
<Page
  xmlns="http://schemas.microsoft.com/winfx/2006/xaml/presentation"
  xmlns:x="http://schemas.microsoft.com/winfx/2006/xaml"
  x:Class="Microsoft.Samples.BrushExamples.ImageBrushExample"
  WindowTitle="ImageBrush Example"
  Background="White">

  <StackPanel>

    <Canvas
      Height="200" Width="300">
      <Canvas.Background>
        <ImageBrush ImageSource="sampleImages\Waterlilies.jpg" />
      </Canvas.Background>
    </Canvas>


  </StackPanel>
</Page>
using System;
using System.Windows;
using System.Windows.Controls;
using System.Windows.Media;
using System.Windows.Media.Imaging;

namespace Microsoft.Samples.BrushExamples
{

    public class ImageBrushExample : Page
    {

        public ImageBrushExample()
        {

            StackPanel mainPanel = new StackPanel();
            canvasBackgroundExample(mainPanel);
            this.Content = mainPanel;
        }

        private void canvasBackgroundExample(Panel mainPanel)
        {

            BitmapImage theImage = new BitmapImage
                (new Uri("sampleImages\\Waterlilies.jpg", UriKind.Relative));

            ImageBrush myImageBrush = new ImageBrush(theImage);

            Canvas myCanvas = new Canvas();
            myCanvas.Width = 300;
            myCanvas.Height = 200;
            myCanvas.Background = myImageBrush;

            mainPanel.Children.Add(myCanvas);
        }
    }
}
Imports System.Windows
Imports System.Windows.Controls
Imports System.Windows.Media
Imports System.Windows.Media.Imaging

Namespace Microsoft.Samples.BrushExamples

    Public Class ImageBrushExample
        Inherits Page

        Public Sub New()

            Dim mainPanel As New StackPanel()
            canvasBackgroundExample(mainPanel)
            Me.Content = mainPanel

        End Sub


        Private Sub canvasBackgroundExample(ByVal mainPanel As Panel)

            Dim theImage As New BitmapImage(New Uri("sampleImages\Waterlilies.jpg", UriKind.Relative))

            Dim myImageBrush As New ImageBrush(theImage)

            Dim myCanvas As New Canvas()
            myCanvas.Width = 300
            myCanvas.Height = 200
            myCanvas.Background = myImageBrush

            mainPanel.Children.Add(myCanvas)


        End Sub

    End Class

End Namespace
Dipingi un'area con un disegno
Un DrawingBrush oggetto consente di disegnare un'area con forme, testo, immagini e video. Le forme all'interno di un pennello di disegno possono essere dipinte con un colore a tinta unita, una sfumatura, un'immagine o anche un altro DrawingBrush. La figura seguente illustra alcuni usi di un oggetto DrawingBrush.

Oggetti dipinti da un DrawingBrush
Un DrawingBrush oggetto disegna un'area con un Drawing oggetto . Un Drawing oggetto descrive il contenuto visibile, ad esempio una forma, una bitmap, un video o una riga di testo. Tipi diversi di disegni descrivono tipi diversi di contenuto. L'elenco seguente contiene i vari tipi di oggetti Drawing.
GeometryDrawing – Disegna una forma.
ImageDrawing – Disegna un'immagine.
GlyphRunDrawing – Disegna testo.
VideoDrawing : riproduce un file audio o video.
DrawingGroup – Disegna altri disegni. Utilizzare un gruppo di disegno per combinare altri disegni in un singolo disegno composito.
Per ulteriori informazioni sugli oggetti Drawing, consultare la Panoramica sugli oggetti di disegno .
Analogamente a ImageBrush, un DrawingBrush si estende con il suo Drawing per riempire l'area di output. È possibile eseguire l'override di questo comportamento modificando la proprietà dall'impostazione Stretch predefinita di Fill. Per ulteriori informazioni, consultare la proprietà Stretch.
Esempio: Disegnare un oggetto con un disegno
Nell'esempio seguente viene illustrato come disegnare un oggetto con un disegno di tre ellissi. Un GeometryDrawing viene utilizzato per descrivere le ellissi.
<Button Content="A Button">
  <Button.Background>
    <DrawingBrush>
      <DrawingBrush.Drawing>
        <GeometryDrawing Brush="LightBlue">
          <GeometryDrawing.Geometry>
            <GeometryGroup>
              <EllipseGeometry RadiusX="12.5" RadiusY="25" Center="25,50" />
              <EllipseGeometry RadiusX="12.5" RadiusY="25" Center="50,50" />
              <EllipseGeometry RadiusX="12.5" RadiusY="25" Center="75,50" />
            </GeometryGroup>
          </GeometryDrawing.Geometry>
          <GeometryDrawing.Pen>
            <Pen Thickness="1" Brush="Gray" />
          </GeometryDrawing.Pen>
        </GeometryDrawing>
      </DrawingBrush.Drawing>
    </DrawingBrush>
  </Button.Background>
</Button>
// Create a DrawingBrush.
DrawingBrush myDrawingBrush = new DrawingBrush();

// Create a drawing.
GeometryDrawing myGeometryDrawing = new GeometryDrawing();
myGeometryDrawing.Brush = Brushes.LightBlue;
myGeometryDrawing.Pen = new Pen(Brushes.Gray, 1);
GeometryGroup ellipses = new GeometryGroup();
ellipses.Children.Add(new EllipseGeometry(new Point(25,50), 12.5, 25));
ellipses.Children.Add(new EllipseGeometry(new Point(50,50), 12.5, 25));
ellipses.Children.Add(new EllipseGeometry(new Point(75,50), 12.5, 25));

myGeometryDrawing.Geometry = ellipses;
myDrawingBrush.Drawing = myGeometryDrawing;

Button myButton = new Button();
myButton.Content = "A Button";

// Use the DrawingBrush to paint the button's background.
myButton.Background = myDrawingBrush;
' Create a DrawingBrush.
Dim myDrawingBrush As New DrawingBrush()

' Create a drawing.
Dim myGeometryDrawing As New GeometryDrawing()
myGeometryDrawing.Brush = Brushes.LightBlue
myGeometryDrawing.Pen = New Pen(Brushes.Gray, 1)
Dim ellipses As New GeometryGroup()
ellipses.Children.Add(New EllipseGeometry(New Point(25,50), 12.5, 25))
ellipses.Children.Add(New EllipseGeometry(New Point(50,50), 12.5, 25))
ellipses.Children.Add(New EllipseGeometry(New Point(75,50), 12.5, 25))

myGeometryDrawing.Geometry = ellipses
myDrawingBrush.Drawing = myGeometryDrawing

Dim myButton As New Button()
myButton.Content = "A Button"

' Use the DrawingBrush to paint the button's background.
myButton.Background = myDrawingBrush
Disegnare un'area con un oggetto visivo
Il più versatile e potente di tutti i pennelli, il VisualBrush dipinge un'area con un Visual. Un Visual è un tipo grafico di basso livello che funge da predecessore di molti componenti grafici utili. Ad esempio, le Windowclassi , FrameworkElemente Control sono tutti tipi di Visual oggetti. Usando un oggetto VisualBrush, è possibile dipingere aree con praticamente qualsiasi oggetto grafico di Windows Presentation Foundation (WPF).
Annotazioni
Anche se VisualBrush è un tipo di Freezable oggetto, non può essere bloccato (di sola lettura) quando la relativa Visual proprietà è impostata su un valore diverso da null.
Esistono due modi per specificare il Visual contenuto di un oggetto VisualBrush.
Creare un nuovo Visual oggetto e usarlo per impostare la Visual proprietà dell'oggetto VisualBrush. Per un esempio, vedere la sezione Esempio: Dipingere un oggetto con un visuale di seguito.
Usare un oggetto esistente Visualche crea un'immagine duplicata della destinazione Visual. È quindi possibile utilizzare il VisualBrush per creare effetti interessanti, ad esempio riflessione e ingrandimento. Per un esempio, vedere la sezione Esempio: Creare una riflessione .
Quando si definisce un nuovo Visual per un VisualBrush e quel Visual è un UIElement, ad esempio un pannello o un controllo, il sistema di layout viene eseguito sul UIElement e sui suoi elementi figlio quando la proprietà AutoLayoutContent è impostata su true. Tuttavia, la radice UIElement è essenzialmente isolata dal resto del sistema: gli stili e il layout esterno non possono permeare questo limite. Pertanto, è necessario specificare in modo esplicito le dimensioni della radice UIElement, perché l'unico elemento padre è VisualBrush e pertanto non può ridimensionare automaticamente l'area da disegnare. Per altre informazioni sul layout in Windows Presentation Foundation (WPF), vedere Layout.
Come ImageBrush e DrawingBrush, un VisualBrush estende il suo contenuto per riempire l'area di output. È possibile eseguire l'override di questo comportamento modificando la proprietà dall'impostazione Stretch predefinita di Fill. Per ulteriori informazioni, consultare la proprietà Stretch.
Esempio: disegnare un oggetto con un oggetto visivo
Nell'esempio seguente vengono usati diversi controlli e un pannello per disegnare un rettangolo.
<Rectangle Width="150" Height="150" Stroke="Black" Margin="5,0,5,0">
  <Rectangle.Fill>
    <VisualBrush>
      <VisualBrush.Visual>
        <StackPanel Background="White">
          <Rectangle Width="25" Height="25" Fill="Red" Margin="2" />
          <TextBlock FontSize="10pt" Margin="2">Hello, World!</TextBlock>
          <Button Margin="2">A Button</Button>
        </StackPanel>
      </VisualBrush.Visual>
    </VisualBrush>
  </Rectangle.Fill>
</Rectangle>
VisualBrush myVisualBrush = new VisualBrush();

// Create the visual brush's contents.
StackPanel myStackPanel = new StackPanel();
myStackPanel.Background = Brushes.White;

Rectangle redRectangle = new Rectangle();
redRectangle.Width = 25;
redRectangle.Height =25;
redRectangle.Fill = Brushes.Red;
redRectangle.Margin = new Thickness(2);
myStackPanel.Children.Add(redRectangle);

TextBlock someText = new TextBlock();
FontSizeConverter myFontSizeConverter = new FontSizeConverter();
someText.FontSize = (double)myFontSizeConverter.ConvertFrom("10pt");
someText.Text = "Hello, World!";
someText.Margin = new Thickness(2);
myStackPanel.Children.Add(someText);

Button aButton = new Button();
aButton.Content = "A Button";
aButton.Margin = new Thickness(2);
myStackPanel.Children.Add(aButton);

// Use myStackPanel as myVisualBrush's content.
myVisualBrush.Visual = myStackPanel;

// Create a rectangle to paint.
Rectangle myRectangle = new Rectangle();
myRectangle.Width = 150;
myRectangle.Height = 150;
myRectangle.Stroke = Brushes.Black;
myRectangle.Margin = new Thickness(5,0,5,0);

// Use myVisualBrush to paint myRectangle.
myRectangle.Fill = myVisualBrush;
Dim myVisualBrush As New VisualBrush()

' Create the visual brush's contents.
Dim myStackPanel As New StackPanel()
myStackPanel.Background = Brushes.White

Dim redRectangle As New Rectangle()
With redRectangle
    .Width = 25
    .Height = 25
    .Fill = Brushes.Red
    .Margin = New Thickness(2)
End With
myStackPanel.Children.Add(redRectangle)

Dim someText As New TextBlock()
Dim myFontSizeConverter As New FontSizeConverter()
someText.FontSize = CDbl(myFontSizeConverter.ConvertFrom("10pt"))
someText.Text = "Hello, World!"
someText.Margin = New Thickness(2)
myStackPanel.Children.Add(someText)

Dim aButton As New Button()
aButton.Content = "A Button"
aButton.Margin = New Thickness(2)
myStackPanel.Children.Add(aButton)

' Use myStackPanel as myVisualBrush's content.
myVisualBrush.Visual = myStackPanel

' Create a rectangle to paint.
Dim myRectangle As New Rectangle()
With myRectangle
    .Width = 150
    .Height = 150
    .Stroke = Brushes.Black
    .Margin = New Thickness(5, 0, 5, 0)
End With

' Use myVisualBrush to paint myRectangle.
myRectangle.Fill = myVisualBrush
Esempio: Crea una riflessione
Nell'esempio precedente è stato illustrato come creare un nuovo Visual oggetto da usare come sfondo. È anche possibile usare un VisualBrush oggetto per visualizzare un oggetto visivo esistente. Questa funzionalità consente di produrre effetti visivi interessanti, ad esempio riflessi e ingrandimento. Nell'esempio seguente viene utilizzata una VisualBrush per creare una riflessione di un Border che contiene diversi elementi. La figura seguente mostra l'output prodotto da questo esempio.

Oggetto Visual riflesso
using System;
using System.Windows;
using System.Windows.Data;
using System.Windows.Controls;
using System.Windows.Media;
using System.Windows.Media.Effects;
using System.Windows.Media.Imaging;
using System.IO;
using System.Collections.ObjectModel;
using System.Windows.Shapes;
namespace SDKSample
{
    public partial class ReflectionExample : Page
    {
        public ReflectionExample()
        {
            // Create a name scope for the page.
            NameScope.SetNameScope(this, new NameScope());

            this.Background = Brushes.Black;
            StackPanel myStackPanel = new StackPanel();
            myStackPanel.Margin = new Thickness(50);

            Border myReflectedBorder = new Border();
            this.RegisterName("ReflectedVisual", myReflectedBorder);

            // Create a gradient background for the border.
            GradientStop firstStop = new GradientStop();
            firstStop.Offset = 0.0;
            Color firstStopColor = new Color();
            firstStopColor.R = 204;
            firstStopColor.G = 204;
            firstStopColor.B = 255;
            firstStopColor.A = 255;
            firstStop.Color = firstStopColor;
            GradientStop secondStop = new GradientStop();
            secondStop.Offset = 1.0;
            secondStop.Color = Colors.White;

            GradientStopCollection myGradientStopCollection = new GradientStopCollection();
            myGradientStopCollection.Add(firstStop);
            myGradientStopCollection.Add(secondStop);

            LinearGradientBrush myLinearGradientBrush = new LinearGradientBrush();
            myLinearGradientBrush.StartPoint = new Point(0, 0.5);
            myLinearGradientBrush.EndPoint = new Point(1, 0.5);
            myLinearGradientBrush.GradientStops = myGradientStopCollection;

            myReflectedBorder.Background = myLinearGradientBrush;

            // Add contents to the border.
            StackPanel borderStackPanel = new StackPanel();
            borderStackPanel.Orientation = Orientation.Horizontal;
            borderStackPanel.Margin = new Thickness(10);

            TextBlock myTextBlock = new TextBlock();
            myTextBlock.TextWrapping = TextWrapping.Wrap;
            myTextBlock.Width = 200;
            myTextBlock.Text = "Lorem ipsum dolor sit amet, consectetuer adipiscing elit." +
                               " Suspendisse vel ante. Donec luctus tortor sit amet est." +
                               " Nullam pulvinar odio et wisi." +
                               " Pellentesque quis magna. Sed pellentesque." +
                               " Nulla euismod." +
                               "Pellentesque habitant morbi tristique senectus et netus et malesuada fames ac turpis egestas.";

            borderStackPanel.Children.Add(myTextBlock);

            StackPanel ellipseStackPanel = new StackPanel();

            Ellipse ellipse1 = new Ellipse();
            ellipse1.Margin = new Thickness(10);
            ellipse1.Height = 50;
            ellipse1.Width = 50;
            ellipse1.Fill = Brushes.Black;
            ellipseStackPanel.Children.Add(ellipse1);
            Ellipse ellipse2 = new Ellipse();
            ellipse2.Margin = new Thickness(10);
            ellipse2.Height = 50;
            ellipse2.Width = 50;
            ellipse2.Fill = Brushes.Black;
            ellipseStackPanel.Children.Add(ellipse2);
            Ellipse ellipse3 = new Ellipse();
            ellipse3.Margin = new Thickness(10);
            ellipse3.Height = 50;
            ellipse3.Width = 50;
            ellipse3.Fill = Brushes.Black;
            ellipseStackPanel.Children.Add(ellipse3);
            borderStackPanel.Children.Add(ellipseStackPanel);

            myReflectedBorder.Child = borderStackPanel;

            // Create divider rectangle
            Rectangle dividerRectangle = new Rectangle();
            dividerRectangle.Height = 1;
            dividerRectangle.Fill = Brushes.Gray;
            dividerRectangle.HorizontalAlignment = HorizontalAlignment.Stretch;

            // Create the object to contain the reflection.
            Rectangle reflectionRectangle = new Rectangle();

            // Bind the height of the rectangle to the border height.
            Binding heightBinding = new Binding();
            heightBinding.ElementName = "ReflectedVisual";
            heightBinding.Path = new PropertyPath(Rectangle.HeightProperty);
            BindingOperations.SetBinding(reflectionRectangle, Rectangle.HeightProperty, heightBinding);

            // Bind the width of the rectangle to the border width.
            Binding widthBinding = new Binding();
            widthBinding.ElementName = "ReflectedVisual";
            widthBinding.Path = new PropertyPath(Rectangle.WidthProperty);
            BindingOperations.SetBinding(reflectionRectangle, Rectangle.WidthProperty, widthBinding);

            // Creates the reflection.
            VisualBrush myVisualBrush = new VisualBrush();
            myVisualBrush.Opacity = 0.75;
            myVisualBrush.Stretch = Stretch.None;
            Binding reflectionBinding = new Binding();
            reflectionBinding.ElementName = "ReflectedVisual";
            BindingOperations.SetBinding(myVisualBrush, VisualBrush.VisualProperty, reflectionBinding);

            ScaleTransform myScaleTransform = new ScaleTransform();
            myScaleTransform.ScaleX = 1;
            myScaleTransform.ScaleY = -1;
            TranslateTransform myTranslateTransform = new TranslateTransform();
            myTranslateTransform.Y = 1;

            TransformGroup myTransformGroup = new TransformGroup();
            myTransformGroup.Children.Add(myScaleTransform);
            myTransformGroup.Children.Add(myTranslateTransform);

            myVisualBrush.RelativeTransform = myTransformGroup;

            reflectionRectangle.Fill = myVisualBrush;

            // Create a gradient background for the border.
            GradientStop firstStop2 = new GradientStop();
            firstStop2.Offset = 0.0;
            Color c1 = new Color();
            c1.R = 0;
            c1.G = 0;
            c1.B = 0;
            c1.A = 255;
            firstStop2.Color = c1;
            GradientStop secondStop2 = new GradientStop();
            secondStop2.Offset = 0.5;
            Color c2 = new Color();
            c2.R = 0;
            c2.G = 0;
            c2.B = 0;
            c2.A = 51;
            firstStop2.Color = c2;
            GradientStop thirdStop = new GradientStop();
            thirdStop.Offset = 0.75;
            Color c3 = new Color();
            c3.R = 0;
            c3.G = 0;
            c3.B = 0;
            c3.A = 0;
            thirdStop.Color = c3;

            GradientStopCollection myGradientStopCollection2 = new GradientStopCollection();
            myGradientStopCollection2.Add(firstStop2);
            myGradientStopCollection2.Add(secondStop2);
            myGradientStopCollection2.Add(thirdStop);

            LinearGradientBrush myLinearGradientBrush2 = new LinearGradientBrush();
            myLinearGradientBrush2.StartPoint = new Point(0.5, 0);
            myLinearGradientBrush2.EndPoint = new Point(0.5, 1);
            myLinearGradientBrush2.GradientStops = myGradientStopCollection2;

            reflectionRectangle.OpacityMask = myLinearGradientBrush2;

            BlurBitmapEffect myBlurBitmapEffect = new BlurBitmapEffect();
            myBlurBitmapEffect.Radius = 1.5;

            reflectionRectangle.BitmapEffect = myBlurBitmapEffect;

            myStackPanel.Children.Add(myReflectedBorder);
            myStackPanel.Children.Add(dividerRectangle);
            myStackPanel.Children.Add(reflectionRectangle);
            this.Content = myStackPanel;
        }
        /*
    <Rectangle
      Height="{Binding Path=ActualHeight, ElementName=ReflectedVisual}"
      Width="{Binding Path=ActualWidth, ElementName=ReflectedVisual}">

      <Rectangle.OpacityMask>
        <LinearGradientBrush StartPoint="0.5,0" EndPoint="0.5,1">
          <GradientStop Color="#FF000000" Offset="0.0" />
          <GradientStop Color="#33000000" Offset="0.5" />
          <GradientStop Color="#00000000" Offset="0.75" />
        </LinearGradientBrush>
      </Rectangle.OpacityMask>

      <Rectangle.BitmapEffect>
        <BlurBitmapEffect Radius="1.5" />
      </Rectangle.BitmapEffect>

    </Rectangle>
  </StackPanel>
</Page>

*/
    }
}
Imports System.Windows
Imports System.Windows.Data
Imports System.Windows.Controls
Imports System.Windows.Media
Imports System.Windows.Media.Effects
Imports System.Windows.Media.Imaging
Imports System.IO
Imports System.Collections.ObjectModel
Imports System.Windows.Shapes
Namespace SDKSample
    Partial Public Class ReflectionExample
        Inherits Page
        Public Sub New()
            ' Create a name scope for the page.
            NameScope.SetNameScope(Me, New NameScope())

            Me.Background = Brushes.Black
            Dim myStackPanel As New StackPanel()
            myStackPanel.Margin = New Thickness(50)

            Dim myReflectedBorder As New Border()
            Me.RegisterName("ReflectedVisual", myReflectedBorder)

            ' Create a gradient background for the border.
            Dim firstStop As New GradientStop()
            firstStop.Offset = 0.0
            Dim firstStopColor As New Color()
            firstStopColor.R = 204
            firstStopColor.G = 204
            firstStopColor.B = 255
            firstStopColor.A = 255
            firstStop.Color = firstStopColor
            Dim secondStop As New GradientStop()
            secondStop.Offset = 1.0
            secondStop.Color = Colors.White

            Dim myGradientStopCollection As New GradientStopCollection()
            myGradientStopCollection.Add(firstStop)
            myGradientStopCollection.Add(secondStop)

            Dim myLinearGradientBrush As New LinearGradientBrush()
            myLinearGradientBrush.StartPoint = New Point(0, 0.5)
            myLinearGradientBrush.EndPoint = New Point(1, 0.5)
            myLinearGradientBrush.GradientStops = myGradientStopCollection

            myReflectedBorder.Background = myLinearGradientBrush

            ' Add contents to the border.
            Dim borderStackPanel As New StackPanel()
            borderStackPanel.Orientation = Orientation.Horizontal
            borderStackPanel.Margin = New Thickness(10)

            Dim myTextBlock As New TextBlock()
            myTextBlock.TextWrapping = TextWrapping.Wrap
            myTextBlock.Width = 200
            myTextBlock.Text = "Lorem ipsum dolor sit amet, consectetuer adipiscing elit." & " Suspendisse vel ante. Donec luctus tortor sit amet est." & " Nullam pulvinar odio et wisi." & " Pellentesque quis magna. Sed pellentesque." & " Nulla euismod." & "Pellentesque habitant morbi tristique senectus et netus et malesuada fames ac turpis egestas."

            borderStackPanel.Children.Add(myTextBlock)

            Dim ellipseStackPanel As New StackPanel()

            Dim ellipse1 As New Ellipse()
            ellipse1.Margin = New Thickness(10)
            ellipse1.Height = 50
            ellipse1.Width = 50
            ellipse1.Fill = Brushes.Black
            ellipseStackPanel.Children.Add(ellipse1)
            Dim ellipse2 As New Ellipse()
            ellipse2.Margin = New Thickness(10)
            ellipse2.Height = 50
            ellipse2.Width = 50
            ellipse2.Fill = Brushes.Black
            ellipseStackPanel.Children.Add(ellipse2)
            Dim ellipse3 As New Ellipse()
            ellipse3.Margin = New Thickness(10)
            ellipse3.Height = 50
            ellipse3.Width = 50
            ellipse3.Fill = Brushes.Black
            ellipseStackPanel.Children.Add(ellipse3)
            borderStackPanel.Children.Add(ellipseStackPanel)

            myReflectedBorder.Child = borderStackPanel

            ' Create divider rectangle
            Dim dividerRectangle As New Rectangle()
            dividerRectangle.Height = 1
            dividerRectangle.Fill = Brushes.Gray
            dividerRectangle.HorizontalAlignment = HorizontalAlignment.Stretch

            ' Create the object to contain the reflection.
            Dim reflectionRectangle As New Rectangle()

            ' Bind the height of the rectangle to the border height.
            Dim heightBinding As New Binding()
            heightBinding.ElementName = "ReflectedVisual"
            heightBinding.Path = New PropertyPath(Rectangle.HeightProperty)
            BindingOperations.SetBinding(reflectionRectangle, Rectangle.HeightProperty, heightBinding)

            ' Bind the width of the rectangle to the border width.
            Dim widthBinding As New Binding()
            widthBinding.ElementName = "ReflectedVisual"
            widthBinding.Path = New PropertyPath(Rectangle.WidthProperty)
            BindingOperations.SetBinding(reflectionRectangle, Rectangle.WidthProperty, widthBinding)

            ' Creates the reflection.
            Dim myVisualBrush As New VisualBrush()
            myVisualBrush.Opacity = 0.75
            myVisualBrush.Stretch = Stretch.None
            Dim reflectionBinding As New Binding()
            reflectionBinding.ElementName = "ReflectedVisual"
            BindingOperations.SetBinding(myVisualBrush, VisualBrush.VisualProperty, reflectionBinding)

            Dim myScaleTransform As New ScaleTransform()
            myScaleTransform.ScaleX = 1
            myScaleTransform.ScaleY = -1
            Dim myTranslateTransform As New TranslateTransform()
            myTranslateTransform.Y = 1

            Dim myTransformGroup As New TransformGroup()
            myTransformGroup.Children.Add(myScaleTransform)
            myTransformGroup.Children.Add(myTranslateTransform)

            myVisualBrush.RelativeTransform = myTransformGroup

            reflectionRectangle.Fill = myVisualBrush

            ' Create a gradient background for the border.
            Dim firstStop2 As New GradientStop()
            firstStop2.Offset = 0.0
            Dim c1 As New Color()
            c1.R = 0
            c1.G = 0
            c1.B = 0
            c1.A = 255
            firstStop2.Color = c1
            Dim secondStop2 As New GradientStop()
            secondStop2.Offset = 0.5
            Dim c2 As New Color()
            c2.R = 0
            c2.G = 0
            c2.B = 0
            c2.A = 51
            firstStop2.Color = c2
            Dim thirdStop As New GradientStop()
            thirdStop.Offset = 0.75
            Dim c3 As New Color()
            c3.R = 0
            c3.G = 0
            c3.B = 0
            c3.A = 0
            thirdStop.Color = c3

            Dim myGradientStopCollection2 As New GradientStopCollection()
            myGradientStopCollection2.Add(firstStop2)
            myGradientStopCollection2.Add(secondStop2)
            myGradientStopCollection2.Add(thirdStop)

            Dim myLinearGradientBrush2 As New LinearGradientBrush()
            myLinearGradientBrush2.StartPoint = New Point(0.5, 0)
            myLinearGradientBrush2.EndPoint = New Point(0.5, 1)
            myLinearGradientBrush2.GradientStops = myGradientStopCollection2

            reflectionRectangle.OpacityMask = myLinearGradientBrush2

            Dim myBlurBitmapEffect As New BlurBitmapEffect()
            myBlurBitmapEffect.Radius = 1.5

            reflectionRectangle.BitmapEffect = myBlurBitmapEffect

            myStackPanel.Children.Add(myReflectedBorder)
            myStackPanel.Children.Add(dividerRectangle)
            myStackPanel.Children.Add(reflectionRectangle)
            Me.Content = myStackPanel

        End Sub
    End Class
End Namespace
<Page
  xmlns="http://schemas.microsoft.com/winfx/2006/xaml/presentation"
  xmlns:x="http://schemas.microsoft.com/winfx/2006/xaml"
  Background="Black">


  <StackPanel Margin="50">

    <!-- The object to reflect. -->
    <Border Name="ReflectedVisual" Width="400">
      <Border.Background>
        <LinearGradientBrush StartPoint="0,0.5" EndPoint="1,0.5">
          <GradientStop Offset="0.0" Color="#CCCCFF" />
          <GradientStop Offset="1.0" Color="White" />
        </LinearGradientBrush>
      </Border.Background>
      <StackPanel Orientation="Horizontal" Margin="10">
        <TextBlock TextWrapping="Wrap" Width="200" Margin="10">
          Lorem ipsum dolor sit amet, consectetuer adipiscing elit.
          Suspendisse vel ante. Donec luctus tortor sit amet est.
          Nullam pulvinar odio et wisi.
          Pellentesque quis magna. Sed pellentesque.
          Nulla euismod.
          Pellentesque habitant morbi tristique senectus et netus et malesuada fames ac turpis egestas.
        </TextBlock>
        <StackPanel>
          <Ellipse Margin="10" Height="50" Width="50" Fill="Black" />
          <Ellipse Margin="10" Height="50" Width="50" Fill="Black" />
          <Ellipse Margin="10" Height="50" Width="50" Fill="Black" />
        </StackPanel>
      </StackPanel>
    </Border>

    <Rectangle Height="1" Fill="Gray" HorizontalAlignment="Stretch" />

    <!-- The object to contain the reflection.-->
    <Rectangle
      Height="{Binding Path=ActualHeight, ElementName=ReflectedVisual}"
      Width="{Binding Path=ActualWidth, ElementName=ReflectedVisual}">
      <Rectangle.Fill>

        <!-- Creates the reflection. -->
        <VisualBrush
          Opacity="0.75" Stretch="None"
          Visual="{Binding ElementName=ReflectedVisual}">
          <VisualBrush.RelativeTransform>

            <!-- Flip the reflection. -->
            <TransformGroup>
              <ScaleTransform ScaleX="1" ScaleY="-1" />
              <TranslateTransform  Y="1" />
            </TransformGroup>
          </VisualBrush.RelativeTransform>
        </VisualBrush>
      </Rectangle.Fill>

      <Rectangle.OpacityMask>
        <LinearGradientBrush StartPoint="0.5,0" EndPoint="0.5,1">
          <GradientStop Color="#FF000000" Offset="0.0" />
          <GradientStop Color="#33000000" Offset="0.5" />
          <GradientStop Color="#00000000" Offset="0.75" />
        </LinearGradientBrush>
      </Rectangle.OpacityMask>

      <Rectangle.BitmapEffect>
        <BlurBitmapEffect Radius="1.5" />
      </Rectangle.BitmapEffect>

    </Rectangle>
  </StackPanel>
</Page>
Per altri esempi che illustrano come ingrandire parti dello schermo e come creare reflection, vedere l'esempio di VisualBrush.
Funzionalità di TileBrush
ImageBrush, DrawingBrushe VisualBrush sono tipi di TileBrush oggetti . TileBrush gli oggetti offrono un notevole controllo sul modo in cui un'area viene dipinta con un'immagine, un disegno o un oggetto visivo. Ad esempio, invece di disegnare solo un'area con una singola immagine estesa, è possibile disegnare un'area con una serie di riquadri immagine che creano un motivo.
A TileBrush ha tre componenti principali: contenuto, riquadri e area di output.

Componenti di un TileBrush con un singolo riquadro
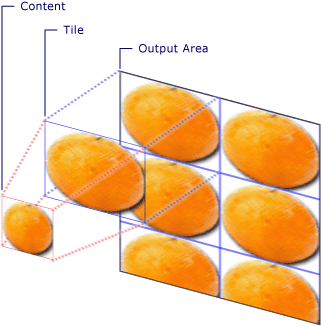
Componenti di un TileBrush con più riquadri
Per altre informazioni sulle funzionalità di affiancamento degli TileBrush oggetti, vedere La panoramica di TileBrush.
Vedere anche
Collabora con noi su GitHub
L'origine di questo contenuto è disponibile in GitHub, in cui è anche possibile creare ed esaminare i problemi e le richieste pull. Per ulteriori informazioni, vedere la guida per i collaboratori.
.NET Desktop feedback