Nota
L'accesso a questa pagina richiede l'autorizzazione. È possibile provare ad accedere o modificare le directory.
L'accesso a questa pagina richiede l'autorizzazione. È possibile provare a modificare le directory.
Note
Community interest groups have now moved from Yammer to Microsoft Viva Engage. To join a Viva Engage community and take part in the latest discussions, fill out the Request access to Finance and Operations Viva Engage Community form and choose the community you want to join.
A composite entity is a concept that lets you build a single entity by using multiple entities that are related to each other.
What is a composite entity?
A composite entity is a concept that allows you to build a single entity by using multiple entities that are related to each other. The concept is heavily used in scenarios where an entity can be represented as a single document, like Sales header/line, Invoice header/line, and Vendor Catalog. This concept is applicable in asynchronous integration scenarios rather than synchronous OData scenarios, and it's only supported from a data management platform. No programmatic interface for composite entities exists in X++. It's only supported for a data management platform that's part of XML file-based imports/exports.
Example
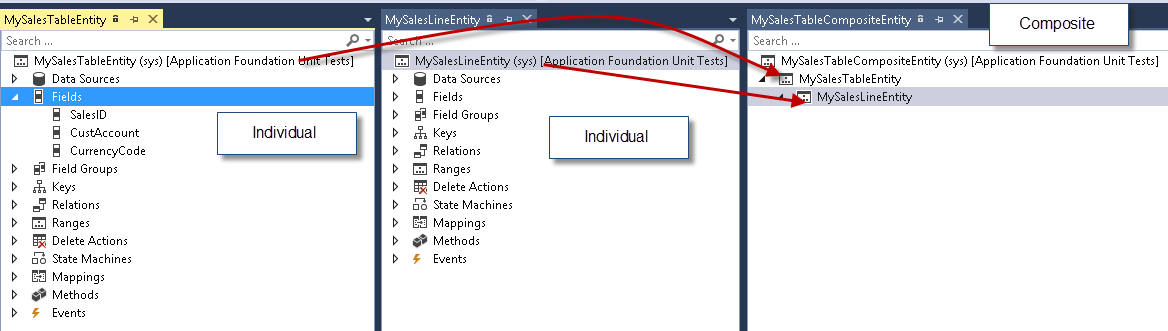
Sales Header and Sales Line are two different entities in the system. If the customer requirement suggests that header and lines are part of a single document, then these two entities can be merged as a composite entity. Sample sales order entity: The composite entity (MySalesTableCompositeEntity) represents a sales order document, which is composed of Sales Order header entity (MySalesTableEntity) and Sales Order Line entity (MySalesTableLineEntity).
Based on the linked entities, these entities can be exposed as an XML document with embedded element tags for entities. XML is the only way to expose a composite entity in data management.
<?xml version="1.0" encoding="utf-8"?>
<Document>

<MySalesTableEntity SalesID="SO1" CurrencyCode="USD" CustAccount="Acc001">
<MySalesLineEntity SalesPrice="2.00" QtyOrdered="10.00" LineAmount="20.00" ItemId="1000" LineNum="1.00" SalesID="SO1"/>
<MySalesLineEntity SalesPrice="2.00" QtyOrdered="10.00" LineAmount="20.00" ItemId="4401" LineNum="2.00" SalesID="SO1"/>
</MySalesTableEntity>

<MySalesTableEntity SalesID="SO2" CurrencyCode="USD" CustAccount="Acc002">
<MySalesLineEntity SalesPrice="2.00" QtyOrdered="10.00" LineAmount="20.00" ItemId="4402" LineNum="1.00" SalesID="SO2"/>
</MySalesTableEntity>

</Document>
Each node in the XML represents attributes from an individual entity. For example - <MySalesTableEntity SalesID="SO1" CurrencyCode="USD" CustAccount="Acc001"> SalesId, CurrencyCode, and CustAccount are attributes from MySalesTableEntity.
Building the composite entity
There's a node for composite data entities under Data model. Let's take the example of MySalesTableEntity.
Step 1: Identify and create the individual entities for the composite entity
Ensure that the entities are related to each other. In this example, the individual entities are MySalesTableEntity and MySalesLineEntity.
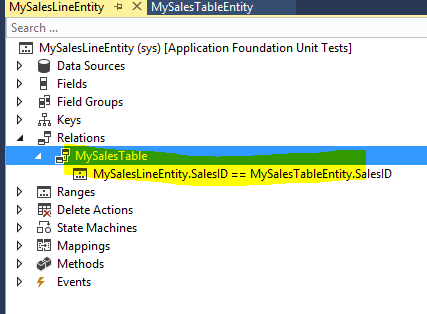
Step 2: Add relations between individual entities
Add a relation to parent entity in the relations node. Example – MySalesLineEntity has relationship to MySalesTableEntity.
Step 3: Create a new composite entity
Add a new Dynamics 365 artifact item of type Composite entity to the project.
In designer mode, select the entity and choose New Root Data Entity Reference.
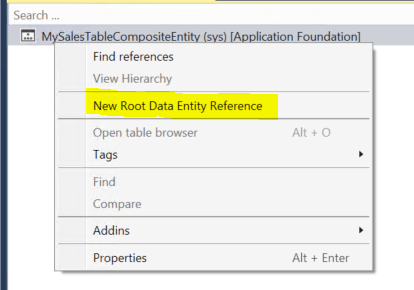
Set the data entity to parent data entity. In this case, it's MySalesTableEntity.
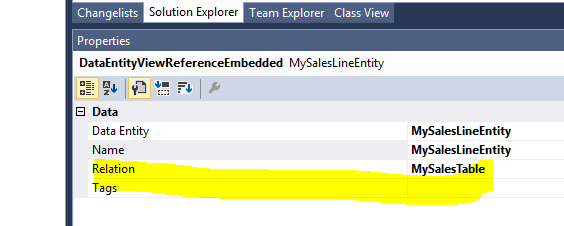
Select the parent entity node and choose New Embedded Data Entity Reference.
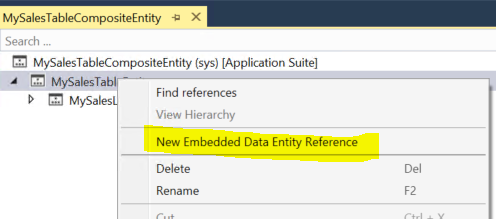
Set the embedded data entity as the child entity. In this case, it's MySalesLineEntity.
Set the Relation property from the dropdown list on the embedded data entity properties.
Composite entity supports multilevel child entities.
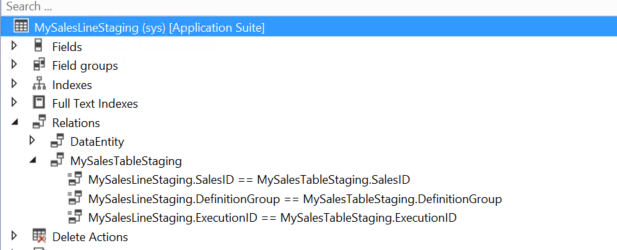
Step 4: Create relationships between staging tables
Create relationships between the parent and child entity staging tables based on the natural keys. For example, staging tables for MySalesTable and MySalesLine are linked by SalesID, DefinitionGroup, and ExecutionId.
Add a foreign key relation on the MySalesLineStaging table.
Add two columns, RowId and ParentRowId (type int), on all the staging tables associated with the composite data entity. Refer to the SysCompositeHeaderStaging table for the column properties.
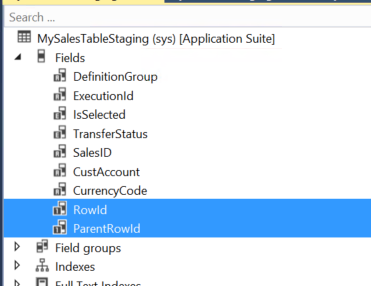
These columns are used to define runtime relationships during the target data movement.
- Create a cluster index on the staging tables, which includes RowId, ParentRowId, DefinitionGroup, and ExecutionId. This is for performance reasons.
- Compile and synchronize the artifacts.
Step 5: Set up the metadata for DMFEntity
For local testing, the composite entity metadata needs to be refreshed.
Go to DIXF Parameters > Entity settings. Select Refresh entity list.

Alternatively, you can write the following job to refresh the composite entity list metadata.
DMFDataPopulation::refreshCompositeEntityList();Execute the job. This refreshes the metadata required for the entity lookup.
Note
Currently, this is a workaround. In the future, a feature is enabled to refresh the list at compile/sync time.
Step 6: Test the entity locally
Import and export the data as a normal entity from the DIXF standard process. Refer to the following steps for importing and exporting entity.
Note
The source types of XML-Attribute or XML-Element are supported for composite entities. In entity execution parameters, composite entities can't be imported in parallel using parallel processing settings.
Import a composite entity
- Select Import.
- Enter Name, Source data format, and Entity name.
- The Source data format is either xml-attribute or xml-element.
- Select Import now.
- The number of records created/updated/pending is shown.
Export a composite entity
- Select Export.
- Enter Name, Source data format, and Entity name.
- Select Add entity and Export now.
- Select Download package.
General troubleshooting guidelines
Issue: The exported composite XML file isn't imported. The scenario that produces this:
- Export a file for composite entity.
- Import the same file.
- Mapping fails and the file isn't imported.
Root cause:
- Check if the exported file has lines or related child entity information.
- If no lines or related child entity information, then the lines aren't mapped during import.
Resolution:
- Create a sample file with all child entities.
- Use this file for initial mapping only.
- When the mapping is successful, import the actual file, which doesn't have the line data into the entity. Use reimport or upload a new file.
- This imports files with partial data (blank child records), depending on the validity of the records.