Nota
L'accesso a questa pagina richiede l'autorizzazione. È possibile provare ad accedere o modificare le directory.
L'accesso a questa pagina richiede l'autorizzazione. È possibile provare a modificare le directory.
Questo avvio rapido ti guida nella creazione di un agente con motore personalizzato che risponde con il messaggio che gli invii.
Prerequisiti
Python 3.9 o versioni successive.
- Per installare Python, passare a https://www.python.org/downloads/ e seguire le istruzioni per il sistema operativo in uso.
- Per verificare la versione, in una finestra del terminale digitare
python --version.
Un editor di codice a scelta. Queste istruzioni usano Visual Studio Code.
Se usi Visual Studio Code, installa l'estensione Python
Inizializzare il progetto e installare l'SDK
Crea un progetto Python e installa le dipendenze richieste.
Aprire un terminale e creare una nuova cartella
mkdir echo
cd echo
Apri la cartella utilizzando Visual Studio Code con questo comando:
code .Crea un ambiente virtuale con il metodo che preferisci e attivalo tramite Visual Studio Code o tramite un terminale.
Quando usi Visual Studio Code, è possibile seguire questi passaggi con l'estensione Python installata.
Premi F1, digita
Python: Create environment, quindi premi INVIO.Seleziona Venv per creare un ambiente virtuale
.venvnell'area di lavoro corrente.Seleziona un'installazione Python per creare l'ambiente virtuale.
Il valore potrebbe presentarsi come segue:
Python 1.13.6 ~\AppData\Local\Programs\Python\Python313\python.exe
Installare l'DSK per agenti
Usa pip per installare il pacchetto microsoft-agents-hosting-aiohttp con questo comando:
pip install microsoft-agents-hosting-aiohttp
Creare l'applicazione server e importare le librerie richieste
Crea un file denominato
start_server.py, copia in codice seguente e incollalo in:# start_server.py from os import environ from microsoft_agents.hosting.core import AgentApplication, AgentAuthConfiguration from microsoft_agents.hosting.aiohttp import ( start_agent_process, jwt_authorization_middleware, CloudAdapter, ) from aiohttp.web import Request, Response, Application, run_app def start_server( agent_application: AgentApplication, auth_configuration: AgentAuthConfiguration ): async def entry_point(req: Request) -> Response: agent: AgentApplication = req.app["agent_app"] adapter: CloudAdapter = req.app["adapter"] return await start_agent_process( req, agent, adapter, ) APP = Application(middlewares=[jwt_authorization_middleware]) APP.router.add_post("/api/messages", entry_point) APP.router.add_get("/api/messages", lambda _: Response(status=200)) APP["agent_configuration"] = auth_configuration APP["agent_app"] = agent_application APP["adapter"] = agent_application.adapter try: run_app(APP, host="localhost", port=environ.get("PORT", 3978)) except Exception as error: raise errorQuesto codice definisce una funzione
start_serverche useremo nel file successivo.Nella stessa directory, crea un file denominato
app.pycon il codice seguente.# app.py from microsoft_agents.hosting.core import ( AgentApplication, TurnState, TurnContext, MemoryStorage, ) from microsoft_agents.hosting.aiohttp import CloudAdapter from start_server import start_server
Creare un'istanza dell'agente come AgentApplication
In app.py, aggiungi il codice seguente per creare AGENT_APP come istanza di AgentApplication, quindi implementa tre route per rispondere a tre eventi:
- Aggiornamento conversazione
- il messaggio
/help - qualsiasi altra attività
AGENT_APP = AgentApplication[TurnState](
    storage=MemoryStorage(), adapter=CloudAdapter()
)

async def _help(context: TurnContext, _: TurnState):
    await context.send_activity(
        "Welcome to the Echo Agent sample 🚀. "
        "Type /help for help or send a message to see the echo feature in action."
    )

AGENT_APP.conversation_update("membersAdded")(_help)

AGENT_APP.message("/help")(_help)


@AGENT_APP.activity("message")
async def on_message(context: TurnContext, _):
    await context.send_activity(f"you said: {context.activity.text}")
Avviare il server Web per ascoltare su localhost:3978
Alla fine di app.py, avvia il server Web usando start_server.
if __name__ == "__main__":
    try:
        start_server(AGENT_APP, None)
    except Exception as error:
        raise error
Eseguire l'agente in locale in modalità anonima
Dal terminale, esegui questo comando:
python app.py
Il terminale dovrebbe restituire quanto segue:
======== Running on http://localhost:3978 ========
(Press CTRL+C to quit)
Testare l'agente localmente
Da un altro terminale (per mantenere l'agente in esecuzione) installa Microsoft 365 Agents Playground con questo comando:
npm install -g @microsoft/teams-app-test-toolNota
Questo comando usa npm perché Microsoft 365 Agents Playground non è disponibile tramite pip.
Il terminale dovrebbe fornire un risultato simile:
added 1 package, and audited 130 packages in 1s

19 packages are looking for funding
run `npm fund` for details

found 0 vulnerabilities
Esegui lo strumento di test per interagire con il tuo agente usando questo comando:
teamsapptesterIl terminale dovrebbe fornire un risultato simile:
Telemetry: agents-playground-cli/serverStart {"cleanProperties":{"options":"{\"configFileOptions\":{\"path\":\"<REDACTED: user-file-path>\"},\"appConfig\":{},\"port\":56150,\"disableTelemetry\":false}"}}

Telemetry: agents-playground-cli/cliStart {"cleanProperties":{"isExec":"false","argv":"<REDACTED: user-file-path>,<REDACTED: user-file-path>"}}

Listening on 56150
Microsoft 365 Agents Playground is being launched for you to debug the app: http://localhost:56150
started web socket client
started web socket client
Waiting for connection of endpoint: http://127.0.0.1:3978/api/messages
waiting for 1 resources: http://127.0.0.1:3978/api/messages
wait-on(37568) complete
Telemetry: agents-playground-server/getConfig {"cleanProperties":{"internalConfig":"{\"locale\":\"en-US\",\"localTimezone\":\"America/Los_Angeles\",\"channelId\":\"msteams\"}"}}

Telemetry: agents-playground-server/sendActivity {"cleanProperties":{"activityType":"installationUpdate","conversationId":"5305bb42-59c9-4a4c-a2b6-e7a8f4162ede","headers":"{\"x-ms-agents-playground\":\"true\"}"}}

Telemetry: agents-playground-server/sendActivity {"cleanProperties":{"activityType":"conversationUpdate","conversationId":"5305bb42-59c9-4a4c-a2b6-e7a8f4162ede","headers":"{\"x-ms-agents-playground\":\"true\"}"}}
Il comando teamsapptester apre il browser predefinito e connette al tuo agente.
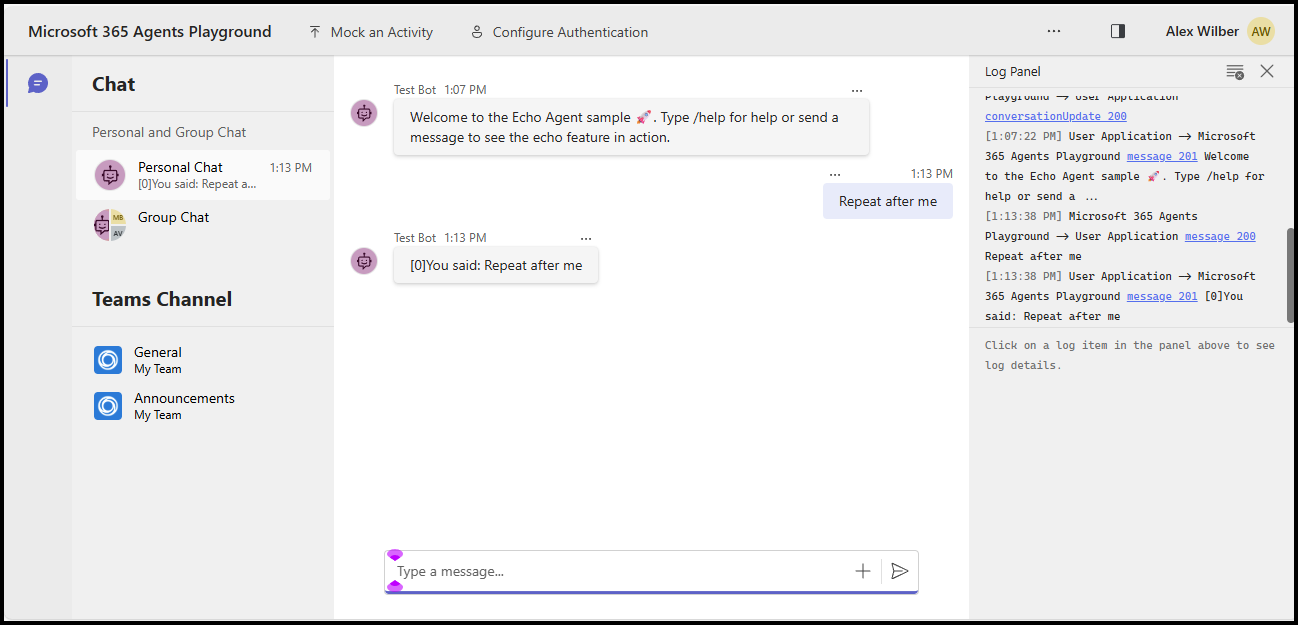
Ora puoi inviare qualsiasi messaggio per vedere la risposta echo, oppure inviare il messaggio /help per vedere in che modo quel messaggio viene instradato al gestore _help.
Questo avvio rapido ti guida nella creazione di un agente con motore personalizzato che risponde con il messaggio che gli invii.
Prerequisiti
Node.js v22 o più recente
- Per installare Node.js passare a nodejs.org e seguire le istruzioni per il sistema operativo.
- Per verificare la versione, in una finestra del terminale digitare
node --version.
Un editor di codice a scelta. Queste istruzioni usano Visual Studio Code.
Inizializzare il progetto e installare l'SDK
Usa npm per inizializzare un progetto Node.js creando un file package.json e installando le dipendenze richieste
Aprire un terminale e creare una nuova cartella
mkdir echo
cd echo
Inizializzare il progetto Node.js
npm init -yInstallare l'DSK per agenti
npm install @microsoft/agents-hosting-expressApri la cartella con Visual Studio Code usando il seguente comando:
code .
Importare le raccolte necessarie
Crea il file index.mjs e importa i seguenti pacchetti NPM nel codice della tua applicazione:
// index.mjs
import { startServer } from '@microsoft/agents-hosting-express'
import { AgentApplication, MemoryStorage } from '@microsoft/agents-hosting'
Implementare EchoAgent come AgentApplication
In index.mjs, aggiungi il codice seguente per creare EchoAgent che estende AgentApplication, quindi implementa tre route per rispondere a tre eventi:
- Aggiornamento conversazione
- il messaggio
/help - qualsiasi altra attività
class EchoAgent extends AgentApplication {
  constructor (storage) {
    super({ storage })

    this.onConversationUpdate('membersAdded', this._help)
    this.onMessage('/help', this._help)
    this.onActivity('message', this._echo)
  }

  _help = async context =>
    await context.sendActivity(`Welcome to the Echo Agent sample 🚀.
      Type /help for help or send a message to see the echo feature in action.`)

  _echo = async (context, state) => {
    let counter= state.getValue('conversation.counter') || 0
    await context.sendActivity(`[${counter++}]You said: ${context.activity.text}`)
    state.setValue('conversation.counter', counter)
  }
}
Avviare il server Web per ascoltare su localhost:3978
Alla fine di index.mjs avvia il server Web usando startServer basato su express e MemoryStorage come spazio di archiviazione dello stato del turno.
startServer(new EchoAgent(new MemoryStorage()))
Eseguire l'agente in locale in modalità anonima
Dal terminale, esegui questo comando:
node index.mjs
Il terminale dovrebbe restituire questo:
Server listening to port 3978 on sdk 0.6.18 for appId undefined debug undefined
Testare l'agente localmente
Da un altro terminale (per mantenere l'agente in esecuzione) installa Microsoft 365 Agents Playground con questo comando:
npm install -D @microsoft/teams-app-test-toolIl terminale dovrebbe fornire un risultato simile:
added 1 package, and audited 130 packages in 1s

19 packages are looking for funding
run `npm fund` for details

found 0 vulnerabilities
Esegui lo strumento di test per interagire con il tuo agente usando questo comando:
node_modules/.bin/teamsapptesterIl terminale dovrebbe fornire un risultato simile:
Telemetry: agents-playground-cli/serverStart {"cleanProperties":{"options":"{\"configFileOptions\":{\"path\":\"<REDACTED: user-file-path>\"},\"appConfig\":{},\"port\":56150,\"disableTelemetry\":false}"}}

Telemetry: agents-playground-cli/cliStart {"cleanProperties":{"isExec":"false","argv":"<REDACTED: user-file-path>,<REDACTED: user-file-path>"}}

Listening on 56150
Microsoft 365 Agents Playground is being launched for you to debug the app: http://localhost:56150
started web socket client
started web socket client
Waiting for connection of endpoint: http://127.0.0.1:3978/api/messages
waiting for 1 resources: http://127.0.0.1:3978/api/messages
wait-on(37568) complete
Telemetry: agents-playground-server/getConfig {"cleanProperties":{"internalConfig":"{\"locale\":\"en-US\",\"localTimezone\":\"America/Los_Angeles\",\"channelId\":\"msteams\"}"}}

Telemetry: agents-playground-server/sendActivity {"cleanProperties":{"activityType":"installationUpdate","conversationId":"5305bb42-59c9-4a4c-a2b6-e7a8f4162ede","headers":"{\"x-ms-agents-playground\":\"true\"}"}}

Telemetry: agents-playground-server/sendActivity {"cleanProperties":{"activityType":"conversationUpdate","conversationId":"5305bb42-59c9-4a4c-a2b6-e7a8f4162ede","headers":"{\"x-ms-agents-playground\":\"true\"}"}}
Il comando teamsapptester apre il browser predefinito e connette al tuo agente.
Ora puoi inviare qualsiasi messaggio per vedere la risposta echo, oppure inviare il messaggio /help per vedere in che modo quel messaggio viene instradato al gestore _help.
Questo avvio rapido ti guida nella creazione di un agente con motore personalizzato che risponde con il messaggio che gli invii.
Prerequisiti
.NET 8.0 SDK o versioni successive
- Per installare .NET SDK, vai a dotnet.microsoft.com e segui le istruzioni relative al tuo sistema operativo.
- Per verificare la versione, in una finestra del terminale digitare
dotnet --version.
Un editor di codice a scelta. Queste istruzioni usano Visual Studio Code.
Inizializzare il progetto e installare l'SDK
Usa dotnet per creare un nuovo progetto Web e installare le dipendenze necessarie.
Aprire un terminale e creare una nuova cartella
mkdir echo
cd echo
Inizializzare il progetto .NET
dotnet new webInstallare l'DSK per agenti
dotnet add package Microsoft.Agents.Hosting.AspNetCoreApri la cartella utilizzando Visual Studio Code con questo comando:
code .
Importare le raccolte necessarie
In Program.cs, sostituisci il contenuto esistente e aggiungi le istruzioni using seguenti per importare i pacchetti SDK nel codice dell'applicazione:
// Program.cs
using Microsoft.Agents.Builder;
using Microsoft.Agents.Builder.App;
using Microsoft.Agents.Builder.State;
using Microsoft.Agents.Core.Models;
using Microsoft.Agents.Hosting.AspNetCore;
using Microsoft.Agents.Storage;
using Microsoft.AspNetCore.Builder;
Implementare EchoAgent come AgentApplication
In Program.cs, dopo le istruzioni using, aggiungi il codice seguente per creare l'estensione EchoAgentAgentApplication e implementare itinerari per rispondere agli eventi:
- Aggiornamento conversazione
- Qualsiasi altra attività
public class EchoAgent : AgentApplication
{
   public EchoAgent(AgentApplicationOptions options) : base(options)
   {
      OnConversationUpdate(ConversationUpdateEvents.MembersAdded, WelcomeMessageAsync);
      OnActivity(ActivityTypes.Message, OnMessageAsync, rank: RouteRank.Last);
   }

   private async Task WelcomeMessageAsync(ITurnContext turnContext, ITurnState turnState, CancellationToken cancellationToken)
   {
        foreach (ChannelAccount member in turnContext.Activity.MembersAdded)
        {
            if (member.Id != turnContext.Activity.Recipient.Id)
            {
                await turnContext.SendActivityAsync(MessageFactory.Text("Hello and Welcome!"), cancellationToken);
            }
        }
    }

   private async Task OnMessageAsync(ITurnContext turnContext, ITurnState turnState, CancellationToken cancellationToken)
   {
      await turnContext.SendActivityAsync($"You said: {turnContext.Activity.Text}", cancellationToken: cancellationToken);
   }
}
Configurare il server Web e registrare l'applicazione agente
In Program.cs, dopo le istruzioni using, aggiungi il seguente codice per configurare l'host Web, registrare l'agente e mappare l'endpoint /api/messages:
var builder = WebApplication.CreateBuilder(args);

builder.Services.AddHttpClient();
builder.AddAgentApplicationOptions();
builder.AddAgent<EchoAgent>();
builder.Services.AddSingleton<IStorage, MemoryStorage>();

var app = builder.Build();

app.MapPost("/api/messages", async (HttpRequest request, HttpResponse response, IAgentHttpAdapter adapter, IAgent agent, CancellationToken cancellationToken) =>
{
    await adapter.ProcessAsync(request, response, agent, cancellationToken);
});

app.Run();
Configurare il server Web per ascoltare su localhost:3978
In launchSettings.json aggiorna applicationURL a http://localhost:3978 in modo che l'app sia in ascolto sulla porta appropriata.
Eseguire l'agente in locale in modalità anonima
Dal terminale, esegui questo comando:
dotnet run
Il terminale dovrebbe fornire un risultato simile:
info: Microsoft.Hosting.Lifetime[14]
      Now listening on: http://localhost:3978
Testare l'agente localmente
Da un altro terminale (per mantenere l'agente in esecuzione) installa Microsoft 365 Agents Playground con il comando seguente:
npm install -g @microsoft/teams-app-test-toolNota
Questo comando utilizza npm perché Microsoft 365 Agents Playground viene distribuito come pacchetto npm.
Il terminale dovrebbe fornire un risultato simile:
added 1 package, and audited 130 packages in 1s

19 packages are looking for funding
run `npm fund` for details

found 0 vulnerabilities
Esegui lo strumento di test per interagire con il tuo agente usando questo comando:
teamsapptesterIl terminale dovrebbe fornire un risultato simile:
Telemetry: agents-playground-cli/serverStart {"cleanProperties":{"options":"{\"configFileOptions\":{\"path\":\"<REDACTED: user-file-path>\"},\"appConfig\":{},\"port\":56150,\"disableTelemetry\":false}"}}

Telemetry: agents-playground-cli/cliStart {"cleanProperties":{"isExec":"false","argv":"<REDACTED: user-file-path>,<REDACTED: user-file-path>"}}

Listening on 56150
Microsoft 365 Agents Playground is being launched for you to debug the app: http://localhost:56150
started web socket client
started web socket client
Waiting for connection of endpoint: http://127.0.0.1:3978/api/messages
waiting for 1 resources: http://127.0.0.1:3978/api/messages
wait-on(37568) complete
Telemetry: agents-playground-server/getConfig {"cleanProperties":{"internalConfig":"{\"locale\":\"en-US\",\"localTimezone\":\"America/Los_Angeles\",\"channelId\":\"msteams\"}"}}

Telemetry: agents-playground-server/sendActivity {"cleanProperties":{"activityType":"installationUpdate","conversationId":"5305bb42-59c9-4a4c-a2b6-e7a8f4162ede","headers":"{\"x-ms-agents-playground\":\"true\"}"}}

Telemetry: agents-playground-server/sendActivity {"cleanProperties":{"activityType":"conversationUpdate","conversationId":"5305bb42-59c9-4a4c-a2b6-e7a8f4162ede","headers":"{\"x-ms-agents-playground\":\"true\"}"}}
Il comando teamsapptester apre il browser predefinito e connette al tuo agente.
Nel campo di testo, inserisci e invia qualsiasi messaggio per visualizzare la risposta echo.
Passaggi successivi
- Consultare gli esempi dell'SDK per agenti su GitHub
- Altre informazioni sulle attività e sul loro utilizzo
- Esaminare gli eventi AgentApplication a cui si può rispondere dal client
- Esaminare gli eventi TurnContext che si possono restituire al client
- Effettuare il provisioning delle risorse di Azure Bot da usare con l'SDK per agenti
- Configurare l'agente .NET per usare OAuth
Agents Playground è disponibile per impostazione predefinita se già usi il Toolkit agenti di Microsoft 365. Puoi consultare una delle seguenti guide se vuoi iniziare a usare il toolkit: