Extend tab app with Microsoft Graph permissions and scopes
You can extend your tab app by using Microsoft Graph to allow additional user permissions, such as to view app user profile, read mail, and more. Your app must ask for specific permission scopes to obtain the access tokens upon app user consent.
Graph scopes, such as User.Read or Mail.Read, indicate what your app can access from a Teams user account. You need to specify your scopes in the authorization request. This article walks you through the steps to configure Microsoft Graph permissions and scopes for your Teams tab app.
Configure API permissions in Microsoft Entra ID
You can configure additional Graph scopes in Microsoft Entra ID for your app. These are delegated permissions, which are used by apps that require signed-in access. A signed-in app user or administrator must initially consent to them. Thereafter, your tab app can consent on behalf of the signed-in user when it calls Microsoft Graph.
We recommend using delegated permissions for the signed-in user. If your application doesn't need a signed-in user, consider using application permissions, also known as the app-only access scenario. Only administrators can grant consent for application permissions. For more information, see application permissions.
To configure API permissions
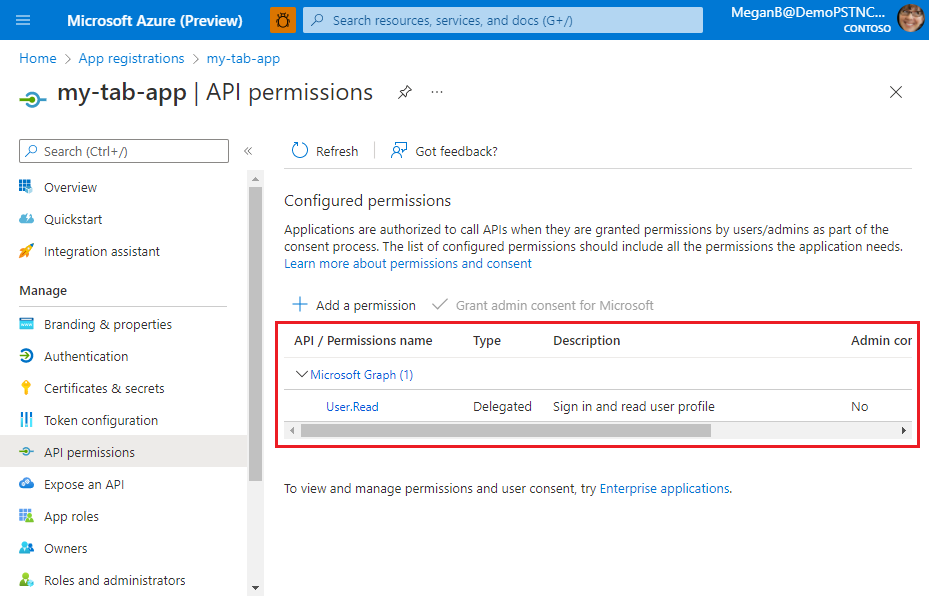
Open the app you registered in the Azure portal.
Select Manage > API permissions from the left pane.
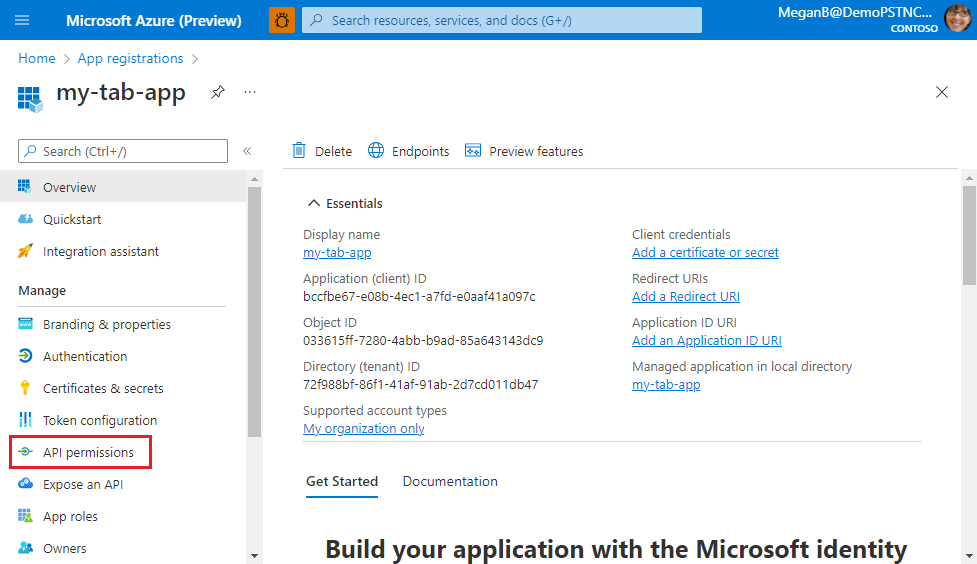
The API permissions page appears.
Select + Add a permission to add Microsoft Graph API permissions.
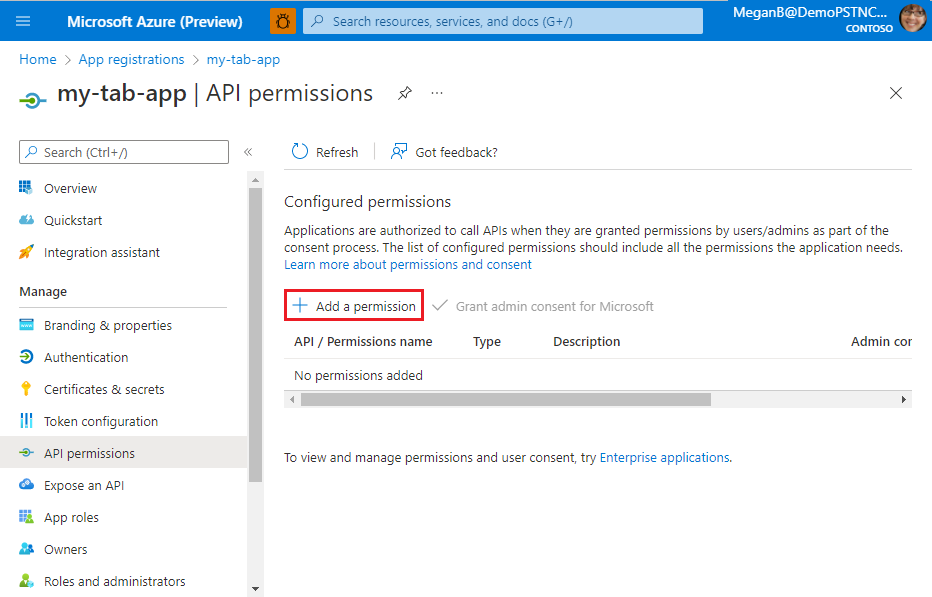
The Request API permissions page appears.
Select Microsoft Graph.
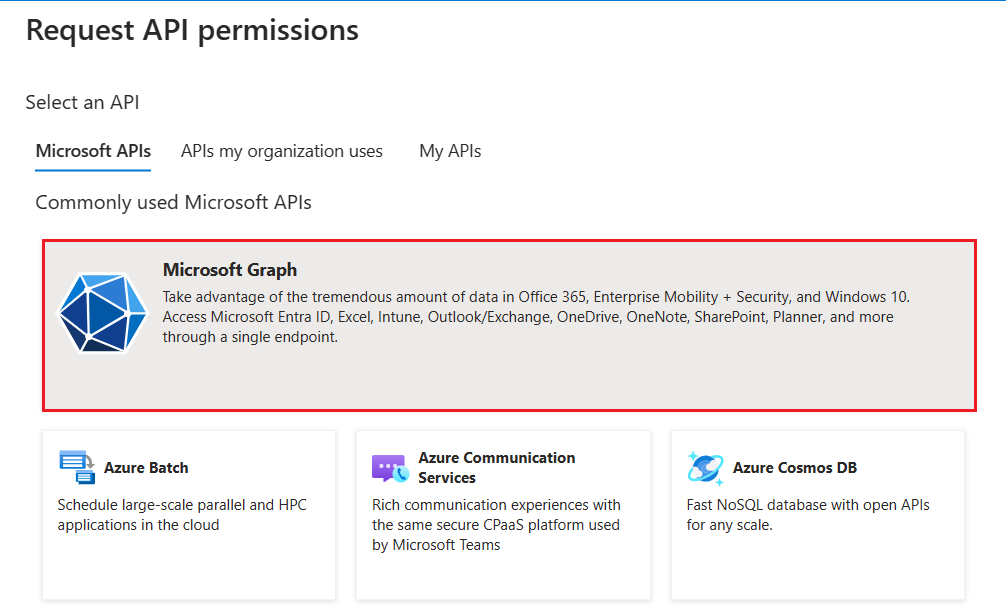
The options for Graph permissions display.
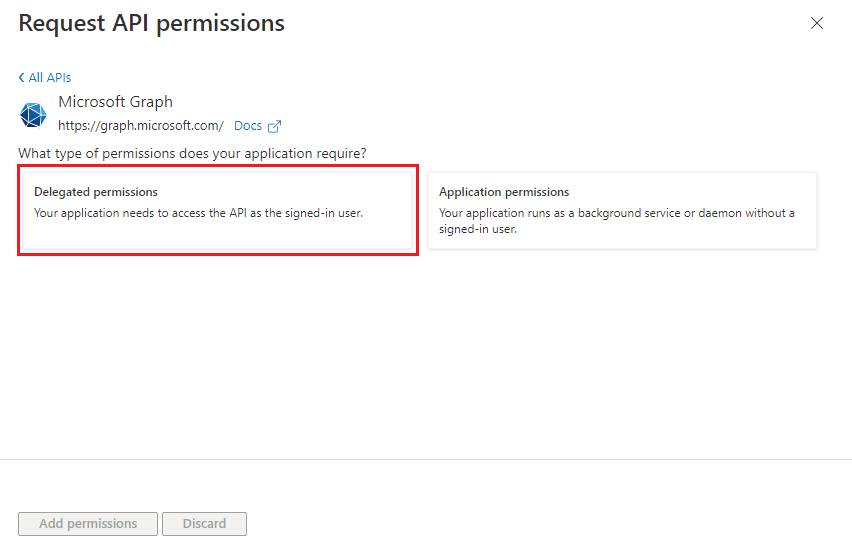
Select Delegated permissions or Application permissions to view the list of delegated or application permissions respectively.
Select relevant permissions for your app, and then select Add permissions.

You can also enter the permission name in the search box to find it.
A message pops up on the browser stating that the permissions were updated.

The added permissions are displayed in the API permissions page.
You've now configured your app with Microsoft Graph permissions.
Configure authentication for different platforms
Depending on the platform or device where you want to target your app, additional configuration might require, such as redirect URIs, specific authentication settings, or details specific to the platform.
Note
- If your tab app hasn't been granted IT admin consent, app users need to provide consent the first time they use your app on a different platform.
- Implicit grant isn't required if single sign-on (SSO) is enabled on a tab app.
You can configure authentication for multiple platforms as long as the URL is unique.
To configure authentication for a platform
Open the app you registered in the Azure portal.
Select Manage > Authentication from the left pane.
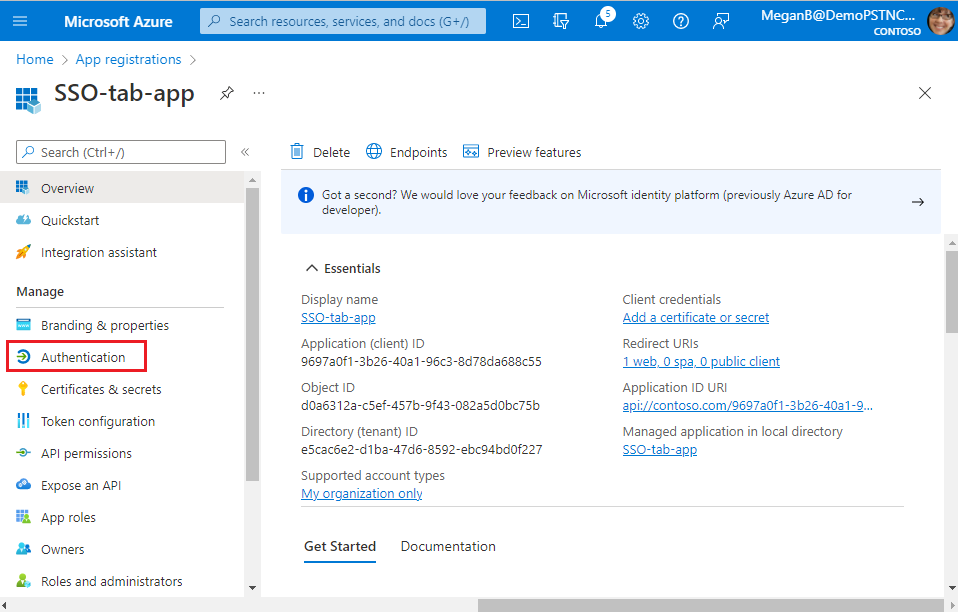
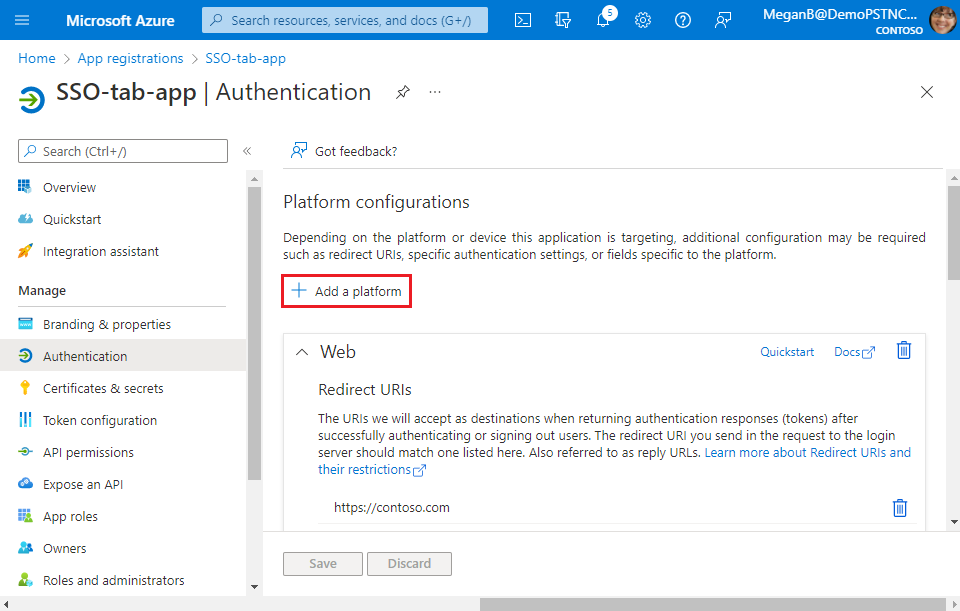
The Platform configurations page appears.
Select + Add a platform.
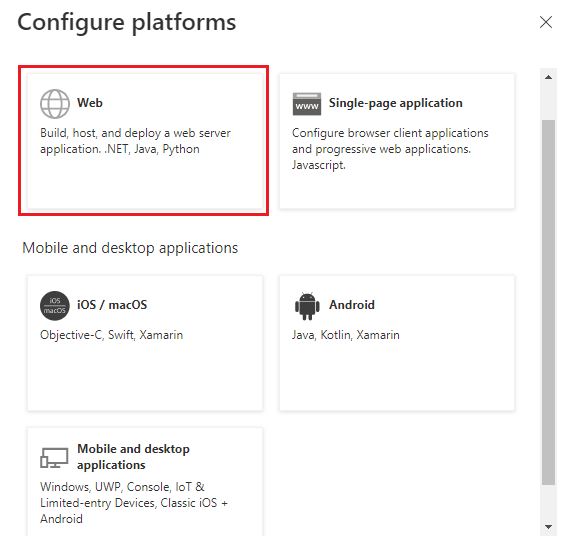
The Configure platforms page appears.
Select the platform that you want to configure for your tab app. You can choose the platform type from web or Single-page application.
You can configure multiple platforms for a particular platform type. Ensure that the redirect URI is unique for every platform you configure.
The Configure Web page appears.
Note
The configurations are different based on the platform you select.
Enter the configuration details for the platform.
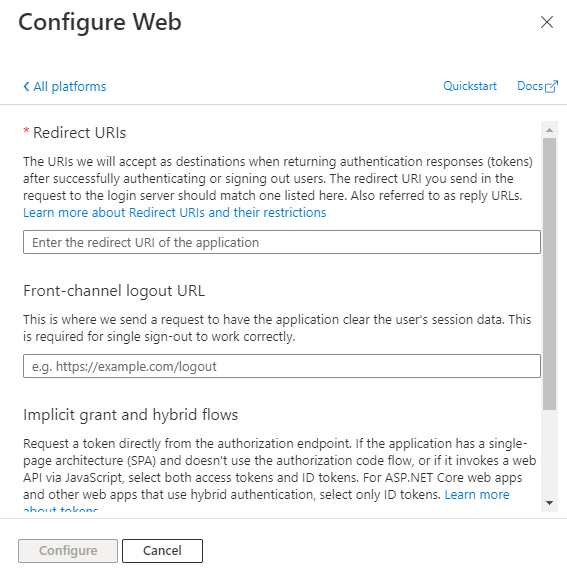
- Enter the redirect URI. The URI should be unique.
- Enter the front-channel logout URL.
- Select the tokens you want Microsoft Entra ID to send for your app.
Select Configure.
The platform is configured and displayed in the Platform configurations page.
Acquire access token for MS Graph
You need to acquire an access token for Microsoft Graph. You can do so by using Microsoft Entra on-behalf-of (OBO) flow.
The current implementation for single sign-on (SSO) is limited to user-level permissions, which aren't usable for making Graph calls. To get the permissions and scopes needed to make a Graph call, SSO apps must implement a custom web service to exchange the token received from the Teams JavaScript library for a token that includes the needed scopes. You can use Microsoft Authentication Library (MSAL) for fetching the token from the client side.
After you've configured Graph permissions in Microsoft Entra ID, you'll need to get the token ID from the Teams client and then exchange it with the server-side token.
Get the token ID from Teams client
The following is an example for getting the token ID from Teams client:
microsoftTeams.authentication.getAuthToken().then((result) => {
    //result contains the id token
            console.log(result);
        })
Exchange the token ID with the server-side token
The following is an example of OBO flow to fetch the access token from Teams client using MSAL:
IConfidentialClientApplication app = ConfidentialClientApplicationBuilder.Create(<"Client id">)
                                                .WithClientSecret(<"Client secret">)
                                                .WithAuthority($"https://login.microsoftonline.com/<"Tenant id">")
                                                .Build();
            try
            {
                var idToken = <"Client side token">;
                UserAssertion assert = new UserAssertion(idToken);
                List<string> scopes = new List<string>();
                scopes.Add("https://graph.microsoft.com/User.Read");
                // Acquires an access token for this application (usually a Web API) from the authority configured in the application.
                var responseToken = await app.AcquireTokenOnBehalfOf(scopes, assert).ExecuteAsync();
                return responseToken.AccessToken.ToString();
            }
            catch (Exception ex)
            {
                return ex.Message;
            }
        }
If you need to access Microsoft Graph data, configure your server-side code to:
- Validate the access token. For more information, see Validate the access token.
- Initiate the OAuth 2.0 OBO flow with a call to the Microsoft identity platform that includes the access token, some metadata about the user, and the credentials of the tab app (its app ID and client secret). The Microsoft identity platform returns a new access token that can be used to access Microsoft Graph.
- Get data from Microsoft Graph by using the new token.
- Use token cache serialization in MSAL.NET to cache the new access token for multiple, if necessary.
Important
- As a best practice for security, always use server-side code to make Microsoft Graph calls or other calls that require passing an access token. This helps protect the token from being intercepted or leaked. DO NOT return the OBO token to the client because it would then enable the client to make direct calls to Microsoft Graph.
- Two separate apps registered in Microsoft Entra ID require individual tokens for each app. Use the OBO flow to enable communication between the apps.
- Don’t use
notifySuccessresult to return the token information to the parent page. UselocalStorageto save the token and pass the item key vianotifySuccess.
Obtain consent
Your app can obtain consent for Graph permissions globally from the tenant administrator, or individually per user.
From the tenant administrator
A simple way of consenting on behalf of an organization is by obtaining admin consent.
From the user
When asking for additional user consent using the Microsoft Teams JavaScript client library (TeamsJS) authentication capability, keep in mind the following considerations:
To implement SSO authentication in a personal tab, follow these steps:
The token retrieved using
getAuthToken()must be exchanged on the server-side using Microsoft Entra OBO flow to get access to those other Graph APIs. Ensure that you use the Microsoft Entra v2 endpoint for this exchange.When you try to execute the token exchange for a user for the first time, if Microsoft Entra refuses to exchange tokens it might be because the user hasn't consented to give your app permission to the user's data. In these cases, your exchange fails with either the
invalid_grantorinteraction_requirederror. Examples of invalid_grant errors include when consent is required or auth_code, assertion, or the refresh token is expired, revoked, malformed, or absent. Examples of interaction_required include when multifactor authentication or corporate device enrollment is required.If the exchange fails because of the
invalid_grantorinteraction_requirederrors, you must prompt the user for consent. Since user interaction can only happen from the client, your server needs to return an indication to your client app that consent is required. You can then use the user interface (UI) to ask the app user to grant other consent. The UI must include a button that triggers an Microsoft Entra consent dialog.To ask the user for consent for your app to access their data, you must include the
prompt=consentproperty in your query-string-parameter to Microsoft Entra ID.- Instead of
?scope={scopes}, use?prompt=consent&scope={scopes} - Ensure that the
{scopes}property includes all the scopes you're prompting the user for. For example,Mail.ReadorUser.Read.
To handle incremental consent for tab app, see incremental and dynamic user consent.
- Instead of
After the app user has granted more permissions, retry the OBO flow to get access to additional Graph APIs. For more information, see Teams Personal Tab SSO Authentication sample code.
Race condition when making an OBO call after invalid grant exception
If a user hasn't granted Microsoft Entra application consent for these scopes, your OBO call fails with invalid_grant or interaction_required error. This error informs you that you need to prompt the user for their consent.
When the user has provided their consent and you try to make an OBO call immediately, sometimes there's a race condition between Microsoft Entra ID propagating this consent and the OBO request taking place. This can lead to OBO call failing with the same invalid_grant or interaction_required errors.
If your application is unaware of this behavior, it might ask the user for consent multiple times. Best practice is to build a meaningful wait-and-retry mechanism to avoid this suboptimal user experience.
The wait-and-retry mechanism must keep track if a user has consented to the required scopes. If an API call that includes an OBO request fails with the above errors, but the user has already consented, avoid showing the consent prompt to the user. Instead, wait for some time before retrying the API call. Usually, Microsoft Entra ID sends the consent within three to five seconds. In one of our sample applications, we retry up to three times with double the wait time between each retry, starting at a one-second wait.
If after three to five attempts the OBO flow still fails, the user might not have consented to all the required scopes, and you might have to prompt them to consent again.
This approach helps reduce the possibility of user being prompted for consent more than once.
Code sample
| Sample name | Description | C# | Node.js |
|---|---|---|---|
| Tabs Microsoft Entra SSO | Microsoft Teams sample app for tabs Microsoft Entra SSO, which uses OBO flow to call Graph APIs. | View | View |