Connect a bot to Web Chat
APPLIES TO: SDK v3
When you create a bot with the Framework Bot Service, the Web Chat channel is automatically configured for you. The Web Chat channel includes the Web Chat control, which provides the ability for users to interact with the bot directly in a web page.
The Web Chat channel in the Bot Framework Portal contains everything you need to embed the Web Chat control in a web page. All you have to do to use the web chat control is get your bot's secret key and embed the control in a web page.
Web Chat security considerations
When you use Azure Bot Service authentication with Web Chat there are some important security considerations you must keep in mind. Please, refer to Security considerations.
Embed the Web Chat control in a web page
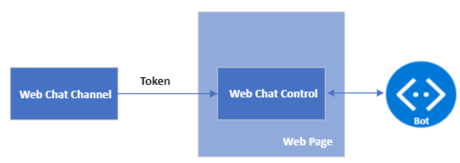
The following picture shows the components involved when embedding the Web Chat control in a web page.
Note
This article assumes that you already have a bot deployed in Azure. For information about deployment, see Deploy your bot.
Get your bot secret key
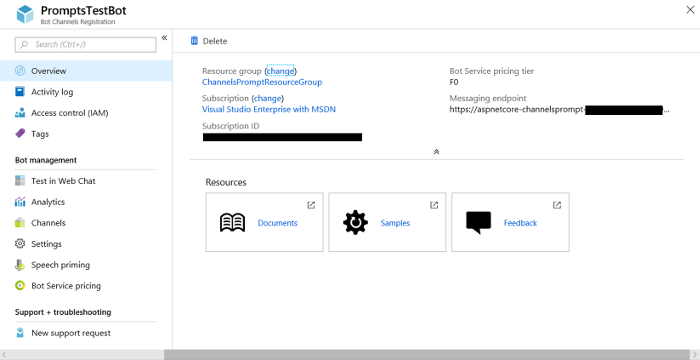
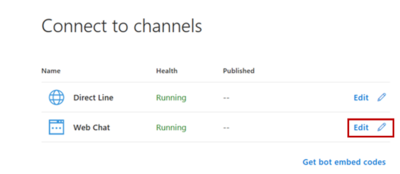
Open your bot in the Azure Portal and click Channels blade.
Click Edit for the Web Chat channel.
Under Secret keys, click Show for the first key.
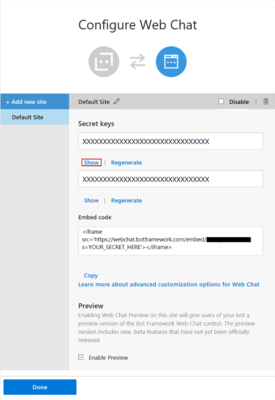
Copy the Secret key and the Embed code.
Click Done.
Development embedding options
Option 1 - Exchange your secret for a token, and generate the embed
Use this option if you can execute a server-to-server request to exchange your web chat secret for a temporary token, and if you want to make it difficult for other developers to embed your bot in their websites. Although using this option will not absolutely prevent other developers from embedding your bot in their websites, it does make it difficult for them to do so.
To exchange your secret for a token and generate the embed:
Issue a GET request to
https://webchat.botframework.com/api/tokensand pass your web chat secret via theAuthorizationheader. TheAuthorizationheader uses theBotConnectorscheme and includes your secret, as shown in the example request below.The response to your GET request will contain the token (surrounded with quotation marks) that can be used to start a conversation by rendering the web chat control within an iframe. A token is valid for one conversation only; to start another conversation, you must generate a new token.
Within the
iframeEmbed code that you copied from the Web Chat channel within the Bot Framework Portal (as described in Get your bot secret key above), change thes=parameter tot=and replace "YOUR_SECRET_HERE" with your token.
Note
Tokens will automatically be renewed before they expire.
Example request
requestGET https://webchat.botframework.com/api/tokens
Authorization: BotConnector YOUR_SECRET_HERE
Note
Please note that for Azure Government, the token exchange URL is different.
requestGET https://webchat.botframework.azure.us/api/tokens
Authorization: BotConnector YOUR_SECRET_HERE
Example response
"IIbSpLnn8sA.dBB.MQBhAFMAZwBXAHoANgBQAGcAZABKAEcAMwB2ADQASABjAFMAegBuAHYANwA.bbguxyOv0gE.cccJjH-TFDs.ruXQyivVZIcgvosGaFs_4jRj1AyPnDt1wk1HMBb5Fuw"
Example iframe (using token)
<iframe src="https://webchat.botframework.com/embed/YOUR_BOT_ID?t=YOUR_TOKEN_HERE"></iframe>
Note
Please note that for Azure Government, the example iframe looks different.
<iframe src="https://webchat.botframework.azure.us/embed/YOUR_BOT_ID?t=YOUR_TOKEN_HERE"></iframe>
Example html code
<!DOCTYPE html>
<html>
<body>
  <iframe id="chat" style="width: 400px; height: 400px;" src=''></iframe>
</body>
<script>

    var xhr = new XMLHttpRequest();
    xhr.open('GET', "https://webchat.botframework.com/api/tokens", true);
    xhr.setRequestHeader('Authorization', 'BotConnector ' + 'YOUR SECRET HERE');
    xhr.send();
    xhr.onreadystatechange = processRequest;

    function processRequest(e) {
      if (xhr.readyState == 4  && xhr.status == 200) {
        var response = JSON.parse(xhr.responseText);
        document.getElementById("chat").src="https://webchat.botframework.com/embed/<botname>?t="+response
      }
    }

  </script>
</html>
Option 2 - Embed the web chat control in your website using the secret
Use this option if you want to allow other developers to easily embed your bot into their websites.
Warning
With this option, the Web Chat channel secret key is exposed in the client web page. Use this option only for development purposes and not in a production environment.
To embed your bot in a web page by specifying the secret within the iframe tag, perform the steps described below.
Copy the
iframeEmbed code from the Web Chat channel within the Bot Framework Portal (as described in Get your bot secret key above).Within that Embed code, replace "YOUR_SECRET_HERE" with the Secret key value that you copied from the same page.
Example iframe (using secret)
<iframe style="height:480px; width:402px" src="https://webchat.botframework.com/embed/YOUR_BOT_ID?s=YOUR_SECRET_HERE"></iframe>
Note
Please note that for Azure Government, the example iframe looks different.
<iframe style="height:480px; width:402px" src="https://webchat.botframework.azure.us/embed/YOUR_BOT_ID?s=YOUR_SECRET_HERE"></iframe>
Production embedding option
Keep your secret hidden, exchange your secret for a token, and generate the embed
This option does not expose the Web Chat channel secret key in the client web page, as it is required in a production environment.
The client must provide a token to talk to the bot. To learn about the differences between secrets and tokens and to understand the risks associated with using secrets, visit Direct Line authentication.
The following client web page shows how to use a token with the Web Chat. If you use Azure Gov, please adjust the URLs from public to government.
<!DOCTYPE html>
<html>
  <head>
    <script src="https://cdn.botframework.com/botframework-webchat/latest/webchat.js"></script>
  </head>
  <body>
    <h2>Web Chat bot client using Direct Line</h2>

    <div id="webchat" role="main"></div>

    <script>

     // "styleSet" is a set of CSS rules which are generated from "styleOptions"
     const styleSet = window.WebChat.createStyleSet({
         bubbleBackground: 'rgba(0, 0, 255, .1)',
         bubbleFromUserBackground: 'rgba(0, 255, 0, .1)',

         botAvatarImage: '<your bot avatar URL>',
         botAvatarInitials: 'BF',
         userAvatarImage: '<your user avatar URL>',
         userAvatarInitials: 'WC',
         rootHeight: '100%',
         rootWidth: '30%'
      });

      // After generated, you can modify the CSS rules
      styleSet.textContent = {
         ...styleSet.textContent,
         fontFamily: "'Comic Sans MS', 'Arial', sans-serif",
         fontWeight: 'bold'
      };

      const res = await fetch('https:<YOUR_TOKEN_SERVER/API>', { method: 'POST' });
      const { token } = await res.json();

      window.WebChat.renderWebChat(
        {
          directLine: window.WebChat.createDirectLine({ token }),
          userID: 'WebChat_UserId',
          locale: 'en-US',
          username: 'Web Chat User',
          locale: 'en-US',
          // Passing 'styleSet' when rendering Web Chat
          styleSet
        },
        document.getElementById('webchat')
      );
    </script>
  </body>
</html>
For examples on how to generate a token, see: