Define, capture, triage, and manage software bugs in Azure Boards
TFS 2017 | TFS 2015 | TFS 2013
How do you track and manage defects in your code? How do you make sure software problems and customer feedback get addressed quickly to support high-quality software deployments? And, how do you do make good progress on new features and address your technical debt?
At a minimum, you need a way to capture your software issues, prioritize them, assign them to a team member, and track progress. And, you want to manage your code defects in ways that align with your Agile practices.
To support these scenarios, Azure Boards provides a specific work item type to track code defects named Bug. Bug work items share all the standard features of other work item types with a few more. For an overview of standard features, see Track work with user stories, issues, bugs, features, and epics.
Bugs also provide the following additional features:
- Options for each team to choose how they want to track bugs
- Test tools to capture bugs
- Built-in integration across Azure DevOps to track bugs linked to builds, releases, and tests
Note
Bug work item types aren't available with the Basic process. The Basic process tracks bugs as Issues and is available when you create a new project from Azure DevOps Services or Azure DevOps Server 2019.1 or later versions.
Prerequisites
- You must connect to a project. If you don't have a project yet, create one.
- You must be added to a project. To get added, Add users to a project or team.
- To view or modify work items, you must have your View work items in this node and Edit work items in this node permissions set to Allow. By default, the Contributors group has this permission set. To learn more, see Set permissions and access for work tracking.
- To add new tags to add to work items, you must have Basic access or higher and have the project-level Create new tag definition permissions set to Allow. By default, the Contributors group has this permission set. Even if the permission is explicitly set for a Stakeholder, they won't have permission to add new tags, as they are prohibited through their access level. To learn more, see Stakeholder access quick reference.
- All project members, even those who belong to the Readers group, can email work items.
Tip
To report a bug, a user must have at a minimum, Stakeholder access and Edit work items in this node permission set to Allow for the Area Path where they will add the bug. To learn more, see Set permissions and access for work tracking
Bug work item type
The following image shows the Bug work item type for the Scrum process. The Bug work item type for Agile and CMMI processes tracks similar information. It's designed to appear on the product backlog along with requirements or on the Taskboard along with tasks.
Note
The images you see from your web portal may differ from the images you see in this article. These differences result from updates made to your web app, options that you or your admin have enabled, and which process was chosen when creating your project—Agile, Basic, Scrum, or CMMI. The Basic process is available with Azure DevOps Server 2019 Update 1 and later versions.
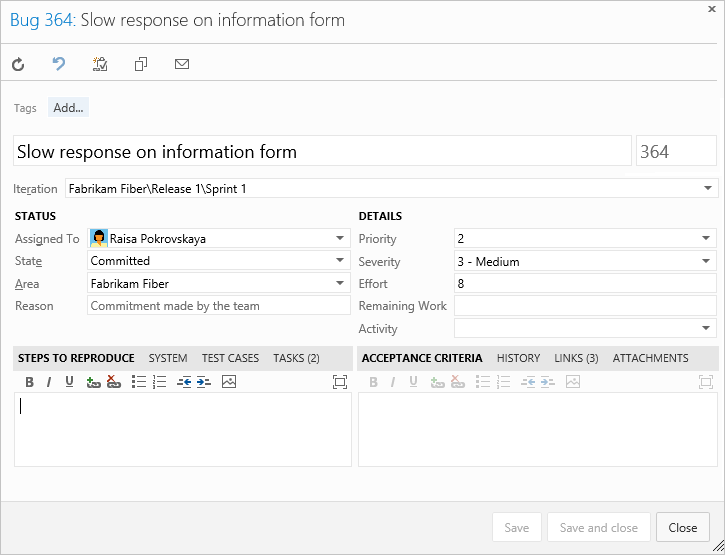
Fields specific to bugs
The Bug work item type uses some bug-specific fields. To capture both the initial issue and ongoing discoveries, use the fields described in the following table. For information about fields specific to the Bug defined for the Capability Maturity Model Integration (CMMI) process, see Bugs, issues, and risks field reference. For information about all other fields, see Work item field index.
Field, Group, or Tab
Usage
Steps to Reproduce
(friendly name=Repro Steps)
Use to capture enough information so that other team members can fully understand the code defect. Include actions taken to find or reproduce the bug and expected behavior.
Information about the software and system configuration that is relevant to the bug and tests to apply. The System Info and Found in Build fields are automatically filled in when you create a bug through a testing tool. These fields specify information about the software environment and build where the bug occurred. To learn more, see Test different configurations.
Provide the criteria to meet before the bug can be closed. Before work begins, describe the customer acceptance criteria as clearly as possible. Teams should use this criteria as the basis for acceptance tests, and to evaluate whether an item has been satisfactorily completed.
Specifies the name of the build that incorporates the code that fixes the bug. This field should be specified when you resolve the bug.
For on-premises Azure DevOps, to access a drop-down menu of all builds that have been run, you can update the FIELD definitions for Found in Build and Integrated in Build to reference a global list. The global list is automatically updated with each build that is run. To learn more, see Query based on build and test integration fields.
For information about how to define build numbers, see build number format options.
- 1: Product requires successful resolution of the work item before it ships and addressed soon.
- 2: Product requires successful resolution of the work item before it ships, but doesn't need to be addressed immediately.
- 3: Resolution of the work item is optional based on resources, time, and risk.
A subjective rating of the impact of a bug or work item on the project or software system. For example: If a remote link within the user interface—a rare event—causes an application or web page to crash—a severe customer experience, you might specify Severity = 2 - High and Priority = 3. Allowed values and suggested guidelines are:
- 1 - Critical: Must fix. A defect that causes termination of one or more system components or the complete system, or causes extensive data corruption. And, there are no acceptable alternative methods to achieve required results.
- 2 - High: Consider fix. A defect that causes termination of one or more system components or the complete system, or causes extensive data corruption. However, an acceptable alternative method exists to achieve required results.
- 3 - Medium: (Default) A defect that causes the system to produce incorrect, incomplete, or inconsistent results.
- 4 - Low: A minor or cosmetic defect that has acceptable workarounds to achieve required results.
Notes:
1 To change the menu selection or picklist, see Customize the work tracking experience. The customization method depends on the process model used by your project.
Choose how your team tracks bugs
Your team can track bugs as requirements or as tasks. To support the team choice, consider the following factors.
- Size of your team. Smaller teams can maintain a lightweight footprint by tracking bugs as requirements.
- Organization requirements to track work. If your team is required to track hours, then choose to track bugs as tasks.
- How your team organizes work. If your team relies on the product backlog to prioritize work and add bugs, track bugs as requirements.
- Tools your team wants to use such as the Planning pane, velocity chart, forecast, rollup, and delivery plans. Tracking bugs as tasks prevents use of several of these tools.
The following table summarizes the three options teams have to track bugs. To learn more and to set the option for your team, see Show bugs on backlogs and boards.
Option
Choose when you want to...
Track bugs as Requirements
- Prioritize (stack rank) bugs along with requirements
- Estimate Bug effort for forecasting
- Update bug status on Kanban board
- Include Bugs in Velocity charts and Cumulative Flow Diagrams
- Can use the Forecast tool to support sprint planning
- Can drag and drop bugs onto Planning pane to assign bugs to a sprint
- Can view Bugs on Delivery Plans
Note
- Bugs are assigned to the Requirements Category
Track bugs as Tasks
- Estimate work for bugs similar to tasks
- Update bug status on sprint Taskboards
- Link bugs to requirements as child items
- Can drag and drop bugs onto Planning pane to assign bugs to a sprint
Note
- Bugs are assigned to the Task Category
- User Stories (Agile), Product Backlog Items (Scrum), or Requirements (CMMI) are the natural parent work item type for Bugs
- Bugs won't be visible on Delivery Plans
Bugs don't appear on backlogs or boards
- Manage bugs using queries
Note
- Bugs are associated with the Bugs Category and won't appear on either backlogs or boards
- Bugs won't be visible on Backlogs, Boards, Sprint Backlogs, Taskboards, or Delivery Plans
- Can't drag and drop bugs onto Planning pane to assign bugs to a sprint
Customize work item type
You can customize the Bug and other work item types. Or, create custom types to track software issues or customer feedback. With all work item types, you can customize the following elements:
- Add or remove custom fields
- Add custom controls or custom tabs within the work item form
- Customize the workflow states
- Add conditional rules
- Choose the backlog level in which work items appear
Before you customize your process, we recommend you review Configure and customize Azure Boards.
To customize your particular process, see Customize the On-premises XML process model.
Add or capture bugs
You can define bugs from several different Azure DevOps tools. These include backlogs and boards and testing tools.
Tip
By default, the Title field is the only required field when creating a bug. You can quickly add bugs in the same way you add user stories or product backlog items using Azure Boards. If you want to make some fields required, do that by adding conditional rules based on a state change. To learn more, see Add a rule to a work item type (Inheritance process).
Add a bug from your backlog or board
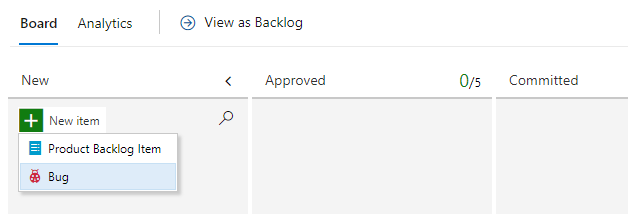
If your team chose to manage bugs with requirements, you can define bugs from your product backlog or Kanban board. To learn more, see Create your product backlog or Start using your Kanban board.
Add a bug from the product backlog

Add a bug from the product backlog
Tip
When you add a bug from your product backlog or Kanban board, the bug is automatically assigned the default Area Path and Iteration Path defined for the team. To learn more, see Team defaults referenced by backlogs and boards.
Add a bug from your sprint backlog or Taskboard
If your team chose to manage bugs with tasks, you can define bugs from your Kanban board, product backlog, Sprint backlog, or Sprint Taskboard. You add a bug as a child to a product backlog work item.
Add a linked child bug from the Kanban board
You add a bug in the same way you add a task to a backlog item. To learn more, see Add tasks or child items as checklists.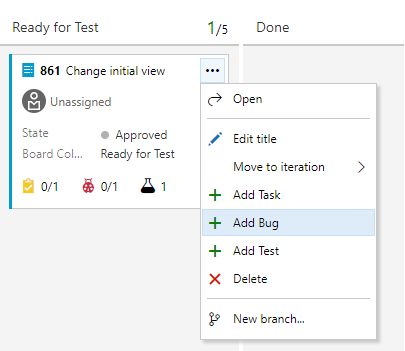
Add a linked child bug from the Sprint Backlog
You add a bug in the same way you add a task to a Sprint backlog. To learn more, see Add tasks to backlog items.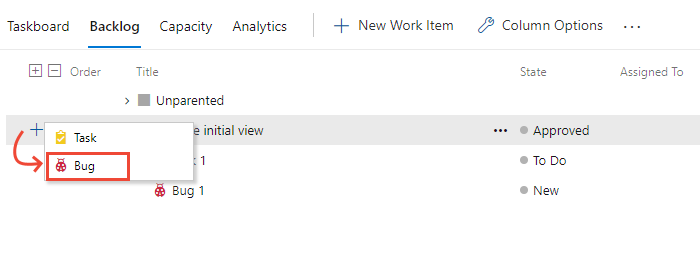
Create a bug from a testing tool
The two testing tools you can use to add bugs while testing include the web portal Test Runner and the Test & Feedback extension.
Test Runner: When running manual tests, you can choose to Create bug. To learn more, see Run manual tests.
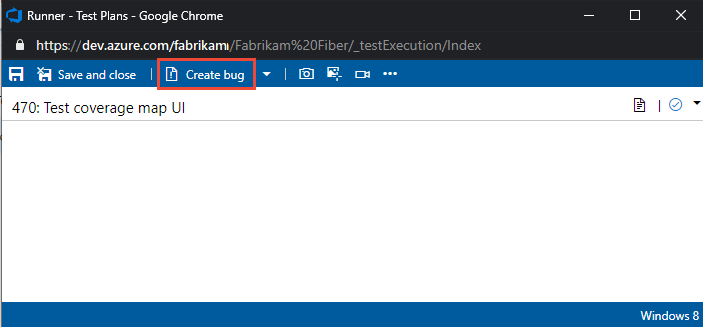
Test & Feedback extension: When running exploratory tests, you can choose to Create bug or Create task. To learn more, see Exploratory testing with the Test & Feedback extension

Bug lifecycle and workflow states
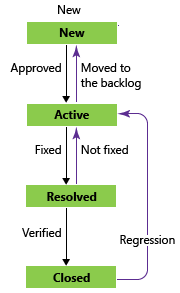
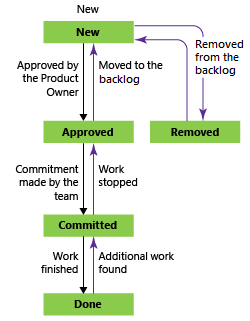
As with all other work item types, the Bug work item type has a well-defined workflow. Each workflow consists of three or more States and a Reason. Reasons specify why the item transitioned from one State to another. The following images illustrate the default bug workflow defined for the Agile, Scrum, and CMMI processes.
| Agile | Scrum | CMMI |
|---|---|---|
 |
 |
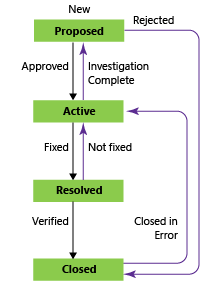 |
For Scrum bugs, you change the State from Committed (similar to Active) to Done. For Agile and CMMI, you first resolve the bug and select a reason that indicates the bug is fixed. Typically, the person who created the bug then verifies the fix and updates the State from Resolved to Closed. If more work has been found after a bug has been resolved or closed, you can reactivate it by setting the State to Committed or Active.
Verify a fix
To verify a fix, a developer or tester attempts to reproduce the bug and look for more unexpected behavior. If necessary, they should reactivate the bug.
When verifying a bug fix, you might find that the bug wasn't fixed or you might disagree with the resolution. In this case, discuss the bug with the person who resolved it, come to an agreement, and possibly reactivate the bug. If you reactivate a bug, include the reasons for reactivating the bug in the bug description.
Close a bug
You close a bug once it's verified as fixed. However, you might also close a bug for one of the following reasons. Reasons available to select depend on the project process and the bug transition states.
Agile process:
- Deferred: Defer bug fix until the next product release.
- Fixed: Bug is verified as fixed.
- Duplicate: Bug tracks another bug currently defined. You can link each bug with the Duplicate/Duplicate of link type and close one of the bugs.
- As Designed: Feature works as designed.
- Cannot Reproduce: Tests prove that the bug can't be reproduced.
- Obsolete: The bug's feature is no longer in the product.
- Copied to Backlog: A user story has been opened to track the bug.
Scrum process:
- Not a Bug: Bug is verified that it isn't a bug.
- Duplicate: Bug tracks another bug currently defined. You can link each bug with the Duplicate/Duplicate of link type and close one of the bugs.
- Removed from the backlog: Bug is verified that it isn't a bug. Remove the bug from the backlog.
- Work finished: Bug has been verified as fixed.
CMMI process:
- Deferred: Defer bug fix until the next product release.
- Duplicate: Bug tracks another bug currently defined. You can link each bug with the Duplicate/Duplicate of link type and close one of the bugs.
- Rejected: Bug is verified that it isn't a bug.
- Verified: Bug is verified as fixed.
Tip
Once a bug has been closed and the fix is actively released in deployments, recommended practice is to never reopen it due to regression. Instead, you should consider opening a new bug and link to the older, closed bug.
List and triage bugs
Most teams, whatever option they chose to track bugs, define one or more bug queries. With queries, you can list active bugs, unassigned bugs, stale bugs, bug trends, and more. You can then add queries and query charts to your team dashboards to monitor bug status and progress.
Bug queries
Open a shared query or use the query editor to create useful bug queries, such as the following options:
- Active bugs by priority (
State <> DoneorState <> Closed) - In Progress bugs (
State = CommittedorState = Active) - Bugs to fix for a target release (
Tags Contains RTM) - Recent bugs - bugs opened within the last three weeks (
Created Date > @Today-21)
Once you have the queries of interest to your team, you can create status or trend charts. You can also add the chart you create to a dashboard.
Triage mode in query results
Once you've started coding and testing, you'll want to hold periodic triage meetings to review and rank your bugs. Typically, the project owner runs the bug triage meetings. Team leads, business analysts, and other stakeholders who can speak about specific project risks attend the triage meetings.
The project owner can define a shared query for new and reopened bugs to list bugs to be triaged.
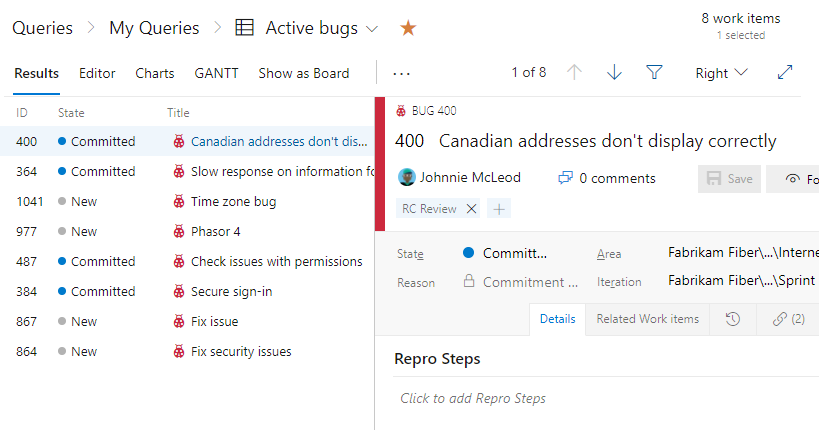
From the query results page, you can quickly move up and down within the list of bug work items using the up and down arrows. As you review each bug, you can assign it, add details, or set priority. To learn more, see Triage work items.
Organize and assign bugs to a sprint
If your team tracks bugs as requirements, view the list of active bugs from your backlog. With the filter function, you can focus solely on bugs. From the product backlog, you can also do the following tasks:
- Organize bugs on your backlog, stack rank against other items (stack ranking is disabled when filtering is enabled)
- Assign bugs to a sprint from your backlog using the Planning pane
- Parent bugs to Features or other portfolio backlog items using the Mapping pane
- View rollup of work to portfolio backlog items.
If your team tracks bugs as tasks, use managed queries to list and triage bugs. Then, within each sprint, you'll see the bugs assigned to the sprint from the Sprint backlog or Taskboard.
Taskboard items versus query list items
You might notice and wonder why the items shown on a sprint Taskboard can differ from a query list created in a corresponding sprint backlog.
It's possible to assign tasks or bugs to an iteration but not have them linked to a parent backlog item. These items will show up in the created query, but might not show up on the Taskboard itself. The system runs the query and then applies a few background processes before displaying Taskboard items.
These reasons can cause work items that belong to the Task Category to not appear on a sprint backlog or Taskboard:
- The task or bug hasn't been linked to a parent backlog item. Only bugs and tasks you've linked to a parent product backlog item (Scrum), user story (Agile), or requirement (CMMI) with an iteration path set to the sprint appears on the sprint backlog page.
- The task or bug is a parent of another task or bug, or the user story is a parent of another user story. If you've created a hierarchy of tasks, bugs, or user stories, only the child-level tasks or the child-level stories at the bottom of the hierarchy appear.
- The task's or bug's linked parent corresponds to a backlog item defined for another team. Or, the area path of the task's or bug's parent backlog item differs from the task's or bug's area path.
Create inline tests linked to bugs
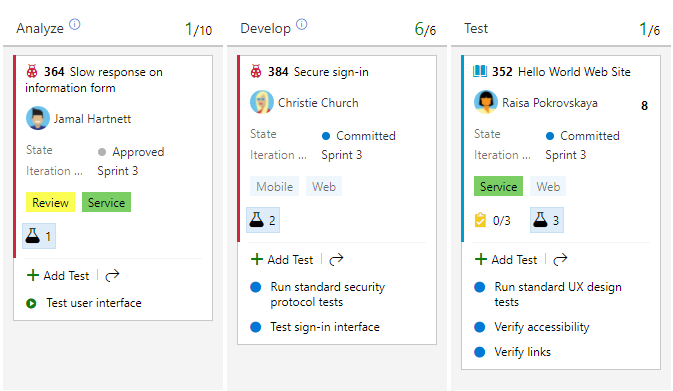
When your team tracks bugs as requirements, you can use the Kanban board to add tests to verify bug fixes.
Update bug status
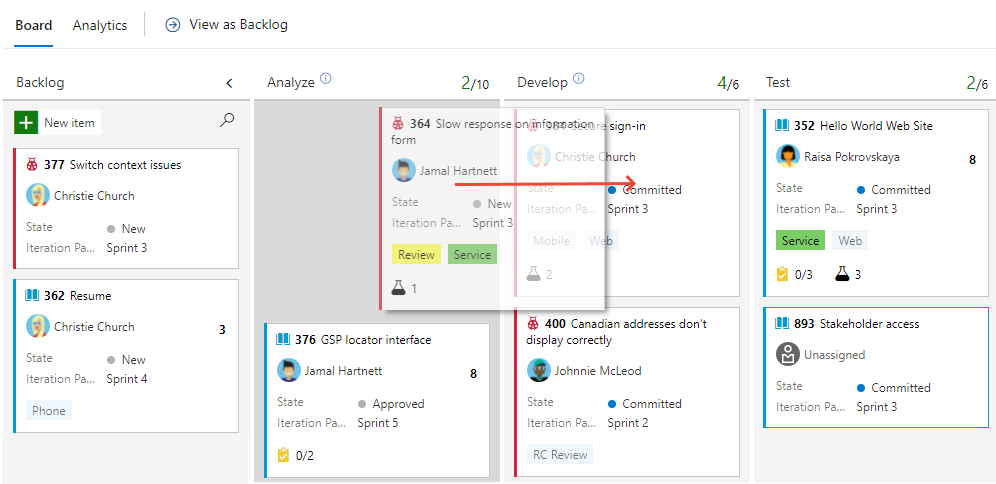
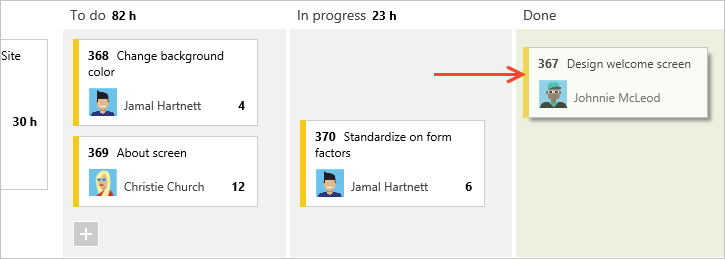
You can update the bug status by dragging and dropping bugs to a new column on a board.
If your team tracks bugs as requirements, you use the Kanban board as shown in the following image. To learn more, see Get started with your Kanban board.
If your team tracks bugs as tasks, you use the Taskboard. To learn more, see Update and monitor your Taskboard.
Customize your board to track intermediate states
You can add intermediate columns to track your bug status on the board. You can also define queries that filter based on the status of a Board Column. To learn more, see the following articles:
Automate bug reassignment based on workflow state
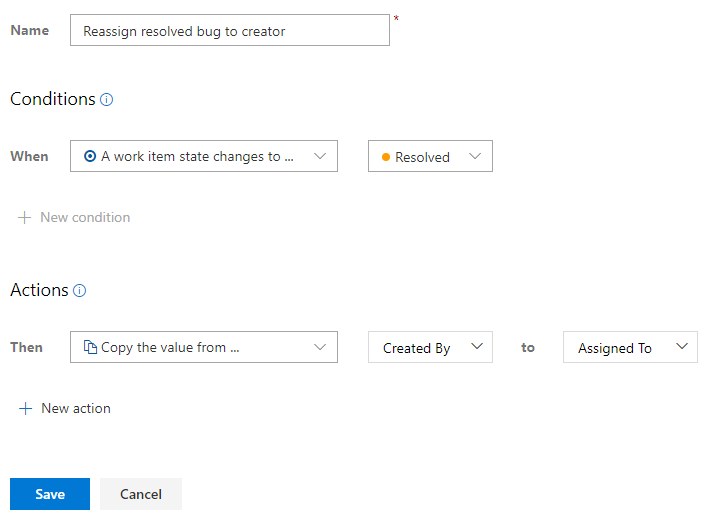
To automate select actions, add custom rules to your Bug work item type. For example, add a rule as shown in the following image. This rule specifies to reassign a bug to the person who opened the bug once it's resolved. Typically, that person verifies that the bug is fixed and closes the bug. To learn more, see Apply rules to workflow states (Inheritance process).
Monitor bug status, assignments, and trends
You can track the bug status, assignments, and trends using queries that you can then chart and add to a dashboard. For example, here are two examples showing active bug trends by State and Active Bugs by Priority over time.
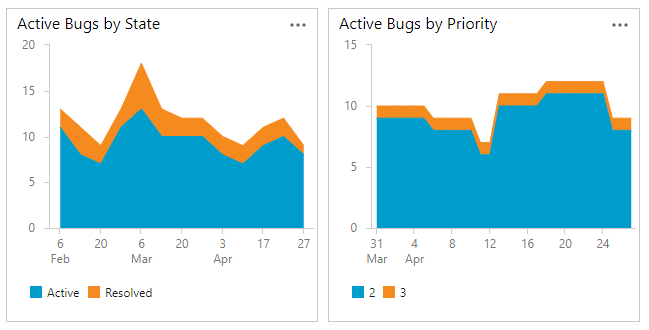
To learn more about queries, charts, and dashboards; see About managed queries and Charts, and Dashboards.
Pre-defined SQL Server bug reports
The following reports are supported for Agile and CMMI processes.
These reports require you have SQL Server Analysis Services and SQL Server Reporting Services configured for your project. To learn how to add SQL Server reports for a project, see Add reports to a project.