Desktop Deployment
A Guide To Pain-Free Desktop Deployment
Steve Campbell and Michael Niehaus
At a Glance:
- Top deployment issues
- Deployment tools and procedures
- Creating and customizing core reference images
- Key deployment strategies
BDD Solution Accelerator
User State Migration Tool
Systems Management Server
Even though it’s been more than four years since Microsoft released Windows XP, there are many organizations that are still upgrading their desktop users to the operating system.
Meanwhile, Windows Vista™ (not to mention the next version of Microsoft® Office) is just around the corner. Whether you’re currently working through the challenges of deploying Windows® XP, or you’re already preparing to deploy Windows Vista, the Microsoft Solution Accelerator for Business Desktop Deployment (BDD) offers end-to-end guidance that can help you efficiently plan, build, test, and execute Windows and Office deployments.
Several years ago, Microsoft realized that many customers face similar issues related to desktop deployments. With feedback from customers and partners, Microsoft identified the common issues that most IT professionals struggle with when undertaking a deployment or migration project. These top issues are outlined in Figure 1.
Figure 1 Top Deployment Issues
| Issue | Description |
| Process | How to undertake, implement, and manage a migration or deployment project. |
| Application compatibility | How to identify, test, and remedy application incompatibilities between Windows XP and previously installed operating systems. |
| Deployment | How to automate and increase the repeatability of migration using tools and scripts to reduce the cost associated with deployments. |
| User state migration | How to identify, collect, and migrate user data and settings including files, configurations, and personalization (wallpaper, favorites, and other preferences). |
| Automation | How to take advantage of existing infrastructure and knowledge to reduce the human interaction required to migrate or deploy an operating system or applications while persisting current user state. |
There were limited options for streamlining the deployment of Windows operating systems prior to Windows 2000 and Windows XP. Tools like Sysprep.exe and third-party imaging apps like Norton Ghost and PowerQuest Drive Image made great strides in reducing the amount of time required to deploy standardized system configurations to standardized hardware. The typical solution involved creating a boot environment (usually based on MS-DOS®) on a floppy disk or CD, a standardized system configuration that had been prepared using Sysprep.exe and captured using an imaging tool, and scripts or other utilities that prompted for the customization information needed to uniquely configure a desktop for a particular role or user. This often meant crafting in-house deployment applications and information repositories. It also meant a substantial investment in the human resources required to physically visit each and every corporate computer with a CD or floppy to run the installation.
As deployment tools and techniques developed, new solutions became available that obviated the need to dispatch technicians with CDs by using various push techniques or client agents. Not all organizations, however, adopted these new methods. Many smaller shops found these solutions too expensive or too difficult to implement. And other organizations simply wanted to use their existing, already familiar Microsoft Systems Management Server (SMS) infrastructure to deploy Windows XP.
A New Deployment Strategy
Feedback from Microsoft customers showed that there was a demand for clear Windows XP deployment best practices. Microsoft addressed the challenge by compiling the most common requirements, solution concepts, and industry trends into what became the Microsoft Solution Accelerator for Business Desktop Deployment.
The objective was simple. Take what was well known in the field and provide a comprehensive framework that addressed all aspects of Windows client deployment projects: plan, image, package, test, communicate, and implement. BDD 1.0, released at the IT Forum conference in November 2003, was a compendium of best practices based on technologies and processes that were state-of-the-industry at the time. The automation and deployment tools were based upon an approach to deployment, called Lite Touch, that employed just a technician, a CD, and an image.
BDD 1.0 provided a Computer Imaging System for building base images and an interview wizard for guiding users and technicians through the customization and application installation selections. The system used Windows Preinstallation Environment (Windows PE) along with some PowerQuest-derived technology as its boot environment. The key advantage for IT professionals was that it provided a complete end-to-end solution for deploying Windows XP and Office 2003 in moderately sized environments using automated, auditable, and repeatable processes.
BDD 1.0 was a success, but still lacked an important key capability: the ability to initiate the entire process with no technician or user intervention. Early adopters of BDD 1.0 pointed out the need for an OS deployment capability based on Microsoft technologies. The bulk of what was needed to automate the wipe-and-load refresh of an existing computer was essentially in place. Why not incorporate Windows PE, SMS inventory and software distribution functionality, and SYSPREP-based images into the SMS environment as an OS deployment solution?
Working together, the Microsoft SMS product group and Core Infrastructure Solutions team crafted the specifications and functionality of the SMS OS Deployment Feature Pack and BDD 2.0, which was released at IT Forum in November 2004.
Zero Touch Deployment
The key request from the IT field was to integrate SMS as a mechanism for automating the deployment of Windows XP. Of course, to do this, the SMS and CIS teams had to overcome several key hurdles. First, the solution needed a bootable deployment environment. To address this challenge, Windows PE was developed further to provide an environment that could boot a computer from CD, RIS, or hard disk. Furthermore, it was given the ability to be scripted, enabling disk partitioning and other automated functions. The SMS team worked to integrate OS deployment capabilities using Windows PE and SYSPREP-based images to both new and existing computers through the SMS 2003 Advanced Client.
Windows Imaging (WIM) was a watershed for the advancement of zero touch deployment capabilities. WIM is a file-based imaging technology that includes advanced compression and single instance storage techniques. It enables the operating system deployment (OSD) capabilities and also reduces the overall size of deployed images.
The team took the core OSD functionality and added granular automation and dynamic capabilities so enterprise customers could reduce the number of images and configurations to an absolute minimum. At the same time, this automation enables inventory and role-based application installation and customization. With BDD 2.0, IT professionals were finally able to implement an integrated, end-to-end desktop deployment solution that was Microsoft-based.
What’s New in BDD 2.5
The most recent release, BDD 2.5, includes many improvements over version 2.0 and addresses a number of customer-reported issues. It supports unattended installations of Windows XP Professional x64 Edition, and the Computer Imaging System contains substantial usability improvements including per-build action lists. Zero Touch Installation (ZTI) has also been improved to be more reliable, versatile, and manageable. You can now monitor ZTI progress through Microsoft Operations Manager (MOM) 2005.
BDD 2.5 contains updated documentation. There is an improved Security Feature Team Guide, an Application Compatibility Feature Team Guide that has been updated for the Application Compatibility Toolkit 4.1, and a new Supplemental Applications Feature Team Guide that provides better guidance for repackaging apps and automating installations.
As illustrated by the BDD 2.5 Explorer (see Figure 2), 10 key areas have been identified in the process. At the center is core project guidance (business case, project planning, and so on) surrounded by important deployment project specialties. Each node represents a particular project component or functional area that has been documented and addressed in a specific feature team guide.
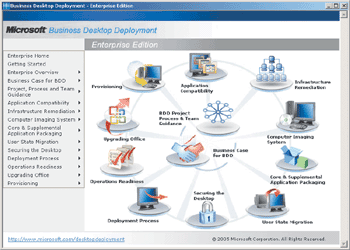
Figure 2** BDD 2.5 Explorer **
The Microsoft Solutions Framework identifies feature teams as an important approach to managing large complex projects and the resulting inter-team communications. Each of the guides includes extensive documentation pertaining to specific actions along with guidance for that particular subject area.
Computer Imaging System
One key challenge for any deployment project is the creation of the core reference image, also known as a "gold image." The Computer Imaging System is a combination of scripts, tools, processes, and settings that, together, let you create a standardized build for end users that can be deployed using repeatable processes.
According to customer research, organizations that have experienced the lowest cost of ownership in the desktop environment had standardized their hardware, reduced image count, and developed repeatable scripts and processes to build their gold images. Microsoft took these best practices to heart and created a tool, which is now part of the BDD, that enables you to build a gold image using existing scripts, preferred settings, and predefined security configurations—all with a single click.
The approach to building the gold image is mapped out in Figure 3. This process looks complicated, but really comprises some simple concepts. First, you create a folder structure for the various components of a gold image, including OS files, drivers, applications, scripts, and so on. Next, you use repeatable, automated scripts to automate all configuration aspects of the gold image. Finally, you capture the resulting customized image using either WIM or a third-party imaging format.
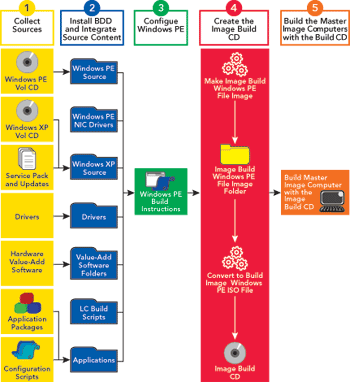
Figure 3** The Road to a Gold Image **
The Computer Imaging System enables you to automate many of the mundane tasks associated with image creation. This includes unattended setup, installation of core applications (such as Microsoft Office, for example), configuration of preferences and security settings via templates, and installation of management clients.
The Actions panel of the BDD is an HTA (HTML-based) application. You can launch the Computer Imaging System Configuration (Config.hta) application from the BDD Explorer. This allows you to set preferences, customize settings, and define other essential configuration options critical to the image you want to capture and deploy. The Actions panel (see Figure 4), for instance, lets you configure and order custom activities that will be performed after the OS has been installed. You can enable or disable the various actions, specify the order in which you want them to be performed, and even indicate whether the system should reboot after any particular actions. These options offer great flexibility when planning your deployment strategy.
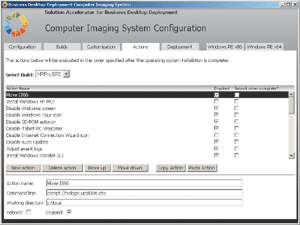
Figure 4** Customizing Actions **
Application Compatibility
A major concern when deploying a new operating system is whether existing applications will be compatible. Breaking any software, especially a line-of-business application, can have a serious impact. So when upgrading an operating system—whether migrating from Windows 2000 to Windows XP or simply rolling out Windows XP Service Pack 2 (SP2)—you will want a comprehensive set of tools and processes to help find and address potential issues with applications. Such tools have been limited, but fortunately the Application Compatibility Toolkit now provides a lot of useful assistance in this area.
The Application Compatibility Toolkit was designed specifically to address the unique changes introduced by Windows XP SP2, including Windows Firewall, changes to DCOM functionality, and changes to Microsoft Internet Explorer and local security zones. Using agents, the Application Compatibility Toolkit locates issues and then corrects the problems. For an explanation on how this process works, take a look at the sidebar "Finding and Fixing Compatibility Issues."
There is also special guidance for ensuring that Microsoft Access databases from previous versions can be migrated. The Access Conversion Toolkit enables you to identify critical dependencies and potential issues with previous versions of Access. But, perhaps its most important capability is to simply identify databases that haven’t been used in a long time. You can find the Access Conversion Toolkit at "Access Conversion Toolkit".
Much like the Application Compatibility Toolkit, the Access Conversion Toolkit includes a collector agent that gathers information about discovered databases. (Some organizations may find success using the software inventory capabilities of Microsoft Systems Management Server (SMS) to retrieve copies of databases from their user populations and evaluate the collected files.) While the Access Conversion Toolkit does not actually convert your databases, it does indicate what needs to be reviewed or addressed.
User State Migration Tool
Moving a user’s existing data and settings is paramount for most organizations as part of a comprehensive migration project. The success or failure of many deployment and migration initiatives can, in large part, be measured by the satisfaction of user communities, and by the number of next-day helpdesk calls. Most of the time, those calls are about documents or settings that are missing or have changed as part of the migration process.
Many users are familiar with the Files and Settings Transfer Wizard that is provided with Windows XP. This is intended to help home users migrate existing data as part of an upgrade or hardware replacement. The User State Migration Tool (USMT) is the corporate equivalent of the Files and Settings Transfer Wizard. USMT is a scriptable command-line tool that allows IT administrators and desktop deployment teams to define what user state should be migrated, where to place it, and how to restore it. The latest USMT scripts can be found at "User State Migration".
The key benefits of USMT in terms of BDD are derived from its automated capabilities. First, USMT is an entirely scriptable tool for migrating user state. It supports the migration of user preferences, data files, and application settings. It can migrate data from local and remote storage, and it supports Encrypted File System data as well as the compression of data before transporting it to network storage. USMT enables user state to be captured and restored without the need for an administrator or user to be logged in. It also supports heartbeat logs so you can remotely track status.
The USMT uses the files described in Figure 5. Each provides a variety of command arguments for configuring the execution of both the store and load actions. You can fine tune the performance and functionality of USMT by defining the storage location, compression options, and user profiles to be evaluated (including an age filter), as well as by configuring several logging and testing flags. See Michael Murgolo’s article "Get a Move On: Migrate User Data with USMT" in this issue of TechNet Magazine for more information.
Figure 5 USMT Components
| File | Description |
| Scanstate.exe | Scans, assimilates, compresses, and stores user information. |
| Loadstate.exe | Restores user state. |
| Migsys.inf | Controls which operating system and browser settings are migrated. |
| Miguser.inf | Controls which file types and desktop settings are migrated. |
| Migapp.inf | Controls which application settings are migrated. |
| Sysfiles.inf | Contains a list of files that USMT must not migrate. |
| ArchiveApp.inf | Contains legacy applications that can be migrated using USMT. |
Finding and Fixing Compatibility Issues
The Application Compatibility Toolkit approaches the challenge of identifying and testing apps through a three-stage framework: Evaluate, Mitigate, Deploy.

Figure A** Application Analyzer **
Evaluate Using collector agents that are distributed to existing desktop clients, you compile a comprehensive inventory of computers and applications. The inventory is evaluated using the Application Analyzer (see Figure A) to determine whether there are known issues. The agents can be deployed throughout your organization using Microsoft Systems Management Server.
Mitigate Using the Application Analyzer, you can compile patches and updates into the appropriate actions. In some cases, multiple patches can be combined into a single action, which may include code updates, new registry settings, or firewall port changes.
Deploy Once the fixes have been identified, tested, and configured, they can be deployed using Group Policy, SMS, or a third-party solution.
Three Deployment Strategies
So, now that you’ve got a freshly created image, tested your apps, and identified important user data, you need a deployment process that lets you deploy the new environment with minimal effort. There are three approaches today: manual, Lite Touch, and Zero Touch. To learn more about the tools involved in each approach, see the "Deployment Tools" sidebar.
With manual installations, IT technicians visit each computer and execute a step-by-step deployment script to upgrade each machine. Deployment rates depend on the number of IT technicians available, with each technician often capable of handling at most 10 machines per day.
With Lite Touch (or moderately automated) installations, technicians still visit each computer to perform the upgrade, but have to spend minimal time there. Preconfigured operating system images are deployed to each machine. Typically, the technician will start the process and verify successful completion, and may be able to deploy between 10 and 20 machines per day.
Zero Touch installations, which are completely automated, rely on a management infrastructure that entirely eliminates the need for technicians to visit machines. More effort is spent up front engineering the process, but overall deployment costs are less and deployment rates much greater, allowing up to hundreds of machines to be deployed per day. (The exact rate is dependent on such factors as infrastructure capabilities, the amount of risk tolerance, and the ability of helpdesk to handle any raised questions.)
OS Deployment Feature Pack
The SMS OS Deployment Feature Pack (OSD) is an add-on for SMS 2003 Service Pack 1 that provides wipe-and-load OS deployment capabilities. It was built to address key challenges that IT shops face, with a special focus on how to build automation into the deployment process.
OSD utilizes several technologies to accomplish an unattended refresh of an existing desktop. SMS 2003 Advanced Clients respond to OSD image package advertisements and act as the agents that enable image package components to be delivered, installed, and executed.
WIM is a new imaging technology that is included with SMS 2003 OSD. Special OSD CDs provide a capture capability that allows images created with SYSPREP to be captured in WIM formats. The WIM technology is a hint at some of the new tools and processes that will be available for Windows Vista deployments.
The automated capabilities of USMT are integrated into OSD functional phases and remove the need for user and administrative logins.
Windows PE is a customizable, reduced-footprint version of Windows XP that can be used for many deployment-related tasks. A customized version of Windows PE is provided with the SMS OSD Feature Pack in a WIM format. This Windows PE WIM is deployed via the SMS 2003 Advanced Client as a bootable environment that subsequently communicates directly with SMS to download and install the corporate image, which is also in a WIM format. Windows PE enables administrators to modify the Sysprep.inf file in the corporate image at deployment time so that customized, just-in-time updates can be implemented.
Deployment Tools
There are tools available from Microsoft and third-party vendors to assist with each type of deployment. Whichever method you employ, automation will be the key to reducing deployment and support costs. The exact tools that you will use as part of your process may vary, but the requirements and capabilities will be much the same. Here are some guidelines to keep in mind:
- When performing manual upgrades, often the only tools used are unattended installation techniques for Windows XP and applications. User data may be manually migrated or extracted using such tools as the File and Settings Transfer Wizard (provided with Windows 2000 and Windows XP) or the User State Migration Tool (available for download from the Microsoft Web site).
- When performing Lite Touch deployments, imaging tools are typically used to capture an image of the preconfigured operating system, which can then be deployed to each machine. A Windows PE-based CD is typically used instead of older MS-DOS-based boot floppies. The User State Migration Tool can be customized to automatically back up and restore the user data on each machine.
- For zero touch deployments, Systems Management Server (SMS) 2003, combined with the OS Deployment Feature Pack, provides the infrastructure for completely hands-off deployments. Tools such as the Zero Touch Installation component of the BDD can further automate the deployment process, lowering the overall cost. Windows PE and the User State Migration Tool are core parts of the process. Applications are typically installed as part of the deployment process with little or no user intervention, enabling clients to be instantly productive on the new operating system.
How the Deployment Process Works
To help you understand how all of this is orchestrated, Figure 6 provides a high-level map of the process.
As with any other SMS package, an advertisement is created for the appropriate collection of computers. The advertisement can be optional (advertised) or mandatory (assigned). And users can push off the installation for a specific amount of time (as determined by the administrators).
Next, the SMS 2003 Advanced Client receives and processes the advertisement. The first thing it does is create a new \Minint folder on the existing drive. This folder will be used as temporary storage for the duration of the process. Depending on the disposition of the hardware, user state capture is completed and the resulting data is placed on the local system (for a system refresh) or off-system (if the system is being replaced).
The SMS agent receives a bootable Windows PE-based WIM image, which is expanded and placed into the \Minint folder. This essentially configures the system as a dual boot environment. The boot files for the system (Master Boot Record, NTLDR, and so on) are modified so that the new Windows PE installation is active in the \Minint folder. At this point the system reboots to Windows PE, and OSD then deletes all the files and folders except for the \Minint directory.
The Windows PE instance then communicates with SMS to find the distribution point that contains the assigned image, then extracts the contents of the image to the local hard disk for installation.
Still running in Windows PE, with the image and Sysprep.inf now local, scripts can be run to begin making customizations. This might include items such as the local time zone, Active Directory® Organizational Unit (OU) membership, domain credentials, drivers, and so on. All of these settings can be queried dynamically from external repositories using WMI, ADO, ADSI, and other similar tools, and then set accordingly.
Once this setup process has completed, normal boot functionality is restored and the system is restarted. On startup, the new Windows XP mini-setup processes drivers and Sysprep parameters and joins the appropriate domain. The OSD agent processes any defined application installations before the user login prompt is displayed. User state (stored either locally or remotely) is restored to the computer as well. When finished, OSD restores management functions to the pre-installed SMS Advanced Client agent.
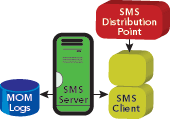
Figure 6** SMS Image Delivery **
Several important aspects of this process are worth noting. Because user state can be kept local to the system in refresh scenarios, on average, approximately 4 to 6 GB of network traffic is eliminated. Because of advanced compression and duplicate file elimination used in WIM images, approximately 30 to 50 percent less network traffic is generated.
USMT ensures that logins by technicians or users are not required to capture and persist user state information. OSD phase actions enable applications to be reinstalled without the need for a user logon. Dynamic, database-driven application manifests can be created on the fly, eliminating the need for role-based images.
Since user state data can be persisted locally, there’s no need to worry about protecting user data while it sits on a temporary server. And SMS and the SMS 2003 Advanced Client communicate using system accounts rather than usernames and passwords. For a deeper look at the inner workings of the OSD Feature Pack, see Adam Gordon’s article "Zero Touch Windows Deployment with SMS," in this issue of TechNet Magazine.
Automating the Installation Process
If your organization has more complex requirements related to the customization of Windows client deployments, the Zero Touch Installation toolset may provide the level of agility you need. The OSD configuration wizard includes the ability to predefine settings for the deployed image, including everything from mundane time zone and corporate identity settings to more crucial domain credentials and volume license keys. These settings are available as OSD image package programs. By default, each configuration definition requires a distinct OSD package program, and this is not much better than having a separate preconfigured image with the desired settings. However, the ZTI tools and scripts provide a much simpler, more dynamic solution to this challenge.
Online Resources
If your company is considering a deployment, these resources can help you implement a process that is suited to your organization’s needs.
- Solution Accelerator for Business Desktop Deployment
- SMS 2003 OS Deployment Feature Pack
- User State Migration Toolkit
- Application Compatibility Toolkit 4.1
- Microsoft Vista Deployment Technologies
Since most configuration choices within an image are based on an attribute of some sort, ZTI was engineered so that it could interact with the various phases of the OSD deployment process to configure dynamic settings. This lets you develop a single WIM image that can support many distinct desktop configurations, with specific configuration tweaks that are determined automatically during the setup process.
BDD Zero Touch Installation includes three key components that work in unison. First, the CustomSettings.ini contains the rules that drive the ZTI process. Sections of this file define which values must be defined for OSD and ZTI, where the values can be found, and the order in which to search for them. Config settings based on subnet, gateway, and hardware type can be defined discreetly in CustomSettings.ini, while more granular per-computer settings or large numbers of settings can be specified via remote databases.
Second, ZeroTouchInstallation.vbs does the heavy lifting. Working closely with CustomSettings.ini, this script makes changes to the post-Sysprep images just after they’ve been laid down. It can communicate with databases to query for custom values, and can even update the driver paths in the image.
Finally, BDDAdminDB provides a sample database that can be used to provide per-computer settings for the OSD deployment process.
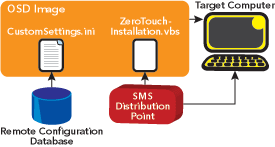
Figure 7** Zero Touch Installation Components **
As shown in Figure 7, the ZeroTouchInstallation.vbs and CustomSettings.ini files are deployed as components of the OSD image. At each OSD phase, ZeroTouchInstallation.vbs executes actions based on definitions or remote data sources specified by CustomSettings.ini. Complex environments may define and consume settings that are found both in CustomSettings.ini and distributed databases. This enables organizations that are highly distributed or decentralized to implement a single corporate image throughout the organization and customize settings and applications in the field as needed.
Guidance for implementing ZTI can be found in the BDD Zero Touch Installation Deployment Feature Team Guide.
Conclusion
If you’re still struggling to manually upgrade your organization’s existing desktop population, Microsoft has a few tools that can help. With both tools and guidance incorporated, Microsoft has delivered a single comprehensive framework that provides a useful end-to-end solution. Regardless of the deployment size and scope, both novice and experienced IT professionals can find a compelling, cost-effective solution for deploying Windows XP. And while these solutions currently focus on Windows XP deployments, the tools and processes are already being fine-tuned for the next generation. Work is currently underway on an update to OSD and the next version of BDD to coincide with the upcoming release of Windows Vista.
Steve Campbell has been with Microsoft as consultant for more than 5 years. He is an architect in deployment and migration technologies and has been a member of key deployment initiatives inside Microsoft.
Michael Niehaus is a Systems Design Engineer in the Core Infrastructure Solutions group at Microsoft. He is responsible for developing best practices, tools, and scripts for Business Desktop Deployment. Reach him at michael.niehaus@microsoft.com.
© 2008 Microsoft Corporation and CMP Media, LLC. All rights reserved; reproduction in part or in whole without permission is prohibited.