Nota
L'accesso a questa pagina richiede l'autorizzazione. È possibile provare ad accedere o modificare le directory.
L'accesso a questa pagina richiede l'autorizzazione. È possibile provare a modificare le directory.
Important
The SharePoint Add-In model in SharePoint Online has been deprecated as of November 27th 2023, checkout the full retirement announcement to learn more.
Deprecation means that the feature will not get any new investments, but it's still supported. SharePoint add-in model is retired fully on April 2nd, 2026 and is no longer available after that time. Primary replacement technology for the SharePoint add-in model is SharePoint Framework (SPFx) which continues to be supported also in future.
This is the third in a series of articles about the basics of developing provider-hosted SharePoint Add-ins. You should first be familiar with SharePoint Add-ins and the previous articles in this series, which you can find at Get started creating provider-hosted SharePoint Add-ins.
Note
If you have been working through this series about provider-hosted add-ins, you have a Visual Studio solution that you can use to continue with this topic. You can also download the repository at SharePoint_Provider-hosted_Add-Ins_Tutorials and open the BeforeRibbonButton.sln file.
A SharePoint Add-in can include custom actions, which is the SharePoint term for custom menu items or ribbon buttons. In this article, you'll learn how to create a custom button that synchronizes a SharePoint list with a remote database.
Create a custom list on the host website
The custom button is going to be on the ribbon of a specific list that records the employees of the local store. In a later article in this series, you'll learn how to programmatically add a custom list to a host website, but for now you'll add one manually.
From the home page of the Fabrikam Hong Kong SAR Store, go to Site Contents > Add an add-in > Custom List.
In the Adding Custom List dialog, specify Local Employees as the name, and then select Create.
On the Site Contents page, open the Local Employees list.
On the List tab on the ribbon, select List Settings.
In the Columns section of the List Settings page, select the Title column.
In the Edit Column form, change the Column name from Title to Name, and then select OK.
On the Settings page, select Create column.
In the Create Column form, do the following:
- For Column name, enter Added to Corporate DB.
- Set type to Yes/No (check box).
- Set Default value to No.
- Select OK. You are taken back to the Settings page.
Select Site Contents to open the Site Contents page. The tile for the new list is there. Open it.
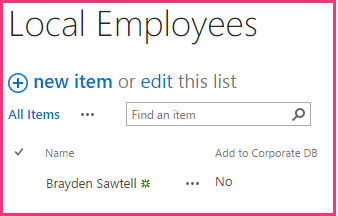
Click new item, and on the create item form, enter a name, but do not select Added to Corporate DB. Select Save. The list should look similar to the following.
Figure 1. Local Employees list with a single item
Add the custom button
In this section, you include markup in the add-in that deploys a button to the list's ribbon. When a user highlights an employee in the list and selects the button, the employee's name is added to the corporate database, and the Added to Corporate DB field for the employee switches from No to Yes.
If Visual Studio is open, you have to close it and reopen the Chain Store solution so that Visual Studio can discover your new list (run Visual Studio as an administrator).
Note
The settings for Startup Projects in Visual Studio tend to revert to defaults whenever the solution is reopened. Always take these steps immediately after reopening the sample solution in this series of articles:
- Right-click the solution node at the top of Solution Explorer, and then select Set startup projects.
- Ensure that all three projects are set to Start in the Action column.
Right-click the ChainStore project in Solution Explorer, and then select Add > New Item.
In the Add New Item dialog, select Ribbon Custom Action, name it AddEmployeeToCorpDB, and then select Add.
The dialog that opens asks three questions. Give the following answers:
Question Give this answer: Where do you want to expose the custom action? Host Web Where is the custom action scoped to? List Instance Which particular item is the custom action scoped to? Local Employees Select Next and you get three more questions:
Question Give this answer: Where is the control located? Ribbon.ListItem.Actions What is the label text for the button control? Add to Corporate DB Where does the button control navigate to? ChainStoreWeb\Pages\EmployeeAdder.aspx
(this is a page whose code-behind is going to add the employee to the database)Click Finish.
An elements.xml file that defines the custom action is added to the project and opened. For the most part, you can treat this file as a black box, and you won't need to make any changes in it until a later article in this series. For now, note only the following:
- The Location attribute of the CommandUIDefinition element has the value
Ribbon.ListItem.Actions.Controls_children. The second part of this,ListItem, identifies the tab on the ribbon where the button will be placed (but that may not be the exact display name of the tab). The third part,Actions, is the name of the section of the ribbon where the button will be placed. - The CommandAction attribute of the CommandUIHandler element begins with the placeholder
~remoteAppUrl. This will be replaced with the URL of the remote web application when the button is deployed. - A few query parameters have been added to the CommandAction value with placeholder values in braces "{ }". These placeholders are resolved at runtime. Note that one of them is the ID of the list item that is selected by the user before she selects the custom button on the ribbon.
- The Location attribute of the CommandUIDefinition element has the value
In the ChainStoreWeb project, open the Pages/EmployeeAdder.aspx file. Notice that it doesn't have any UI. The add-in is going to use this page as a kind of web service. This is possible because the ASP.NET System.Web.UI.Page class implements System.Web.IHttpHandler and because the Page_Load event runs automatically when the page is requested.
Open the code-behind file Pages/EmployeeAdder.aspx.cs. The method that adds the employee to the remote database,
AddLocalEmployeeToCorpDB, is already present. It uses the SharePointContext object to get the host web's URL, which the add-in uses as its tenant discriminator. The first thing the Page_Load method needs to do is initialize this object. The object is created and cached in the Session when the add-in's start page loads, so add the following code to the Page_Load method. (The SharePointContext object is defined in the SharePointContext.cs file that the Office Developer Tools for Visual Studio generates when the add-in solution is created.)spContext = Session["SPContext"] as SharePointContext;The
AddLocalEmployeeToCorpDBmethod takes the employee's name as a parameter, so add the following line to the Page_Load method. You'll create theGetLocalEmployeeNamemethod in a later step.// Read from SharePoint string employeeName = GetLocalEmployeeName();Under this line, add the call to the
AddLocalEmployeeToCorpDBmethod.// Write to remote database AddLocalEmployeeToCorpDB(employeeName);Add a using statement to file for the namespace
Microsoft.SharePoint.Client. (The Office Developer Tools for Visual Studio included the Microsoft.SharePoint.Client assembly in the ChainStoreWeb project when it was created.)Now add the following method to the
EmployeeAdderclass. The SharePoint .NET Client-side Object Model (CSOM) is documented in detail elsewhere on MSDN, and we encourage you to explore it when you are finished with this series of articles. For this article, note that the ListItem class represents an item in a SharePoint list, and that the value of a field in the item can be referenced with "indexer" syntax. Also notice that the code refers to the field as Title even though you changed the field name to Name. This is because fields are always referred to in code by their internal name, not their display name. The internal name of a field is set when the field is created and can never change. You complete theTODO1in a later step.private string GetLocalEmployeeName() { ListItem localEmployee; // TODO1: Initialize the localEmployee object by getting // the item from SharePoint. return localEmployee["Title"].ToString(); }Our code will need the list item's ID before it can retrieve it from SharePoint. Add the following declaration to the
EmployeeAdderclass just under the declaration for thespContextobject.private int listItemID;Now add the following method to the
EmployeeAdderclass to get the list item's ID from the query parameter.private int GetListItemIDFromQueryParameter() { int result; Int32.TryParse(Request.QueryString["SPListItemId"], out result); return result; }To initialize the
listItemIDvariable, add the following line to the Page_Load method just under the line that initializes thespContextvariable.listItemID = GetListItemIDFromQueryParameter();In the
GetLocalEmployeeName, replace theTODO1with the following code. For the time being, just treat this code as a black box while we concentrate on getting the custom button working. We'll learn more about this code in the next article in this series, which is all about the SharePoint client-side object model.using (var clientContext = spContext.CreateUserClientContextForSPHost()) { List localEmployeesList = clientContext.Web.Lists.GetByTitle("Local Employees"); localEmployee = localEmployeesList.GetItemById(listItemID); clientContext.Load(localEmployee); clientContext.ExecuteQuery(); }The entire method should now look like the following.
private string GetLocalEmployeeName()
{
  ListItem localEmployee;

  using (var clientContext = spContext.CreateUserClientContextForSPHost())
  {
    List localEmployeesList = clientContext.Web.Lists.GetByTitle("Local Employees");
    selectedLocalEmployee = localEmployeesList.GetItemById(listItemID);
    clientContext.Load(selectedLocalEmployee);
    clientContext.ExecuteQuery();
  }
  return localEmployee["Title"].ToString();
}
The EmployeeAdder page should not actually render, so add the following as the last line in the Page_Load method. This redirects the browser back to the list view page for the Local Employees list.
// Go back to the Local Employees page
Response.Redirect(spContext.SPHostUrl.ToString() + "Lists/Local%20Employees/AllItems.aspx", true);
The entire Page_Load method should now look like the following.
protected void Page_Load(object sender, EventArgs e)
{
  spContext = Session["SPContext"] as SharePointContext;
  listItemID = GetListItemIDFromQueryParameter();

  // Read from SharePoint
  string employeeName = GetLocalEmployeeName();

  // Write to remote database
  AddLocalEmployeeToCorpDB(employeeName);

  // Go back to the preceding page
  Response.Redirect(spContext.SPHostUrl.ToString() + "Lists/Local%20Employees/AllItems.aspx", true);
}
Request permission to read the host web list
As you have seen, SharePoint prompts you to grant the add-in permissions to the host web when it is installed. You have been re-installing the add-in every time you select F5. So far, the add-in has only needed minimal permissions, but the GetLocalEmployeeName method requires permission to read the lists of the host website. The add-in uses its add-in manifest to tell SharePoint what permissions it needs. Follow these steps.
In Solution Explorer, open the AppManifest.xml file in the ChainStore project (the file is called AppManifest because add-ins used to be called "apps"). The manifest designer opens.
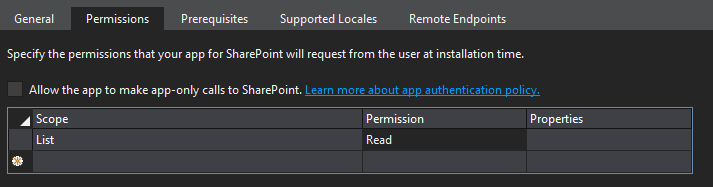
Open the Permissions tab, select the empty cell under the Scope column, and then select List from the drop-down.
In the Permission field, select Read from the drop-down.
Leave the Properties field empty and save the file. The Permissions tab should look similar to the following.
Figure 2. Permissions tab
Run the add-in and test the button
Use the F5 key to deploy and run your add-in. Visual Studio hosts the remote web application in IIS Express and hosts the SQL database in SQL Express. It also makes a temporary installation of the add-in on your test SharePoint site and immediately runs the add-in. You are prompted to grant permissions to the add-in before its start page opens. This time the prompt has a drop-down where you select the list that the app needs to read as seen in the following screenshot.
Figure 3. SharePoint add-in permission prompt
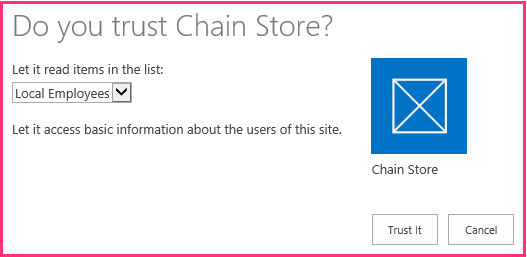
Select Local Employees from the list, and then select Trust it.
When the add-in's start page opens, select Back to Site on the chrome control at the top.
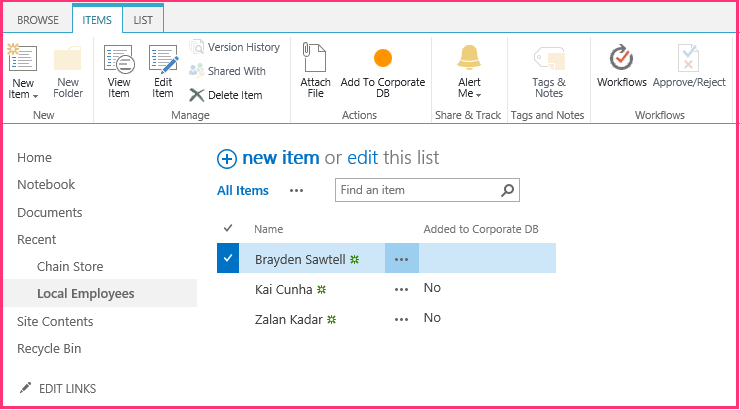
From the website's home page, go to Site Contents > Local Employees. The list view page opens.
Add a few employees to the list. Do not select the Added to Corporate DB check box.
On the ribbon, open the Items tab. In the Actions section of the tab is the custom button Add to Corporate DB.
Select an item in the list. The page and ribbon should look similar to the following.
Figure 4. Local Employees list
After selecting an item in the list, select Add to Corporate DB.
The page seems to reload because the Page_Load method of the EmployeeAdder page redirects back to it.
Use the browser's back button twice to go back to the add-in's start page.
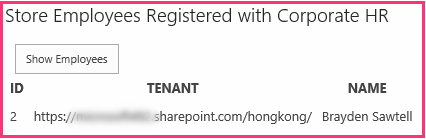
Select Show Employees, and the list of employees will be populated with the employee that you added. It should look similar to the following:
Figure 5. Corporate employees list on the add-in start page
To end the debugging session, close the browser window or stop debugging in Visual Studio. Each time that you select F5, Visual Studio retracts the previous version of the add-in and installs the latest one.
You will work with this add-in and Visual Studio solution in other articles, and it's a good practice to retract the add-in one last time when you are done working with it for a while. Right-click the project in Solution Explorer and select Retract.
Next steps
In the next article, we'll take a brief break from coding to get a quick overview of the SharePoint client-side object model.