Nota
L'accesso a questa pagina richiede l'autorizzazione. È possibile provare ad accedere o modificare le directory.
L'accesso a questa pagina richiede l'autorizzazione. È possibile provare a modificare le directory.
You can broaden the appeal of your SharePoint Framework client-side web part by localizing it for different languages spoken by SharePoint users all over the world. In this article, you'll localize a web part to the Dutch (Netherlands) locale, and verify that the localized values are displayed correctly.
Note
Before following the steps in this article, be sure to set up your SharePoint client-side web part development environment.
Prepare the project
Create a new project
Create a new folder for your project.
md react-localizationGo to the project folder.
cd react-localizationIn the project folder, run the SharePoint Framework Yeoman generator to scaffold a new SharePoint Framework project.
yo @microsoft/sharepointWhen prompted, enter the following values:
- What is your solution name? react-localization
- Which type of client-side component to create? WebPart
- What is your Web part name? Greeting
- Which template would you like to use? React
After the scaffolding completes, lock down the version of the project dependencies by running the following command:
npm shrinkwrapOpen your project folder in your code editor. This article uses Visual Studio Code in the steps and screenshots, but you can use any editor that you prefer.
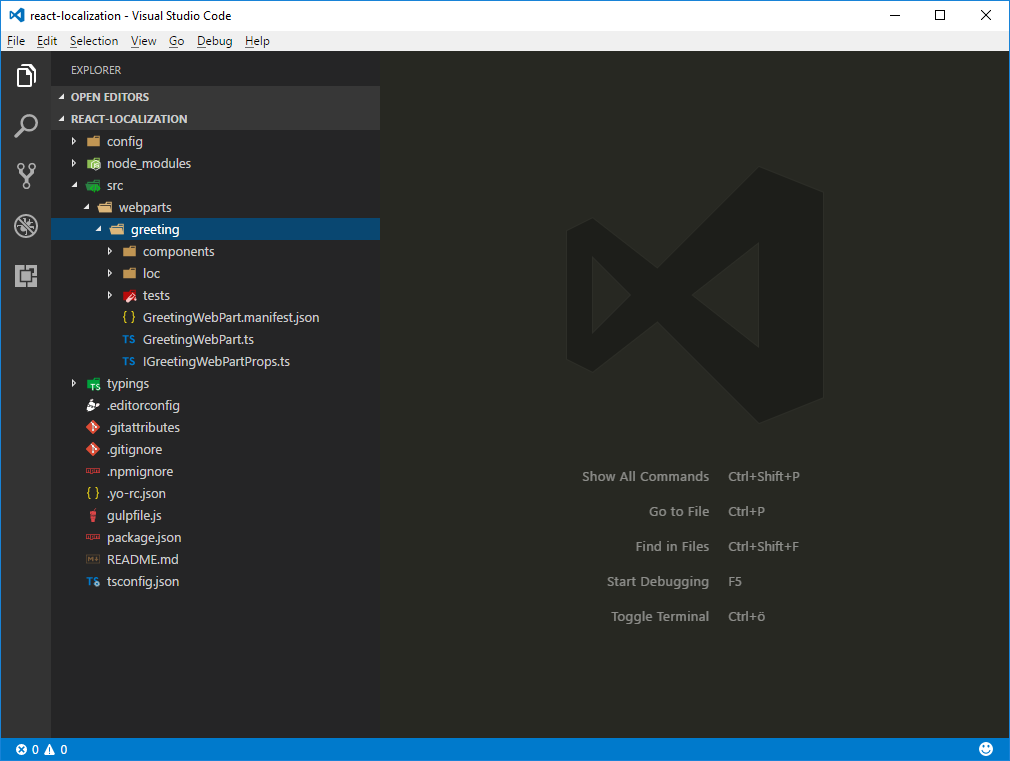
Replace the default code
In the code editor, open the ./src/webparts/greeting/GreetingWebPart.ts file, and update the definition of the
IGreetingWebPartPropsinterface to the following code:export interface IGreetingWebPartProps { greeting: string; }In the same file, change the GreetingWebPart class to:
export default class GreetingWebPart extends BaseClientSideWebPart<IGreetingWebPartProps> {

  public render(): void {
    const element: React.ReactElement<IGreetingProps > = React.createElement(
      Greeting,
      {
        greeting: this.properties.greeting
      }
    );

    ReactDom.render(element, this.domElement);
  }

  protected get dataVersion(): Version {
    return Version.parse('1.0');
  }

  protected getPropertyPaneConfiguration(): IPropertyPaneConfiguration {
    return {
      pages: [
        {
          header: {
            description: strings.PropertyPaneDescription
          },
          groups: [
            {
              groupName: strings.DisplayGroupName,
              groupFields: [
                PropertyPaneTextField('greeting', {
                  label: strings.GreetingFieldLabel
                })
              ]
            }
          ]
        }
      ]
    };
  }
}
Update the main React component by opening the ./src/webparts/greeting/components/Greeting.tsx file and changing its code to:
import * as React from 'react';
import styles from './Greeting.module.scss';
import { IGreetingProps } from './IGreetingProps';
import { escape } from '@microsoft/sp-lodash-subset';

export default class Greeting extends React.Component<IGreetingProps, {}> {
  public render(): JSX.Element {
    return (
      <div className={styles.greeting}>
        <div className={styles.container}>
          <div className={`ms-Grid-row ms-bgColor-themeDark ms-fontColor-white ${styles.row}`}>
            <div className="ms-Grid-col ms-u-lg10 ms-u-xl8 ms-u-xlPush2 ms-u-lgPush1">
              <span className='ms-font-xl ms-fontColor-white'>
                Welcome to SharePoint!
              </span>
              <p className='ms-font-l ms-fontColor-white'>
                Customize SharePoint experiences using web parts.
              </p>
              <p className='ms-font-l ms-fontColor-white'>
                {escape(this.props.greeting)}
              </p>
              <a href="https://aka.ms/spfx" className={styles.button}>
                <span className={styles.label}>Learn more</span>
              </a>
            </div>
          </div>
        </div>
      </div>
    );
  }
}
Update the main React component interface by opening the ./src/webparts/greeting/components/IGreetingProps.tsx file and changing its code to:
import { IGreetingWebPartProps } from '../GreetingWebPart';

export interface IGreetingProps extends IGreetingWebPartProps {
}
Update the localization TypeScript type definition file by opening the ./src/webparts/greeting/loc/mystrings.d.ts file and changing its code to:
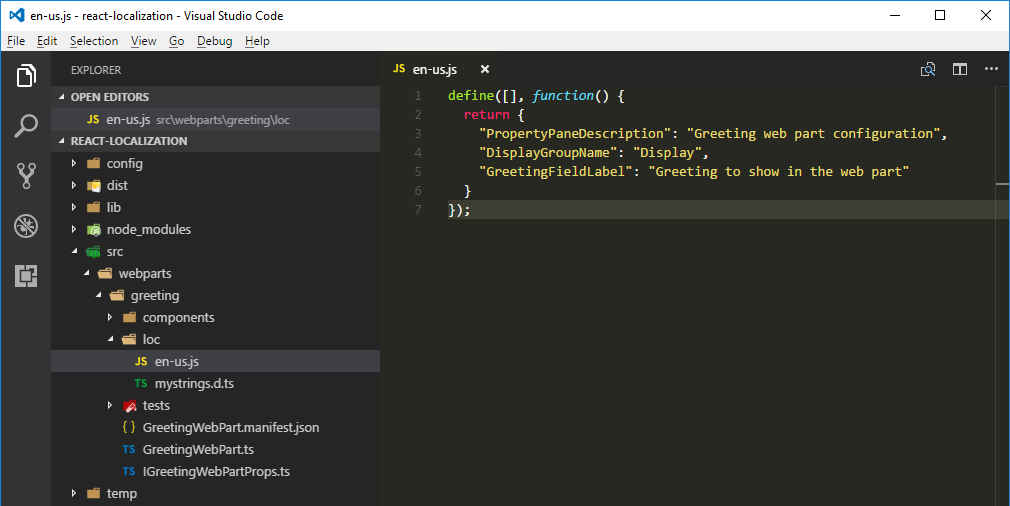
declare interface IGreetingWebPartStrings {
  PropertyPaneDescription: string;
  DisplayGroupName: string;
  GreetingFieldLabel: string;
}

declare module 'GreetingWebPartStrings' {
  const strings: IGreetingWebPartStrings;
  export = strings;
}
Update the US English locale file by opening the ./src/webparts/greeting/loc/en-us.js file and changing its code to:
define([], function() {
  return {
    "PropertyPaneDescription": "Greeting web part configuration",
    "DisplayGroupName": "Display",
    "GreetingFieldLabel": "Greeting to show in the web part"
  }
});
In the web part manifest, update the default value of the greeting property by opening the ./src/webparts/greeting/GreetingWebPart.manifest.json file and changing the properties section to:
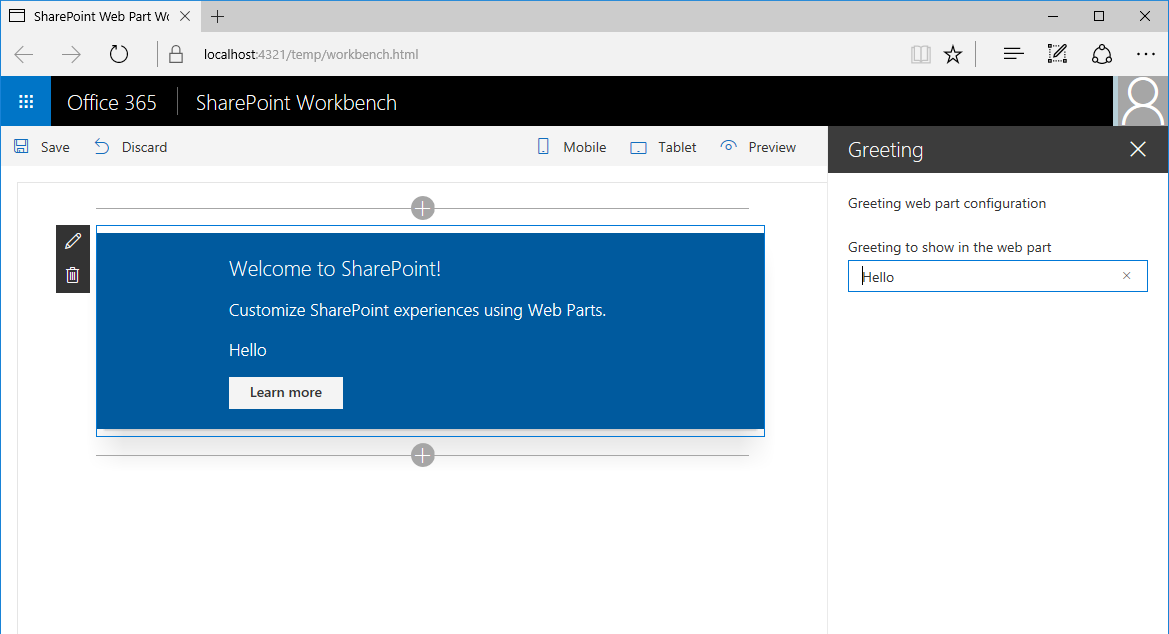
{
  // ...
  "preconfiguredEntries": [{
    "groupId": "5c03119e-3074-46fd-976b-c60198311f70", // Advanced
    "group": { "default": "Advanced" },
    "title": { "default": "Greeting" },
    "description": { "default": "Greets the user" },
    "officeFabricIconFontName": "Page",
    "properties": {
      "greeting": "Hello"
    }
  }]
}
Verify that you've applied all changes correctly by running the following command:
gulp serveIn the SharePoint Workbench, add the web part to the page, and open its configuration.
Localize the web part manifest
Every SharePoint Framework client-side web part consists of code and a manifest. The manifest provides information about the web part such as its title, description, and icon. When adding a web part to the page, the information from the web part manifest is displayed to users.
Using this information, users decide if the web part is the one that they're looking for. Providing a title and description that correctly reflect the web part's functionality is essential if you want your web part to be used. If your web part is used on non-English sites, localizing its metadata can improve the user experience even further.
Some properties defined in the web part manifest, such as title or description, support specifying localized values. For the complete list of all web part manifest properties that support localization, see Simplify adding web parts with preconfigured entries.
Properties that support localization are of type ILocalizedString. Each localized string must specify at least the default value and optionally values for other locales.
Add localized values for title, description, and group name
- In the code editor, open the ./src/webparts/greeting/GreetingWebPart.manifest.json file.
- In the preconfiguredEntries array, add translations for the title, description, and group properties in Dutch (Netherlands), by changing the code to:
{
  // ...
  "preconfiguredEntries": [{
    "groupId": "5c03119e-3074-46fd-976b-c60198311f70", // Advanced
    "group": { "default": "Advanced", "nl-NL": "Anders" },
    "title": { "default": "Greeting", "nl-NL": "Begroeting" },
    "description": { "default": "Greets the user", "nl-NL": "Begroet de gebruiker" },
    "officeFabricIconFontName": "Page",
    "properties": {
      "greeting": "Hello"
    }
  }]
}
Important
You should pay attention to the correct spelling of the locales. The first part needs to be in lowercase letters while the last part has to be written in uppercase ("nl-NL").
Run the following command to verify that the project is working:
gulp serve
Note
Unfortunately, the SharePoint Workbench doesn't currently support previewing the localized values from the web part manifest. It always uses the default translation.
Localize the web part property pane
When working with a web part, a user often needs to configure it for their specific needs. Providing descriptive labels for the different configuration settings improves the usability of the web part and decreases the number of support requests from users for help with configuring web parts.
The web part property pane consists of sections. Each section has a header and one or more controls that allow users to configure the web part. Each of these controls contains a label that describes its purpose.
By default, web parts load the string labels from a JavaScript resource file. If you've built classic web parts with full-trust solutions, they resemble .resx resource files. It's not required to use these resource files, and you could include the strings directly in code. However, it's highly recommended that you use resource files. The little additional overhead they add outweighs the effort required to extract all labels afterwards should you need to translate the web part later on.
The localization files used by the web part are stored in the ./src/webparts/greeting/loc folder.
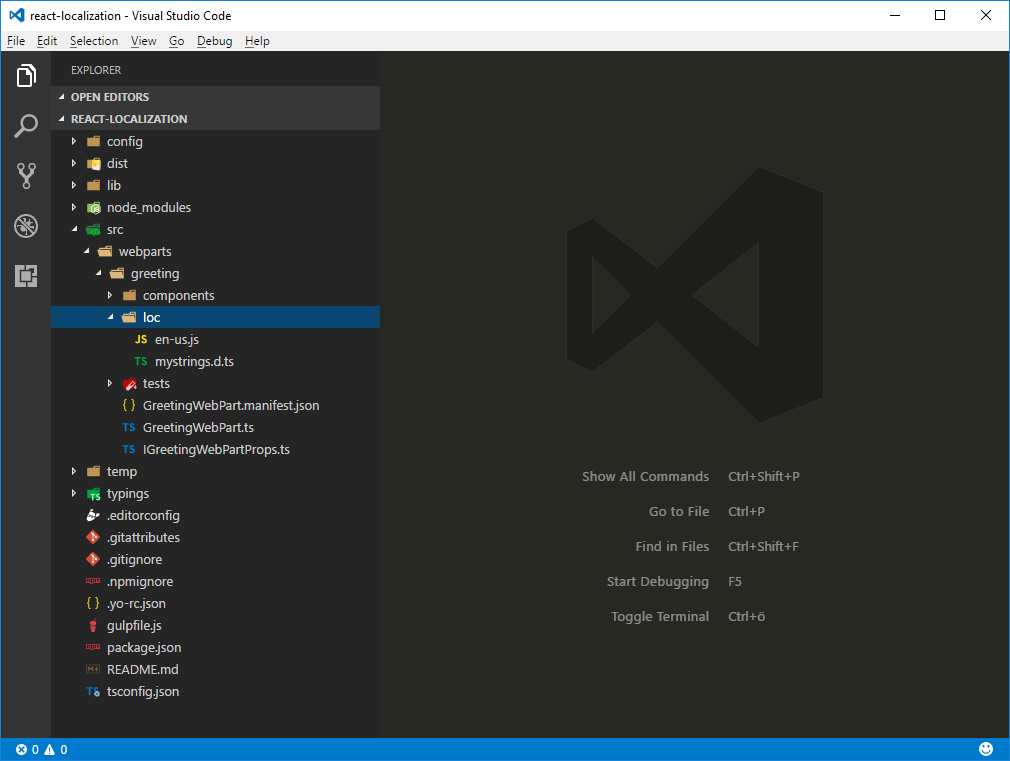
The loc folder contains a TypeScript type definition file (./src/webpart/greeting/loc/mystrings.d.ts) that informs TypeScript of the different strings included in the localized files. Using the information from this file, your code editor can provide you with IntelliSense when working with strings in code. Additionally, while building your project, TypeScript can verify that you're not referring to a string that hasn't been defined.

For each locale supported by your web part, there's also a plain JavaScript file (not TypeScript) named in lowercase after the locale (for example en-us.js) that contains the translated strings.
Important
You should pay extra attention to verifying that all keys specified in the TypeScript type definition file for localization have translations in all localization JavaScript files.
The default locale used by the SharePoint Framework is en-US. If your web part is used on a site that uses a locale not supported by your web part, the SharePoint Framework uses en-US as the default locale.
You can override this behavior by creating a locale file named default.js with the translations in your preferred language. While the name default.js doesn't follow the locale naming convention, it signals to the SharePoint Framework build process to use that particular locale file as the fallback locale instead of the standard US English locale.
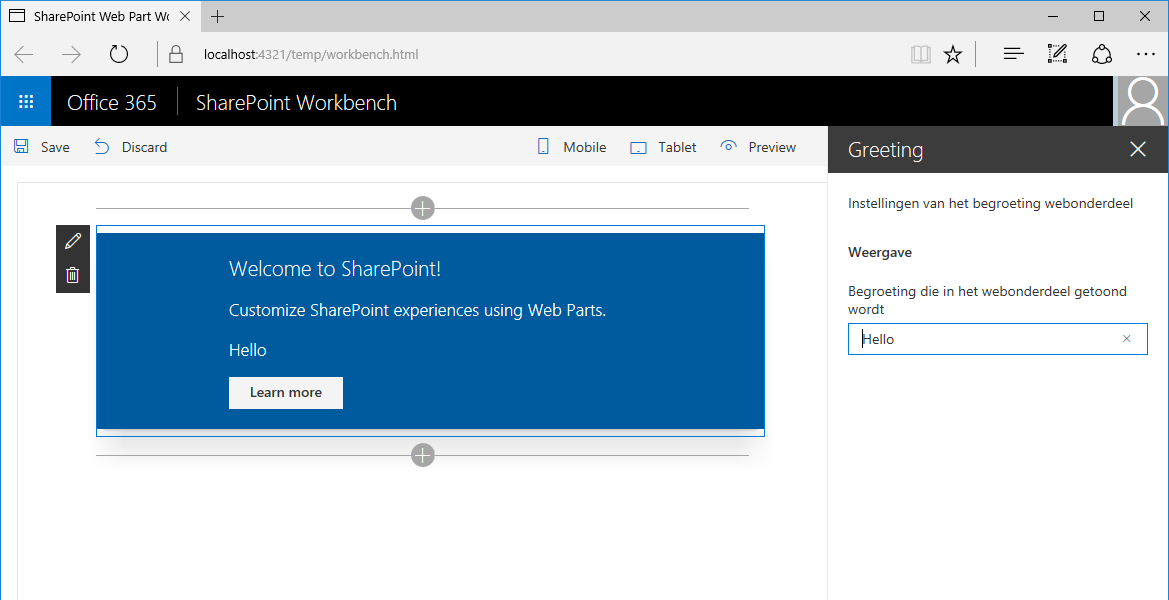
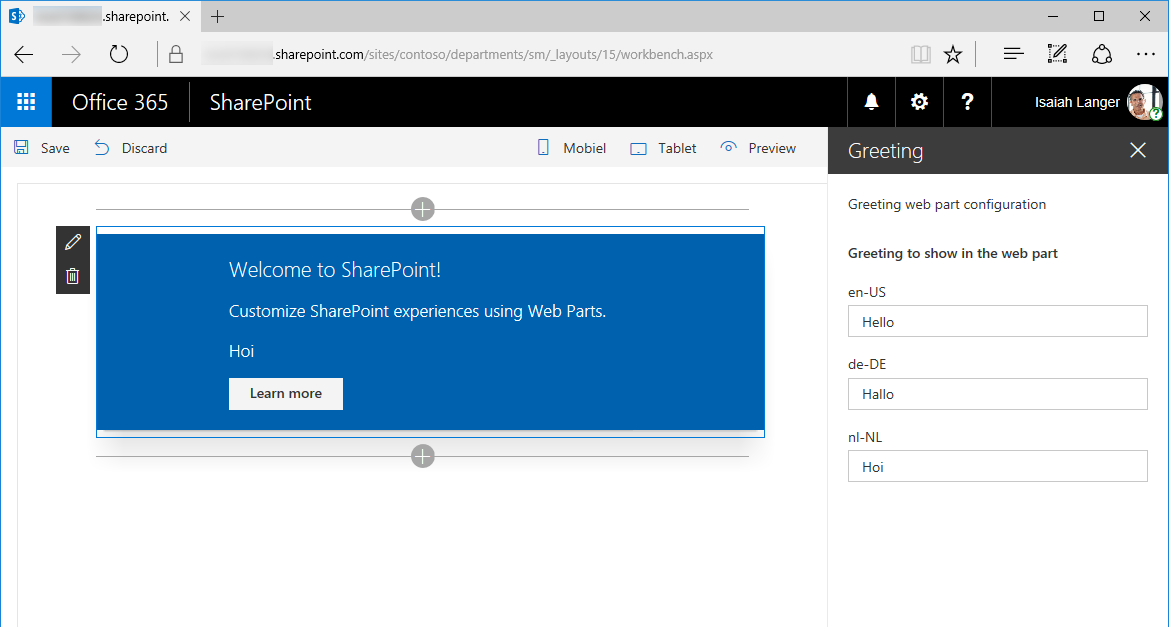
Add localized values for web part property pane strings
In the ./src/webparts/greetings/loc folder, create a new file named nl-nl.js, and enter the following code:
define([], function() {
  return {
    "PropertyPaneDescription": "Instellingen van het begroeting webonderdeel",
    "DisplayGroupName": "Weergave",
    "GreetingFieldLabel": "Begroeting die in het webonderdeel getoond wordt"
  }
});
Verify that the keys in the TypeScript type definition file for localization match the contents of the locale files for US English and Dutch (Netherlands).

Verify the localized web part property pane strings
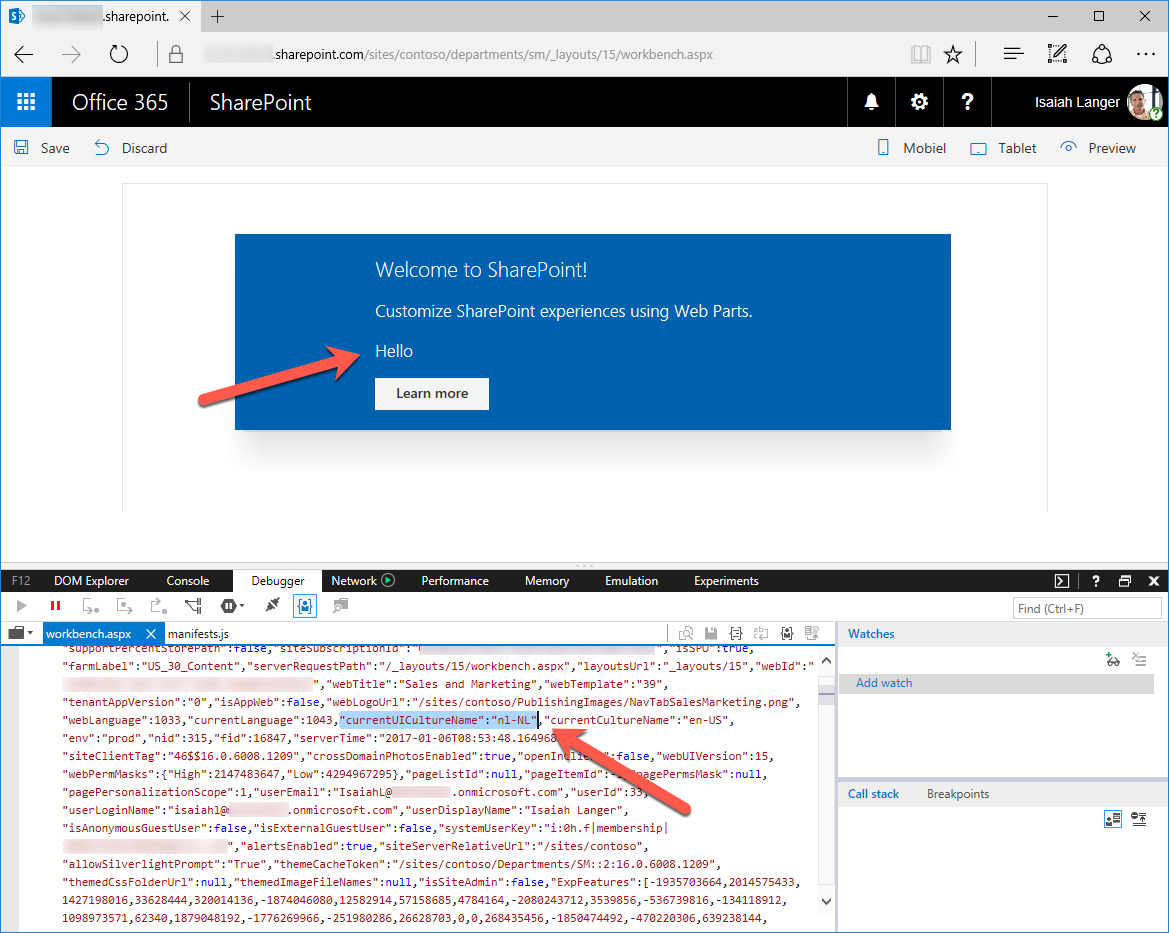
When testing web parts by using the hosted version of the SharePoint Workbench or team sites on a developer tenant, the locale of the context site expressed by the spPageContextInfo.currentUICultureName property is used as the default locale.
When testing web parts by using the local SharePoint Workbench, the SharePoint Framework uses by default the en-US locale to display web part property pane strings. There are two ways in which you can test the values from other locales supported by your web part.
Specify the locale to be tested by using the command-line argument
Another way to specify the locale to be used by the local SharePoint Workbench is to specify it as an argument for the gulp task.
Start the SharePoint Workbench by running the following command:
gulp serve --locale=nl-nlWhen you open your web part's configuration, you'll see that all property pane strings are displayed in Dutch (Netherlands) rather than the default US English.
Localize web part contents
The same way that you localize web part property pane strings, you should localize all strings displayed by the web part in its body. You can use the same approach that you use when localizing web part property pane strings. For every string to be localized, add a key in the localization TypeScript definition file, and then translate the string to each of the supported locales in the corresponding locale JavaScript file.
Globalize the web part strings
The default web part provided with the scaffolded SharePoint Framework project has its strings embedded in the code. Before you can localize these strings, you've to replace them with references to the localized strings. This process is often referred to as globalization or internationalization (or i18n for short).
In the code editor, open the ./src/webparts/greeting/components/Greetings.tsx file.
In the top section of the file, directly after the last
importstatement, add a reference to the localized strings:import * as strings from 'GreetingWebPartStrings';Replace the contents of the Greeting class with the following code:
// ...
export default class Greeting extends React.Component<IGreetingProps, {}> {
  public render(): JSX.Element {
    return (
      <div className={styles.greeting}>
        <div className={styles.container}>
          <div className={`ms-Grid-row ms-bgColor-themeDark ms-fontColor-white ${styles.row}`}>
            <div className="ms-Grid-col ms-u-lg10 ms-u-xl8 ms-u-xlPush2 ms-u-lgPush1">
              <span className='ms-font-xl ms-fontColor-white'>
                Welcome to SharePoint!
              </span>
              <p className='ms-font-l ms-fontColor-white'>
                Customize SharePoint experiences using web parts.
              </p>
              <p className='ms-font-l ms-fontColor-white'>
                {escape(this.props.greeting)}
              </p>
              <a href="https://aka.ms/spfx" className={styles.button}>
                <span className={styles.label}>{strings.LearnMoreButtonLabel}</span>
              </a>
            </div>
          </div>
        </div>
      </div>
    );
  }
}
Add the new string to the localization TypeScript type definition file
Having replaced the string with a reference, the next step is to add that string to the localization files used by the web part.
In the code editor, open the ./src/webparts/greetings/loc/mystrings.d.ts file, and change its code to:
declare interface IGreetingWebPartStrings {
  PropertyPaneDescription: string;
  DisplayGroupName: string;
  GreetingFieldLabel: string;
  LearnMoreButtonLabel: string;
}

declare module 'greetingStrings' {
  const strings: IGreetingWebPartStrings;
  export = strings;
}
Add localized values for the new string
The last step is to provide localized versions for the new string in all locales supported by the web part.
In the code editor, open the ./src/webparts/greeting/loc/en-us.js file, and change its code to:
define([], function() {
  return {
    "PropertyPaneDescription": "Greeting web part configuration",
    "DisplayGroupName": "Display",
    "GreetingFieldLabel": "Greeting to show in the web part",
    "LearnMoreButtonLabel": "Learn more"
  }
});
Open the ./src/webparts/greeting/loc/nl-nl.js file, and change its code to:
define([], function() {
  return {
    "PropertyPaneDescription": "Instellingen van het begroeting webonderdeel",
    "DisplayGroupName": "Weergave",
    "GreetingFieldLabel": "Begroeting die in het webonderdeel getoond wordt",
    "LearnMoreButtonLabel": "Meer informatie"
  }
});
Confirm that the translated string is correctly displayed by running the following command:
gulp serve --locale=nl-nl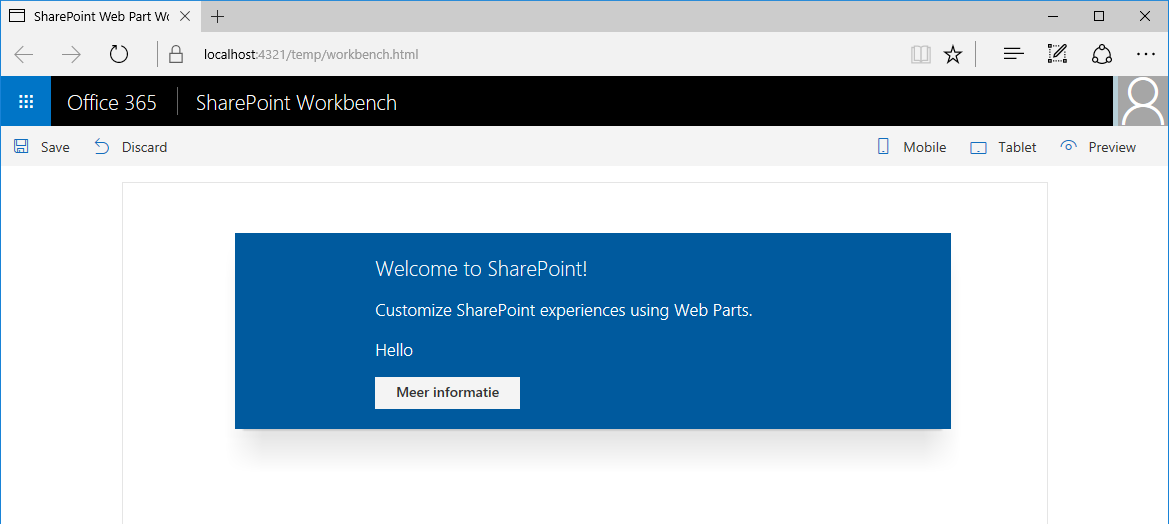
Improve globalizing and localizing web parts by using pseudo-locales
Using localization when building web parts offers clear benefits but is also something that developers overlook easily. Often, translations to other locales are provided later in the project and it's difficult for testers to verify that all code properly supports the different locales.
The same words in different locales have different lengths. For example, the same sentence translated from English to German or Dutch can become 35% longer. Without all translations available upfront, it's difficult for developers and designers to ensure that the user interface can properly accommodate longer strings.
Some languages use special characters beyond the standard ASCII character set. If designers use a non-standard font, its possible that the font doesn't properly support some special characters.
Finding out about all these issues late in the project will likely lead to delays and costly fixes. The SharePoint Framework allows developers to use pseudo-locales to address these issues while building web parts.
Tip
What are pseudo-locales? Pseudo-locales are locales designed to test software for proper support of the different aspects of the localization process, such as support for special characters, right-to-left languages, or accommodating longer strings in the user interface.
Add the base pseudo-locale
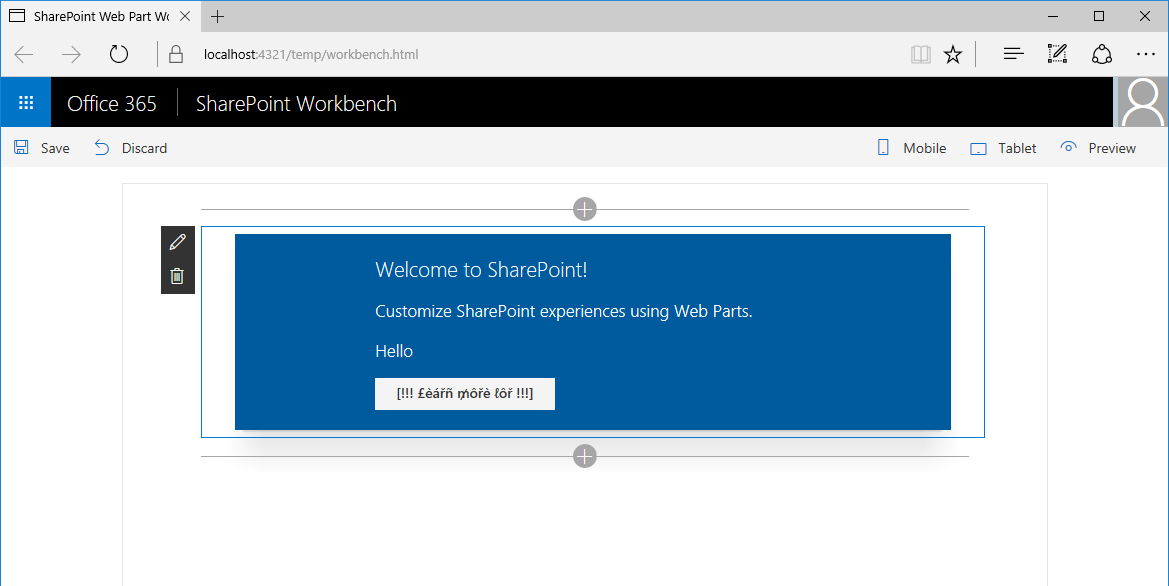
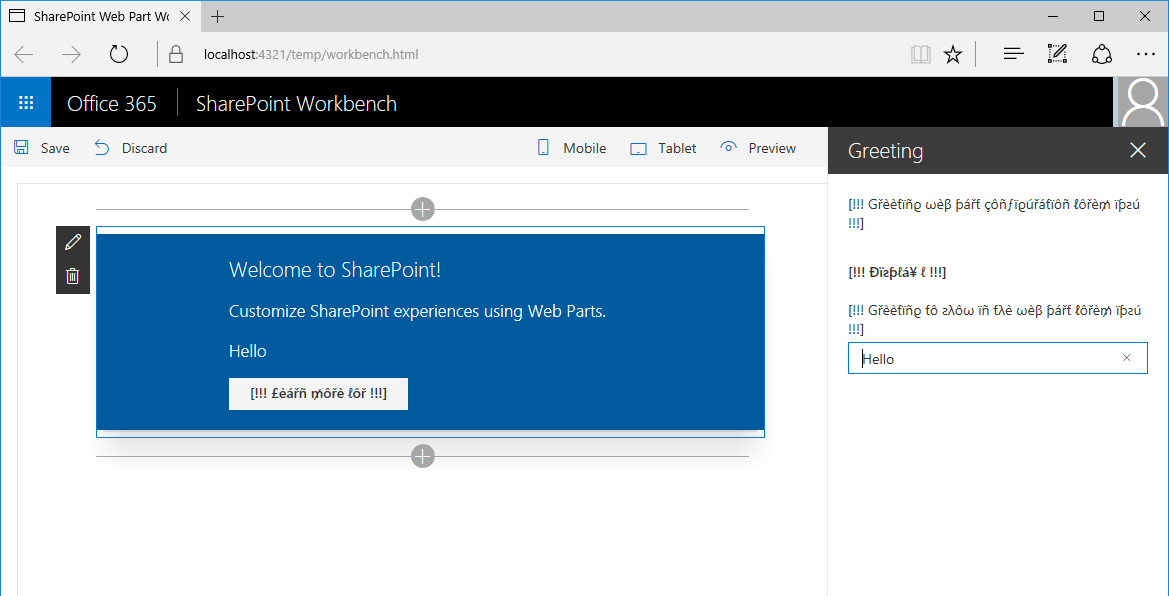
In the ./src/webparts/greeting/loc folder, add a new file named qps-ploc.js, and paste the following code:
define([], function() {
  return {
    "PropertyPaneDescription": "[!!! Gřèèƭïñϱ ωèβ ƥářƭ çôñƒïϱúřáƭïôñ ℓôřè₥ ïƥƨú !!!]",
    "DisplayGroupName": "[!!! Ðïƨƥℓᥠℓ !!!]",
    "GreetingFieldLabel": "[!!! Gřèèƭïñϱ ƭô ƨλôω ïñ ƭλè ωèβ ƥářƭ ℓôřè₥ ïƥƨú !!!]",
    "LearnMoreButtonLabel": "[!!! £èářñ ₥ôřè ℓôř !!!]"
  }
});
Tip
You can convert US English strings to their base pseudo-locale equivalent at Pseudolocalize!. By increasing the length of the generated string by 35%, you should be able to simulate the length of strings translated to longer locales such as German or Dutch. Additionally, by surrounding the translations with brackets and exclamation marks you can more easily see if the whole string is displayed on the screen.
Test the project using the base pseudo-locale by running the following command:
gulp serve --locale=qps-plocAfter adding the web part to the page, you can quickly see that there are two strings in the web part body that haven't been internationalized and are still displayed in US English rather than in the base pseudo-locale.
Open the web part property pane, and confirm that all strings and their special characters are displayed properly and that they fit in the available space correctly.
Localize web part settings values
SharePoint supports Multilingual User Interface (MUI) where the site administrator can enable multiple languages for the user interface. When the user visits the site, its UI automatically is displayed using the preferred language based on that user's preferences.
Web parts used on multilingual sites should automatically detect the currently used language and display their contents in that language. The SharePoint Framework simplifies this process by automatically loading the resource file corresponding to the currently used language. Additionally, when testing SharePoint Framework web parts using the hosted version of the SharePoint Workbench, the Workbench also automatically uses the language preferred by the user.
Values configured through web part properties aren't stored in resource files. By default, the configured value is used as-is, which might lead to inconsistencies, such as greeting the user in English when the user's preferred language is Dutch.
By using the building blocks provided with the SharePoint Framework, you can extend your web part with support for storing web part configuration values in multiple languages. For each of the supported languages, the property pane displays a separate text field in which the user can enter the translated value for that property.
Note
The SharePoint site used to test the web part shown in this article is a multilingual site with the US English, Dutch, and German languages enabled. For more information about enabling additional languages on SharePoint sites, see Choose the languages you want to make available for a site’s user interface.
Add list of languages supported by SharePoint Online
The list of languages enabled on a multilingual SharePoint site is returned as an array of locale identifiers (LCID), for example, 1033 for US English.
However, the currently used language is returned as a string, for example, en-US for US English. Because JavaScript doesn't have a native way of converting the LCID number to the locale name, and the other way around, you've to do it yourself.
In the code editor, open the ./src/webparts/greeting/GreetingWebPart.ts file.
Add a new class variable named locales in the existing GreetingWebPart with the following code:
export default class GreetingWebPart extends BaseClientSideWebPart<IGreetingWebPartProps> {
  private locales = {
    1025: 'ar-SA',
    1026: 'bg-BG',
    1027: 'ca-ES',
    1028: 'zh-TW',
    1029: 'cs-CZ',
    1030: 'da-DK',
    1031: 'de-DE',
    1032: 'el-GR',
    1033: 'en-US',
    1035: 'fi-FI',
    1036: 'fr-FR',
    1037: 'he-IL',
    1038: 'hu-HU',
    1040: 'it-IT',
    1041: 'ja-JP',
    1042: 'ko-KR',
    1043: 'nl-NL',
    1044: 'nb-NO',
    1045: 'pl-PL',
    1046: 'pt-BR',
    1048: 'ro-RO',
    1049: 'ru-RU',
    1050: 'hr-HR',
    1051: 'sk-SK',
    1053: 'sv-SE',
    1054: 'th-TH',
    1055: 'tr-TR',
    1057: 'id-ID',
    1058: 'uk-UA',
    1060: 'sl-SI',
    1061: 'et-EE',
    1062: 'lv-LV',
    1063: 'lt-LT',
    1066: 'vi-VN',
    1068: 'az-Latn-AZ',
    1069: 'eu-ES',
    1071: 'mk-MK',
    1081: 'hi-IN',
    1086: 'ms-MY',
    1087: 'kk-KZ',
    1106: 'cy-GB',
    1110: 'gl-ES',
    1164: 'prs-AF',
    2052: 'zh-CN',
    2070: 'pt-PT',
    2108: 'ga-IE',
    3082: 'es-ES',
    5146: 'bs-Latn-BA',
    9242: 'sr-Latn-RS',
    10266: 'sr-Cyrl-RS',
  };

  // ...
}
The locales variable lists all languages supported by SharePoint Online.
Add two class methods that allow you to get the LCID from the locale name, and the locale name from the LCID:
export default class GreetingWebPart extends BaseClientSideWebPart<IGreetingWebPartProps> {
  // ...

  private getLocaleId(localeName: string): number {
    const pos: number = (Object as any).values(this.locales).indexOf(localeName);
    if (pos > -1) {
      return parseInt(Object.keys(this.locales)[pos]);
    }
    else {
      return 0;
    }
  }

  private getLocaleName(localeId: number): string {
    const pos: number = Object.keys(this.locales).indexOf(localeId.toString());
    if (pos > -1) {
      return (Object as any).values(this.locales)[pos];
    }
    else {
      return '';
    }
  }
}
Remove the standard greeting web part property
Originally, the Greeting web part had the greeting property defined where the user could specify the greeting to be displayed on the screen. To adapt the web part to support multilingual SharePoint sites, you need to store multiple values; one for each language. Because you can't know upfront which languages will be enabled on the site, rather than using one static web part property, you can dynamically generate web part properties at runtime.
In the code editor, open the ./src/webparts/greeting/GreetingWebPart.manifest.json file.
Remove the greeting property from the properties property:
{
  // ...

  "preconfiguredEntries": [{
    "groupId": "5c03119e-3074-46fd-976b-c60198311f70", // Advanced
    "group": { "default": "Advanced", "nl-NL": "Anders" },
    "title": { "default": "Greeting", "nl-NL": "Begroeting" },
    "description": { "default": "Greets the user", "nl-NL": "Begroet de gebruiker" },
    "officeFabricIconFontName": "Page",
    "properties": {
    }
  }]
}
Open the ./src/webparts/greeting/GreetingWebPart.ts file.
Remove the greeting property from the
IGreetingWebPartPropsinterface definition:export interface IGreetingWebPartProps { }Because the main React component should display a greeting, open the ./src/webparts/greeting/components/IGreetingProps.ts file, and change the IGreetingProps interface to:
export interface IGreetingProps {
  greeting: string;
}
With this modification, you can pass the greeting to be displayed from the web part to the React component.
Display property pane text fields for all enabled languages
Initially, by using the web part configuration, the user could configure a welcome message. The web part allowed the user to configure a single value that was displayed to all users no matter what their language preference was. By retrieving the list of languages enabled on the current site, you can dynamically display text fields to allow the user to provide translations for all the languages enabled on the site.
Load information about languages enabled on the current site
The first step is to load the information about all languages enabled on the current site.
In the code editor, open the ./src/webparts/greeting/GreetingWebPart.ts file.
Add a new class variable named supportedLanguageIds:
export default class GreetingWebPart extends BaseClientSideWebPart<IGreetingWebPartProps> {
  // ...
  private supportedLanguageIds: number[];
  // ...
}
Because we'll be querying data in SharePoint, we use SharePoint Http Client for the operations.
Add the following imports just above the GreetingWebPart.
import {
  SPHttpClient,
  SPHttpClientResponse
} from '@microsoft/sp-http';
In the GreetingWebPart class, add a new method named getSupportedLanguageIds:
export default class GreetingWebPart extends BaseClientSideWebPart<IGreetingWebPartProps> {
  // ...

  private getSupportedLanguageIds(): Promise<number[]> {
    return new Promise<number[]>((resolve: (supportedLanguageIds: number[]) => void, reject: (error: any) => void): void => {
      if (this.supportedLanguageIds) {
        resolve(this.supportedLanguageIds);
        return;
      }

      this.context.spHttpClient.get(this.context.pageContext.web.absoluteUrl + '/_api/web?$select=SupportedUILanguageIds', SPHttpClient.configurations.v1)
      .then((response: SPHttpClientResponse): Promise<{ SupportedUILanguageIds: number[] }> => {
        return response.json();
      }).then((siteInfo: { SupportedUILanguageIds: number[] }): void => {
        this.supportedLanguageIds = siteInfo.SupportedUILanguageIds;
        resolve(siteInfo.SupportedUILanguageIds);
      }, (error: any): void => {
        reject(error);
      });
    });
  }
}
The list of languages enabled on the current site should be loaded only once. If the information about the languages hasn't been loaded yet, the method uses the standard SharePoint Framework HTTP Client to call the SharePoint REST API and retrieve the information about languages enabled on the current site.
Dynamically render text fields for all languages
Now that you can retrieve the information about the languages enabled on the current site, you will display text fields for each of these languages so that the user can specify translated values for the greeting message.
In the code editor, open the ./src/webparts/greeting/GreetingWebPart.ts file.
Add a new class variable named greetingFields to the GreetingWebPart class:
export default class GreetingWebPart extends BaseClientSideWebPart<IGreetingWebPartProps> {
  // ...
  private greetingFields: IPropertyPaneField<any>[] = [];
  // ...
}
Change the import statement for the @microsoft/sp-webpart-base package to:
import {
  BaseClientSideWebPart,
  IPropertyPaneConfiguration,
  PropertyPaneTextField,
  IPropertyPaneField
} from '@microsoft/sp-webpart-base';
Change the propertyPaneSettings getter to get the list of text fields from the newly added greetingFields class variable:
export default class GreetingWebPart extends BaseClientSideWebPart<IGreetingWebPartProps> {
  // ...

    protected getPropertyPaneConfiguration(): IPropertyPaneConfiguration {
    return {
      pages: [
        {
          header: {
            description: strings.PropertyPaneDescription
          },
          groups: [
            {
              groupName: strings.GreetingGroupName,
              groupFields: this.greetingFields
            }
          ]
        }
      ]
    };
  }

  // ...
}
If the site has multiple languages enabled, the web part renders multiple fields for the user to enter the greeting message. To make it clear that these fields belong together, put them in a separate group.
In the code editor, open the ./src/webparts/greeting/loc/mystrings.d.ts file, and change its code to:
declare interface IGreetingWebPartStrings {
  PropertyPaneDescription: string;
  GreetingGroupName: string;
  LearnMoreButtonLabel: string;
}

declare module 'GreetingWebPartStrings' {
  const strings: IGreetingWebPartStrings;
  export = strings;
}
Update the following resource files to provide values for the GreetingGroupName string.
./src/webparts/greeting/loc/en-us.js
define([], function() {
  return {
    "PropertyPaneDescription": "Greeting web part configuration",
    "GreetingGroupName": "Greeting to show in the web part",
    "LearnMoreButtonLabel": "Learn more"
  }
});
./src/webparts/greeting/loc/nl-nl.js
define([], function() {
  return {
    "PropertyPaneDescription": "Instellingen van het begroeting webonderdeel",
    "GreetingGroupName": "Begroeting die in het webonderdeel getoond wordt",
    "LearnMoreButtonLabel": "Meer informatie"
  }
});
./src/webparts/greeting/loc/qps-ploc.js
define([], function() {
  return {
    "PropertyPaneDescription": "[!!! Gřèèƭïñϱ ωèβ ƥářƭ çôñƒïϱúřáƭïôñ ℓôřè₥ ïƥƨú !!!]",
    "GreetingGroupName": "[!!! Gřèèƭïñϱ ƭô ƨλôω ïñ ƭλè ωèβ ƥářƭ ℓôřè₥ ïƥƨú !!!]",
    "LearnMoreButtonLabel": "[!!! £èářñ ₥ôřè ℓôř !!!]"
  }
});
In the ./src/webparts/greeting/GreetingWebPart.ts file, override the onPropertyPaneConfigurationStart method by using the following code:
export default class GreetingWebPart extends BaseClientSideWebPart<IGreetingWebPartProps> {
  // ...
  protected onPropertyPaneConfigurationStart(): void {
    this.context.statusRenderer.displayLoadingIndicator(this.domElement, 'languages');

    this.getSupportedLanguageIds()
      .then((supportedLanguageIds: number[]): void => {
        this.greetingFields = [];
        supportedLanguageIds.forEach(localeId => {
          this.greetingFields.push(PropertyPaneTextField(`greeting_${localeId}`, {
            label: this.getLocaleName(localeId)
          }));
        });

        this.context.propertyPane.refresh();
        this.context.statusRenderer.clearLoadingIndicator(this.domElement);
        this.render();
      });
  }
}
When the user opens the web part property pane, the method loads the information about the languages enabled on the current site. Because loading this information might take a moment, the method displays a loading indicator communicating its status to the user.
After the information about the enabled languages is loaded, the method creates a new property pane text field linked to a dynamic web part property named greeting__lcid_, for example, greeting_1033 for US English.
After the text fields for all enabled languages are constructed, the method refreshes the property pane by calling the IPropertyPaneAccessor.refresh method.
Finally, the method clears the web part loading indicator and re-renders the web part body.
Show the greeting for the preferred user language
Originally, the web part showed the same greeting for all users no matter what their preferred language was. Now that the web part has different translations of the welcome message stored, it should display the greeting that uses the language preferred by the current user.
In the ./src/webparts/greeting/GreetingWebPart.ts file, change the web part's render method to:
export default class GreetingWebPart extends BaseClientSideWebPart<IGreetingWebPartProps> {
  // ...

  public render(): void {
    const element: React.ReactElement<IGreetingProps> = React.createElement(Greeting, {
      greeting: this.getGreeting()
    });

    ReactDom.render(element, this.domElement);
  }
}
In the GreetingWebPart, add a new method named getGreeting:
export default class GreetingWebPart extends BaseClientSideWebPart<IGreetingWebPartProps> {
  // ...

  private getGreeting(): string {
    let localeId: number = this.getLocaleId(this.context.pageContext.cultureInfo.currentUICultureName);
    if (localeId === 0) {
      localeId = 1033;
    }

    return this.properties[`greeting_${localeId}`];
  }

  // ...
}
This method gets the currently used language and converts it to a locale ID. It then returns the value of the greeting property translated to that language.
Localization in different build types
Depending on the selected build mode, the SharePoint Framework handles localization files differently. Following are some of the differences between the files generated in a debug build and a release build.
Localization files in the debug build
When building SharePoint Framework projects in debug mode, only the information about the default locale is included in the generated web part manifest. In debug mode, SharePoint Framework uses either the default en-US locale, or the locale that has been specified in the project configuration or by using the locale argument in the command line.
Resource files with translated strings aren't included in the output dist folder. Instead, they're loaded at runtime from the intermediate lib folder by using the path in the generated web part manifest.
Looking at the information about the GreetingWebPartStrings module in the web part manifest generated during a debug build, you can see that despite the different locales supported by the web part (en-US, nl-NL, and qps-ploc), the path to the en-US resource file stored in the intermediate location has been assigned as the default path of the localization module.
{
  "id": "edbc4e31-6085-4ffa-85f4-eeffcb0ea2d4",
  "alias": "GreetingWebPart",
  "componentType": "WebPart",
  "version": "0.0.1",
  "manifestVersion": 2,
  // ...
  "loaderConfig": {
    "entryModuleId": "greeting-web-part",
    "internalModuleBaseUrls": [
      "https://localhost:4321/"
    ],
    "scriptResources": {
      "greeting-web-part": {
        "type": "path",
        "path": "dist/greeting-web-part.js"
      },
      "GreetingWebPartStrings": {
        "defaultPath": "lib/webparts/greeting/loc/en-us.js",
        "type": "localizedPath",
        "paths": {
          "en-US": "lib/webparts/greeting/loc/en-us.js",
          "nl-NL": "lib/webparts/greeting/loc/nl-nl.js",
          "qps-ploc": "lib/webparts/greeting/loc/qps-ploc.js"
        }
      },
      // ...
    }
  }
}
Localization files in the release build
When building SharePoint Framework projects in release mode, the information about all available locales is included in the generated web part manifest. Additionally, resources for each locale are stored in a separate file. These resource files are copied, along with the web part manifest and the web part bundle, to the ./temp/deploy folder.
Important
In release builds, resource files are copied only to the ./temp/deploy folder and not to the ./dist folder. When deploying your web part to production, you should always use files from the ./temp/deploy folder to ensure that you are deploying all files required by your web part.
Examining the latest web part manifest generated in a release build, you can see that now the GreetingWebPartStrings module contains references to all supported locales.
{
  "id": "edbc4e31-6085-4ffa-85f4-eeffcb0ea2d4",
  "alias": "GreetingWebPart",
  "componentType": "WebPart",
  "version": "0.0.1",
  "manifestVersion": 2,
  // ...
  "loaderConfig": {
    "entryModuleId": "greeting-web-part",
    "internalModuleBaseUrls": [
      "https://cdn.contoso.com/"
    ],
    "scriptResources": {
      "greeting-web-part": {
        "type": "path",
        "path": "greeting-web-part_159d9eb591c6716cae6d0ff15b78a19a.js"
      },
      "GreetingWebPartStrings": {
        "defaultPath": "react-localization-greetingwebpartstrings_en-us_b5e89eba6e8d819bf1647b3ab505dae5.js",
        "type": "localizedPath",
        "paths": {
          "en-US": "react-localization-greetingwebpartstrings_en-us_b5e89eba6e8d819bf1647b3ab505dae5.js",
          "nl-NL": "react-localization-greetingwebpartstrings_nl-nl_d6e80ff75385975e7737774e0802641e.js",
          "qps-ploc": "react-localization-greetingwebpartstrings_qps-ploc_effe5ee4af9cadee91bbf84327eb7308.js"
        }
      },
      // ...
    }
  }
}
When loading the web part on the page, the SharePoint Framework automatically loads the resource file for the corresponding locale by using the information from the context site. If no matching resource file is found, the SharePoint Framework loads the file specified in the defaultPath property.
By keeping the resource files separate, the SharePoint Framework minimizes the amount of data loaded on the page to the locale that matches the one used on the site.